Port forwarding is a networking technique used to redirect communication requests from one port number to another port number, typically across a network boundary such as a router or firewall. This technique can be used with Firewalld, available in RockyLinux, or derivative distros from RHEL such as AlmaLinux, CentOS, and others.
Problem
How to configure Firewalld to be port forwarding?
Solution
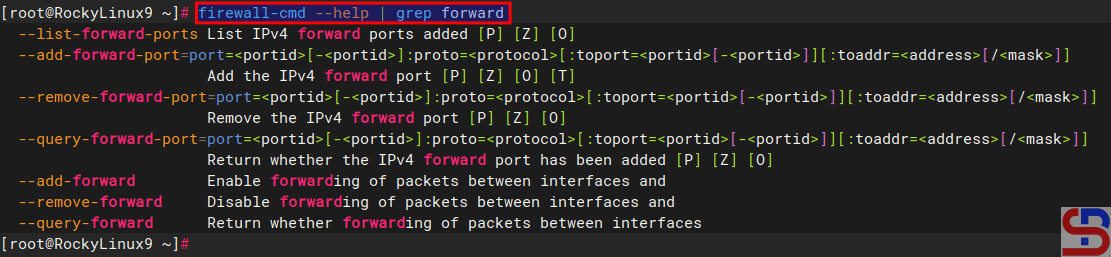
If you want to see the command in firewalls to run port forwarding, type the below command:
firewall-cmd --help | grep forward
The commands in firewalld for port forwarding
There are 2 methods of port forwarding: forward the connection of a port to one IP/device and forward the connection of a port to a different IP/device.
A. Forward to the same IP/device
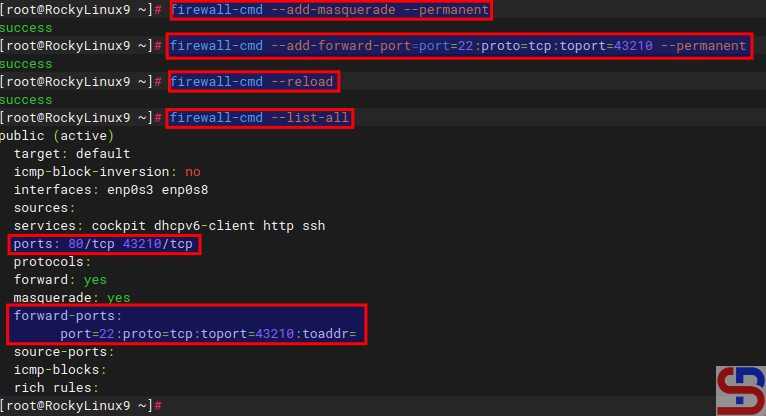
By default, you must use the format below to forward a port in a device:
You can add an option ‐-permanent if you want the rule to remain after reloading or rebooting the system. For example, you have a server with IP 192.168.56.2 where port 22 on the server is closed so to access the server via SSH must use port 43210. If you follow this article, then you must type the command below to access the server:
ssh sysadmin@192.168.56.2 -p 43210
Access the server via SSH using the port
However, by implementing a port forwarding you can access the server without typing the port. Let’s say, the firewalld is in the device, then on the device open port 43210 using the command:
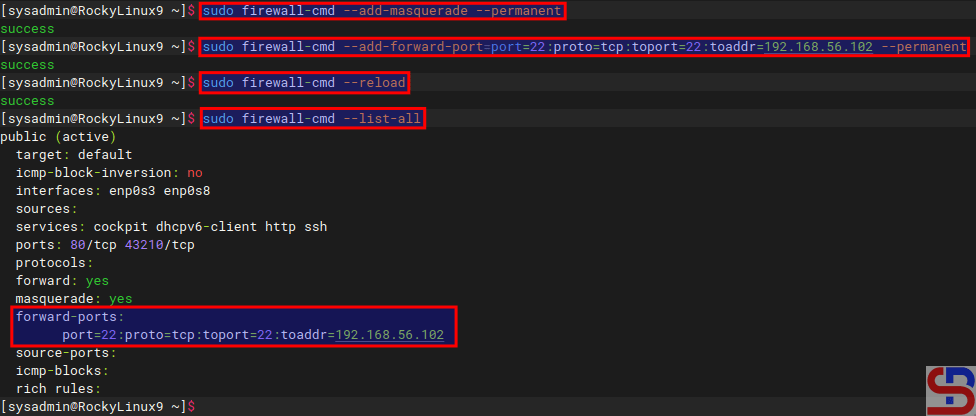
If you want the rule to stay in place after a system reboot or reload, you can add a ‐-permanent option. As an illustration, suppose you have a server with IP address 192.168.56.2 and port 22 is available. You would like users who access port 22 to forward to port 22 with IP address 192.168.56.102. Use the command below to configure firewalls:
Add a forwarding port to a different IP in firewalld
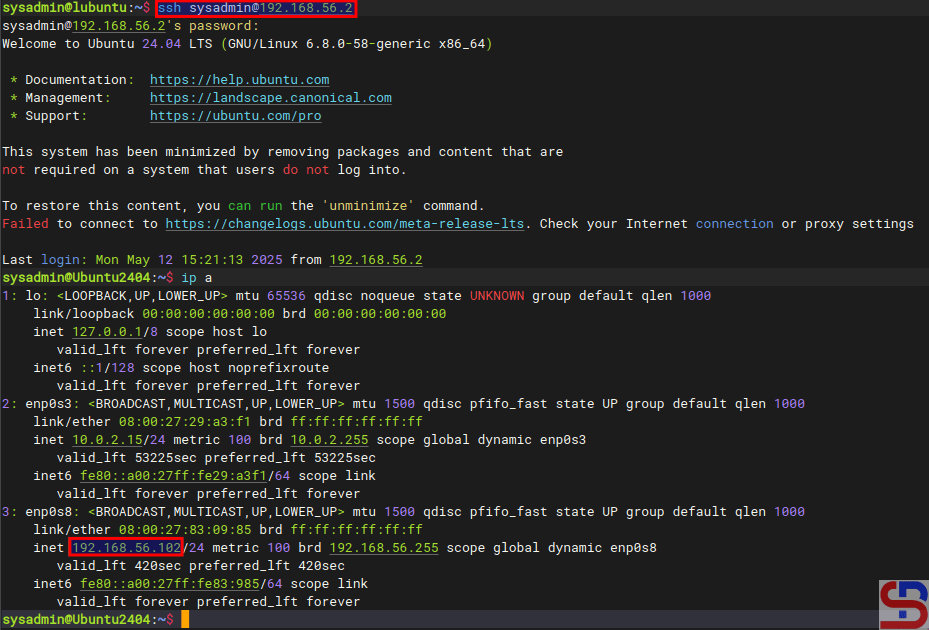
If you type the command below:
ssh sysadmin@192.168.56.2
You will be forwarded to a server that uses IP 192.168.56.102 as shown below:
Forward a port to another IP/device
Note
To see rule forwarding is in the rule in the firewall, besides being able to use the firewall-cmd ‐-list-all command, you can also use the command below:
sudo firewall-cmd --list-forward-ports
then you will see the results as shown below:
Using –list-forward-ports option
And if you want to delete a rule port forwarding in the firewall, then you can simply change the options ‐-add-forward-port to ‐-remove-forward-port so the command will change like in the command below:
How to Configure Virtual Hosts in Apache on RockyLinux?
written by sysadmin | 21 June 2025
The previous article explained how to create virtual hosts in Ubuntu. This article will explain how to configure virtual hosts in Apache on Rocky Linux or derivatives of RHEL, such as Almalinux, CentOS, and so on.
Problem
How to configure virtual hosts in Apache on RockyLinux?
Solution
Before starting the configuration, make sure that on the RockyLinux server, the Apache application is installed by using the command:
yum install -y httpd
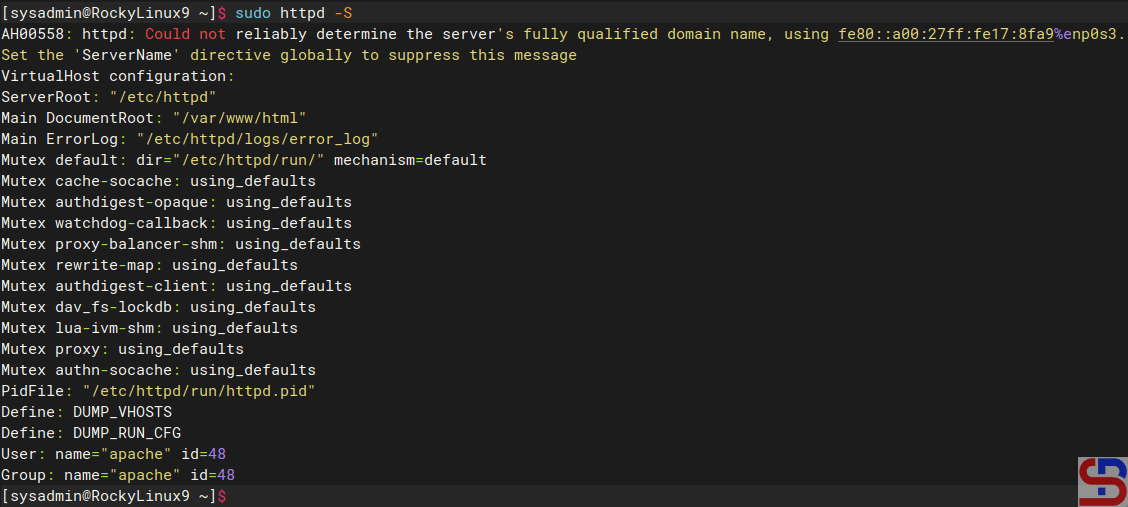
To see the default settings of Apache in RockyLinux, type the command below:
sudo httpd -S
Display default Apache configuration
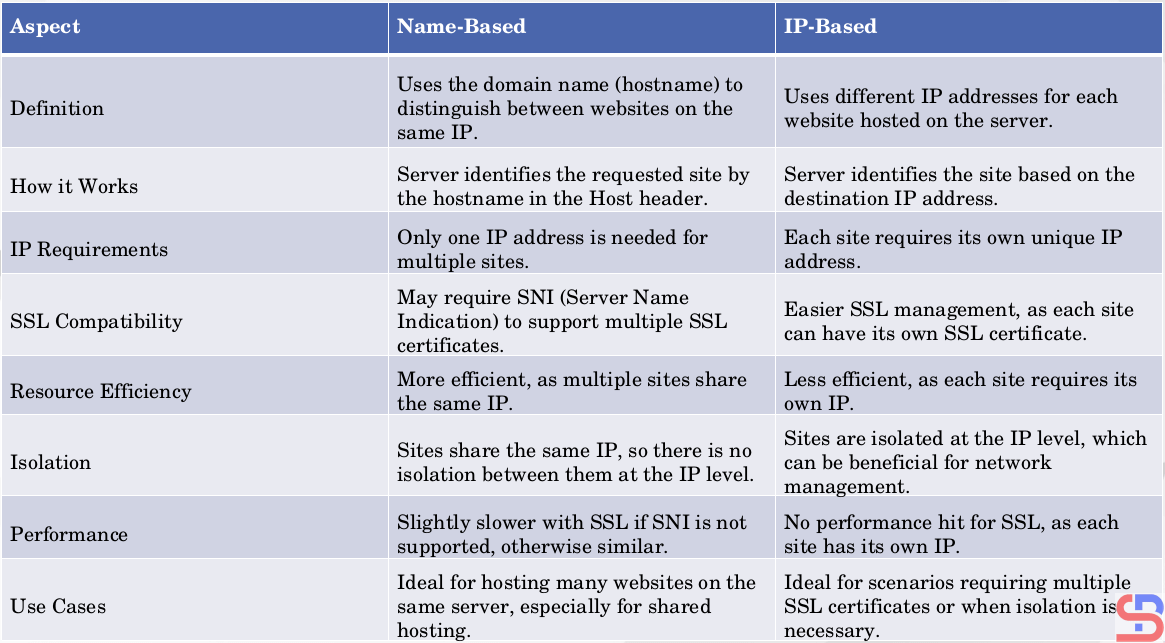
2 types of virtual hosts can be used, name-based and IP-based, and the difference between the two can be seen in the image below:
Comparison of name-based and IP-based in virtual hosts
WARNING
This article uses a private IP, not a public IP.
A. name-based virtual hosts
The meaning of name-based is that you have many websites or domains, but you only have one IP. For example, you have 2 domain names: website1.com and website2.com, but you only have 1 IP, which is 192.168.56.2. Here are the steps to get all three domains to use the same IP:
1. Create the directories and the files
By default, Apache uses the /var/www/html folder as its rootdocument, as shown in the image above. However, to make it easier to configure it, you should create a folder for each of these websites, as shown in the image below:
You can change the above directory to another directory, but for the next steps, you have to follow the directory you created.
After that, create an index.html file for each domain:
sudo sh -c 'echo "<h1> This is for website1.com domain</h1>" > /var/www/html/website1.com/index.html'
sudo sh -c 'echo "<h1> This is for website2.com domain</h1>" > /var/www/html/website2.com/index.html'
Unlike Ubuntu and its derivatives, which use the sites-available and sites-enabled folders in configuring virtual hosts, by default, RockyLinux and its derivatives do not use both folders, but the virtual hosts configuration is inserted into the /etc/httpd/conf.d/ folder. Therefore, type the command below to create two domains in the virtual hosts:
echo "<VirtualHost *:80>" | sudo tee /etc/httpd/conf.d/website1.com.conf > /dev/null
echo "     ServerName website1.com"  | sudo  tee -a /etc/httpd/conf.d/website1.com.conf > /dev/null
echo "     ServerAlias www.website1.com"    |  sudo  tee -a /etc/httpd/conf.d/website1.com.conf > /dev/null
echo "     ServerAdmin webmaster@website1.com"   | sudo  tee -a /etc/httpd/conf.d/website1.com.conf > /dev/null
echo "     DocumentRoot /var/www/html/website1.com"  | sudo  tee -a /etc/httpd/conf.d/website1.com.conf > /dev/null
echo "     ErrorLog logs/website1-error.log"   | sudo  tee -a /etc/httpd/conf.d/website1.com.conf > /dev/null
echo "     CustomLog logs/website1-access.log combined"   | sudo  tee -a /etc/httpd/conf.d/website1.com.conf > /dev/null
echo "</VirtualHost>"   | sudo  tee -a /etc/httpd/conf.d/website1.com.conf > /dev/null

echo "<VirtualHost *:80>"  | sudo tee /etc/httpd/conf.d/website2.com.conf > /dev/null
echo "     ServerName website2.com"  | sudo  tee -a /etc/httpd/conf.d/website2.com.conf > /dev/null
echo "     ServerAlias www.website2.com"  | sudo  tee -a  /etc/httpd/conf.d/website2.com.com >  /dev/null
echo "     ServerAdmin webmaster@website2.com"  | sudo  tee -a /etc/httpd/conf.d/website2.com.conf > /dev/null
echo "     DocumentRoot /var/www/html/website2.com"   | sudo  tee -a  /etc/httpd/conf.d/website2.com.conf > /dev/null
echo "     ErrorLog logs/website2-error.log"   | sudo  tee -a /etc/httpd/conf.d/website2.com.conf > /dev/null
echo "     CustomLog logs/website2-access.log combined"   | sudo  tee -a /etc/httpd/conf.d/website2.com.conf > /dev/null
echo "</VirtualHost>"   | sudo  tee -a /etc/httpd/conf.d/website2.com.conf > /dev/null
WARNING
You can change *:80 to your IP server like 192.168.56.2:80.
4. Check the configuration
Use the command below to check whether there is an Apache configuration that is an error or not by using the command below:
sudo apachectl configtest
If there is no error, then reload Apache using the command below:
sudo systemctl reload httpd
WARNING
Use the command above if there is a change in the configuration of virtual hosts in each domain.
5. Check in the browser
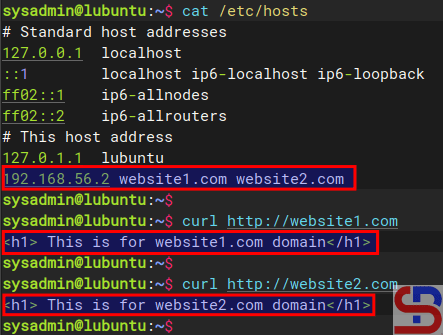
Because this article uses a private IP, you must configure it in the hosts file before you check the browser. If you use Windows, change the hosts file in C:\Windows\System32\drivers\etc\hosts or in /etc/hosts if you use Linux. In the hosts file, add the below script:
192.168.56.2 website1.com website2.com
Info
Change IP 192.168.56.2 with your RockyLinux IP server.
By default, Rockylinux activates the firewall, so you have to open the HTTP port using the command below:
Open your browser and type each of these domains, then there should be a site displayed as in the image below:
http://website1.com
Site website1.com
http://website2.com
site website2.com
If you use Linux, you can use the command below to check the result:
curl http://website1.com
curl http://website2.com
Using the curl command
By default, websites work on the web server using port 80. But you can change port 80 to another port as long as the port is not used on the server. For example, if you want the website1.com site to use port 8080, change the /etc/httpd/conf.d/website1.com.conf file and change its contents to something like this:
The meaning of IP-based is that you use a different IP address for each website. For example, you have 2 IPs and 2 domains, where IP 192.168.56.2 is for site1.com, and IP 192.168.56.104 is for site2.com. This article will use a server that has 2 IPs, as shown below:
Using 2 NICs in a server
1. Create the directories and the files
By default, Apache uses the /var/www/html folder as its rootdocument, as shown in the image above. However, to make it easier to configure it, you should create a folder for each of these websites, as shown in the image below:
You can change the above directory to another directory, but for the next steps, you have to follow the directory you created.
After that, create an index.html file for each domain:
sudo sh -c 'echo "<h1> This is for site1.com domain</h1>" > /var/www/html/site1.com/index.html'
sudo sh -c 'echo "h1> This is for site2.com domain</h1>" > /var/www/html/site2.com/index.html'
Unlike Ubuntu and its derivatives, which use the sites-available and sites-enabled folders in configuring virtual hosts, by default, RockyLinux and its derivatives do not use both folders, but the virtual hosts configuration is inserted into the /etc/httpd/conf.d/ folder. Therefore, type the command below to create two domains in the virtual hosts:
echo "<VirtualHost 192.168.56.2:80>" | sudo tee /etc/httpd/conf.d/website1.com.conf > /dev/null
echo "     ServerName website1.com"  | sudo  tee -a /etc/httpd/conf.d/website1.com.conf > /dev/null
echo "     ServerAlias www.website1.com"    |  sudo  tee -a /etc/httpd/conf.d/website1.com.conf > /dev/null
echo "     ServerAdmin webmaster@website1.com"   | sudo  tee -a /etc/httpd/conf.d/website1.com.conf > /dev/null
echo "     DocumentRoot /var/www/html/website1.com"  | sudo  tee -a /etc/httpd/conf.d/website1.com.conf > /dev/null
echo "     ErrorLog logs/website1-error.log"   | sudo  tee -a /etc/httpd/conf.d/website1.com.conf > /dev/null
echo "     CustomLog logs/website1-access.log combined"   | sudo  tee -a /etc/httpd/conf.d/website1.com.conf > /dev/null
echo "</VirtualHost>"   | sudo  tee -a /etc/httpd/conf.d/website1.com.conf > /dev/null

echo "<VirtualHost 192.168.56.104:80>"  | sudo tee /etc/httpd/conf.d/website2.com.conf > /dev/null
echo "     ServerName website2.com"  | sudo  tee -a /etc/httpd/conf.d/website2.com.conf > /dev/null
echo "     ServerAlias www.website2.com"  | sudo  tee -a  /etc/httpd/conf.d/website2.com.com >  /dev/null
echo "     ServerAdmin webmaster@website2.com"  | sudo  tee -a /etc/httpd/conf.d/website2.com.conf > /dev/null
echo "     DocumentRoot /var/www/html/website2.com"   | sudo  tee -a  /etc/httpd/conf.d/website2.com.conf > /dev/null
echo "     ErrorLog logs/website2-error.log"   | sudo  tee -a /etc/httpd/conf.d/website2.com.conf > /dev/null
echo "     CustomLog logs/website2-access.log combined"   | sudo  tee -a /etc/httpd/conf.d/website2.com.conf > /dev/null
echo "</VirtualHost>"   | sudo  tee -a /etc/httpd/conf.d/website2.com.conf > /dev/null
4. Check the configuration
Use the command below to check whether there is an Apache configuration that is an error or not by using the command below:
sudo apachectl configtest
If there is no error, then reload Apache using the command below:
sudo systemctl reload httpd
WARNING
Use the command above if there is a change in the configuration of virtual hosts in each domain.
5. Check in the browser
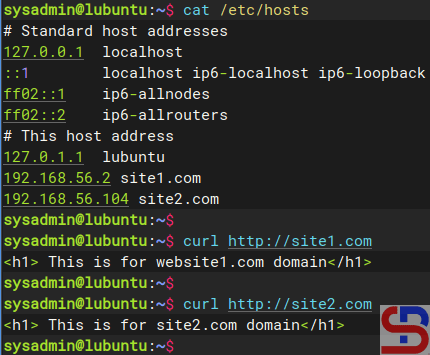
Because this article uses a private IP, you must configure it in the hosts file before you check the browser. If you use Windows, change the hosts file in C:\Windows\System32\drivers\etc\hosts or in /etc/hosts if you use Linux. In the hosts file, add the below script:
192.168.56.2   site1.com
192.168.56.104 site2.com
Info
Change IP 192.168.56.2 & IP 192.168.56.104 with your RockyLinux IP server.
By default, Rockylinux activates the firewall, so you have to open the HTTP port using the command below:
Open your browser and type each of these domains then there should be a site displayed as in the image below:
http://site1.com
Site site1.com
http://site2.com
Site site2.com
If you use Linux, you can use the command below to check the result:
curl http://site1.com
curl http://site2.com
Using the curl command
By default, websites work on the web server using port 80. But you can change port 80 to another port as long as the port is not used on the server. So, if you want the site1.com site to use port 8181, change the /etc/httpd/conf.d/website1.com.conf file and change its contents to something like this:
Reload Apache and open it in the browser by typing the command:
http://site1.com:8181
Site site1.com:8181
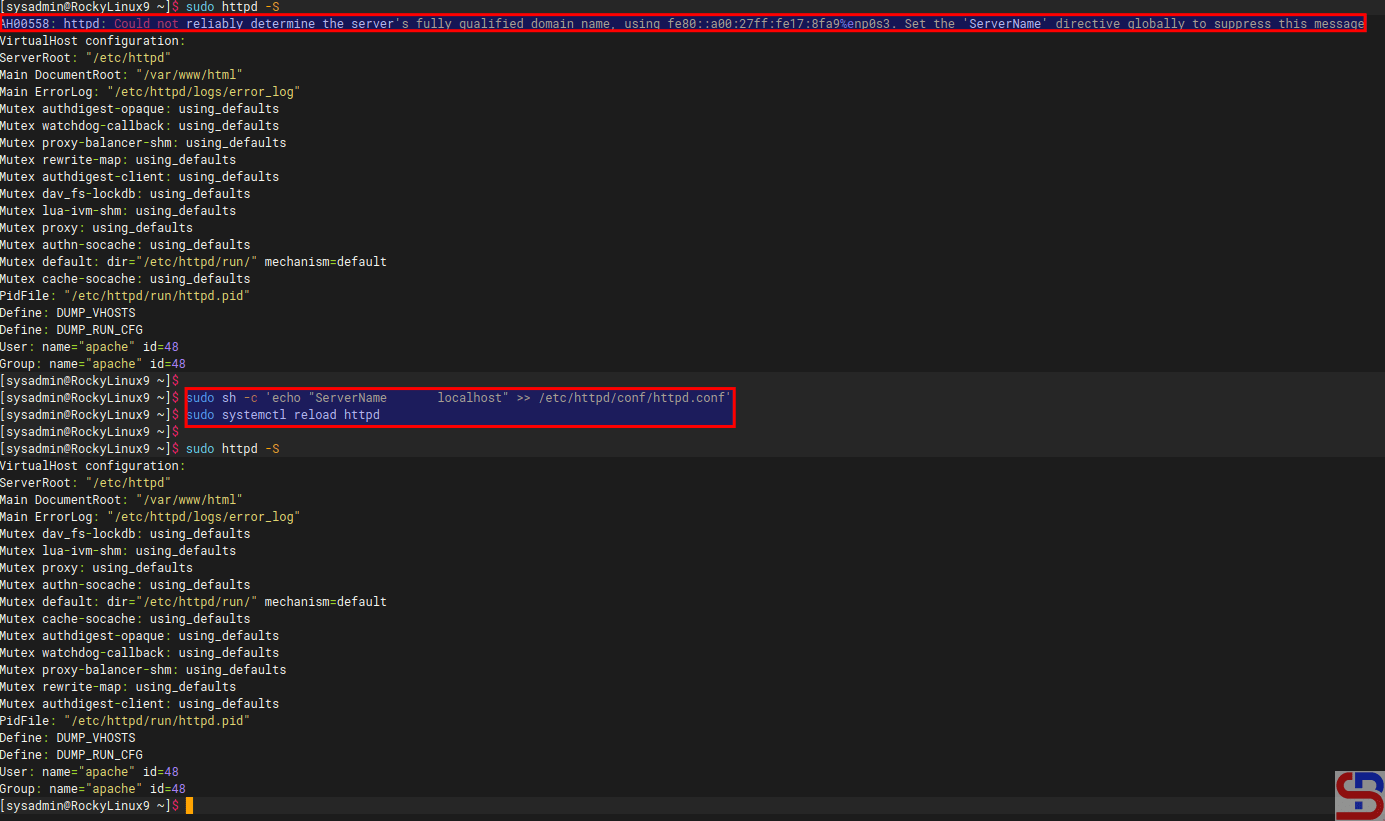
Note
If you want to remove the error like this:
AH00558: httpd: Could not reliably determine the server’s fully qualified domain name, using 192.168.56.103. Set the ‘ServerName’ directive globally to suppress this message
Go to the /etc/httpd/conf/httpd.conf and insert the script below:
ServerName localhost
Reload the Apache, and the error will disappear, like in the image below:
NFS or Network File Sharing is a protocol that allows you to share directories and files with other Linux clients over a network. Similar to locally created folders, an NFS file share is accessible when mounted on a client computer. When you have limited disk space and need to share public data between client machines, NFS is especially helpful.
Problem
How to install and configure NFS on Linux?
Solution
This article will explain how to install and configure NFS on 3 Linux distros: Rockylinux, Ubuntu, and OpenSuse and this article should work in each of their derivatives of the three distros.
A. On the server
Following are the steps to install and configure NFS:
1. Install NFS
I install NFS in the server with IP 192.168.56.2, and to install the NFS application on the Linux server, use the command below:
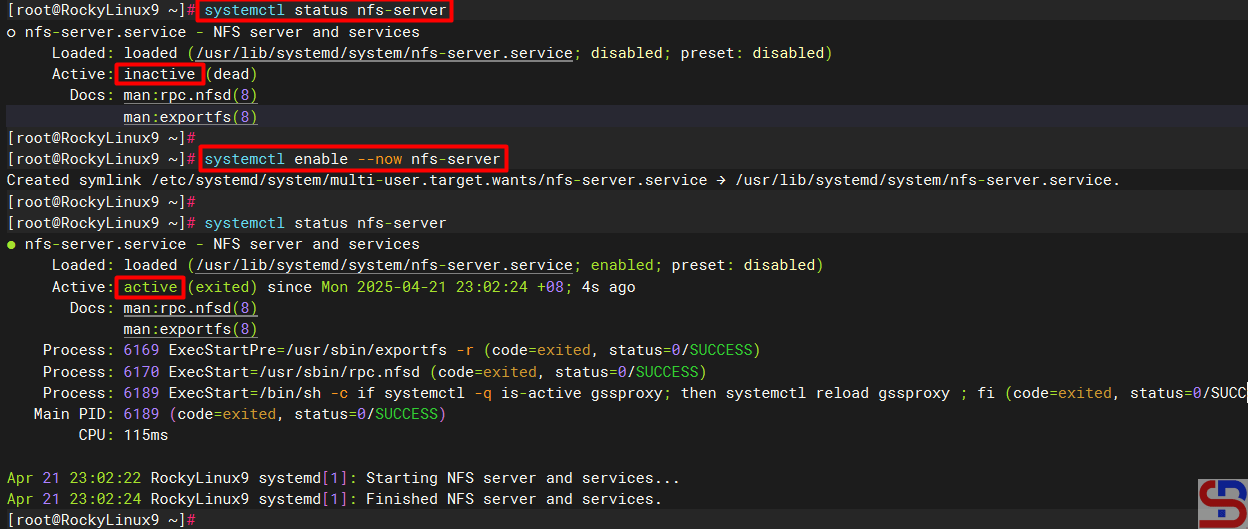
If you see the NFS status is still not on, use the command below to turn on the NFS service:
sudo systemctl enable --now nfs-server
Check the NFS service status
Sometimes you have to check the nfs-mountd service using the command below:
sudo systemctl status nfs-mountd
If the service is not on the server, then use the command below to turn on the service:
sudo systemctl start nfs-mountd
3. Check the rpcbind status
Make sure that the rpcbind service is actively used by NFS for the mapping port. Use the command below to check the status of the service:
sudo systemctl status rpcbind
If the service is not active, use the command below to start the service:
sudo systemctl enable -now rpcbind
4. Check NFS and Portmap
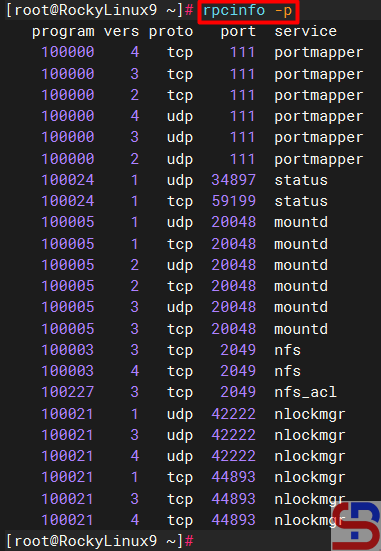
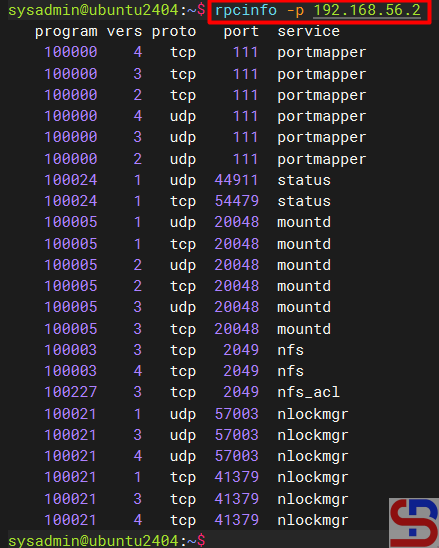
To see if NFS and portmap (Portmap is a server that converts RPC program numbers into DARPA protocol port numbers. It must be running to make RPC calls) are running on the server, use the command below:
sudo rpcinfo -p
Check whether NFS and portmap run in the server or not
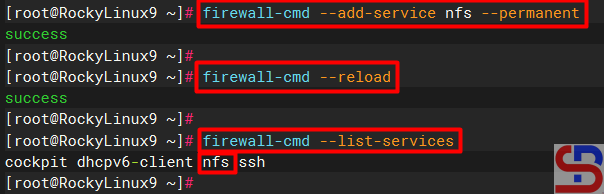
5. Configure firewall
If you still turn on the firewall on Linux, use the command below to open the NFS port (Port NFS is TCP Port 2049):
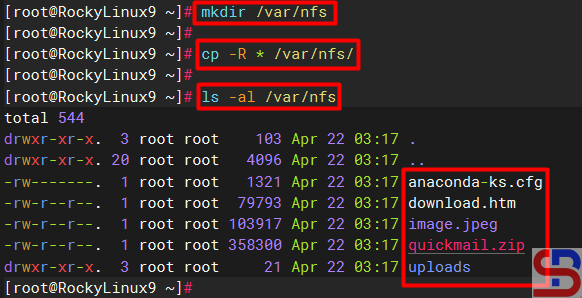
Create a folder to collect NFS files and folders and I make it in the folder /var/nfs using the command below:
mkdir /var/nfs
After that, copy the file(s) and folder(s) that you want to share into the folder as shown below:
Copy the file(s) and folder(s) into the folder sharing
7. Define an Export File
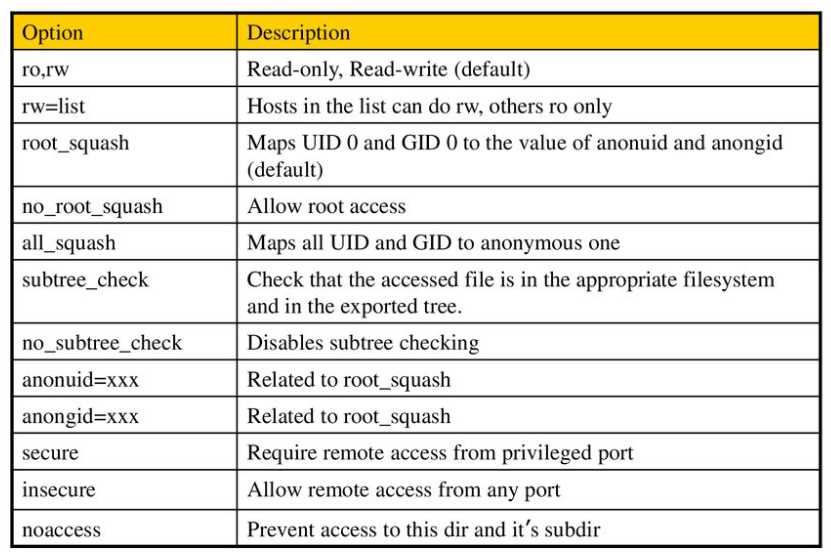
To grant access to NFS clients, you need to define an export file and it is typically located at /etc/exports. Use the format below to define an export file:
/folder/path accessible-host-ip-address(options)
The options you can use can be seen in the image below:
You can use more than one option like (rw,sync,no_subtree_check). By default, NFS uses the ro option where the client can only read the file or folder in the folder sharing. In this article, I only want the folder sharing can only be accessed by users who only use IP 192.168.56.0/24 and the folder can be changed by the users, then use the command below to enter the script into the exports file:
Use the command below to make the folder sharing available to the clients:
sudo exportfs -r
Use the command below to view the exports file:
showmount -e
To see which hosts access file sharing, use the command below:
sudo netstat -an | grep 2049
B. On the client
Following are the steps to install and configure NFS:
1. Install NFS client
Use the command below to install the NFS client:
RockyLinux
sudo dnf install -y nfs-utils
Ubuntu
sudo apt-get install -y nfs-common
OpenSUSE
zypper install -y nfs-client*
2. Check the ports in the NFS server
Use the command below to check whether the client can access the ports (port 2049 and 111) in the NFS server or not (the IP server NFS is 192.168.56.2):
rpcinfo -p 192.168.56.2
Check the connection between the client to the NFS server
2. Make and mount a folder
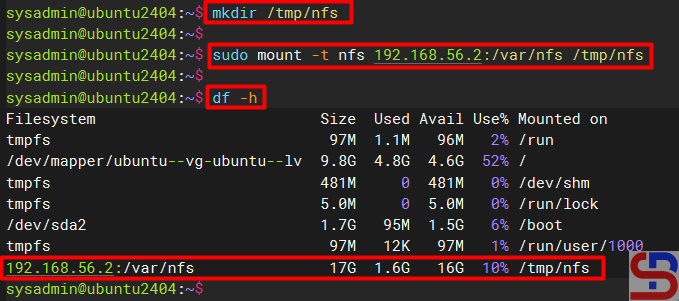
Make the folder where we want to mount the NFS shares from the server, for example, I made a folder in /tmp/nfs:
mkdir /tmp/nfs
After that the mount folder with the NFS server using the format below:
sudo mount -t nfs 192.168.56.2:/var/nfs /tmp/nfs
Mount the folder to the folder-sharing
INFO
You can use the -v option so that the above command becomes: sudo mount -v -t nfs 192.168.56.2:/var/nfs /tmp/nfs
to display the logs when mounting so that you can know if there is an error when mounting.
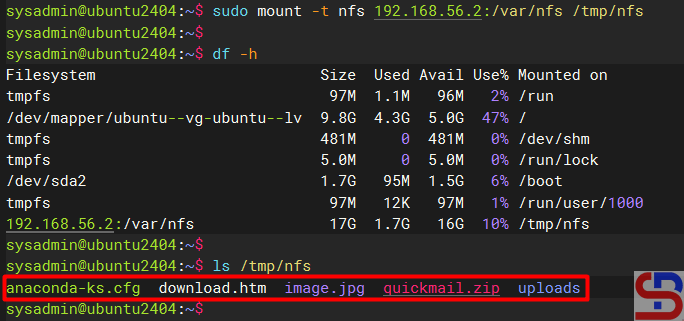
You should access the folder sharing on the NFS server as shown below:
Access to the NFS server
You can use the command below to see the NFS client connection:
sudo mount | grep -i nfs
Check the status of the NFS client
4. Simulation test
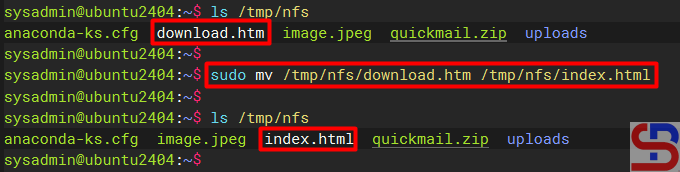
Try to do the simulation by changing the file name in the folder sharing. I try to rename the download.htm file to index.html using the command below:
sudo mv /tmp/nfs/download.htm /tmp/nfs/index.html
The file was successfully changed as shown below:
Rename the file in NFS
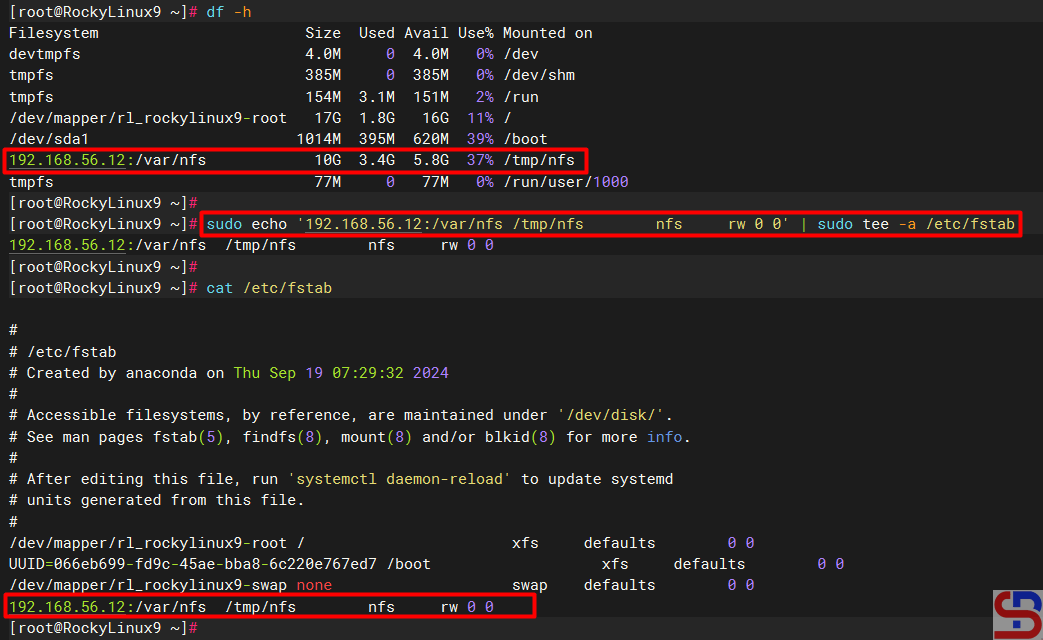
5. Configure the fstab file
To keep the folder sharing is still connected in the client after the client is rebooted, configure the /etc/fstab file using the command below:
echo '192.168.56.2:/var/nfs /tmp/nfs nfs rw 0 0' | sudo tee -a /etc/fstab
Insert the script to fstab file
C. Errors and solutions
Below are errors that often appear and their solutions:
1. No options for /var/nfs
Sometimes when you run the exportfs -r command, there is an error as below:
exportfs: No options for /var/nfs/192.168.56.0/24(rw) : suggest (sync) to avoid warning exportfs: Failed to stat /var/nfs/192.168.56.0/24(rw): No such file or directory
Error failed to stat
To eliminate the error, check in the /etc/exports file and you have to fix the writing in the file from:
/var/nfs/192.168.56.0/24(rw)
changed into
/var/nfs 192.168.56.0/24(rw)
After that, run the exportfs -r command again and the error should disappear.
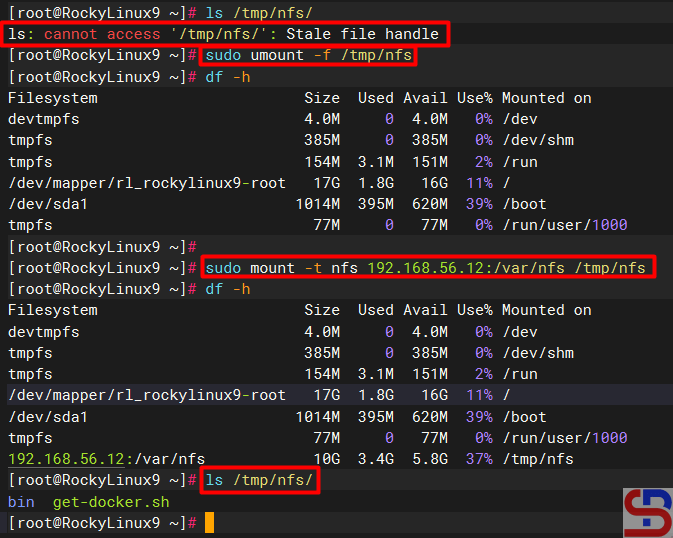
2. Error Stale file handle
When you want to connect a client to the NFS server there is an error like the below (usually this happens if there is an error like number 1 or other causes on the NFS server):
Stale file handle
Stale file handle error
To solve this error you have to unmount on the side of the client and then mount back as shown below:
Solve the stale file handle error
3. RPC: Program not registered
When typing the showmount -e command on the NFS server there is an error as below:
clnt_create: RPC: Program not registered
Error Program Not Registered
The solution is that you have to run the command below so that the nfs-mountd service runs on the server:
systemctl start nfs-mountd
4. Permission denied
When you want to connect to the NFS server or when you want to change the file in the NFS, there is an error like this:
Permission denied
Error Permission denied
The solution is to check the exports file on the NFS server and make sure that the folder has been given permissions as in step 5 in the server section.
Note
If you want to block an IP address of a host so the host can’t access the NFS server, use the command below to block the IP host:
In my experience, you can’t immediately block a client to NFS if the client is still connected to the NFS. You have to wait until the client disconnects to the NFS server, either the host reboots or others.
The previous article explained how to install the Nagios application on Ubuntu. This article will explain how to install the Nagios application on RockyLinux.
Problem
How to install Nagios on RockyLinux?
Solution
Below are the steps to install Nagios on RockyLinux and work on RockyLinux 9.5 and below. But I think these steps should apply to installing Nagios on RHEL and its derivatives, such as CentOS, AlmaLinux, and so on.
1. Download the packages
Install the packages needed to install Nagios using the command below:
yum install -y httpd php php-devel gcc glibc glibc-common gd gd-devel make net-snmp-* wget zip unzip php-mysqlnd php-mysql*
2. Create a user and a group
Create a user and group for Nagios using the commands:
Use the commands below to download Nagios, where at the time of this writing (February 2025), the latest version of Nagios is version 4.5.9:
cd /tmp
wget https://github.com/NagiosEnterprises/nagioscore/archive/refs/heads/master.zip -O nagios.zip
unzip nagios.zip
cd nagioscore-master/
4. Install Nagios
By default, Linux will create a Nagios folder in the /usr/local folder to save Nagios configuration files. So, use the following commands to install Nagios:
./configure
Info
If you want to save all Nagios files in a non-default folder, for example, in the /data folder, then use the following command: ./configure –prefix=/data/nagios
After that, run the following commands:
make all
make install
make install-init
make install-commandmode
make install-config
make install-webconf
5. Create the password
Create a password for the user to access the Nagios application. Usually, nagiosadmin is a popular username for Nagios, but you can create another username.
If you installed Nagios in a non-default folder, for example, in the /data folder, execute the below command: htpasswd -c /data/nagios/etc/htpasswd.users nagiosadmin
6. Download Nagios Plugins
Plugins are compiled executables or scripts (Perl, shell, Python, PHP, Ruby, etc.) that can be run from a command line to check the status of a host or service. Nagios Core uses the results from plugins to determine the current status of hosts and services on your network. As of this writing (February 2025), the latest version of Nagios plugins is version 2.4.12. You can check the latest version of Nagios plugins on this site. Run the following commands to download Nagios plugins:
cd /tmp
wget https://github.com/nagios-plugins/nagios-plugins/archive/refs/heads/master.zip -O nagios-plugins.zip
unzip nagios-plugins.zip
cd nagios-plugins-master/
7. Install Nagios Plugins
After that, install Nagios plugins using the following commands:
./tools/setup
sudo ./configure --with-nagios-user=nagios --with-nagios-group=nagios
sudo make
sudo make install
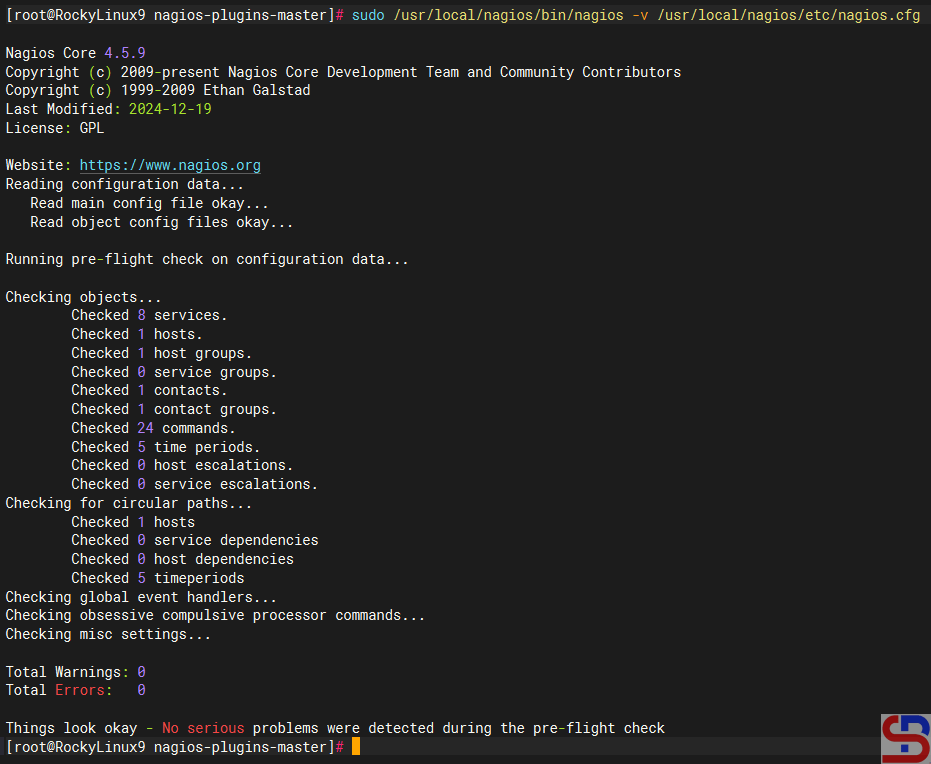
8. Check the configuration
After installing Nagios and Nagios plugins, run the following command to check the configuration of Nagios:
If you installed Nagios in a non-default folder, for example, in the /data folder, execute the below command: /data/nagios/bin/nagios -v /data/nagios/etc/nagios.cfg
and make sure there is no error like in the image below:
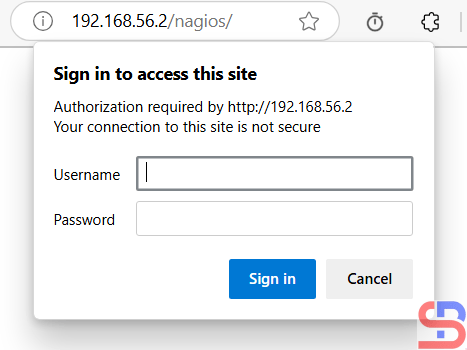
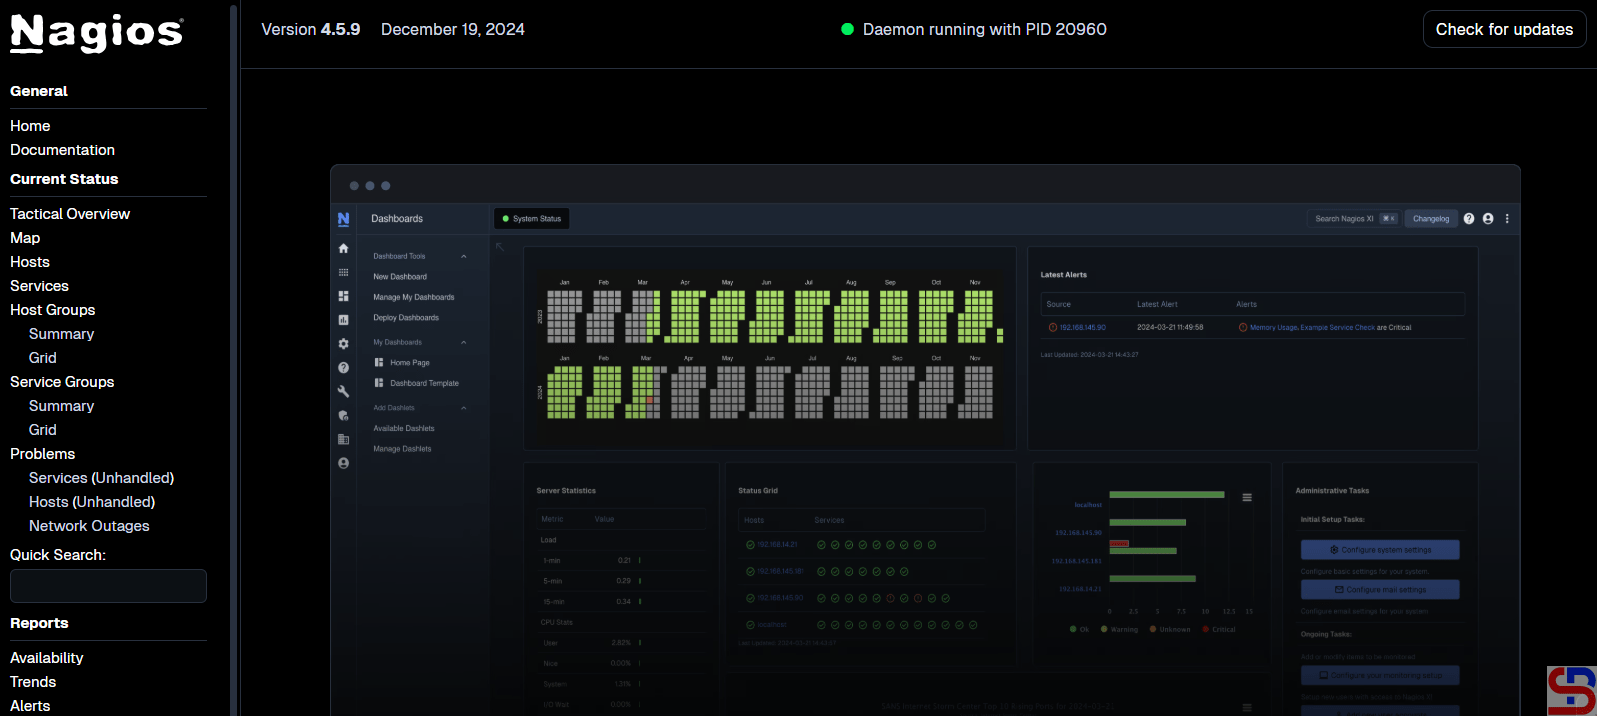
Back to your browser again, and it should work now. Insert the username (nagiosadmin) and the password for Nagios. If the username and the password are right, the Nagios application will appear like this:
Open the Nagios application
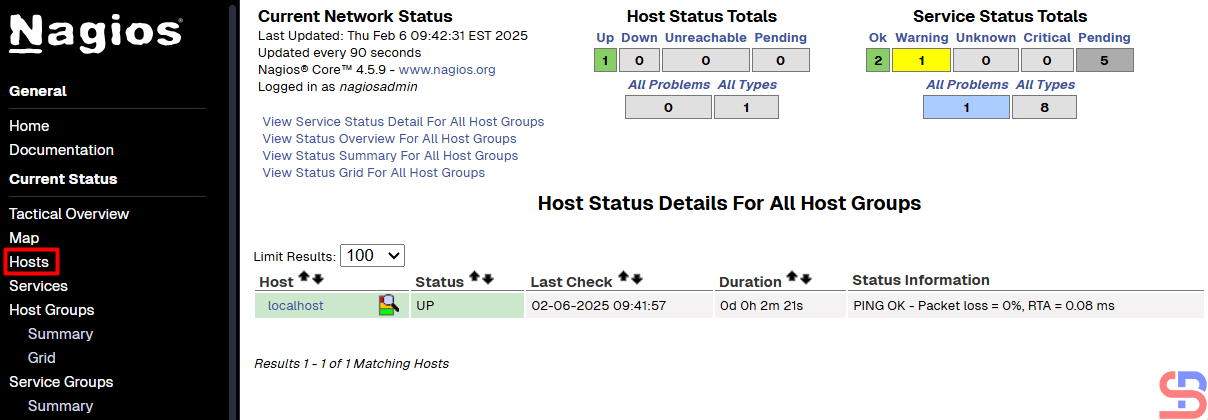
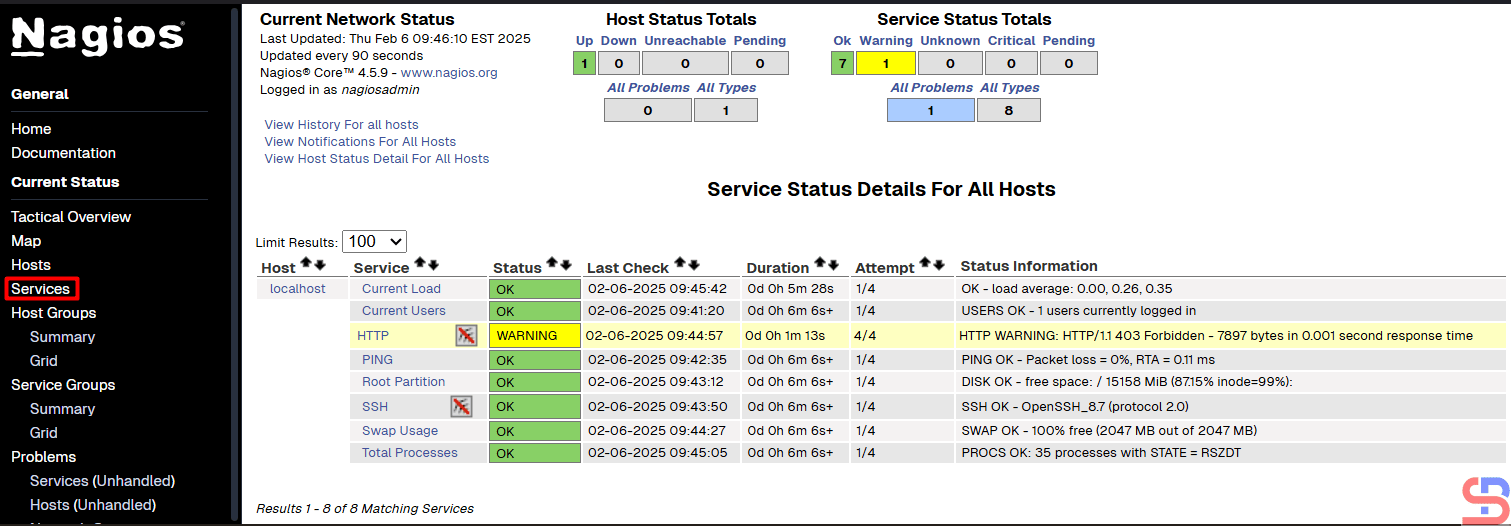
If you want to know which hosts are being monitored by Nagios, click Hosts. Nagios will display the hosts that are being monitored:
Hosts monitored by Nagios
From the picture above, it can be seen that currently, Nagios is only monitoring the Nagios server or localhost. If you want to know which services are being monitored by Nagios, click Services. Nagios will display the services that are being monitored:
Services monitored by Nagios
From the picture above, you can see that Nagios monitored 8 services for the Nagios server or localhost.
Note
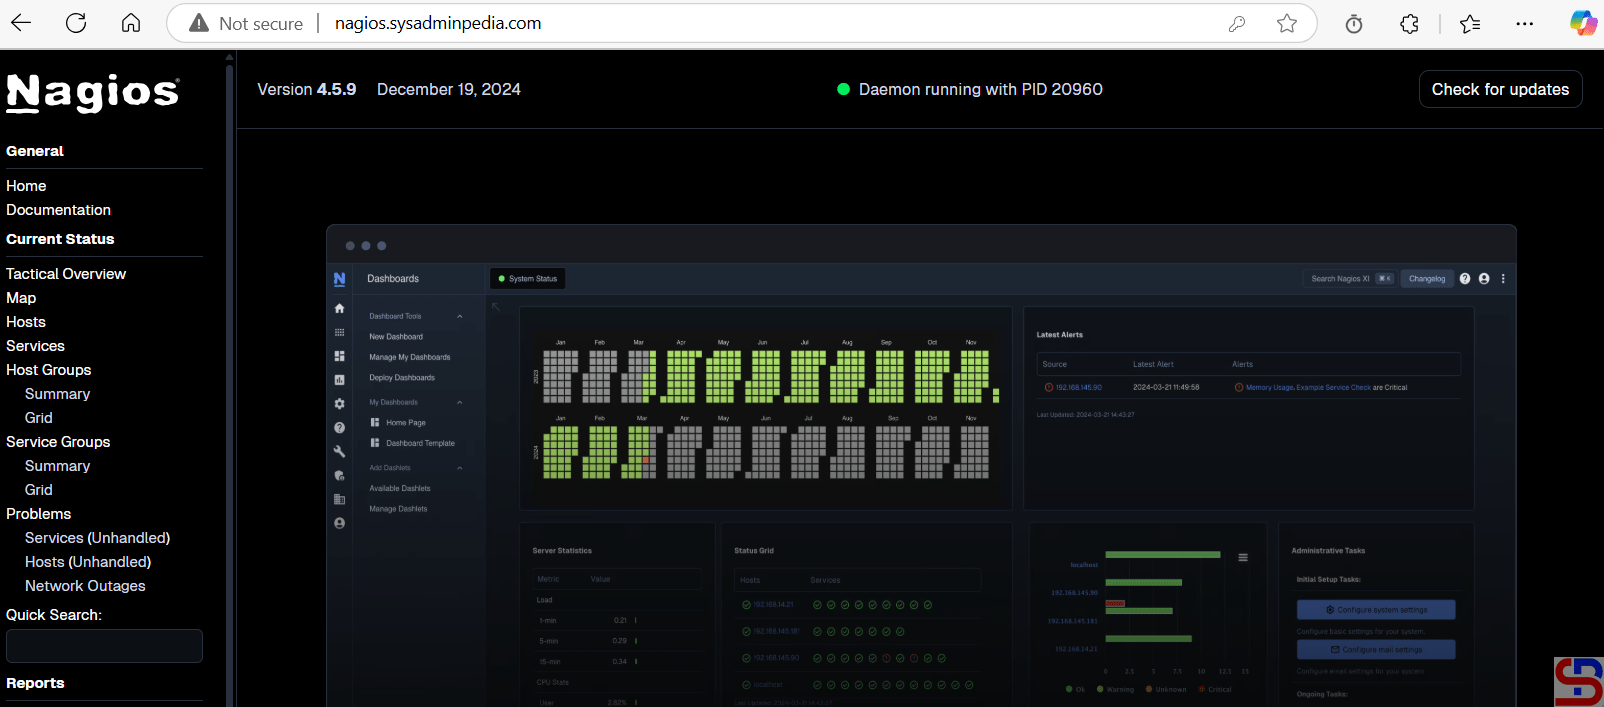
If you have a domain/subdomain and want to use that domain/subdomain for the Nagios application, create a virtual host on your web server. For example, I have the domain sysadminpedia.com and want to use the subdomain nagios.sysadminpedia.com for the Nagios application. So, I created the script below in the file /etc/httpd/conf.d/nagios.sysadminpedia.com.conf:
Restart the web server, open your browser, and type your domain/subdomain for Nagios, and it should be like the image below:
Using a domain or a subdomain for the Nagios application
Info
If you installed Nagios in a non-default folder, for example, in the /data folder, you can copy the script above, but you must change the word /usr/local to /data.
SUDO stands for “SuperUser DO” and it is a program for Unix-like computer operating systems that enables users to run programs with the security privileges of another user, by default, the superuser. With sudo, a normal user can install or delete an application, change the server network, or even reboot or shut down the server.
Problem
How to make a Linux user have the sudo function?
Solution
This article will explain how to make a Linux user have the sudo function on RockyLinux/AlmaLinux/CentOS, Ubuntu/Debian, and OpenSUSE distros. For example, you want to add the user john to these distros and want that user to be able to use the sudo function. As far as I know, there are two methods to do it:
1. Change the sudoers file
Open the /etc/sudoers file or use the command below:
visudo
Add to the file the user name as in the image below:
Add the user in the sudoers file
After that, save the file and then try to add a new user using the user john, if there is a display like the image below:
Choose number 1
Then select number 1, and the user should successfully add a new user as in the image above.
2. Add the user to the sudo group
Add the user to the sudo group, where the name of this sudo group can vary in each distro. To see the name of the sudo group, look in the sudoers file and look for a sentence similar to ‘Allows people in group to execute any command‘. For example, in RockyLinux and OpenSUSE, the name of the sudo group is wheel, sudo in Ubuntu, and don’t forget to make sure to uncomment the section as in the image below:
Check the sudo group in the sudoers file
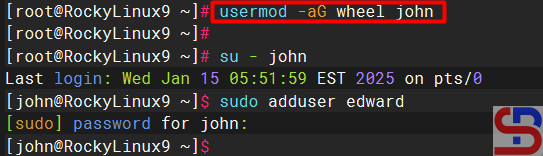
Then type the command below so that a user can use sudo:
RockyLinux & OpenSUSE
usermod -aG wheel john
Add the user to the sudo group
Ubuntu/Debian
usermod -aG sudo john
Note
The two methods above can provide the sudo feature to a user on Linux so that the user can run commands that can only be executed by root if the user uses the sudo command by writing down the password. However, if you want the bob user not to have to enter a password when running the sudo command, then in the sudoers file, type the script below:
bob ALL=(ALL) NOPASSWD: ALL
Use the command below if you want the robin user to only be able to perform reboot commands using sudo, but not other commands using sudo:
How to Open And Close a Port on RockyLinux Server?
written by sysadmin | 21 June 2025
By default, the RockyLinux/AlmaLinux/CentOS distro provides two firewalls, iptables and firewalld. This article will explain how to open and close a port using Firewalld on the distro. If you have opened and closed a port using Firewalld, you don’t need to open and close a port in iptables.
Problem
How to open and close a port on the RockyLinux server?
Solution
A. Check the Firewalld status
By default, the Firewalld package is installed automatically using the command:
systemctl status firewalld
Check the status of Firewalld
From the picture above, you can see that the firewall on the server is already running. If the Firewalld is not already running, use the command below:
systemctl enable --now firewalld
But if on your server there is no firewall package, you can install it using the command below:
yum install -y firewalld
B. Check the zones
Firewalld uses zones and services, compared to iptables, which use chains and rules. Zones are a collection of rules that have been set for what network connections should be permitted based on the level of confidence in the network connected to the system. We can determine the name of the network interface and the network source into zones.To see the zones in firewalld and which zone is the default, use the command below:
Use the command below to see the ports that have been opened:
firewall-cmd --list-ports
List all opened ports
D. Open the port from a certain IP
If you want to open a port from a certain IP, for example, you only allow IP 192.168.56.100 to access port 22 on this server, then use the command below:
If you want to close a port from a certain IP, for example, you block a host with IP 192.168.56.100 from accessing port 22 on this server, then use the command below:
If you use GCP in daily operations, it is recommended to use the commands in the CLI known as gcloud. This is because many commands can only be executed using gcloud rather than using the Console in the browser.
Problem
How to install gcloud on RockyLinux?
Solution
Before you access GCP and run GCP commands through your server, you must first install gcloud on your server.
A. Install gcloud
As far as I know, there are 2 methods to install gcloud on RockyLinux/AlmaLinux/CentOS, and both methods recommend using a user other than root.
1. Using the script
Before you download the script, install the packages using the command below:
yum install tar curl
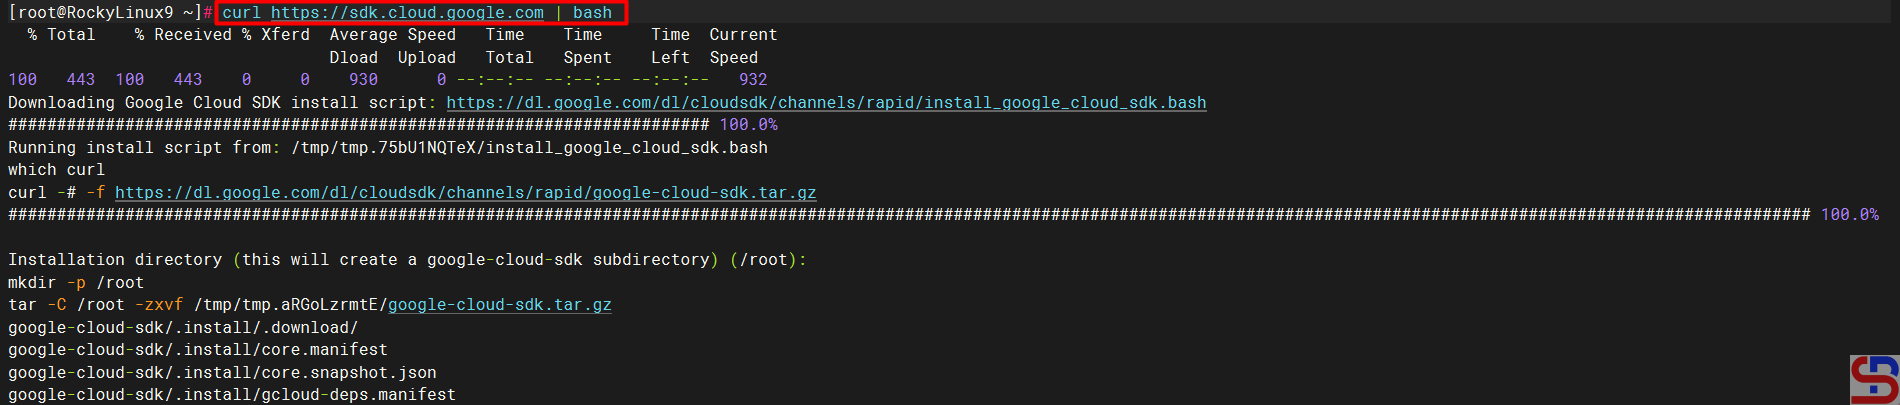
Use the command below to download and install the script:
curl https://sdk.cloud.google.com | bash
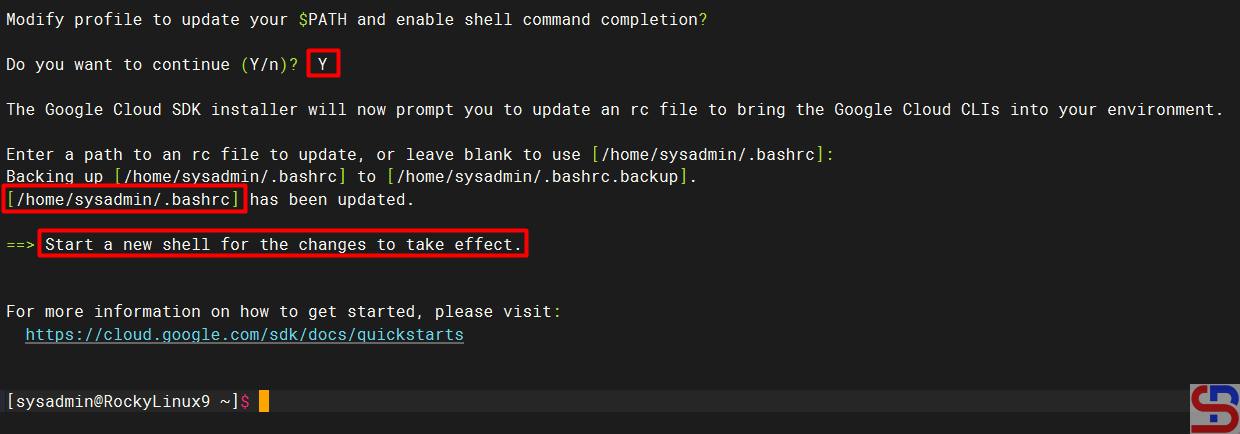
Then you will see a display like the one below:
Install gcloud using the script
Wait until it’s finished, and you will see a display like the one below:
Installation complete
From the image above, you are asked to create a new SSH connection so that the effect can be seen, and type the command below:
gcloud version
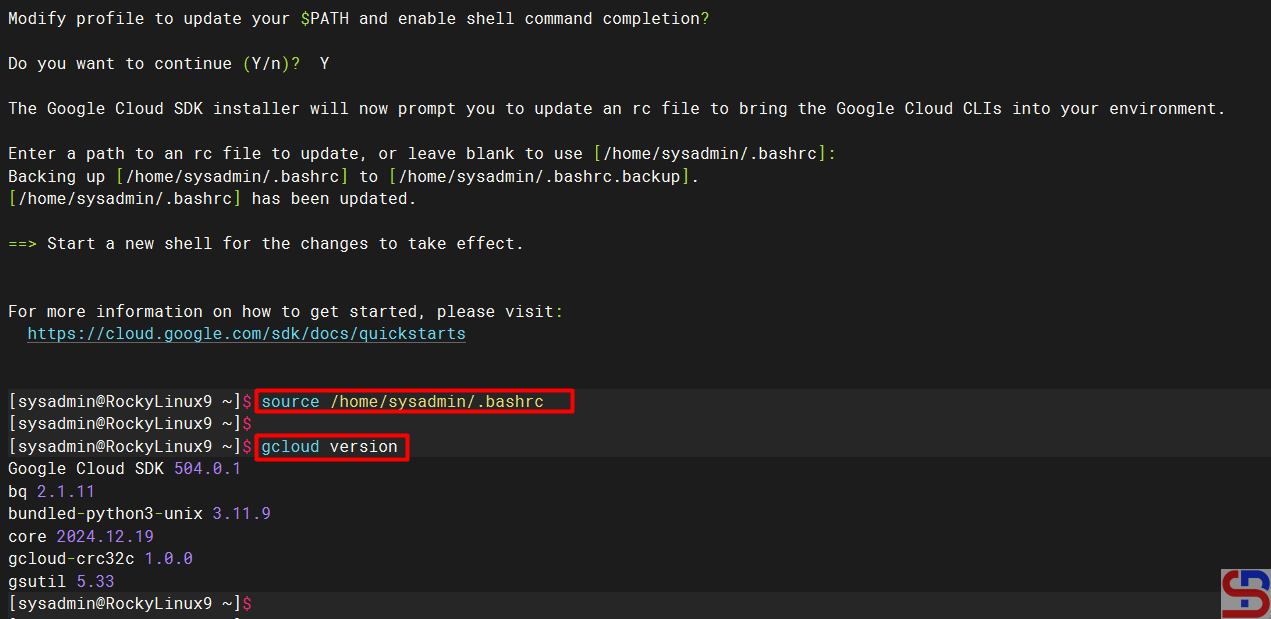
However, you can use the command below:
source /home/sysadmin/.bashrc
So you don’t need to create a new SSH connection to run the gcloud version command, which results in the image below:
Check the result of the installation
2. Using the Repository
You have to add the Google Cloud SDK repository to your server using the following command:
sudo tee -a /etc/yum.repos.d/google-cloud-sdk.repo << EOM
[google-cloud-cli]
name=Google Cloud CLI
baseurl=https://packages.cloud.google.com/yum/repos/cloud-sdk-el9-x86_64
enabled=1
gpgcheck=1
repo_gpgcheck=0
gpgkey=https://packages.cloud.google.com/yum/doc/rpm-package-key.gpg
EOM
After that, install gcloud using the command below:
yum install google-cloud-sdk
After the installation finishes, run the following command to test the gcloud command:
gcloud version
B. Connect to GCP
After you install gcloud on your server, type the command below:
gcloud init
Then there will be a display like the image below:
Click the link
Click the Ctrl+Click button in the red box to open the link in a browser, or if you have difficulty, copy what is in the red box and place it in your browser so you will see a display like the one below:
Click the account
Click on the Google account that will access GCP, then there will be a display like the image below:
Click the Continue button
Click the Continue button, then the display below will appear:
Click the Allow button
Click the Allow button, then the display below will appear:
Click the Copy button
Click the Copy button, and paste it into the CLI on your server as in the image below:
Paste the code
Select the project and configure the zone as in the image above. After that, the gcloud configuration is complete.
C. Test gcloud
Now, try gcloud to access your GCP. I try to list my virtual machine in GCP using the below command:
gcloud compute instances list
Then the display below will appear:
Display virtual machine in GCP using gcloud
If you get a display like the image above, you have successfully used your gcloud to access your GCP.
Note
If you have many projects on your GCP, you can choose one of these projects as the starting point for your gcloud on GCP. You can switch projects using the command:
gcloud config set project PROJECT_ID
Change PROJECT_ID to the project ID you want to switch to.