The previous article explained how to create virtual hosts in Ubuntu. This article will explain how to configure virtual hosts in Apache on Rocky Linux or derivatives of RHEL, such as Almalinux, CentOS, and so on.
Problem
How to configure virtual hosts in Apache on RockyLinux?
Solution
Before starting the configuration, make sure that on the RockyLinux server, the Apache application is installed by using the command:
yum install -y httpd
To see the default settings of Apache in RockyLinux, type the command below:
sudo httpd -S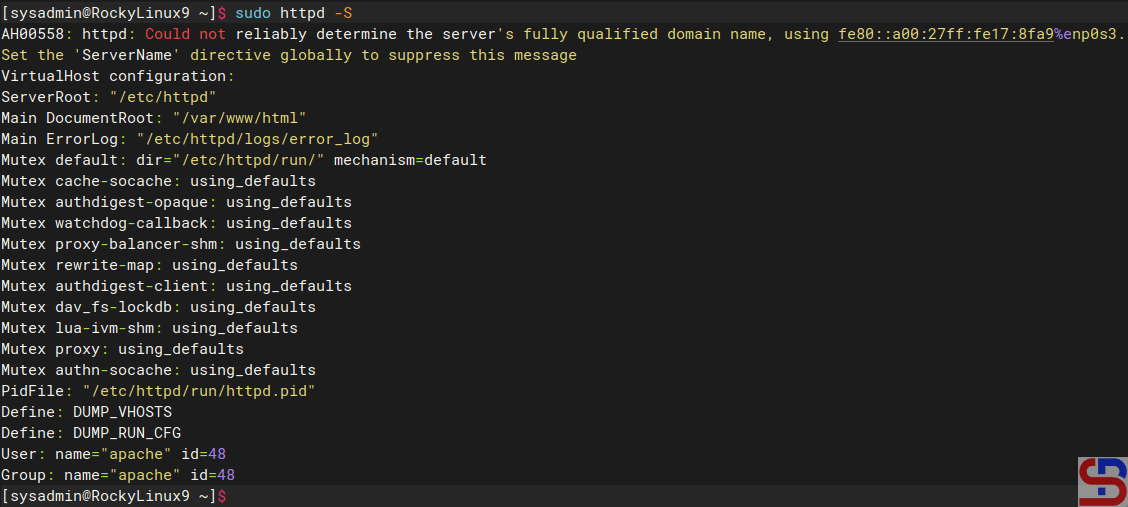
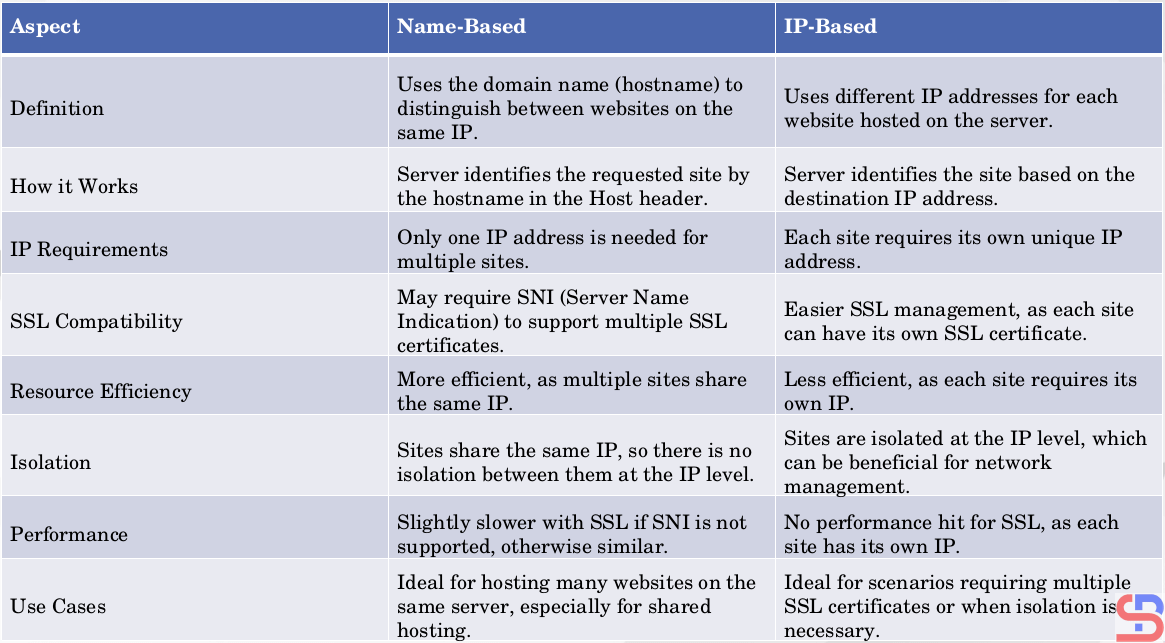
2 types of virtual hosts can be used, name-based and IP-based, and the difference between the two can be seen in the image below:
A. name-based virtual hosts
The meaning of name-based is that you have many websites or domains, but you only have one IP. For example, you have 2 domain names: website1.com and website2.com, but you only have 1 IP, which is 192.168.56.2. Here are the steps to get all three domains to use the same IP:
1. Create the directories and the files
By default, Apache uses the /var/www/html folder as its rootdocument, as shown in the image above. However, to make it easier to configure it, you should create a folder for each of these websites, as shown in the image below:
sudo mkdir -p /var/www/html/website1.com/
sudo mkdir -p /var/www/html/website2.com/
After that, create an index.html file for each domain:
sudo sh -c 'echo "<h1> This is for website1.com domain</h1>" > /var/www/html/website1.com/index.html'
sudo sh -c 'echo "<h1> This is for website2.com domain</h1>" > /var/www/html/website2.com/index.html'
2. Change ownership
Change the ownership of the folders:
sudo chown -R apache:apache /var/www/html/website1.com/
sudo chown -R apache:apache /var/www/html/website2.com/
sudo chmod -R 755 /var/www/html
3. Configuration of virtual hosts
Unlike Ubuntu and its derivatives, which use the sites-available and sites-enabled folders in configuring virtual hosts, by default, RockyLinux and its derivatives do not use both folders, but the virtual hosts configuration is inserted into the /etc/httpd/conf.d/ folder. Therefore, type the command below to create two domains in the virtual hosts:
echo "<VirtualHost *:80>" | sudo tee /etc/httpd/conf.d/website1.com.conf > /dev/null
echo "     ServerName website1.com"  | sudo  tee -a /etc/httpd/conf.d/website1.com.conf > /dev/null
echo "     ServerAlias www.website1.com"    |  sudo  tee -a /etc/httpd/conf.d/website1.com.conf > /dev/null
echo "     ServerAdmin webmaster@website1.com"   | sudo  tee -a /etc/httpd/conf.d/website1.com.conf > /dev/null
echo "     DocumentRoot /var/www/html/website1.com"  | sudo  tee -a /etc/httpd/conf.d/website1.com.conf > /dev/null
echo "     ErrorLog logs/website1-error.log"   | sudo  tee -a /etc/httpd/conf.d/website1.com.conf > /dev/null
echo "     CustomLog logs/website1-access.log combined"   | sudo  tee -a /etc/httpd/conf.d/website1.com.conf > /dev/null
echo "</VirtualHost>"   | sudo  tee -a /etc/httpd/conf.d/website1.com.conf > /dev/null

echo "<VirtualHost *:80>"  | sudo tee /etc/httpd/conf.d/website2.com.conf > /dev/null
echo "     ServerName website2.com"  | sudo  tee -a /etc/httpd/conf.d/website2.com.conf > /dev/null
echo "     ServerAlias www.website2.com"  | sudo  tee -a  /etc/httpd/conf.d/website2.com.com >  /dev/null
echo "     ServerAdmin webmaster@website2.com"  | sudo  tee -a /etc/httpd/conf.d/website2.com.conf > /dev/null
echo "     DocumentRoot /var/www/html/website2.com"   | sudo  tee -a  /etc/httpd/conf.d/website2.com.conf > /dev/null
echo "     ErrorLog logs/website2-error.log"   | sudo  tee -a /etc/httpd/conf.d/website2.com.conf > /dev/null
echo "     CustomLog logs/website2-access.log combined"   | sudo  tee -a /etc/httpd/conf.d/website2.com.conf > /dev/null
echo "</VirtualHost>"   | sudo  tee -a /etc/httpd/conf.d/website2.com.conf > /dev/null
4. Check the configuration
Use the command below to check whether there is an Apache configuration that is an error or not by using the command below:
sudo apachectl configtest
If there is no error, then reload Apache using the command below:
sudo systemctl reload httpd
5. Check in the browser
Because this article uses a private IP, you must configure it in the hosts file before you check the browser. If you use Windows, change the hosts file in C:\Windows\System32\drivers\etc\hosts or in /etc/hosts if you use Linux. In the hosts file, add the below script:
192.168.56.2 website1.com website2.com
By default, Rockylinux activates the firewall, so you have to open the HTTP port using the command below:
firewall-cmd --add-service=http --permanent
firewall-cmd --reload
Open your browser and type each of these domains, then there should be a site displayed as in the image below:
http://website1.com
http://website2.com
If you use Linux, you can use the command below to check the result:
curl http://website1.com
curl http://website2.com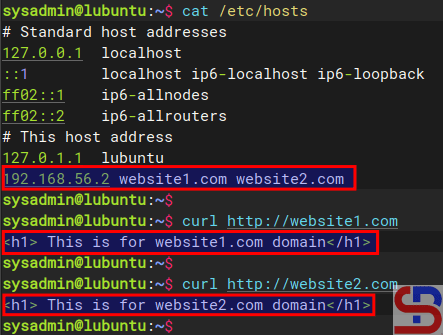
By default, websites work on the web server using port 80. But you can change port 80 to another port as long as the port is not used on the server. For example, if you want the website1.com site to use port 8080, change the /etc/httpd/conf.d/website1.com.conf file and change its contents to something like this:
Listen 8080
<VirtualHost *:8080>
     ServerName website1.com
     ServerAlias www.website1.com
     ServerAdmin webmaster@website1.com
     DocumentRoot /var/www/html/website1.com
     ErrorLog logs/website1-error.log
     CustomLog logs/website1-access.log combined
</VirtualHost>
Don’t forget to open the 8080 port on the Rockylinux server and reload Apache using the command below:
firewall-cmd --add-port=8080/tcp --permanent
firewall-cmd --reload
sudo systemctl reload apache
Open your browser and type the command below:
http://website1.com:8080
B. IP-based virtual hosts
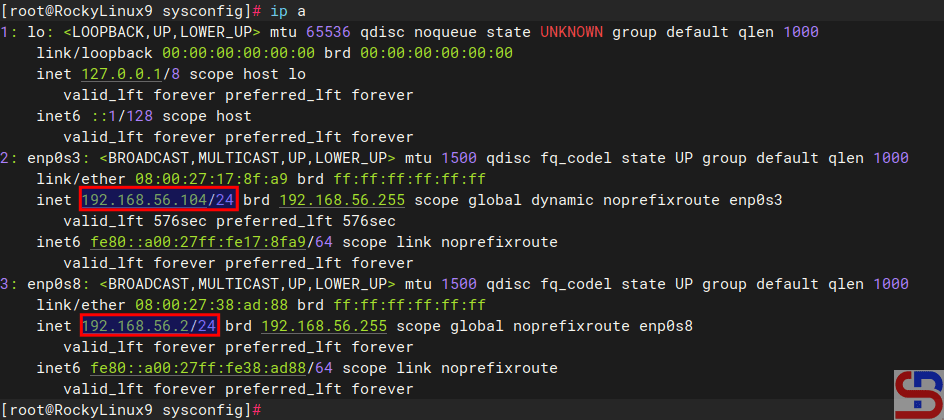
The meaning of IP-based is that you use a different IP address for each website. For example, you have 2 IPs and 2 domains, where IP 192.168.56.2 is for site1.com, and IP 192.168.56.104 is for site2.com. This article will use a server that has 2 IPs, as shown below:
1. Create the directories and the files
By default, Apache uses the /var/www/html folder as its rootdocument, as shown in the image above. However, to make it easier to configure it, you should create a folder for each of these websites, as shown in the image below:
sudo mkdir -p /var/www/html/site1.com/
sudo mkdir -p /var/www/html/site2.com/
After that, create an index.html file for each domain:
sudo sh -c 'echo "<h1> This is for site1.com domain</h1>" > /var/www/html/site1.com/index.html'
sudo sh -c 'echo "h1> This is for site2.com domain</h1>" > /var/www/html/site2.com/index.html'
2. Change ownership
Change the ownership of the folders:
sudo chown -R apache:apache /var/www/html/site1.com/
sudo chown -R apache:apache /var/www/html/site2.com/
sudo chmod -R 755 /var/www/html
3. Configuration of virtual hosts
Unlike Ubuntu and its derivatives, which use the sites-available and sites-enabled folders in configuring virtual hosts, by default, RockyLinux and its derivatives do not use both folders, but the virtual hosts configuration is inserted into the /etc/httpd/conf.d/ folder. Therefore, type the command below to create two domains in the virtual hosts:
echo "<VirtualHost 192.168.56.2:80>" | sudo tee /etc/httpd/conf.d/website1.com.conf > /dev/null
echo "     ServerName website1.com"  | sudo  tee -a /etc/httpd/conf.d/website1.com.conf > /dev/null
echo "     ServerAlias www.website1.com"    |  sudo  tee -a /etc/httpd/conf.d/website1.com.conf > /dev/null
echo "     ServerAdmin webmaster@website1.com"   | sudo  tee -a /etc/httpd/conf.d/website1.com.conf > /dev/null
echo "     DocumentRoot /var/www/html/website1.com"  | sudo  tee -a /etc/httpd/conf.d/website1.com.conf > /dev/null
echo "     ErrorLog logs/website1-error.log"   | sudo  tee -a /etc/httpd/conf.d/website1.com.conf > /dev/null
echo "     CustomLog logs/website1-access.log combined"   | sudo  tee -a /etc/httpd/conf.d/website1.com.conf > /dev/null
echo "</VirtualHost>"   | sudo  tee -a /etc/httpd/conf.d/website1.com.conf > /dev/null

echo "<VirtualHost 192.168.56.104:80>"  | sudo tee /etc/httpd/conf.d/website2.com.conf > /dev/null
echo "     ServerName website2.com"  | sudo  tee -a /etc/httpd/conf.d/website2.com.conf > /dev/null
echo "     ServerAlias www.website2.com"  | sudo  tee -a  /etc/httpd/conf.d/website2.com.com >  /dev/null
echo "     ServerAdmin webmaster@website2.com"  | sudo  tee -a /etc/httpd/conf.d/website2.com.conf > /dev/null
echo "     DocumentRoot /var/www/html/website2.com"   | sudo  tee -a  /etc/httpd/conf.d/website2.com.conf > /dev/null
echo "     ErrorLog logs/website2-error.log"   | sudo  tee -a /etc/httpd/conf.d/website2.com.conf > /dev/null
echo "     CustomLog logs/website2-access.log combined"   | sudo  tee -a /etc/httpd/conf.d/website2.com.conf > /dev/null
echo "</VirtualHost>"   | sudo  tee -a /etc/httpd/conf.d/website2.com.conf > /dev/null
4. Check the configuration
Use the command below to check whether there is an Apache configuration that is an error or not by using the command below:
sudo apachectl configtest
If there is no error, then reload Apache using the command below:
sudo systemctl reload httpd
5. Check in the browser
Because this article uses a private IP, you must configure it in the hosts file before you check the browser. If you use Windows, change the hosts file in C:\Windows\System32\drivers\etc\hosts or in /etc/hosts if you use Linux. In the hosts file, add the below script:
192.168.56.2   site1.com
192.168.56.104 site2.com
By default, Rockylinux activates the firewall, so you have to open the HTTP port using the command below:
firewall-cmd --add-service=http --permanent
firewall-cmd --reload
Open your browser and type each of these domains then there should be a site displayed as in the image below:
http://site1.com
http://site2.com
If you use Linux, you can use the command below to check the result:
curl http://site1.com
curl http://site2.com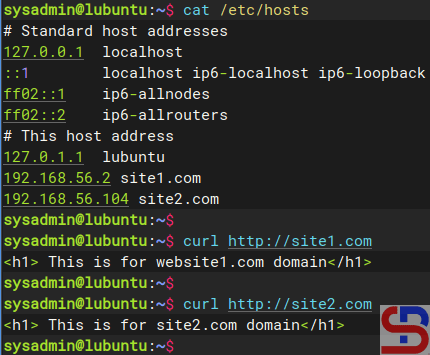
By default, websites work on the web server using port 80. But you can change port 80 to another port as long as the port is not used on the server. So, if you want the site1.com site to use port 8181, change the /etc/httpd/conf.d/website1.com.conf file and change its contents to something like this:
Listen 8181 <VirtualHost 192.168.56.102:8181> ServerName site1.com ServerAlias www.site1.com ServerAdmin webmaster@site1.com DocumentRoot /var/www/html/site1.com ErrorLog <code class="language-shell-session">logs/site1-error.log CustomLoglogs/site1-access.log combined </VirtualHost>
If you use the firewall in your Ubuntu server, don’t forget to open port 8181 using the command below:
sudo firewall-cmd --add-port=8181/tcp --permanent
sudo firewall-cmd --reload
sudo systemctl reload apache
Reload Apache and open it in the browser by typing the command:
http://site1.com:8181
Note
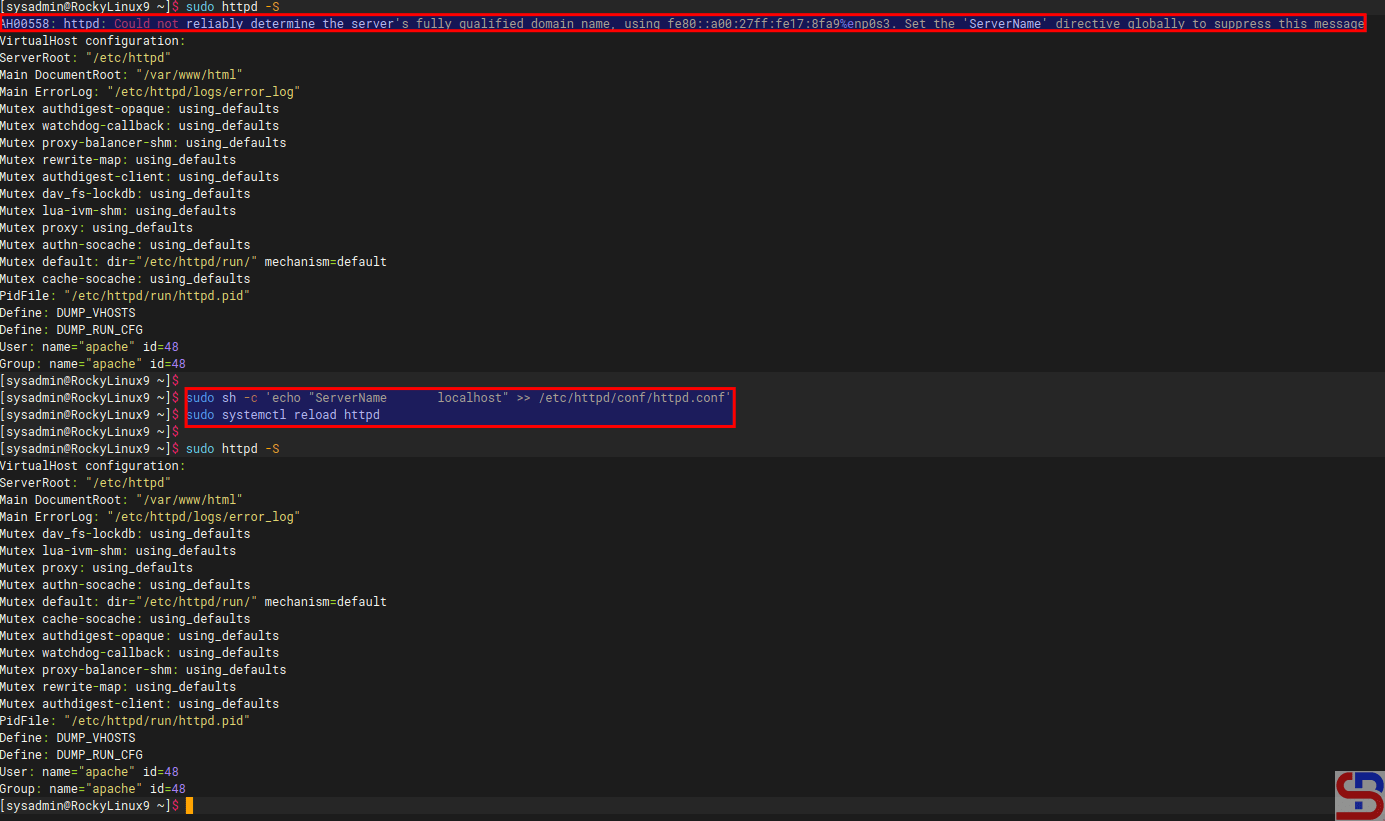
If you want to remove the error like this:
AH00558: httpd: Could not reliably determine the server’s fully qualified domain name, using 192.168.56.103. Set the ‘ServerName’ directive globally to suppress this message
Go to the /etc/httpd/conf/httpd.conf and insert the script below:
ServerName localhost
Reload the Apache, and the error will disappear, like in the image below:
References

