How to Create a Docker Image?

Previously, you often used a Docker image that you downloaded from Docker Hub. But now, you want to create a Docker image for your own application needs.


Problem

How to create a Docker image?


Solution

To create a Docker image, you must create a Dockerfile.

A. Dockerfile

Dockerfile is a script that contains a set of instructions used to create a Docker image using the format:

#comment
INSTRUCTION arguments


You should know that Docker runs Dockerfile files sequentially from top to bottom, and this file does not have a file extension, so just write Dockerfile. To make things easier, it is best to place this Dockerfile in the same location as the files needed to create a Docker image, so that it is easier to create. That way, to create a Docker image, just run the command:

docker build -t image_name .


B. Instructions

The following are the standard Dockerfile instructions: 

1. FROM instruction

This instruction is the first command to perform a build stage in the Dockerfile with the example below:

FROM alpine:3

Using the FROM instruction


2. LABEL instruction

To add metadata to the Docker image you create, where the metadata is additional information, such as the name of the application, creator, website, and so on.

FROM alpine:3

LABEL author="sysadmin"
LABEL company="sysadminpedia" website="https://www.sysadminpedia.com"

Using the LABEL instruction


3. WORKING DIRECTORY instruction

This instruction specifies directories/folders to execute instructions in the container. By default, if there is no working directory, then the container will go to the / folder automatically. If the workdir does not exist, the directory will automatically be created, and then, after we determine the location of the workdir, the directory will be used as a place to execute the next instruction. If the workdir’s location is a relative path, then it will automatically enter the directory of the previous workdir. Workdir can also be used as a path for the first location when it enters the container.

FROM alpine:3

LABEL author="sysadmin"
LABEL company="sysadminpedia" website="https://www.sysadminpedia.com"

WORKDIR /app

Using the WORKDIR instruction


4. RUN instruction

This instruction is a command in the image during the build stage, where the results of the RUN command will be committed to changes to the image, so that the RUN command will only be executed during the Docker build process, and this command will not be executed again and when you run the docker container from the image the RUN command will not be executed. 

FROM alpine:3

LABEL author="sysadmin"
LABEL company="sysadminpedia" website="https://www.sysadminpedia.com"

WORKDIR /app

RUN mkdir hello
RUN echo "Hello World" > "hello/world.txt"

Using the RUN instruction


5. USER instruction

To change the user or user group when Docker images are run, because by default, Docker will use the root user, and we can change it by using the user instruction, with the note that the user must be created first.

FROM alpine:3

LABEL author="sysadmin"
LABEL company="sysadminpedia" website="https://www.sysadminpedia.com"

WORKDIR /app

RUN mkdir hello
RUN echo "Hello World" > "hello/world.txt"

RUN addgroup -S app_group
RUN adduser -S -D -h /app app_user app_group
RUN chown -R app_user:app_group /app
USER app_user

Using the USER instruction


6. ENTRYPOINT instruction

An instruction in the Dockerfile specifies the main command that is executed when the container is started, and this is the main process of the container.

FROM alpine:3

LABEL author="sysadmin"
LABEL company="sysadminpedia" website="https://www.sysadminpedia.com"


WORKDIR /app

RUN mkdir hello
RUN echo "Hello World" > "hello/world.txt"

RUN addgroup -S app_group
RUN adduser -S -D -h /app app_user app_group
RUN chown -R app_user:app_group /app
USER app_user

ENTRYPOINT ["cat", "hello/world.txt"]

Using the ENTRYPOINT instruction


7. COMMAND instruction

An instruction that is used when the Docker container is running and will not be executed during the build image process. You cannot add more than one CMD instruction in an image, and if there is more than one instruction in an image, then the last CMD instruction will be executed. If there is an ENTRYPOINT instruction, then the CMD instruction becomes an argument from the ENTRYPOINT instruction. Examples of its use are as below:

FROM alpine:3

LABEL author="sysadmin"
LABEL company="sysadminpedia" website="https://www.sysadminpedia.com"

WORKDIR /app

RUN mkdir hello
RUN echo "Hello World" > hello/world.txt

RUN addgroup -S app_group
RUN adduser -S -D -h /app app_user app_group
RUN chown -R app_user:app_group /app
USER app_user

ENTRYPOINT ["cat"]

CMD ["hello/world.txt"]


The Dockerfile file above seems to be the command cat hello/world.txt, as in the picture below:

Using the CMD instruction


If there is no ENTRYPOINT, the CMD itself can be executed directly as a container command, as in the Dockerfile file below:

FROM alpine:3

LABEL author="sysadmin"
LABEL company="sysadminpedia" website="https://www.sysadminpedia.com"

WORKDIR /app

RUN mkdir hello
RUN echo "Hello World" > hello/world.txt

RUN addgroup -S app_group
RUN adduser -S -D -h /app app_user app_group
RUN chown -R app_user:app_group /app
USER app_user

CMD ["cat", "hello/world.txt"]


8. COPY instruction

To add files from the source to the destination folder in a Docker image folder. For example, if you want to copy all files with the extension .txt from a folder on the server, put them in the hello folder in the Docker image.

FROM alpine:3

LABEL author="sysadmin"
LABEL company="sysadminpedia" website="https://www.sysadminpedia.com"

WORKDIR /app

RUN mkdir hello
RUN echo "Hello World" > "hello/world.txt"

RUN addgroup -S app_group
RUN adduser -S -D -h /app app_user app_group
RUN chown -R app_user:app_group /app
USER app_user

COPY *.txt hello

CMD ["cat", "hello/world.txt"]

Using the COPY instruction


You can see in the image that in the folder on the server, there is an nginx.conf file and a tar.gz file,  but the files that are copied are only files with the extension .txt, such as the COPY command in the Dockerfile file.

9. ADD instruction

To add files from the source to the destination folder in the Docker image, and this command can detect if a source file is a compressed file, such as gzip, and will automatically extract it in the destination folder, and can also support adding multiple files at once. The difference with COPY is that COPY can only copy files, while ADD, in addition to copying, can also download the source from the URL and automatically extract compressed files. The best way to practice is to use COPY as much as possible, but if you really need to extract compressed files, then use the ADD command.

FROM alpine:3

LABEL author="sysadmin"
LABEL company="sysadminpedia" website="https://www.sysadminpedia.com"

WORKDIR /app

RUN mkdir hello
RUN echo "Hello World" > "hello/world.txt"

RUN addgroup -S app_group
RUN adduser -S -D -h /app app_user app_group
RUN chown -R app_user:app_group /app
USER app_user

COPY *.txt hello

ADD *.gz hello

CMD ["cat", "hello/world.txt"]

Using the ADD instruction

The crontab and hosts files are extracted from the etc.tar.gz file, and this explains that when you use the COPY instruction to copy a compressed file, the file will be extracted automatically in the container.

10. .dockerignore File

To specify which file(s) or folder(s) we ignore when the process of copying or adding file(s) or folder(s) to the Docker image. Because when doing the copy or add process, Docker will read the file named .dockerignore first. Create a .dockerignore file and then fill it with example.txt and qwerty.txt. Then, create the files example.txt and qwerty.txt in that folder, and they should not be copied to the folder in the Docker image.

Using the .dockerignore file


11. EXPOSE instruction

To tell the container which port to listen port on a specific number and protocol. Actually, EXPOSE will not publish any ports, but is only for documentation to inform the creator of the Docker container that this Docker image will use a specific port when run in a Docker container. For example, as below:

FROM alpine:3

LABEL author="sysadmin"
LABEL company="sysadminpedia" website="https://www.sysadminpedia.com"

WORKDIR /app

RUN mkdir hello
RUN echo "Hello World" > "hello/world.txt"

RUN addgroup -S app_group
RUN adduser -S -D -h /app app_user app_group
RUN chown -R app_user:app_group /app
USER app_user

ADD *.txt hello

COPY *.gz hello

EXPOSE 8080

CMD ["cat", "hello/world.txt"]


To see the open ports on this Docker image, use the command as shown in the image below:

Using the EXPOSE instruction


To create a container using this Docker image and see the open ports on this container, use the command as shown in the image below:

Display the EXPOSE instruction in the container


12. ENVIRONMENT VARIABLE instruction

To change the environment variables either during the build stage or when running in a Docker Container. The ENV defined in the Dockerfile can be reused using the ${ENV_NAME} syntax.

FROM alpine:3

LABEL author="sysadmin"
LABEL company="sysadminpedia" website="https://www.sysadminpedia.com"

WORKDIR /app

RUN mkdir hello
RUN echo "Hello World" > "hello/world.txt"

RUN addgroup -S app_group
RUN adduser -S -D -h /app app_user app_group
RUN chown -R app_user:app_group /app
USER app_user

COPY *.txt hello

ADD *.gz hello

EXPOSE 8080

ENV APP_PORT=8080
EXPOSE ${APP_PORT}

CMD ["cat", "hello/world.txt"]


The Environment Variable created using the ENV instruction is stored in the Docker image and can be viewed using the docker image inspect command.

Using the ENV instruction


Environment variables can be changed in value when creating a Docker container with the docker command using the –env-key=value option. So if you use the Dockerfile above, which uses APP_PORT=8080, but you want to use APP_PORT=9090, then you can use the command:

docker container create --name env_ins --env APP_PORT=9090 -p 9090:80 env_ins

Using the ENV instruction when creating a container


13. VOLUME instruction

To create the volume automatically when creating the container, and all the files contained in the volume are automatically copied to the Docker Volume, even though we didn’t create the Docker Volume when creating the Docker Container. It is suitable for cases when the application stores data in a file, so that the data can be automatically and safely stored in the Docker Volume.

FROM alpine:3

LABEL author="sysadmin"
LABEL company="sysadminpedia" website="https://www.sysadminpedia.com"

WORKDIR /app

RUN mkdir hello
RUN echo "Hello World" > "hello/world.txt"

RUN addgroup -S app_group
RUN adduser -S -D -h /app app_user app_group
RUN chown -R app_user:app_group /app
USER app_user

COPY *.txt hello

ADD *.gz hello

ENV APP_PORT=8080
EXPOSE ${APP_PORT}

ENV APP_DATA=/logs
VOLUME ${APP_DATA}

CMD ["cat", "hello/world.txt"]

Using the VOL instruction


Then, create a container from the Docker image and inspect it with the keyword Mounts. List the volume on the server, and it should be the same as in the image below:

Display the volume


14. ARGUMENT instruction

To define variables that can be used by the user to send when performing a Docker build process, use the –build-arg key=value command. This instruction is only used during the build time process, which means that when running in a Docker container, this instruction will not be used any differently from the ENV used. Accessing variables from ARG is the same as accessing variables from ENV using ${variable_name}.

FROM alpine:3

LABEL author="sysadmin"
LABEL company="sysadminpedia" website="https://www.sysadminpedia.com"

WORKDIR /app

RUN mkdir hello
RUN echo "Hello World" > "hello/world.txt"

RUN addgroup -S app_group
RUN adduser -S -D -h /app app_user app_group
RUN chown -R app_user:app_group /app
USER app_user

COPY *.txt hello

ADD *.gz hello

ENV APP_PORT=8080
EXPOSE ${APP_PORT}

ARG app=qwerty
RUN mv hello/world.txt hello/${app}.txt

CMD ["cat", "hello/${app}.txt"]

Using the ARG instruction


As you can see in the image above, the file name changes to qwerty.txt, which corresponds to the arguments you wrote in Docker. If you want to change the argument when creating a Docker image, then you can change it by adding the –build-arg app=pass option so that the file becomes pass.txt, as shown in the image below:

Using the ARG when creating a Docker image


Based on the image above, you can see that the file name has changed to pass.txt. However, you have to know that when you run the container and run the log command, it will display as shown in the picture below:

Error when opening the log


You can see in the image above that there is an error in the container log. This is because ARGs can only be accessed at build time, while CMDs are executed at runtime, so if you want to use ARG at runtime, then you need to insert the ARG into ENV, and your Dockerfile will be as below:

FROM alpine:3

LABEL author="sysadmin"
LABEL company="sysadminpedia" website="https://www.sysadminpedia.com"

WORKDIR /app

RUN mkdir hello
RUN echo "Hello World" > "hello/world.txt"

RUN addgroup -S app_group
RUN adduser -S -D -h /app app_user app_group
RUN chown -R app_user:app_group /app
USER app_user

COPY *.txt hello

ADD *.gz hello

ENV APP_PORT=8080
EXPOSE ${APP_PORT}

ARG app=qwerty
RUN mv hello/world.txt hello/${app}.txt

CMD ["cat", "hello/${app}.txt"]


15. Health CHECK instruction

To tell Docker if the container is still running properly or not. If there is a HEALTHCHECK, the container will automatically have a health status from the beginning with a starting value. If successful, it has a healthy value, and if it fails, it has an unhealthy value.

FROM nginx:alpine

RUN addgroup -S app_group \
    && adduser -S -G app_group -h /app app_user

RUN mkdir -p /app /var/cache/nginx /var/log/nginx /run \
    && chown -R app_user:app_group /app /var/cache/nginx /var/log/nginx /run

RUN echo "OK" > /app/healthz.html

RUN cat <<'EOF' > /etc/nginx/conf.d/default.conf
server {
    listen 80;

    location /healthz {
        root /app;
        try_files /healthz.html =404;
    }

    location / {
        return 200 "Hello from Nginx! Everything works fine.\n";
    }
}
EOF

USER app_user

# Healthcheck
HEALTHCHECK --interval=30s --timeout=5s --start-period=5s --retries=3 \
  CMD wget --no-verbose --tries=1 --spider http://127.0.0.1/healthz || exit 1

CMD ["nginx", "-g", "daemon off;"]

Using the HEALTHCHECK instruction


Note

Actually, it was the developers who created the Dockerfile as an image for their applications to run on Docker. However, as a sysadmin, you should also understand the instructions in the Dockerfile so that you can help developers if there is an error in their Docker, or maybe also to create a Docker image for sysadmin purposes.


References

youtube.dimas-maryanto.com
youtube.com
stackify.com
devopscube.com
geeksforgeeks.org


How to Share a Folder Between Container Hosts?

The previous articles have explained storage connections using volume and bind mount. This article will describe how to share a folder so that containers on other hosts can access it.

 

Problem

How to share a data folder between container hosts?


Solution

In this article, I use 3 servers where 1 server runs an NFS server with an IP of 192.168.56.12, and 2 servers run Docker with IPs 192.168.56.2 (docker1) and 192.168.56.102 (docker2). You can go to this article about NFS, and I use the /var/nfs folder as a data folder for all containers. After installing NFS on the server, type the following commands to configure NFS in the NFS server:

sudo mkdir /var/nfs
sudo chmod -R 777 /var/nfs
sudo echo "/var/nfs 192.168.56.0/24(rw,sync,no_subtree_check,no_root_squash)" | sudo tee /etc/exports
sudo exportfs -r
sudo touch /var/nfs/test.txt
sudo bash -c 'echo "This is from NFS server" > /var/nfs/test.txt'


Warning
I think you should know the version of NFS you are using by typing the command nfsstat -s so that when creating the container for the nfsvers option, you can fill the option with that version of NFS.


On 2 other Docker hosts, type the command below to make a volume Docker:

docker volume create --driver local \
  --opt type=nfs \
  --opt o=addr=192.168.56.12,rw,nfsvers=4,noatime,nodev,nosuid \
  --opt device=:/var/nfs \
  nfs_volume


After that, type the command below on those 2 Docker hosts to run the container connected to your NFS server:

docker run --rm -it -u root --workdir /root \
  --mount source=nfs_volume,target=/root \
  alpine ash


INFO
The docker run ‐-rm -it image_name shell command is used to run a container, and then you go to the folder / in the container. Add the  ‐-workdir /root option if you want to directly access the /root folder automatically after the container is formed. And if you exit from the container, the container is deleted instantly.


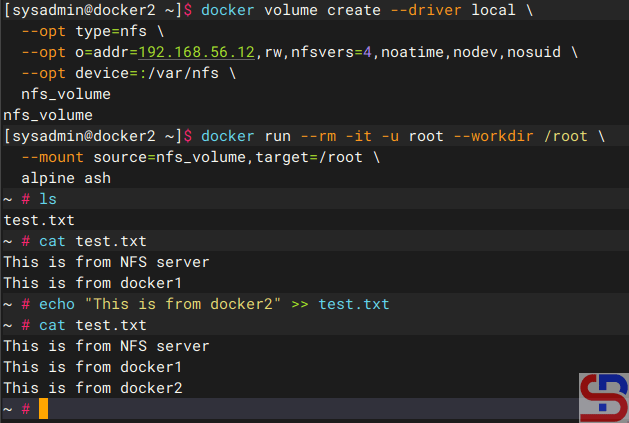
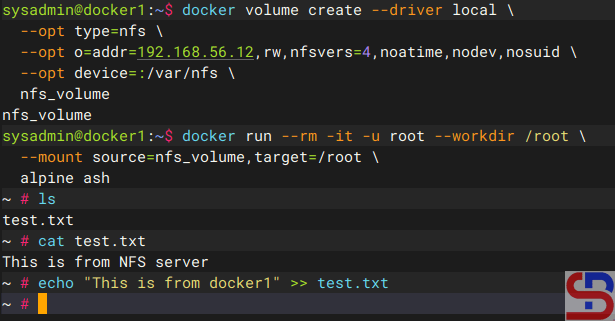
The image below is an example of when a container from docker1 host (192.168.56.2) accesses the NFS server:

Access the NFS folder from the docker1 host


The image below is an example of when a container from the docker2 host (192.168.56.102) accesses the NFS server:

Access the NFS folder from docker2 host


As you can see in the images above, all containers can access the NFS server and can change the files on the NFS server.


Note

On the internet, some developers make a Docker plugin to access NFS servers from containers, such as plugins docker-volume-netshare, nfs- volume-plugin, nfsvol, and so on. I have tried the first 3 plugins, but I always failed when accessing the NFS server using the plugins. But, there is a Docker plugin called docker-volume-sshfs that can access a folder, but the connection does not use NFS; but uses SSH, so you don’t need to install and configure NFS. As long as the folder can still be accessed using SSH, then this Docker plugin can still be used. For example, I create /home/sysadmin/data  as a data folder in IP 192.168.56.12, so I use the commands below to create the folder:

mkdir /home/sysadmin/data
cd /home/sysadmin/data
echo "This is from server" > test.txt


On the 2 Docker hosts, use the command below to install the Docker plugin:

docker plugin install --grant-all-permissions vieux/sshfs DEBUG=1
docker plugin ls

Install Docker plugin vieux/sshfs


Use the command below to create a volume in Docker:

docker volume create \
-d vieux/sshfs \
-o sshcmd=sysadmin@192.168.56.12:/home/sysadmin/data \
-o port=22 \
-o password=qwerty \
ssh_volume 


After that, use the command below to run the container to connect to the folder:

docker run -it --rm \
--workdir /root  \
-v ssh_volume:/root  \
alpine sh


The image below is an example of when a container from docker1 host (192.168.56.2) accesses the data folder:

Access the data folder from docker1 host


The image below is an example of when a container from docker2 host (192.168.56.102) accesses the data folder:

Access the data folder from docker2 host


As you can see in the images above, all containers can access the data folder and can change the files in the folder.


References

youtube.dimas-maryanto.com
docs.docker.com


How to Run a Container Automatically After the Server Reboots?

By default, if a server containing Docker reboots, all Docker containers on that server will shut down. If the server has a lot of containers, you will have to manually turn them on, which is highly exhausting.


Problem

How to run a container automatically after the server reboots?


Solution

In Docker, the restart policy specifies when and how the Docker container will be automatically restarted in the event of a system failure, shutdown, or reboot. There are 4 types of restart policies that you can use:


Restart Policy in Docker

Option Description
no Never restarts automatically and this is a default policy
on-failure Restart only if the exit code ≠ 0 (fail). Can be added to the maximum restart (on-failingure: 5).
always Always restart the container, unless it is stopped manually (docker stop), including when rebooting the server.
unless-stopped Similar to the always option, but it won't restart if the container is stopped manually, even after a reboot.


By default, Docker uses the no option for the restart policy so that the container won’t turn on when the server boots. There are several methods to automatically turn on containers after the server reboots:

Warning
Make sure that Docker on your server is enabled because all containers on that server won’t run automatically after restarting the server if you haven’t enabled Docker.


1. If your container is still not running

Use the format below if you run a container and you want it to turn on automatically after restarting the server:

docker run -d ‐-restart restart_option your_docker_image


If your container name is a webserver that uses the nginx image and you want the container to run automatically after the server reboots, you can use the command below:

docker run -d --restart always --name webserver nginx


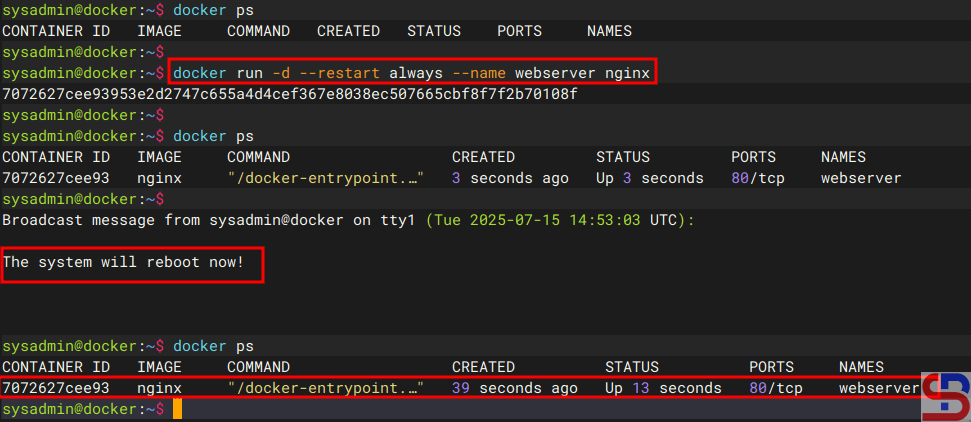
Once the container is running, try restarting the server, and it should continue to run automatically after the server restart, like in the image below:

The container runs automatically after the  server restarts using the always option


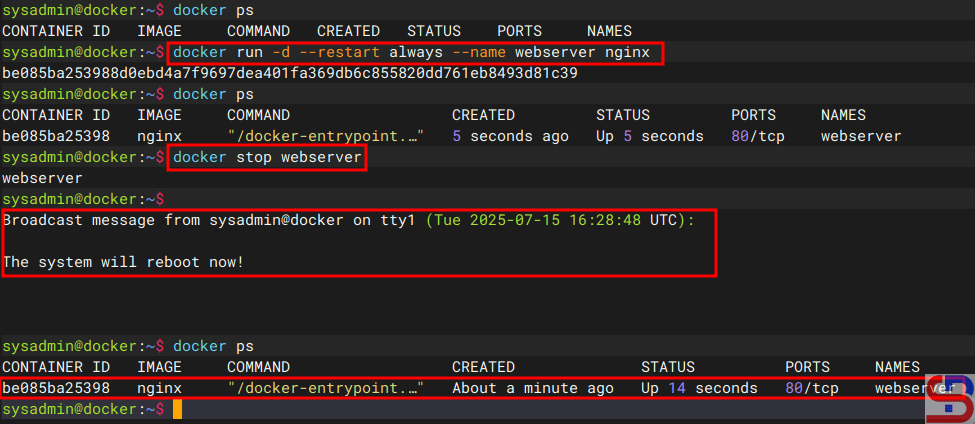
Now, try to stop the container and restart the server, and then the container should still run automatically after the server restarts, like in the image below:

The container still runs automatically after the  server restarts using the always option


2. If your container is running

If a container is running but has not used the restart option, you can use the format below so that the container can run automatically after the server restarts:

docker update --restart unless-stopped container_name_or_id


For example, you see a memcached container that uses a redis image is already running on the server, but has not used the restart option. Use the command below if you want the container to keep running after the server restarts, but if the container previously stopped, then at the time of the server restart, the container still won’t run:

docker update --restart unless-stopped memcached


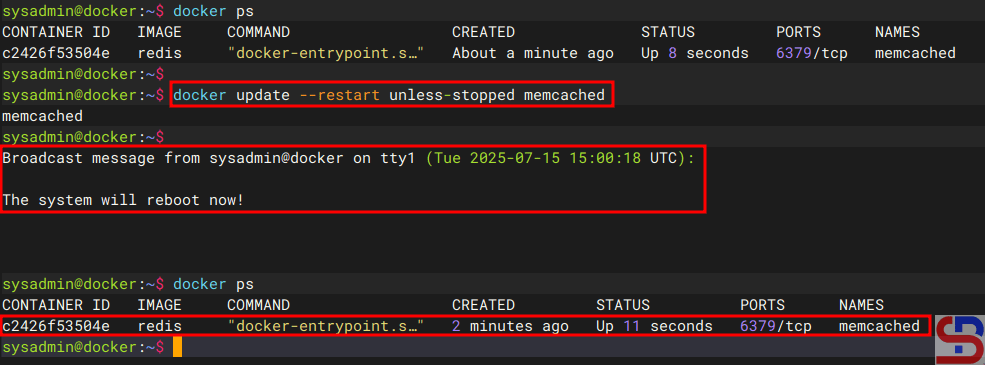
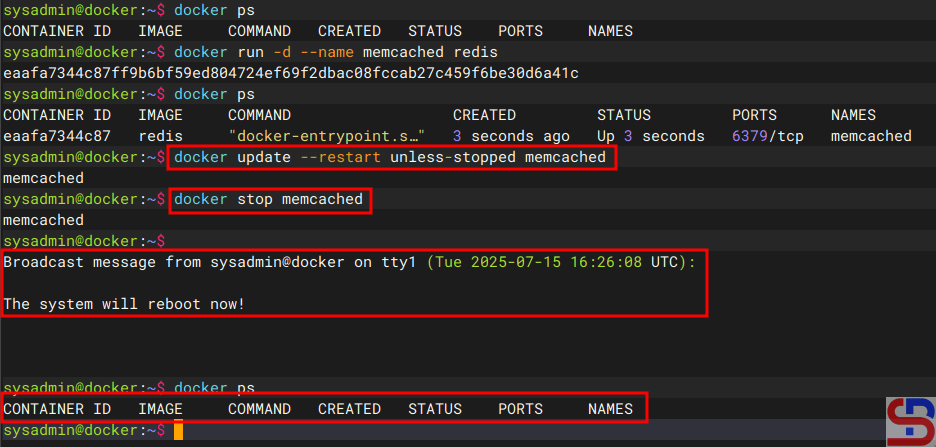
Now, try restarting the server while the container is running, and then the container should still run automatically if the server reboots, like in the image below:

run a container automatically after the server reboots
The container runs automatically after the  server restarts using the unless-stopped option


Now, try to stop the container and then restart the server; the container should still not run after the server restarts, like in the image below:

run a container automatically after the server reboots
The container is still not running after the  server restarts using the unless-stopped option


3. Using crontab

The third method of using crontab is to enter the following formats into crontab:

@reboot /usr/bin/docker start container_name_or_id


For example, you want to run the webserver container automatically after restarting the server, so insert the script below into the crontab :

@reboot /usr/bin/docker start webserver


If a container uses a crontab to keep it running after restarting the server, it will continue to run after restarting the server, even if it uses the unless-stopped option and the container is not running before the server is restarted.


Note

If you want a container to run automatically after restarting the server, it is important to note the distinction between using the always and unless-stopped parameters. If the container is a very important application, such as a webserver or database, use the always option for the container, but use the unless-stopped option if the container is a non-essential application.


References

docs.docker.com
stackoverflow.com
betterstack.com
baeldung.com


How to Storage Mount Using Bind Mount on Docker?

The previous article explained how to make storage using volume in Docker. This article will explain how to make storage using Bind Mount.


Problem

How to storage mount using bind mount on Docker?


Solution

A bind mount is a method of hosting a directory or file that is directly mounted into a container. Since they aren’t isolated by Docker, both non-Docker processes on the host and container processes can modify the mounted files simultaneously. So, you can change the data from the host, and those changes will be reflected in the container. This method is useful for development environments where code must be updated and tested in real-time. There are 2 ways when use bind mount:

A. using -v option

This option (using -v or ‐-volume) uses three fields, separated by colon characters (:). The fields must be in the correct order, and the meaning of each field is not immediately obvious. To use this option, use the format below:

docker run -d –name container_name -v /path/folder/in/server:/path/folder/in/container[:opts] image_name:tag


INFO
opts is the abbreviation for options like readonly, private, z, Z, and so on. The third field is optional, and is separated by colon characters.  You can see the options and their descriptions on this page.


To see more detailed information about mounting a container, use the format below:

docker inspect container_name -f "{{json .Mounts}}" | python3 -m json.tool


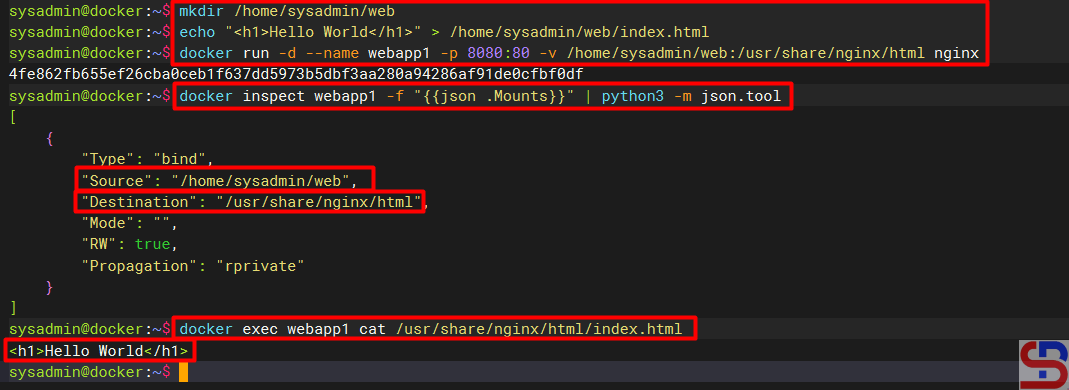
For example, you want to create a container with a nginx webserver that can be accessed with port 8080 with sources in folder /home/sysadmin/web and destination to the folder /usr/share/nginx/html on container, so first make a web folder in the server, and create a simple site then create a container using the command below:

mkdir /home/sysadmin/web
echo "<h1>Hello World</h1>" > web/index.html
docker run -d --name webapp1 -p 8080:80 -v /home/sysadmin/web:/usr/share/nginx/html nginx
docker inspect webapp1 -f "{{json .Mounts}}" | python3 -m json.tool
docker exec webapp1 cat /usr/share/nginx/html/index.html

Execute the commands


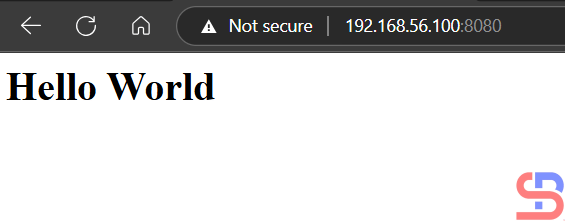
You can see from the image above that the index.html file in the container only displays the hello world sentence, so when you open the browser then the displays in the browser as shown below:

The display of the website


You can change the appearance of the website in the index.html file on the server or in the container. For example, you add the script below to the file on the server:

echo "<h2>Additional from server</h2>" >> web/index.html


Likewise, if you add the script below to the container:

docker exec webapp1 bash -c "echo Additional from container >> /usr/share/nginx/html/index.html"


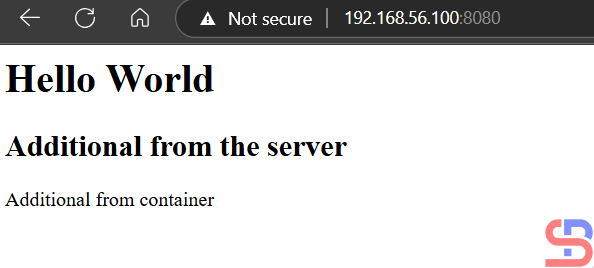
Both scripts will be included in the index.html file and will be displayed on the website as shown below:

Display of the website after additional scripts


B. Using ‐-mount Option

In general, these options are more explicit and verbose. This option consists of multiple key-value pairs, separated by commas, and each consisting of a <key>=<value> tuple. The biggest difference is that the -v syntax combines all the options in one field, while the –mount syntax separates them. The –mount syntax is more verbose than -v or –volume, but the order of the keys is not significant, and it is easier to understand. To use this option, use the format below:

docker run -d --name container_name --mount type=type_mount,source=/path/folder/in/server,destination=/path/folder/in/container[,<key>=<value>...] image_name:tag


INFO
The third field is optional, and is separated by commas like readonly, bind-propagation, and so on. You can see the options and their descriptions on this page.


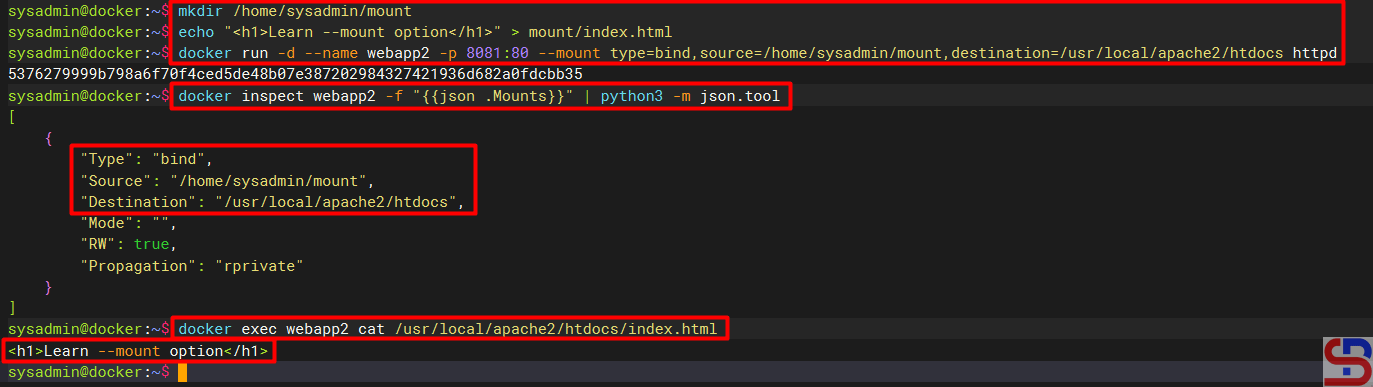
For example, you want to create a container with an Apache web server that can be accessed on port 8081 with sources in the folder /home/sysadmin/mount and destination to the folder /usr/local/apache2/htdocs on the container, so first make the mount folder in the server, then make the container using the command below:

mkdir /home/sysadmin/mount
echo "<h1>Learn --mount option</h1>" > mount/index.html
docker run -d --name webapp2 -p 8081:80 --mount type=bind,source=/home/sysadmin/mount,destination=/usr/local/apache2/htdocs httpd
docker inspect webapp2 -f "{{json .Mounts}}" | python3 -m json.tool
docker exec webapp2 cat /usr/local/apache2/htdocs/index.html

Execute the commands


Like using the -v option, you can change the appearance of the website in the index.html file on the server or in the container. For example, you add the script below to the file on the server:

echo "<h2>Additional from server</h2>" >> mount/index.html


Likewise, if you add the script below to the container:

docker exec webapp2 bash -c "echo Additional from container >> /usr/local/apache2/htdocs/index.html"


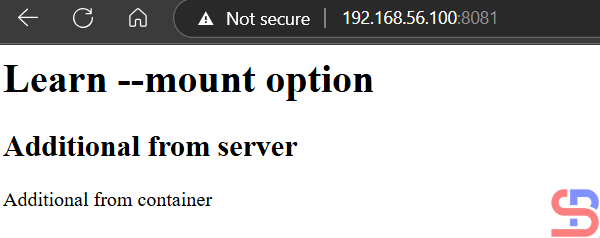
Both scripts will be included in the index.html file and will be displayed on the website as shown below:

Display of the website after additional scripts


Note

The only difference between the two options above is how the commands are executed; otherwise, the results would be identical.


References

youtube.dimas-maryanto.com
youtube.com
docs.docker.com
docker.com
linkedin.com


How to Connect Storage Mount Using Volume Mount on Docker?

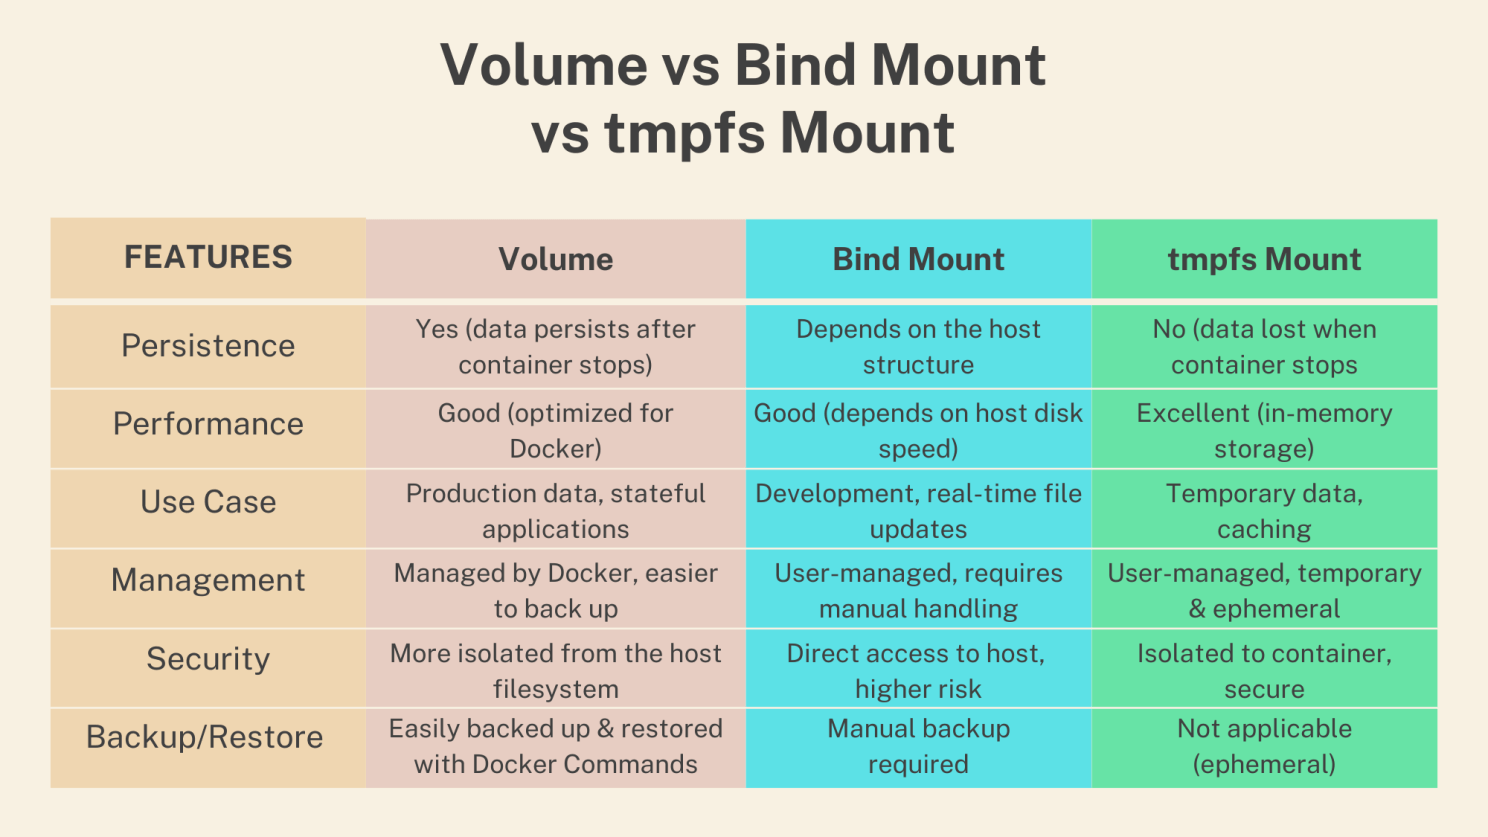
The previous article explained how to access the database installed in a container. But you must know that if you delete the container, it will automatically delete the database too. Therefore, you must create a storage to store a database so that if you delete the container, either intentionally or unintentionally, the database will remain. By default, Docker supports the following types of storage mounts for storing data outside of the container’s writable layer: volume mounts, bind mounts, and tmpfs mounts, each with its unique characteristics and use cases. This article will explain how to connect storage mount using volume mount. You can see a summary of the three types of storage here.


Problem

How to connect storage mount using volume mount on Docker?


Solution

Volumes are persistent storage mechanisms managed by the Docker daemon. It is stored in the filesystem on the host in /var/lib/docker/volumes folder, but to interact with the data in the volume, you must mount the volume to a container. Volumes are ideal for performance-critical data processing and long-term storage needs and are also suitable for sharing data between containers since volumes can be attached to multiple containers.

A. List, remove and create the volume

To see the volume on the server, use the command below:

docker volume ls


To remove a volume, use the command below:

docker volume rm volume_name


Use the command below to remove all unused volumes:

docker volume prune


By default, there is no volume if there is no container on the server. But if there is a container that uses storage like a container that uses a database image, the volume will form automatically. To see which containers that use volume can use the command below:

docker container inspect webapp postgresdb mysqldb -f '{{ .Name }} => {{json .Mounts}}'


Display the container that uses volume


You can create a new volume using the format below:

docker volume create volume_name


Use the command below if you want to create a mysql_vol volume:

docker volume create mysql_vol


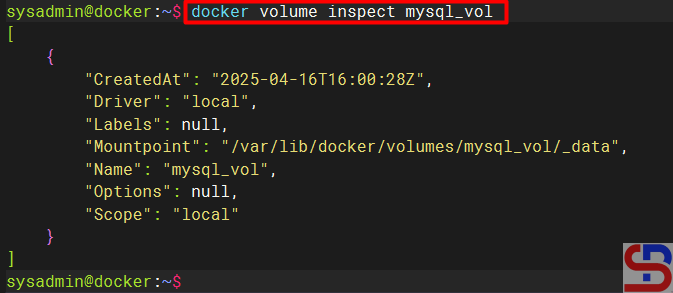
To see this volume information in detail, use the command below:

docker volume inspect mysql_vol

make storage using volume mount on Docker
Inspect the volume


B. Connect storage mount to a container

After that, make a new container where the container mounts to the volume you created using the format below:

docker run -d --name container_name -v volume_name:/path/folder/in/container image_name


You can see more detailed information on mounting a container, using the format below:

docker inspect container_name -f "{{json .Mounts}}" | python3 -m json.tool


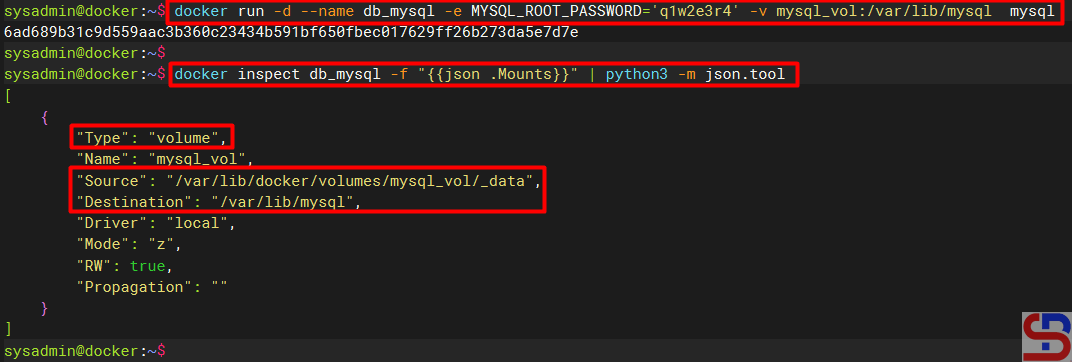
For example, use the command below if you want to create a db_mysql container with a password q1w2e3r4 using mysql_vol volume in the folder /var/lib/mysql :

docker run -d --name db_mysql -e MYSQL_ROOT_PASSWORD='q1w2e3r4' -v mysql_vol:/var/lib/mysql  mysql
docker inspect db_mysql -f "{{json .Mounts}}" | python3 -m json.tool


Run the container and check the mount


C. Simulate remove the container

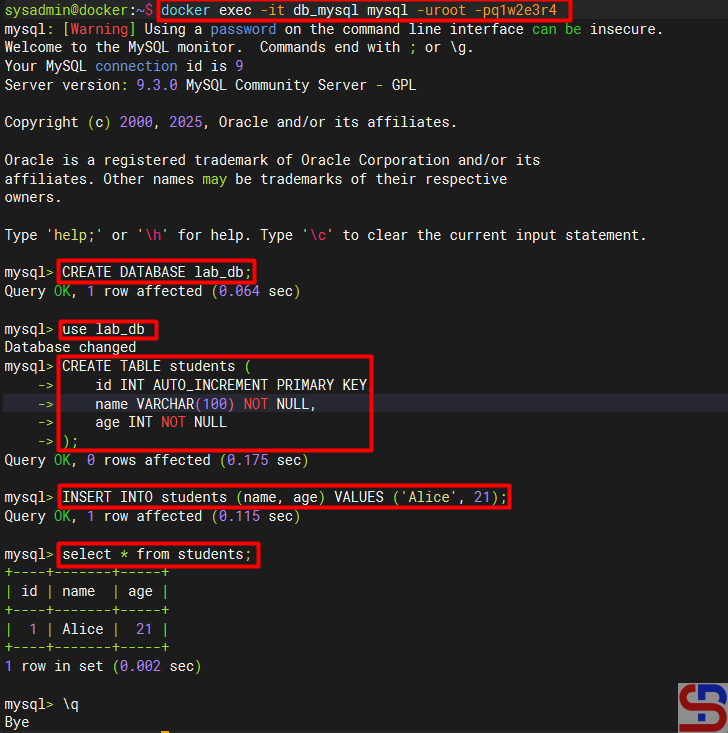
After that, try to enter the container by using the command below:

docker exec -it db_mysql mysql -uroot -pq1w2e3r4


Create a database and fill it as shown in the image below:

make storage using volume mount on Docker
Create a database


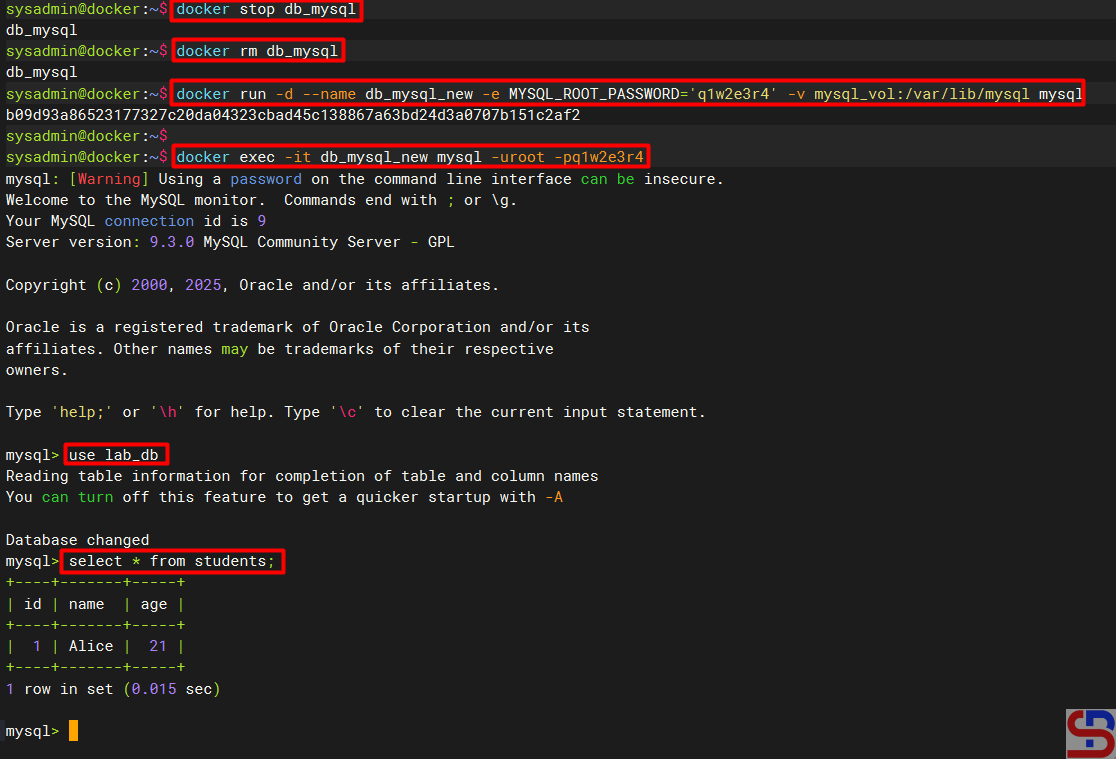
Then, try to simulate by deleting the container and creating a new container where the data is put into the mysql_vol volume in the /var/lib/mysql folder using the command below:

docker stop db_mysql
docker rm db_mysql
docker run -d --name db_mysql_new -e MYSQL_ROOT_PASSWORD='q1w2e3r4' -v mysql_vol:/var/lib/mysql mysql


Access the container by using the command:

docker exec -it db_mysql_new mysql -uroot -pq1w2e3r4


The lab_db database should still be accessible using the container you just created, as shown in the image below:

make storage using volume mount on Docker
The database can still be accessed


D. Share data in the volume among containers

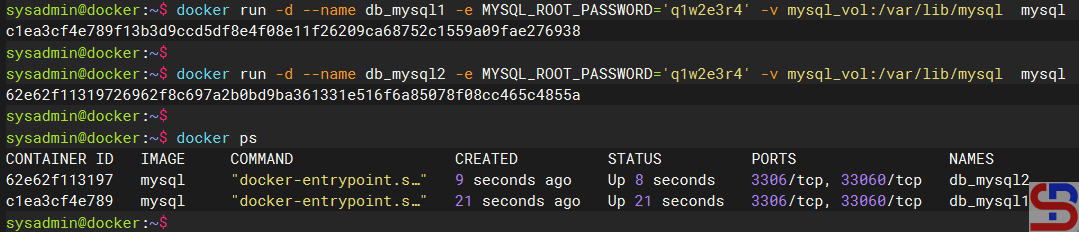
Let’s do a simulation to share the data that is in the volume with more than one container on a single server. In this article, 2 containers will be created that are connected to a mysql_vol volume. Type the command below to make 2 containers:

docker run -d --name db_mysql1 -e MYSQL_ROOT_PASSWORD='q1w2e3r4' -v mysql_volume:/var/lib/mysql  mysql
docker run -d --name db_mysql2 -e MYSQL_ROOT_PASSWORD='q1w2e3r4' -v mysql_volume:/var/lib/mysql  mysql
docker ps

Create 2 containers


After that, type the command below to create a database and insert the data via container db_mysql1:

docker exec db_mysql bash -c "mysql -uroot -pq1w2e3r4 -e \"CREATE DATABASE db_school; USE db_school; CREATE TABLE students (id INT AUTO_INCREMENT PRIMARY KEY, name VARCHAR(100) NOT NULL, age INT NOT NULL); INSERT INTO students (name, age) VALUES ('bob', 21), ('John', 22);select * from students;\""


Then there will be a display below:

Execute the command to create a database and insert data


From the picture above, there are 2 data in the student table in the db_school database. Type the command below to add data to the table from container db_mysql2:

docker exec db_mysql1 bash -c "mysql -uroot -pq1w2e3r4 -e \"USE db_school; INSERT INTO students (name, age) VALUES ('Laura', 20), ('Andrew', 23);select * from students;\""

Execute the command to add data


In the picture above, there are 4 data in the student table so that the Docker volume data can be shared between containers on a server well.


Note

You can see the picture below to see the difference between the three storage:

Types of storage in Docker (Image credit from linkedin.com)


References

docs.docker.com
medium.com
linkedin.com
hub.docker.com
youtube.com


How to Manage Networking in Docker?

Docker has a network system to regulate communication between one container and another container, your Docker host(server), and the outside world.


Problem

How to manage networking in Docker?


Solution

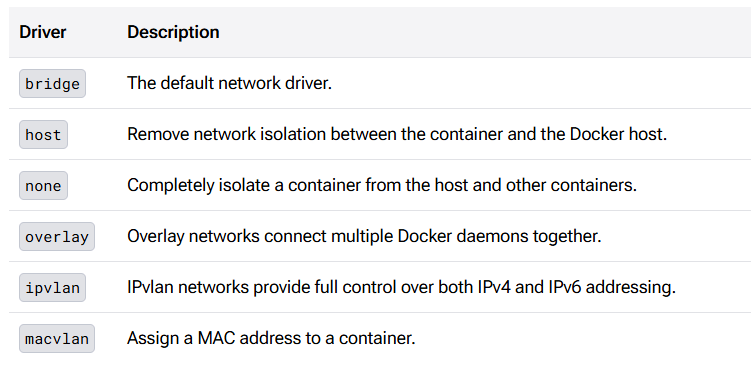
Docker provides six network drivers that you can use, as shown in the image below:

The six network drivers in Docker (Image credit for docs.docker.com)


You can see from the image above that the bridge is a default network driver, so if you do not specify a driver, then this type of network is created. To see the types of network drivers on your server, use the command below:

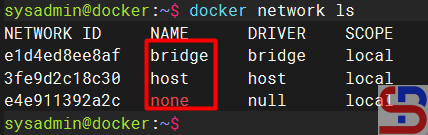
docker network ls

List the network drivers in Docker on your server


To see the configuration details of each network driver, use the command below:

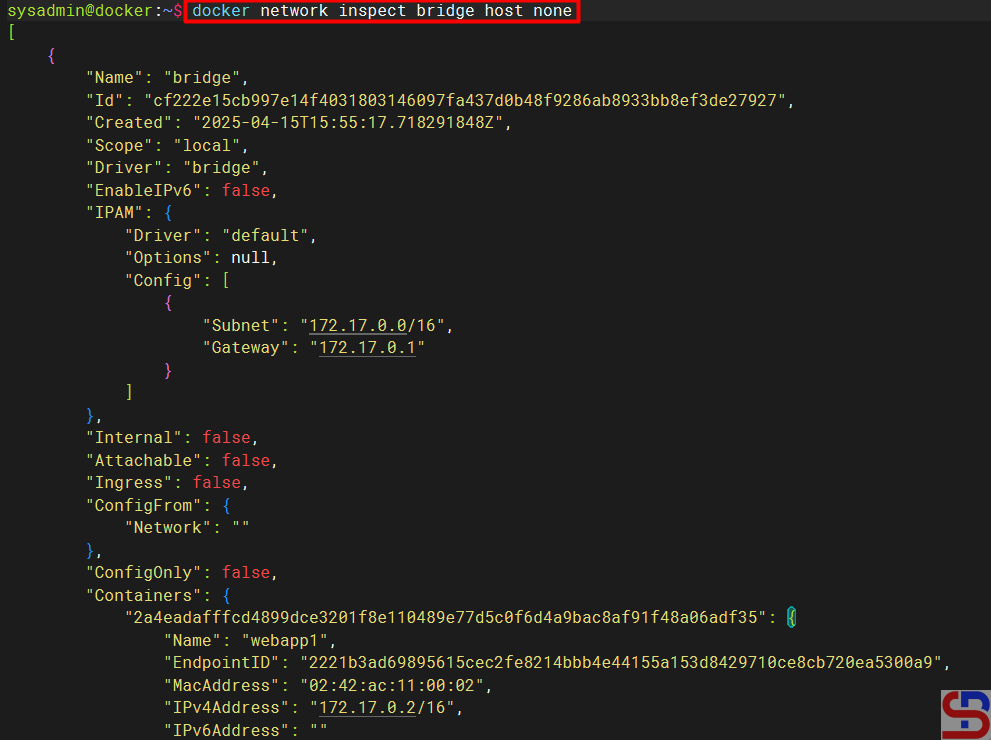
docker network inspect bridge host none

Display detailed information about the network on each network driver


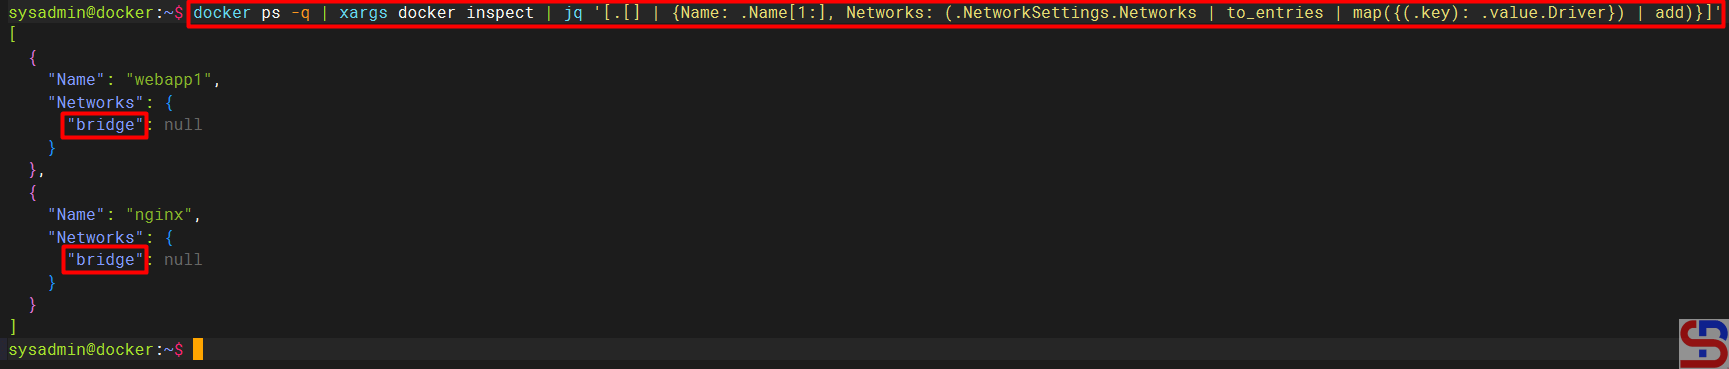
To see the type of driver network used in each container, use the command below:

docker ps -q | xargs docker inspect | jq '[.[] | {Name: .Name[1:], Networks: (.NetworkSettings.Networks | to_entries | map({(.key): .value.Driver}) | add)}]'

Display the network drivers in each container


To see the IP of each container, for example, in the nginx container, use the command below:

docker inspect -f '{{range.NetworkSettings.Networks}}{{.IPAddress}}{{end}}' nginx

Display of the IP of a container


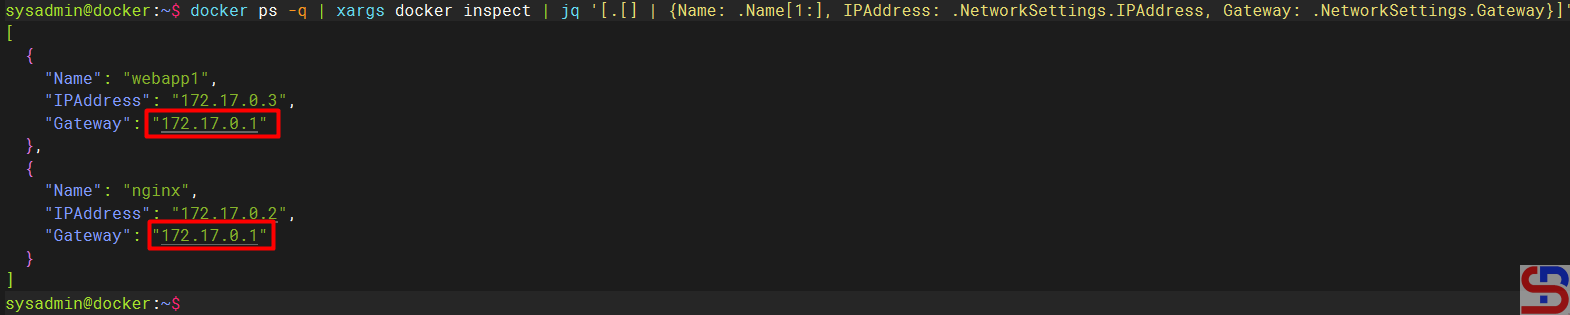
To communicate between one container with another container, both containers must have the same gateway. For example, you have made two containers, so by default, the two containers will use a network bridge driver so that it has the same gateway. Use the command below to see the two container IPs:

docker ps -q | xargs docker inspect | jq '[.[] | {Name: .Name[1:], IPAddress: .NetworkSettings.IPAddress, Gateway: .NetworkSettings.Gateway}]'

Display all the IPs in each container


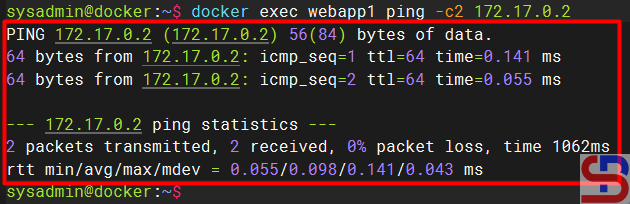
Then try to enter one of the containers and ping to another container using the command:

docker exec webapp1 ping -c2 172.17.0.2

Ping between containers


And the containers should be able to communicate with each other like the image above.

WARNING
If you can’t ping on your container, then you have to install ping in your container by accessing one of your containers and installing the ping package. If your container uses Ubuntu, then you can install it using the command:
apt update;apt install iputils-ping


A. Create a new network

You can create a new network on the server for your own needs using the format below:

docker network create network_name --driver driver_name


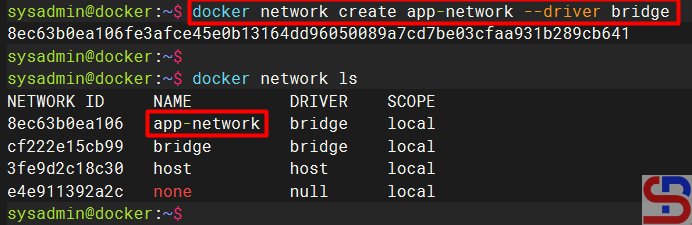
For example, you want to create an app-network network using a bridge driver, then use the command below:

docker network create app-network --driver bridge

Create a new network


INFO
You may not write the option ‐-driver if you want to create a new network using a bridge driver because bridge is a default network driver in Docker.


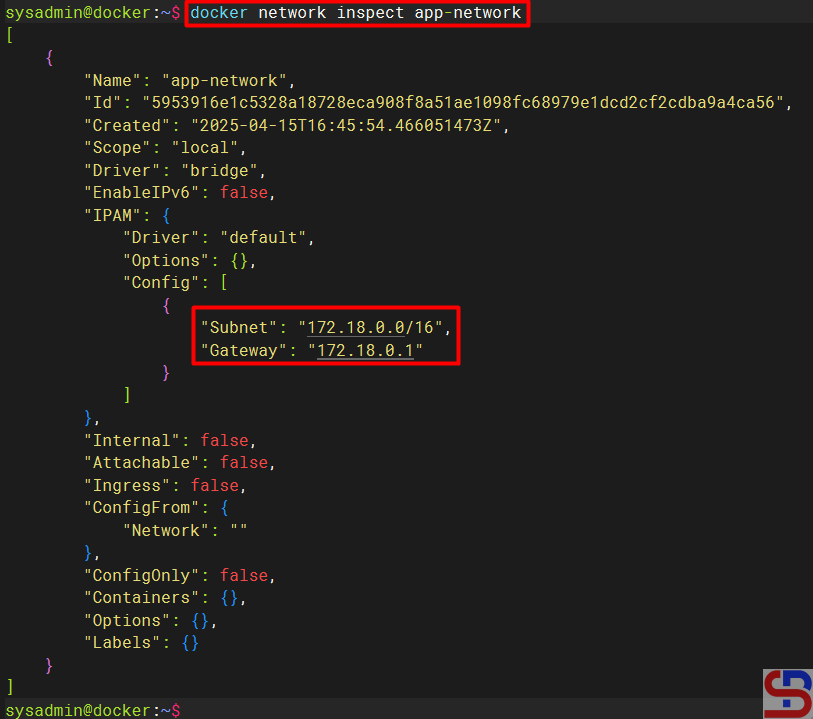
After that, try to use the command below to see the detailed information of the app-network:

docker network inspect app-network


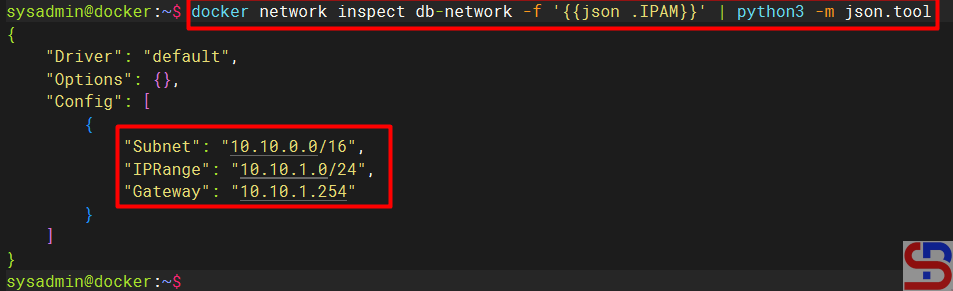
You can see from the picture above that the IP and Gateway from the app-network have been made automatically. You can make an IP and a Gateway according to what you want. For example, you want to create a new network with the name db-network, which has a range of IP 10.10.1.0/24 and Subnet 10.10.0.0/16 and Gateway 10.10.1.254, then use the command below:

docker network create -d bridge db-network \
--subnet=10.10.0.0/16 \
--ip-range=10.10.1.0/24 \
--gateway=10.10.1.254

Create a new network with the custom values


Use the command below to display network information details easily:

docker network inspect db-network -f '{{json .IPAM}}' | python3 -m json.tool

manage networking in Docker
Display the value of the network in a container


From the image above, you can see that the IP, Subnet, and Gateway on the network are the same as what you want.

B. Connecting a network to a container

If you connect the current container to a network, use the format below:

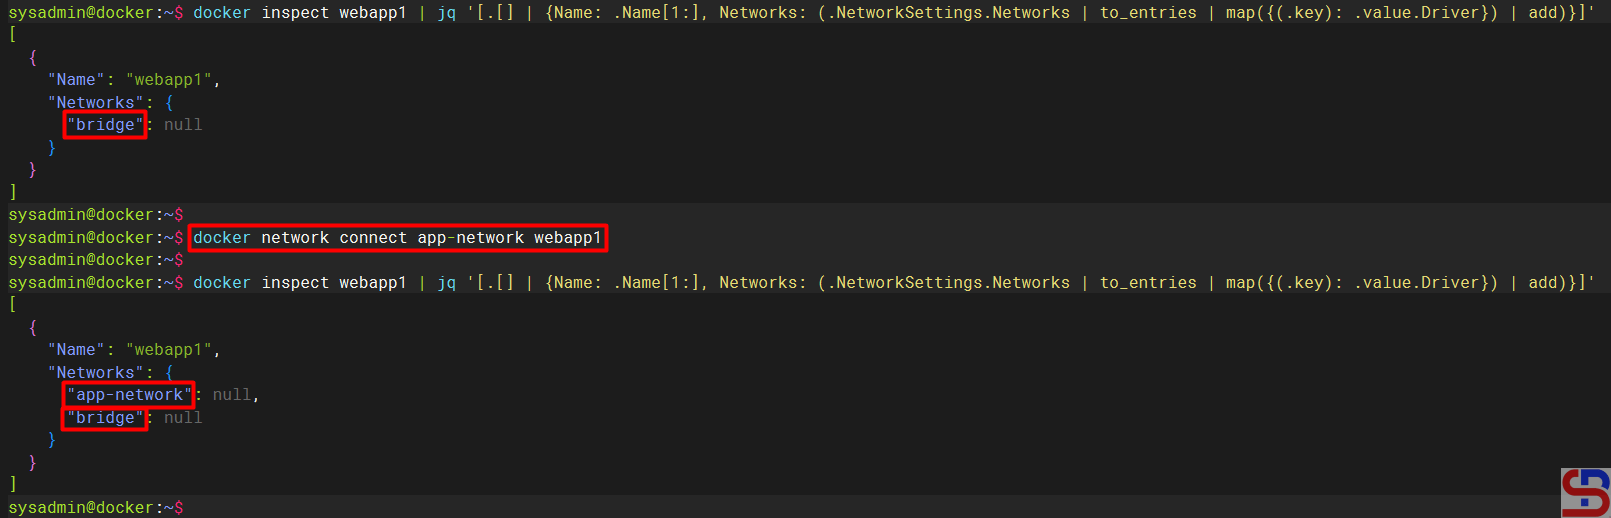
docker network connect network-name container-name


For example, if you want to connect the webapp1 container to the app-network network, use the command below:

docker network connect app-network webapp1

manage networking in Docker
Connecting a network to a container


If you want to create a new container by directly connecting to a network, use the format below:

docker container run --name container_name --network network_name image:tag


For example, if you want to create a db-mysql container on the db-network network, use the command below:

docker run -d --name db-mysql --network db-network -e MYSQL_ROOT_PASSWORD='q1w2e3r4' mysql

manage networking in Docker
Connecting a network when creating a new container


C. Disconnect a network in the container

To disconnect a network in the container, use the format below:

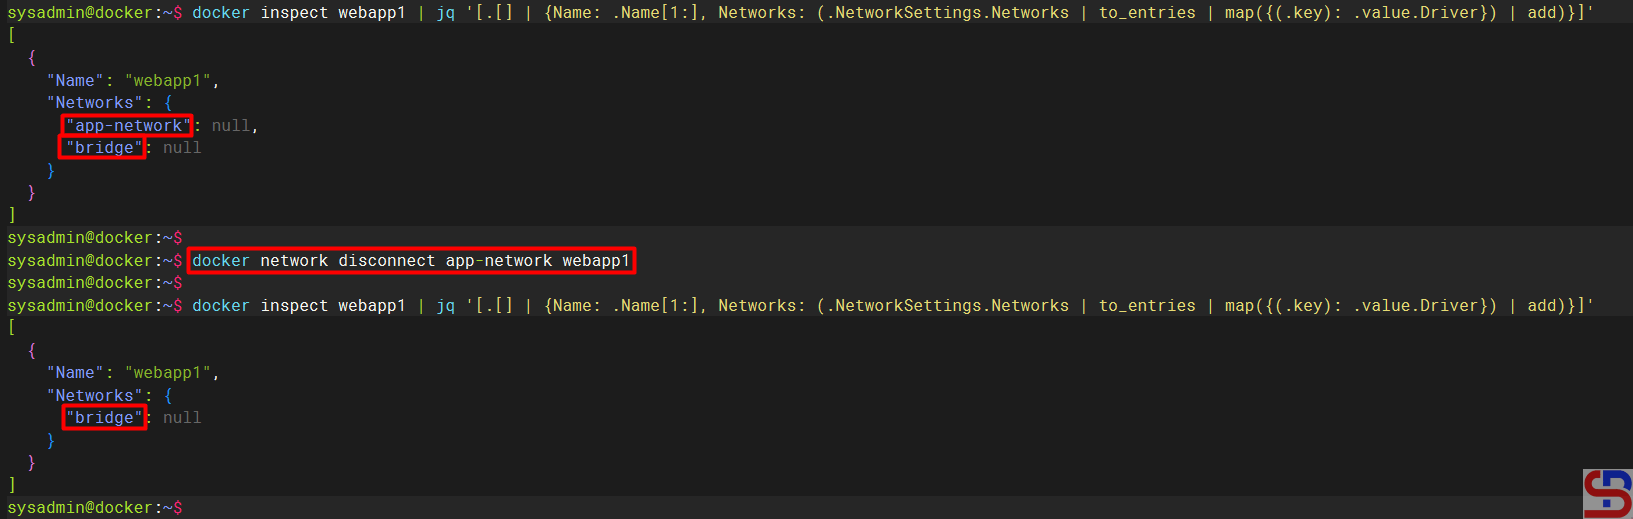
docker network disconnect network_name container_name


For example, if you want to break the app-network network from the webapp1 container, use the format below:

docker network disconnect network1 webapp1

manage networking in Docker
Disconnect a network from a container


D. Removing a network

To remove a network, use the format below:

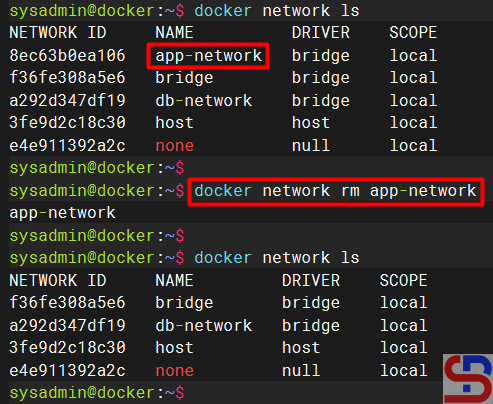
docker network rm network_name


For example, I want to delete the app-network network, use the command below:

docker network rm app-network

manage networking in Docker
Remove a network


WARNING
You cannot remove a network if the network is still connected to a container. First, disconnect the network connection from the container, and then you can delete the network.


Note

You must be careful when setting the network in Docker because if you set the wrong network, one or several containers will not be connected, which causes the application that runs on the Docker will be disturbed.


References

docs.docker.com
spacelift.io
youtube.dimas-maryanto.com
stackoverflow.com
youtube.com


How to Move a File/Folder From the Server to the Container And Vice Versa?

The previous article explained how to access a container in Docker. Now, I need to move a file/folder from the server to the container and vice versa.


Problem

How to move a file/folder from the server to the container and vice versa?


Solution

These are how to move a file/folder from the server to the container and vice versa:

A. Move from the server to the container

To move a file from the server to the container, use the format below:

docker cp src_path container:dest_path


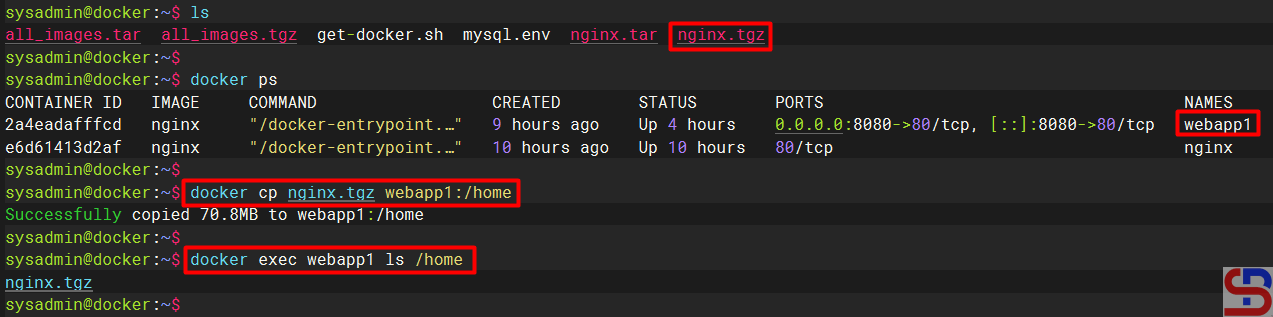
For example, I want to move the nginx.tgz file from the server to the webapp1 container in the folder /home, so I use the command below:

docker cp nginx.tgz webapp1:/home


And the file will move to the /home folder in the container, like in the image below:

Move the file from the server to the container


B. Move from the container to the server

To move a file from the server to the container, use the format below:

docker cp container:src_path dest_path


For example, you want to move the docker-entrypoint.sh file in the container to the server in the folder /tmp, use the command below to move the file:

docker cp webapp1:docker-entrypoint.sh /tmp


And the file should be transferred to the folder /tmp on the server as shown below:

move a file/folder from the server to the container and vice versa
Move the file from the container to the server


Note

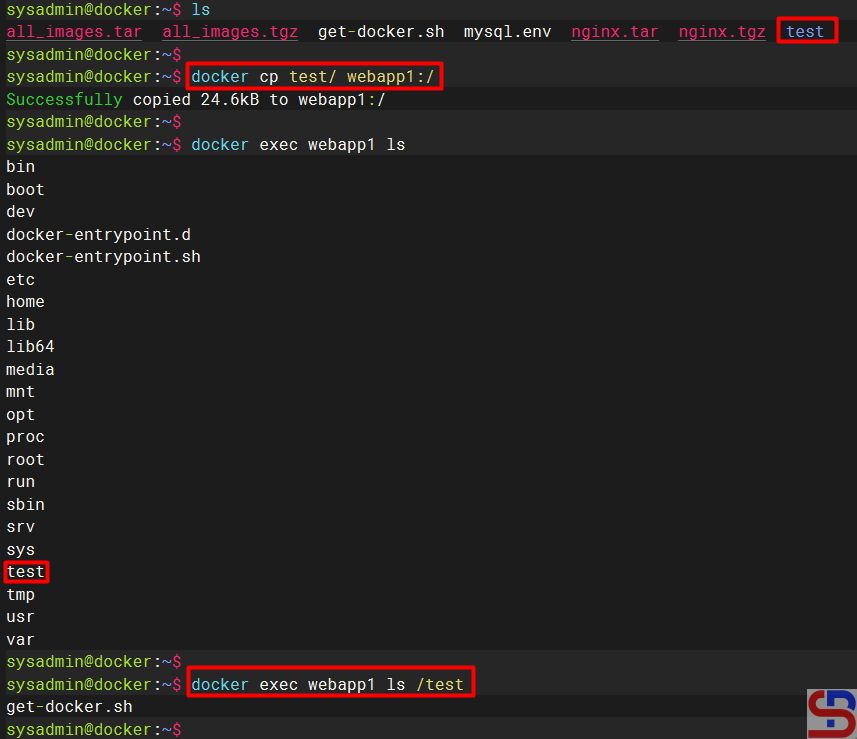
You can move the folder and its contents from the server to the container and vice versa by using the format above without the need to add the -r option, as shown in the image below:

move a file/folder from the server to the container and vice versa
Move the folder into and out of the container


WARNING
You cannot move more than one file or folder from the server to the container or vice versa.


References

youtube.dimas-maryanto.com
docs.docker.com
mkyong.com