The previous article explained how to configure the firewalld to become a port forwarding. This article will explain how to configure ufw applications in Ubuntu to become a port forwarding.
Suppose you have an Ubuntu server with IP address 192.168.56.102 and want to close port 22 but open port 43210 if someone wants to access the server via SSH. Change the SSH port like in this article, and you have to enable ufw in the server using the command below:
sudo ufw enable
Answer the question by pushing the y button. Now type the below commands to open port 22 and port 43210:
sudo ufw allow 43210/tcp
Check the SSH port using the below command and make sure the SSH port is pointed to the new port (port 43210) like in the below image:
Check the port
If the port is still connected to port 22, you can go to this article to change the SSH port.Now, try to access the server using the command below:
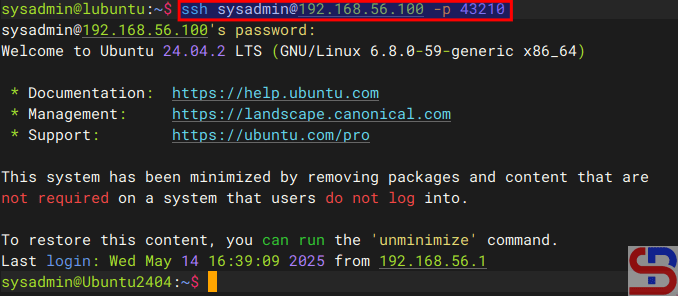
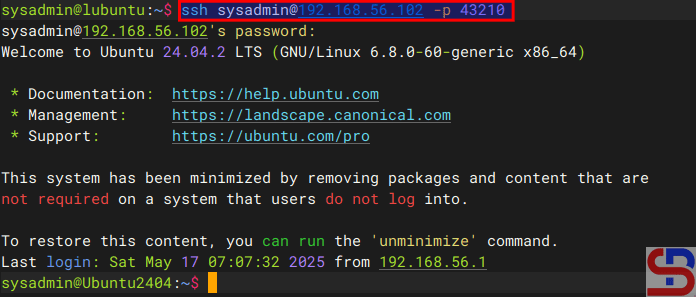
ssh sysadmin@192.168.56.102 -p 43210
Access to the server via SSH using the port
You should access the server like in the image above. Now, you want to implement the port forwarding in the ufw so the sysadmin doesn’t need to write -p 43210 anymore. So, you have to configure the before.rules file in the /etc/ufw folder. In short, before.rules typically contains rules that handle essential network traffic before ufw’s User-Defined Rules are applied. I think you have to backup the file before you configure the file using the below command:
sudo cp /etc/ufw/before.rules /etc/ufw/before.rules.ori
sudo vi /etc/ufw/before.rules
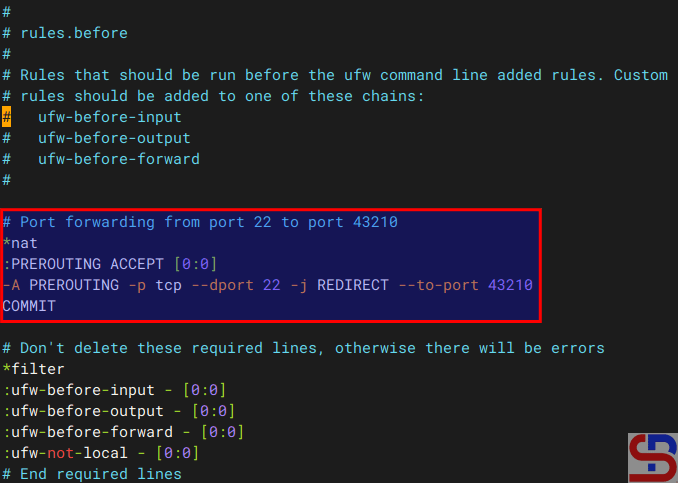
After that, copy the script below to the file before the *filter section:
# Port forwarding from port 22 to port 43210
*nat
:PREROUTING ACCEPT [0:0]
-A PREROUTING -p tcp --dport 22 -j REDIRECT --to-port 43210
COMMIT
Configure the before.rules file
Restart ufw using the command below:
sudo ufw reload
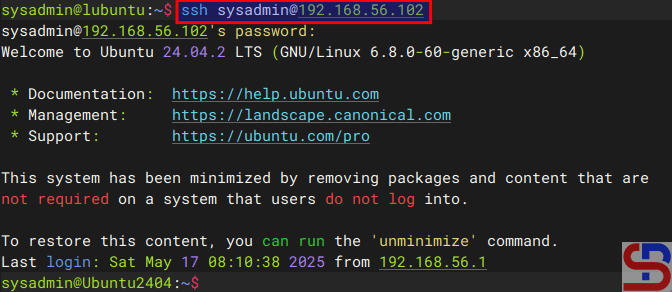
Now, try to access using the command below:
ssh sysadmin@192.168.56.102
You should access to the server without writing the port anymore like in the image below:
Access to the server without writing the port
B. Forward to the different IP/device
Suppose you have a Ubuntu server with IP address 192.168.56.102 and port 22 is available. You would like users who access the server using SSH to forward to port 22 with IP address 192.168.56.2 using RockyLinux. So, these are the steps:
1. Configure ufw
Check your Ubuntu server to see whether UFW is running on the server using the command below:
sudo ufw status
If it still doesn’t run, use the command below to have ufw run on that server:
sudo ufw enable
Answer the question by pushing the y button. Then, open port 22 by using the command below:
sudo ufw allow 22/tcp
To run the forwarding port on UFW, you must configure the before.rules file in the /etc/ufw folder. In short, before.rules typically contains rules that handle essential network traffic before ufw’s User-Defined Rules are applied. I think you have to backup the file before you configure the file using the below command:
sudo cp /etc/ufw/before.rules /etc/ufw/before.rules.ori
sudo vi /etc/ufw/before.rules
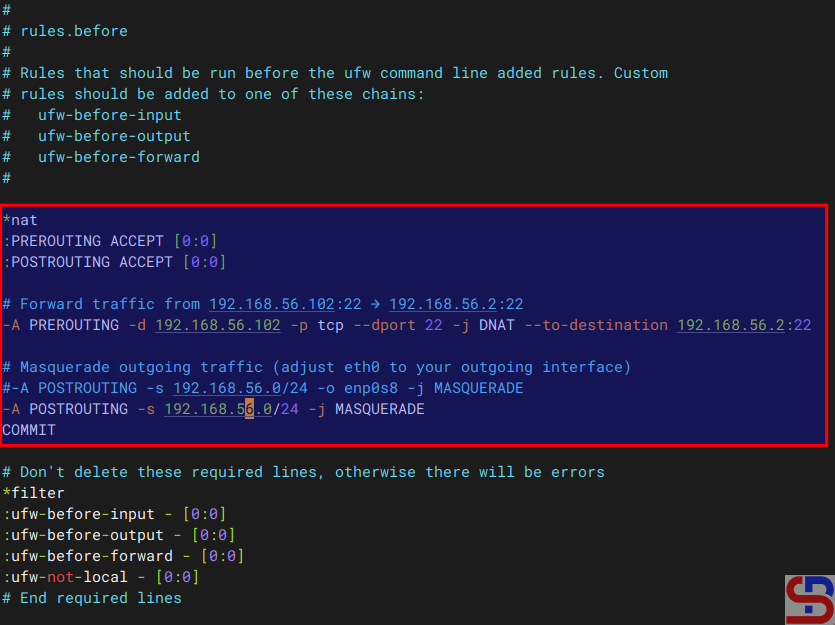
After that, copy the script below to the file before the *filter section:
*nat
:PREROUTING ACCEPT [0:0]
:POSTROUTING ACCEPT [0:0]

# Forward traffic from 192.168.56.102:22 → 192.168.56.2:22
-A PREROUTING -d 192.168.56.102 -p tcp --dport 22 -j DNAT --to-destination 192.168.56.2:22

# Masquerade outgoing traffic (adjust eth0 to your outgoing interface)
-A POSTROUTING -s 192.168.56.0/24 -o eth0 -j MASQUERADE

COMMIT
Configure the before.rules file
2. Enable IP Forwarding
Go to the /etc/default/ufw file and change the file from:
DEFAULT_FORWARD_POLICY="DROP"
to
DEFAULT_FORWARD_POLICY="ACCEPT"
After that, go to the /etc/sysctl.conf file and uncomment or add in the file:
net.ipv4.ip_forward=1
And run the below commands:
sudo sysctl -p
sudo ufw reload
3. Test the result
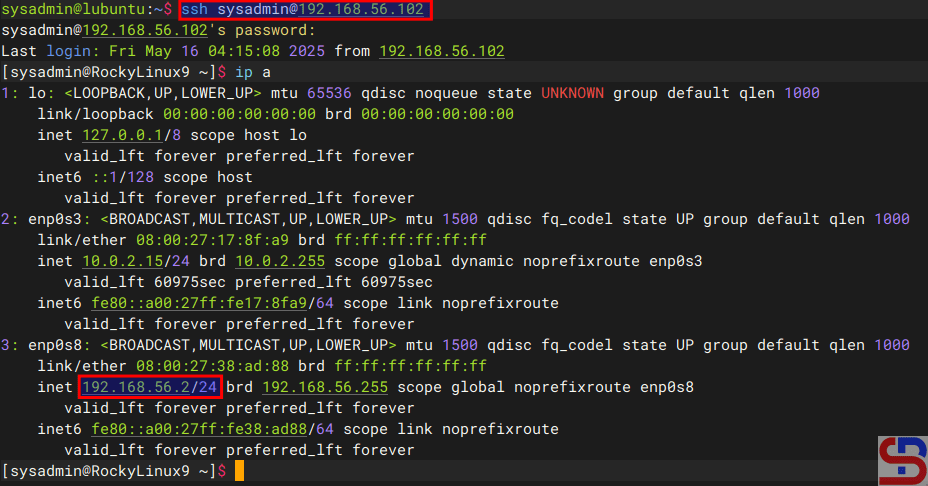
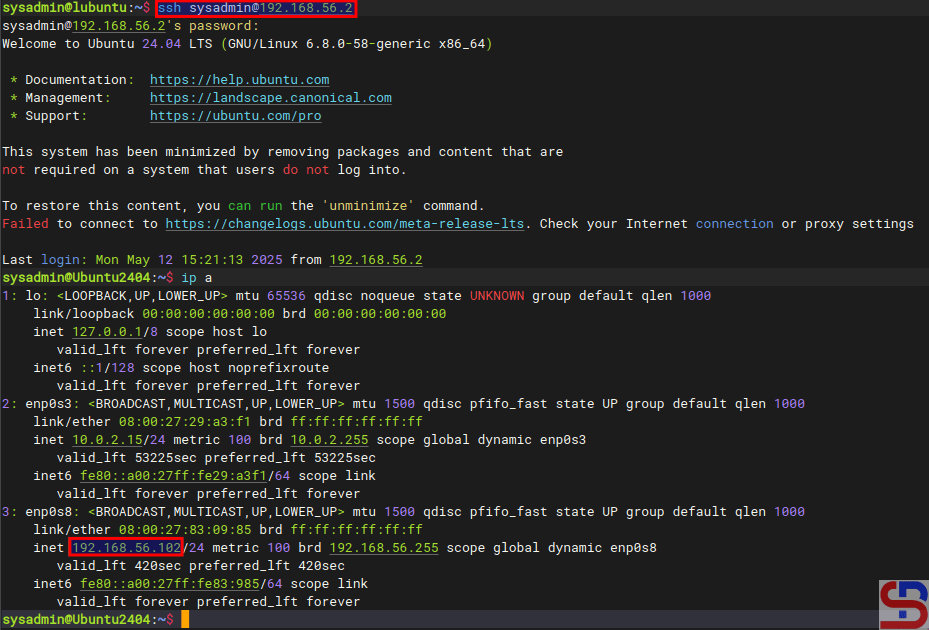
Now, try to access the Ubuntu server which has an IP 192.168.56.102 and you should be forwarded to the Rockylinux server that uses IP 192.168.56.2 like the below image:
ssh sysadmin@192.168.56.102
Test access
If you have a display like the image above, you have succeeded in making ufw as a forwarding port to a different IP/device.
Note
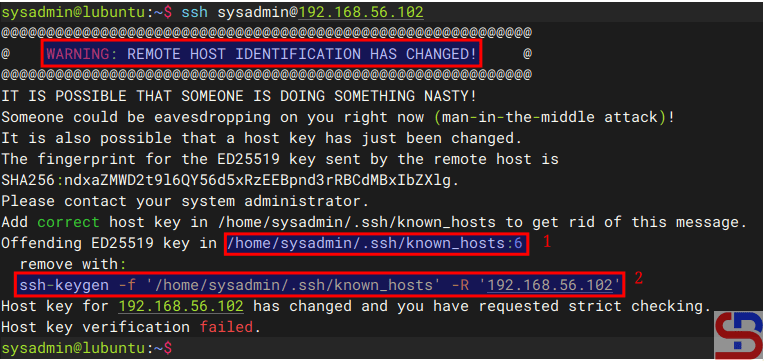
If you get an error like this:
WARNING: REMOTE HOST IDENTIFICATION HAS CHANGED!
Error when connecting the server via SSH
When you get this error, the system gives the clue to solve this error. Based on the picture above, you can go to the /home/sysadmin/.ssh/known_hosts file and delete line 6 or you run the command below:
How to Access the Server via SSH After Changing the SSH Port?
written by sysadmin | 26 June 2025
The previous article explained how to change the SSH port. Nevertheless, after I changed the port, I could not access the server via SSH using the new port.
Problem
How to access the server via SSH after changing the SSH port?
Solution
Let’s say you have changed the SSH port from port 22 to port 43210 by changing it in the /etc/ssh/sshd_config file and checking the port by typing the command below:
sudo grep -E "^Port" /etc/ssh/sshd_config
After that, restart the SSH using the command below:
sudo systemctl restart sshd
Change to the new port in SSH
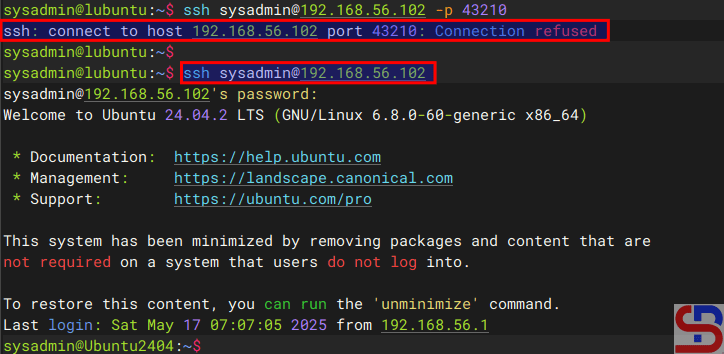
However, you can’t access the server via SSH using port 43210 but can still access via SSH port 22 as shown in the image below:
Test the result
In the remote, type the command below to check if the SSH port has changed to Port 43210 or not:
sudo ss -tulnp | grep sshd
If you find the result as shown in the image below:
Check the port
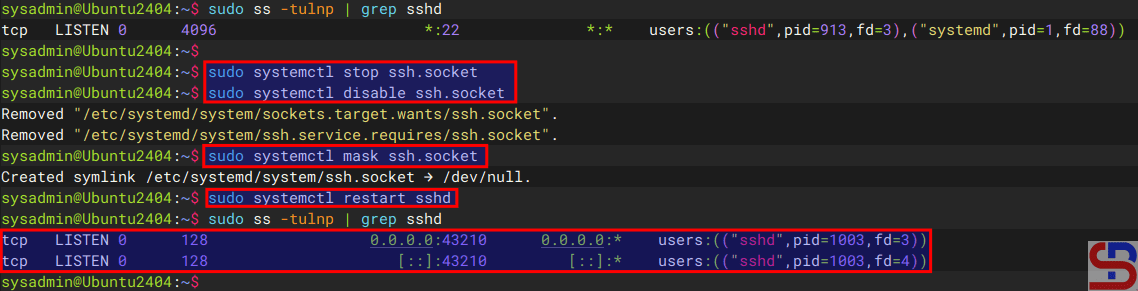
It means the SSH is still connected to port 22 and not to port 43210. Therefore, type the commands below:
You can see in the image above that the SSH port has changed to port 43210 and you should be able to access the server via SSH using port 43210.
Test the result
Note
The socket statistics, or ss, is a tool to display network socket information. This tool has the same function as netstat but has several advantages such as faster, filtering by connection state (e.g., established, time-wait), debugging high-performance networks, and so on.
Port forwarding is a networking technique used to redirect communication requests from one port number to another port number, typically across a network boundary such as a router or firewall. This technique can be used with Firewalld, available in RockyLinux, or derivative distros from RHEL such as AlmaLinux, CentOS, and others.
Problem
How to configure Firewalld to be port forwarding?
Solution
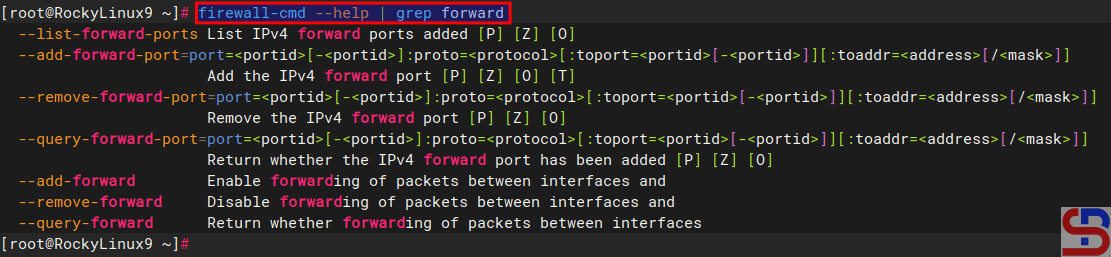
If you want to see the command in firewalls to run port forwarding, type the below command:
firewall-cmd --help | grep forward
The commands in firewalld for port forwarding
There are 2 methods of port forwarding: forward the connection of a port to one IP/device and forward the connection of a port to a different IP/device.
A. Forward to the same IP/device
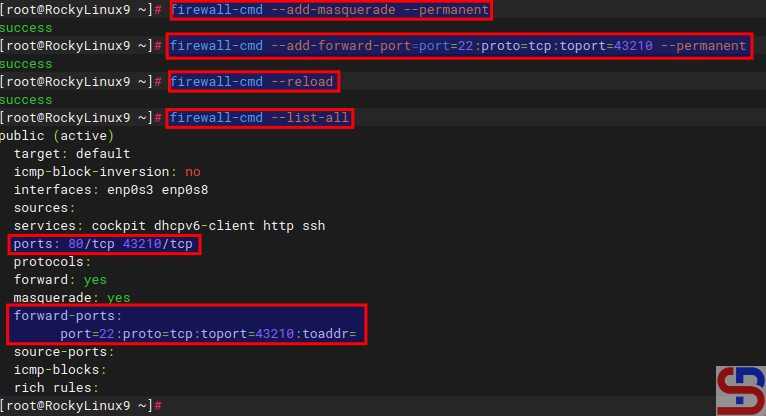
By default, you must use the format below to forward a port in a device:
You can add an option ‐-permanent if you want the rule to remain after reloading or rebooting the system. For example, you have a server with IP 192.168.56.2 where port 22 on the server is closed so to access the server via SSH must use port 43210. If you follow this article, then you must type the command below to access the server:
ssh sysadmin@192.168.56.2 -p 43210
Access the server via SSH using the port
However, by implementing a port forwarding you can access the server without typing the port. Let’s say, the firewalld is in the device, then on the device open port 43210 using the command:
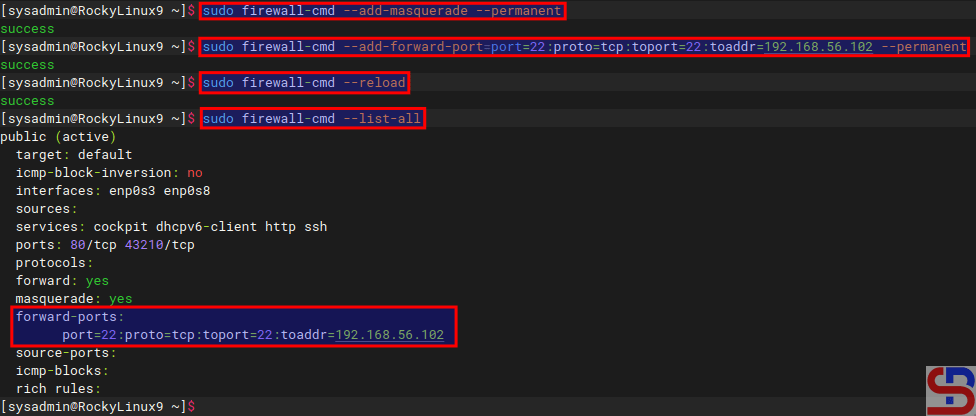
If you want the rule to stay in place after a system reboot or reload, you can add a ‐-permanent option. As an illustration, suppose you have a server with IP address 192.168.56.2 and port 22 is available. You would like users who access port 22 to forward to port 22 with IP address 192.168.56.102. Use the command below to configure firewalls:
Add a forwarding port to a different IP in firewalld
If you type the command below:
ssh sysadmin@192.168.56.2
You will be forwarded to a server that uses IP 192.168.56.102 as shown below:
Forward a port to another IP/device
Note
To see rule forwarding is in the rule in the firewall, besides being able to use the firewall-cmd ‐-list-all command, you can also use the command below:
sudo firewall-cmd --list-forward-ports
then you will see the results as shown below:
Using –list-forward-ports option
And if you want to delete a rule port forwarding in the firewall, then you can simply change the options ‐-add-forward-port to ‐-remove-forward-port so the command will change like in the command below:
How to Configure Virtual Hosts in Apache on RockyLinux?
written by sysadmin | 26 June 2025
The previous article explained how to create virtual hosts in Ubuntu. This article will explain how to configure virtual hosts in Apache on Rocky Linux or derivatives of RHEL, such as Almalinux, CentOS, and so on.
Problem
How to configure virtual hosts in Apache on RockyLinux?
Solution
Before starting the configuration, make sure that on the RockyLinux server, the Apache application is installed by using the command:
yum install -y httpd
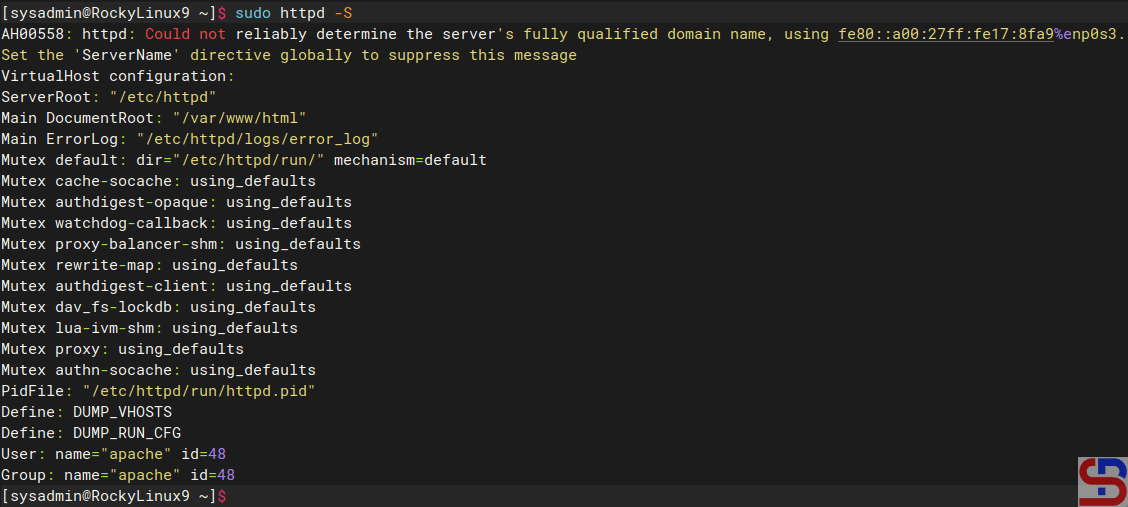
To see the default settings of Apache in RockyLinux, type the command below:
sudo httpd -S
Display default Apache configuration
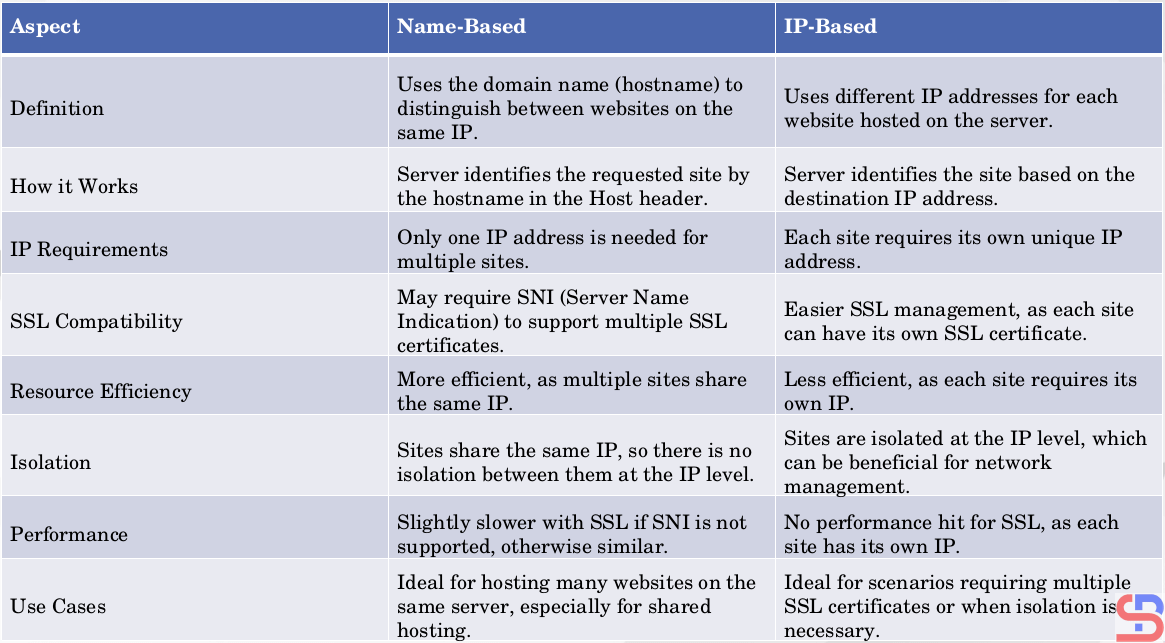
2 types of virtual hosts can be used, name-based and IP-based, and the difference between the two can be seen in the image below:
Comparison of name-based and IP-based in virtual hosts
WARNING
This article uses a private IP, not a public IP.
A. name-based virtual hosts
The meaning of name-based is that you have many websites or domains, but you only have one IP. For example, you have 2 domain names: website1.com and website2.com, but you only have 1 IP, which is 192.168.56.2. Here are the steps to get all three domains to use the same IP:
1. Create the directories and the files
By default, Apache uses the /var/www/html folder as its rootdocument, as shown in the image above. However, to make it easier to configure it, you should create a folder for each of these websites, as shown in the image below:
You can change the above directory to another directory, but for the next steps, you have to follow the directory you created.
After that, create an index.html file for each domain:
sudo sh -c 'echo "<h1> This is for website1.com domain</h1>" > /var/www/html/website1.com/index.html'
sudo sh -c 'echo "<h1> This is for website2.com domain</h1>" > /var/www/html/website2.com/index.html'
Unlike Ubuntu and its derivatives, which use the sites-available and sites-enabled folders in configuring virtual hosts, by default, RockyLinux and its derivatives do not use both folders, but the virtual hosts configuration is inserted into the /etc/httpd/conf.d/ folder. Therefore, type the command below to create two domains in the virtual hosts:
echo "<VirtualHost *:80>" | sudo tee /etc/httpd/conf.d/website1.com.conf > /dev/null
echo "     ServerName website1.com"  | sudo  tee -a /etc/httpd/conf.d/website1.com.conf > /dev/null
echo "     ServerAlias www.website1.com"    |  sudo  tee -a /etc/httpd/conf.d/website1.com.conf > /dev/null
echo "     ServerAdmin webmaster@website1.com"   | sudo  tee -a /etc/httpd/conf.d/website1.com.conf > /dev/null
echo "     DocumentRoot /var/www/html/website1.com"  | sudo  tee -a /etc/httpd/conf.d/website1.com.conf > /dev/null
echo "     ErrorLog logs/website1-error.log"   | sudo  tee -a /etc/httpd/conf.d/website1.com.conf > /dev/null
echo "     CustomLog logs/website1-access.log combined"   | sudo  tee -a /etc/httpd/conf.d/website1.com.conf > /dev/null
echo "</VirtualHost>"   | sudo  tee -a /etc/httpd/conf.d/website1.com.conf > /dev/null

echo "<VirtualHost *:80>"  | sudo tee /etc/httpd/conf.d/website2.com.conf > /dev/null
echo "     ServerName website2.com"  | sudo  tee -a /etc/httpd/conf.d/website2.com.conf > /dev/null
echo "     ServerAlias www.website2.com"  | sudo  tee -a  /etc/httpd/conf.d/website2.com.com >  /dev/null
echo "     ServerAdmin webmaster@website2.com"  | sudo  tee -a /etc/httpd/conf.d/website2.com.conf > /dev/null
echo "     DocumentRoot /var/www/html/website2.com"   | sudo  tee -a  /etc/httpd/conf.d/website2.com.conf > /dev/null
echo "     ErrorLog logs/website2-error.log"   | sudo  tee -a /etc/httpd/conf.d/website2.com.conf > /dev/null
echo "     CustomLog logs/website2-access.log combined"   | sudo  tee -a /etc/httpd/conf.d/website2.com.conf > /dev/null
echo "</VirtualHost>"   | sudo  tee -a /etc/httpd/conf.d/website2.com.conf > /dev/null
WARNING
You can change *:80 to your IP server like 192.168.56.2:80.
4. Check the configuration
Use the command below to check whether there is an Apache configuration that is an error or not by using the command below:
sudo apachectl configtest
If there is no error, then reload Apache using the command below:
sudo systemctl reload httpd
WARNING
Use the command above if there is a change in the configuration of virtual hosts in each domain.
5. Check in the browser
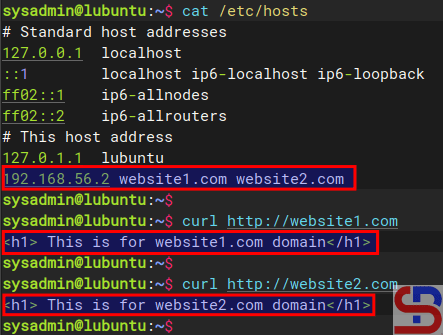
Because this article uses a private IP, you must configure it in the hosts file before you check the browser. If you use Windows, change the hosts file in C:\Windows\System32\drivers\etc\hosts or in /etc/hosts if you use Linux. In the hosts file, add the below script:
192.168.56.2 website1.com website2.com
Info
Change IP 192.168.56.2 with your RockyLinux IP server.
By default, Rockylinux activates the firewall, so you have to open the HTTP port using the command below:
Open your browser and type each of these domains, then there should be a site displayed as in the image below:
http://website1.com
Site website1.com
http://website2.com
site website2.com
If you use Linux, you can use the command below to check the result:
curl http://website1.com
curl http://website2.com
Using the curl command
By default, websites work on the web server using port 80. But you can change port 80 to another port as long as the port is not used on the server. For example, if you want the website1.com site to use port 8080, change the /etc/httpd/conf.d/website1.com.conf file and change its contents to something like this:
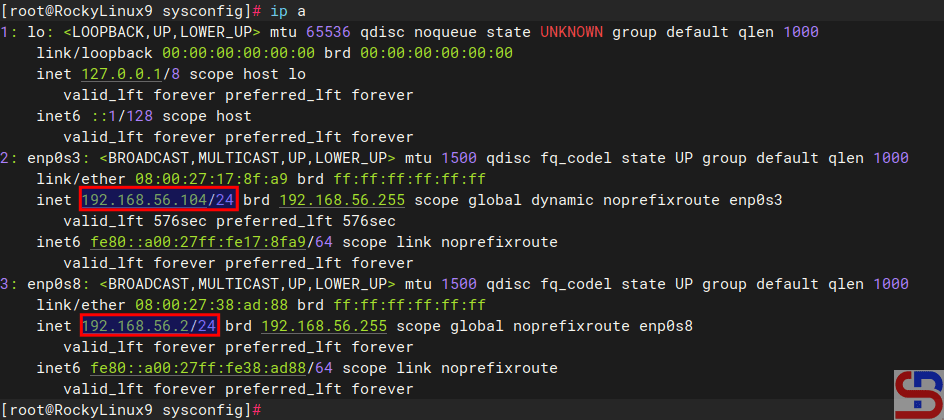
The meaning of IP-based is that you use a different IP address for each website. For example, you have 2 IPs and 2 domains, where IP 192.168.56.2 is for site1.com, and IP 192.168.56.104 is for site2.com. This article will use a server that has 2 IPs, as shown below:
Using 2 NICs in a server
1. Create the directories and the files
By default, Apache uses the /var/www/html folder as its rootdocument, as shown in the image above. However, to make it easier to configure it, you should create a folder for each of these websites, as shown in the image below:
You can change the above directory to another directory, but for the next steps, you have to follow the directory you created.
After that, create an index.html file for each domain:
sudo sh -c 'echo "<h1> This is for site1.com domain</h1>" > /var/www/html/site1.com/index.html'
sudo sh -c 'echo "h1> This is for site2.com domain</h1>" > /var/www/html/site2.com/index.html'
Unlike Ubuntu and its derivatives, which use the sites-available and sites-enabled folders in configuring virtual hosts, by default, RockyLinux and its derivatives do not use both folders, but the virtual hosts configuration is inserted into the /etc/httpd/conf.d/ folder. Therefore, type the command below to create two domains in the virtual hosts:
echo "<VirtualHost 192.168.56.2:80>" | sudo tee /etc/httpd/conf.d/website1.com.conf > /dev/null
echo "     ServerName website1.com"  | sudo  tee -a /etc/httpd/conf.d/website1.com.conf > /dev/null
echo "     ServerAlias www.website1.com"    |  sudo  tee -a /etc/httpd/conf.d/website1.com.conf > /dev/null
echo "     ServerAdmin webmaster@website1.com"   | sudo  tee -a /etc/httpd/conf.d/website1.com.conf > /dev/null
echo "     DocumentRoot /var/www/html/website1.com"  | sudo  tee -a /etc/httpd/conf.d/website1.com.conf > /dev/null
echo "     ErrorLog logs/website1-error.log"   | sudo  tee -a /etc/httpd/conf.d/website1.com.conf > /dev/null
echo "     CustomLog logs/website1-access.log combined"   | sudo  tee -a /etc/httpd/conf.d/website1.com.conf > /dev/null
echo "</VirtualHost>"   | sudo  tee -a /etc/httpd/conf.d/website1.com.conf > /dev/null

echo "<VirtualHost 192.168.56.104:80>"  | sudo tee /etc/httpd/conf.d/website2.com.conf > /dev/null
echo "     ServerName website2.com"  | sudo  tee -a /etc/httpd/conf.d/website2.com.conf > /dev/null
echo "     ServerAlias www.website2.com"  | sudo  tee -a  /etc/httpd/conf.d/website2.com.com >  /dev/null
echo "     ServerAdmin webmaster@website2.com"  | sudo  tee -a /etc/httpd/conf.d/website2.com.conf > /dev/null
echo "     DocumentRoot /var/www/html/website2.com"   | sudo  tee -a  /etc/httpd/conf.d/website2.com.conf > /dev/null
echo "     ErrorLog logs/website2-error.log"   | sudo  tee -a /etc/httpd/conf.d/website2.com.conf > /dev/null
echo "     CustomLog logs/website2-access.log combined"   | sudo  tee -a /etc/httpd/conf.d/website2.com.conf > /dev/null
echo "</VirtualHost>"   | sudo  tee -a /etc/httpd/conf.d/website2.com.conf > /dev/null
4. Check the configuration
Use the command below to check whether there is an Apache configuration that is an error or not by using the command below:
sudo apachectl configtest
If there is no error, then reload Apache using the command below:
sudo systemctl reload httpd
WARNING
Use the command above if there is a change in the configuration of virtual hosts in each domain.
5. Check in the browser
Because this article uses a private IP, you must configure it in the hosts file before you check the browser. If you use Windows, change the hosts file in C:\Windows\System32\drivers\etc\hosts or in /etc/hosts if you use Linux. In the hosts file, add the below script:
192.168.56.2   site1.com
192.168.56.104 site2.com
Info
Change IP 192.168.56.2 & IP 192.168.56.104 with your RockyLinux IP server.
By default, Rockylinux activates the firewall, so you have to open the HTTP port using the command below:
Open your browser and type each of these domains then there should be a site displayed as in the image below:
http://site1.com
Site site1.com
http://site2.com
Site site2.com
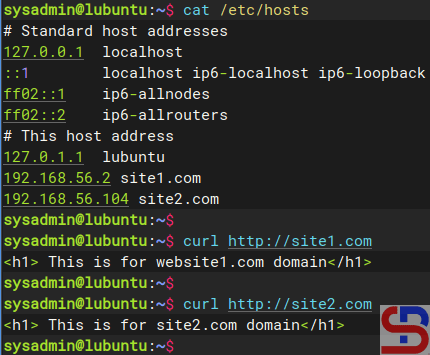
If you use Linux, you can use the command below to check the result:
curl http://site1.com
curl http://site2.com
Using the curl command
By default, websites work on the web server using port 80. But you can change port 80 to another port as long as the port is not used on the server. So, if you want the site1.com site to use port 8181, change the /etc/httpd/conf.d/website1.com.conf file and change its contents to something like this:
Reload Apache and open it in the browser by typing the command:
http://site1.com:8181
Site site1.com:8181
Note
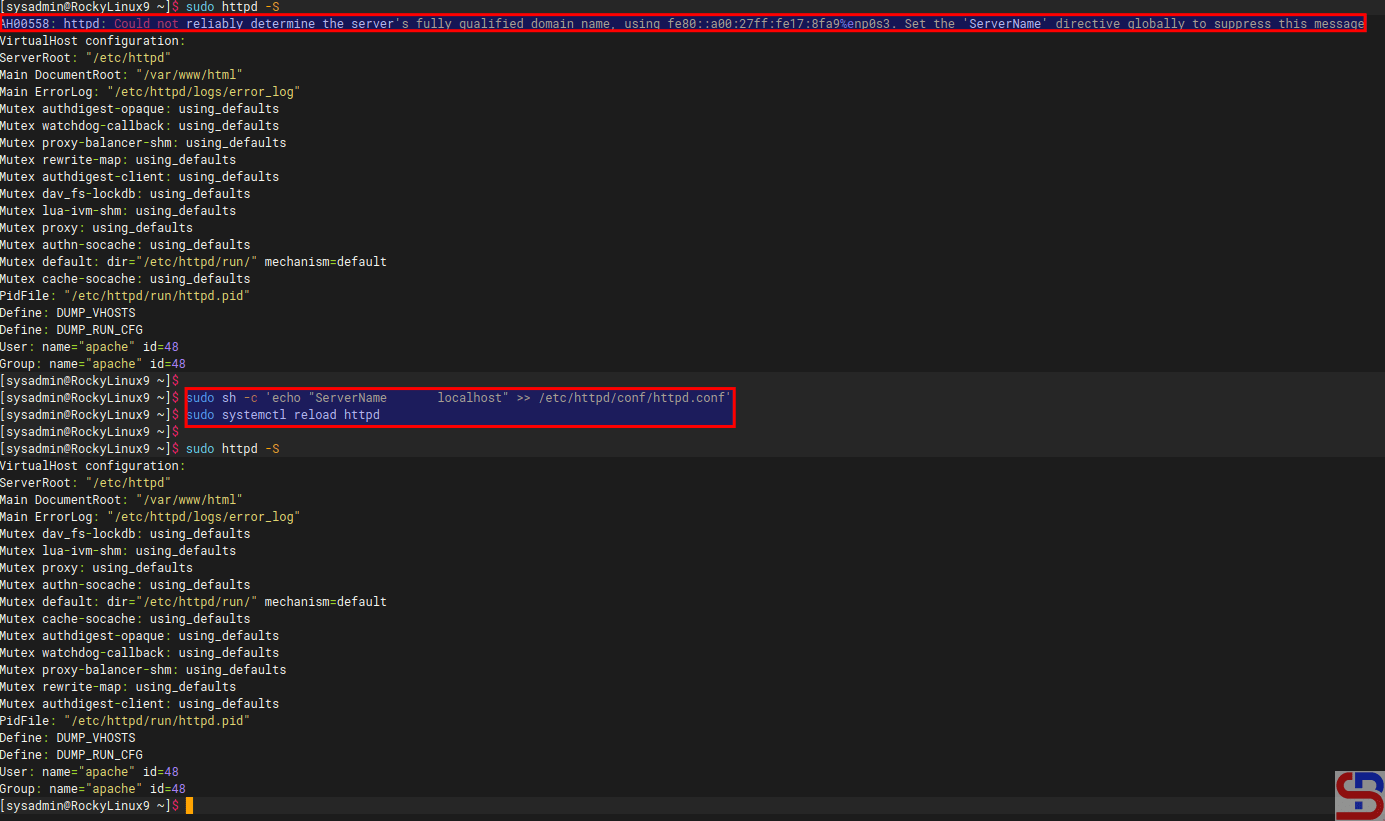
If you want to remove the error like this:
AH00558: httpd: Could not reliably determine the server’s fully qualified domain name, using 192.168.56.103. Set the ‘ServerName’ directive globally to suppress this message
Go to the /etc/httpd/conf/httpd.conf and insert the script below:
ServerName localhost
Reload the Apache, and the error will disappear, like in the image below:
How to Configure Virtual Hosts in Apache on Ubuntu?
written by sysadmin | 26 June 2025
Virtual hosts are a feature on a web server, such as Apache or Nginx, to run more than one site on a server. By using this feature, you can easily configure multiple domains on a server and save on operational costs because you only need one server or a public IP. This article will explain how to configure virtual hosts in Apache on Ubuntu.
Problem
How to configure virtual hosts in Apache on Ubuntu?
Solution
Before starting the configuration, make sure that on the Ubuntu server, the Apache application is installed by using the command:
apt update
apt install -y apache2
To see the default settings of Apache in Ubuntu, type the command below:
sudo apache2ctl -S
Display default Apache configuration
2 types of virtual hosts can be used, name-based and IP-based, and the difference between the two can be seen in the image below:
Comparison of name-based and IP-based in virtual hosts
WARNING
This article uses a private IP, not a public IP.
A. name-based virtual hosts
The meaning of name-based is that you have many websites or domains, but you only have one IP. For example, you have 2 domain names: website1.com and website2.com, but you only have 1 IP, which is 192.168.56.100. Here are the steps to get all three domains to use the same IP:
1. Create the directories and the files
By default, Apache uses the /var/www/html folder as its rootdocument, as shown in the image above. However, to make it easier to configure it, you should create a folder for each of these websites, as shown in the image below:
You can change the above directory to another directory, but for the next steps, you have to follow the directory you created.
After that, create an index.html file for each domain:
sudo sh -c 'echo "<h1> This is for website1.com domain</h1>" > /var/www/html/website1.com/index.html'
sudo sh -c 'echo "<h1> This is for website2.com domain</h1>" > /var/www/html/website2.com/index.html'
By default, 2 directories are used to manage the many domains in the virtual hosts running on that server: the sites-available and sites-enabled directories located in the /etc/apache2 directory. The sites-enabled directory contains all the configurations of the website (virtual host) that are available on the server but are not yet activated automatically. In contrast, the sites-enabled directory contains a symlink (symbolic link) to the configuration file that exists in the sites-available directory, and only the files that exist in the sites-enabled directory will be executed and activated by the web server if the web server is restarted or reloaded. Use the command below to create two websites on virtual hosts:
echo '<VirtualHost *:80>' | sudo tee /etc/apache2/sites-available/website1.com.conf > /dev/null
echo '    ServerName website1.com' | sudo tee -a /etc/apache2/sites-available/website1.com.conf > /dev/null
echo '    ServerAlias www.website1.com' | sudo tee -a /etc/apache2/sites-available/website1.com.conf > /dev/null
echo '    ServerAdmin webmaster@website1.com' | sudo tee -a /etc/apache2/sites-available/website1.com.conf > /dev/null
echo '    DocumentRoot /var/www/html/website1.com' | sudo tee -a /etc/apache2/sites-available/website1.com.conf > /dev/null
echo '    ErrorLog ${APACHE_LOG_DIR}/website1-error.log' | sudo tee -a /etc/apache2/sites-available/website1.com.conf > /dev/null
echo '    CustomLog ${APACHE_LOG_DIR}/website1-access.log combined' | sudo tee -a /etc/apache2/sites-available/website1.com.conf > /dev/null
echo '</VirtualHost>' | sudo tee -a /etc/apache2/sites-available/website1.com.conf > /dev/null

echo '<VirtualHost *:80>' | sudo tee /etc/apache2/sites-available/website2.com.conf > /dev/null
echo '    ServerName website2.com' | sudo tee -a /etc/apache2/sites-available/website2.com.conf > /dev/null
echo '    ServerAlias www.website2.com' | sudo tee -a /etc/apache2/sites-available/website2.com.conf > /dev/null
echo '    ServerAdmin webmaster@website2.com' | sudo tee -a /etc/apache2/sites-available/website2.com.conf > /dev/null
echo '    DocumentRoot /var/www/html/website2.com' | sudo tee -a /etc/apache2/sites-available/website2.com.conf > /dev/null
echo '    ErrorLog ${APACHE_LOG_DIR}/website2-error.log' | sudo tee -a /etc/apache2/sites-available/website2.com.conf > /dev/null
echo '    CustomLog ${APACHE_LOG_DIR}/website2-access.log combined' | sudo tee -a /etc/apache2/sites-available/website2.com.conf > /dev/null
echo '</VirtualHost>' | sudo tee -a /etc/apache2/sites-available/website2.com.conf > /dev/null
WARNING
You can change *:80 to your IP server like 192.168.56.102:80.
Then type the command below to enable the Virtual Hosts configuration:
Type the command below to disable the default virtual hosts configuration:
sudo a2dissite 000-default.conf
WARNING
If you want to change the configuration of virtual hosts, you have to change it in the sites-available directory and not in the sites-enabled directory.
5. Check the configuration
Use the command below to check whether there is an Apache configuration that is an error or not by using the command below:
sudo apache2ctl configtest
If there is no error, then reload Apache using the command below:
sudo systemctl reload apache2
WARNING
Use the command above if there is a change in the configuration of virtual hosts in each domain.
6. Check in the browser
Because this article uses a private IP, you must configure it in the hosts file before you check the browser. If you use Windows, change the hosts file in C:\Windows\System32\drivers\etc\hosts or in /etc/hosts if you use Linux. In the hosts file, add the below script:
192.168.56.102 website1.com website2.com
Info
Change IP 192.168.56.102 with your Ubuntu IP server.
If your Ubuntu server uses a firewall, type the command below to open the port for Apache:
sudo ufw allow 'Apache Full'
Open your browser and type each of these domains, then there should be a site displayed as in the image below:
http://website1.com
Site website1.com
http://website2.com
site website2.com
If you use Linux, you can use the command below to check the result:
curl http://website1.com
curl http://website2.com
Using the curl command
By default, websites work on the web server using port 80. But you can change port 80 to another port as long as the port is not used on the server. For example, if you want the website1.com site to use port 8080, change the /etc/apache2/sites-available/website1.com.conf file and change its contents to something like this:
If you use the firewall in the Ubuntu server, don’t forget to open port 8080 using the command below:
sudo ufw allow 8080
Reload Apache and open it in the browser by typing the command:
http://website1.com:8080
Site website1.com:8080
B. IP-based virtual hosts
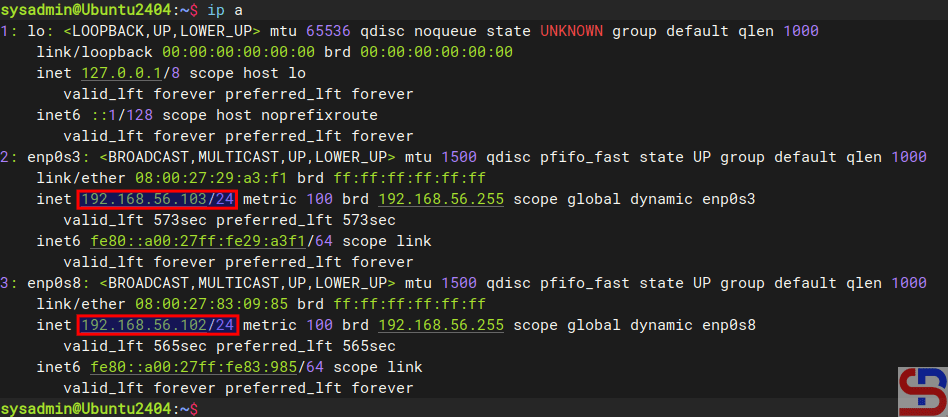
The meaning of IP-based is that you use a different IP address for each website. For example, you have 2 IPs and 2 domains, where IP 192.168.56.102 is for site1.com, and IP 192.168.56.103 is for site2.com. This article will use a server that has 2 IPs, as shown below:
Using 2 NICs in a server
1. Create the directories and the files
By default, Apache uses the /var/www/html folder as its rootdocument, as shown in the image above. However, to make it easier to configure it, you should create a folder for each of these websites, as shown in the image below:
You can change the above directory to another directory, but for the next steps, you have to follow the directory you created.
After that, create an index.html file for each domain:
sudo sh -c 'echo "<h1> This is for site1.com domain</h1>" > /var/www/html/site1.com/index.html'
sudo sh -c 'echo "<h1> This is for site2.com domain</h1>" > /var/www/html/site2.com/index.html'
By default, 2 directories are used to manage the many domains in the virtual hosts running on that server: the sites-available and sites-enabled directories located in the /etc/apache2 directory. The sites-enabled directory contains all the configuration of the website (virtual host) that is available on the server, but is not yet activated automatically while the sites-enabled directory contains a symlink (symbolic link) to the configuration file that exists in the sites-available directory and only the files that exist in the site-enabled directory will be executed and activated by the web server if the webserver is restarted or reloaded. Use the command below to create a virtual hosts directory:
echo '<VirtualHost 192.168.56.102:80>' | sudo tee /etc/apache2/sites-available/site1.com.conf > /dev/null
echo '    ServerName site1.com' | sudo tee -a /etc/apache2/sites-available/site1.com.conf > /dev/null
echo '    ServerAlias www.site1.com' | sudo tee -a /etc/apache2/sites-available/site1.com.conf > /dev/null
echo '    ServerAdmin webmaster@site1.com' | sudo tee -a /etc/apache2/sites-available/site1.com.conf > /dev/null
echo '    DocumentRoot /var/www/html/site1.com' | sudo tee -a /etc/apache2/sites-available/site1.com.conf > /dev/null
echo '    ErrorLog ${APACHE_LOG_DIR}/site1-error.log' | sudo tee -a /etc/apache2/sites-available/site1.com.conf > /dev/null
echo '    CustomLog ${APACHE_LOG_DIR}/site1-access.log combined' | sudo tee -a /etc/apache2/sites-available/site1.com.conf > /dev/null
echo '</VirtualHost>' | sudo tee -a /etc/apache2/sites-available/site1.com.conf > /dev/null

echo '<VirtualHost 192.168.56.103:80>' | sudo tee /etc/apache2/sites-available/site2.com.conf > /dev/null
echo '    ServerName site2.com' | sudo tee -a /etc/apache2/sites-available/site2.com.conf > /dev/null
echo '    ServerAlias www.site2.com' | sudo tee -a /etc/apache2/sites-available/site2.com.conf > /dev/null
echo '    ServerAdmin webmaster@site2.com' | sudo tee -a /etc/apache2/sites-available/site2.com.conf > /dev/null
echo '    DocumentRoot /var/www/html/site2.com' | sudo tee -a /etc/apache2/sites-available/site2.com.conf > /dev/null
echo '    ErrorLog ${APACHE_LOG_DIR}/site2-error.log' | sudo tee -a /etc/apache2/sites-available/site2.com.conf > /dev/null
echo '    CustomLog ${APACHE_LOG_DIR}/site2-access.log combined' | sudo tee -a /etc/apache2/sites-available/site2.com.conf > /dev/null
echo '</VirtualHost>' | sudo tee -a /etc/apache2/sites-available/site2.com.conf > /dev/null
WARNING
If you want to change the configuration of virtual hosts, you have to change it in the sites-available directory and not in the sites-enabled directory.
Then type the command below to enable the Virtual Hosts configuration:
Type the command below to disable the default virtual hosts configuration:
sudo a2dissite 000-default.conf
5. Check the configuration
Use the command below to check whether there is an Apache configuration that is an error or not by using the command below:
sudo apache2ctl configtest
If there is no error, then reload Apache using the command below:
sudo systemctl reload apache2
WARNING
Use the command above if there is a change in the configuration of virtual hosts in each domain.
6. Check in the browser
Because this article uses a private IP, you must configure it in the hosts file before you check the browser. If you use Windows, change the hosts file in C:\Windows\System32\drivers\etc\hosts or in /etc/hosts if you use Linux. In the hosts file, add the below script:
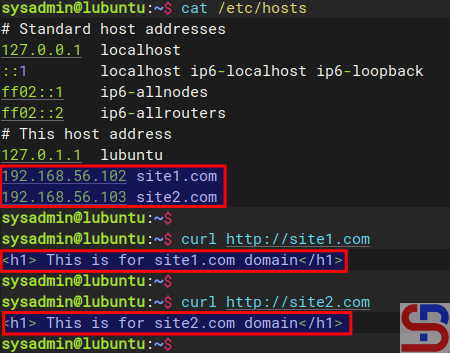
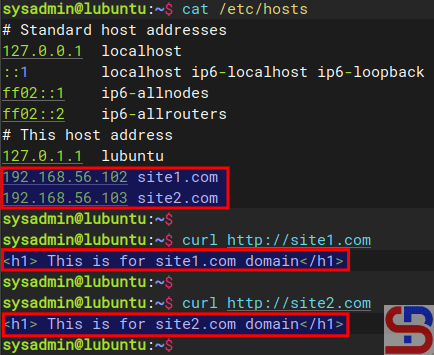
192.168.56.102  site1.com
192.168.56.103   site2.com
Info
Change IP 192.168.56.102 and IP 192.168.56.103 with your Ubuntu IP server.
If your Ubuntu server uses a firewall, type the command below to open the port for Apache:
sudo ufw allow 'Apache Full'
Open your browser and type each of these domains, then there should be a site displayed as in the image below:
http://site1.com
Site site1.com
http://site2.com
Site site2.com
If you use Linux, you can use the command below to check the result:
curl http://site1.com
curl http://site2.com
Using the curl command
By default, websites work on the web server using port 80. But you can change port 80 to another port as long as the port is not used on the server. So, if you want the site1.com site to use port 8181, change the /etc/apache2/sites-available/site1.com.conf file and change its contents to something like this:
If you use the firewall in your Ubuntu server, don’t forget to open port 8181 using the command below:
sudo ufw allow 8181
Reload Apache and open it in the browser by typing the command:
http://site1.com:8181
Site site1.com:8181
Note
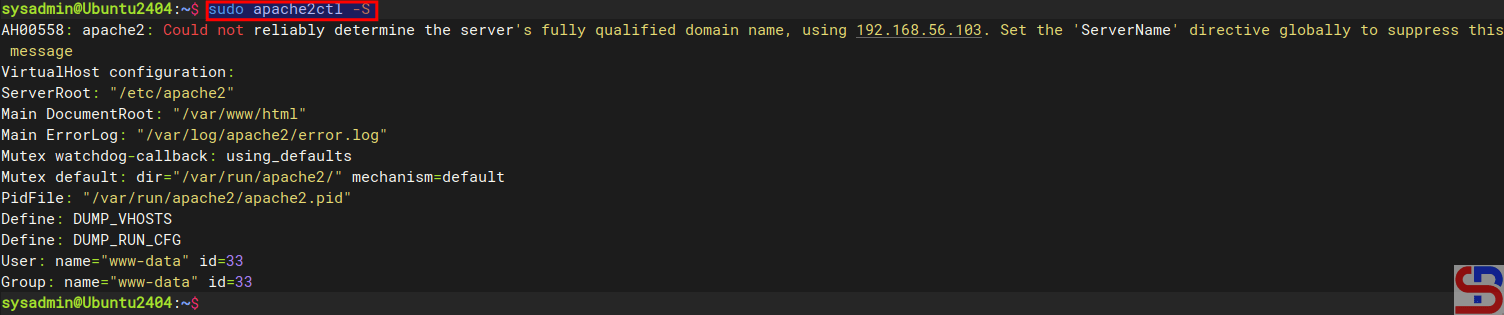
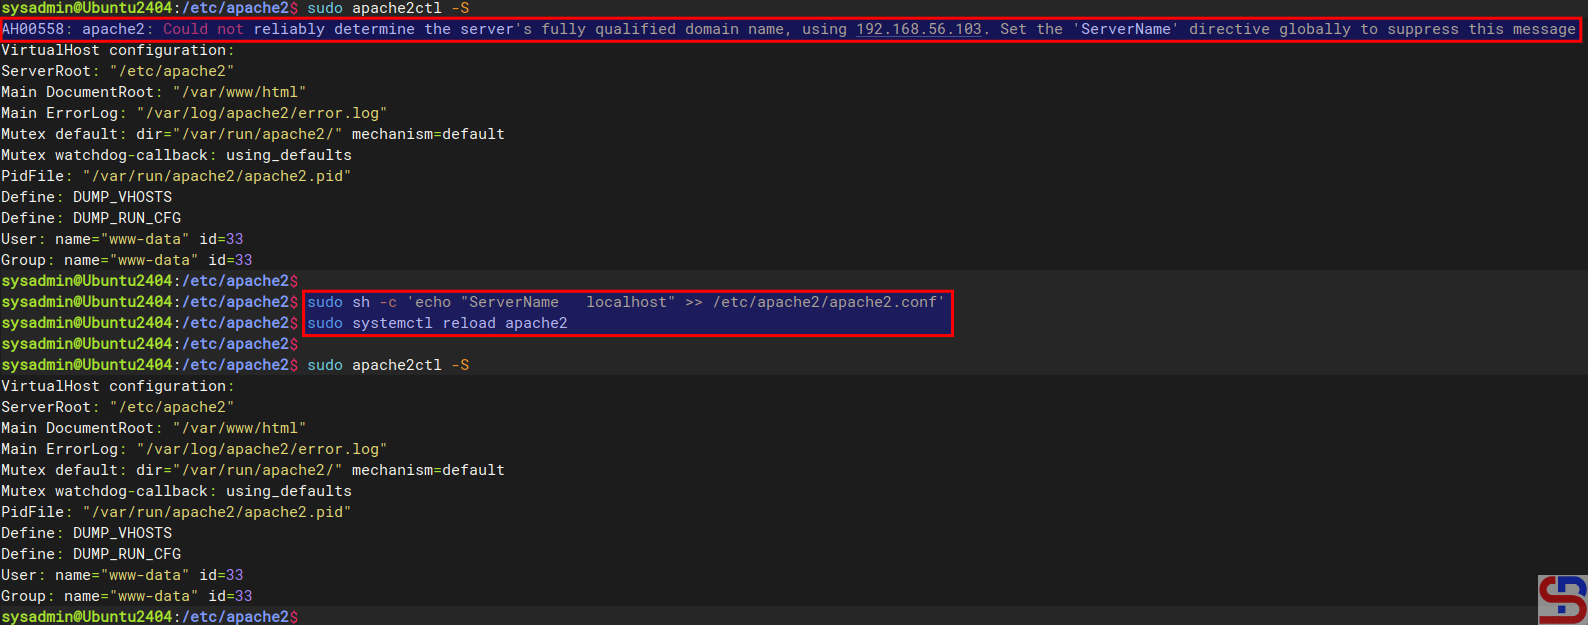
If you want to remove the error like this:
AH00558: apache2: Could not reliably determine the server’s fully qualified domain name, using 192.168.56.103. Set the ‘ServerName’ directive globally to suppress this message
Go to the /etc/apache2/apache2.conf and insert the script below:
ServerName localhost
Reload the Apache, and the error will disappear, like in the image below:
Remove error AH00558
WARNING
You can change the localhost to your domain name, like website1.com or another domain name.
The previous article explained how to make storage using volume in Docker. This article will explain how to make storage using Bind Mount.
Problem
How to storage mount using bind mount on Docker?
Solution
A bind mount is a method of hosting a directory or file that is directly mounted into a container. Since they aren’t isolated by Docker, both non-Docker processes on the host and container processes can modify the mounted files simultaneously. So, you can change the data from the host, and those changes will be reflected in the container. This method is useful for development environments where code must be updated and tested in real-time. There are 2 ways when use bind mount:
A. using -v option
This option (using -v or ‐-volume) uses three fields, separated by colon characters (:). The fields must be in the correct order, and the meaning of each field is not immediately obvious. To use this option, use the format below:
docker run -d –namecontainer_name-v /path/folder/in/server:/path/folder/in/container[:opts] image_name:tag
INFO
opts is the abbreviation for options like readonly, private, z, Z, and so on. The third field is optional, and is separated by colon characters. You can see the options and their descriptions on this page.
To see more detailed information about mounting a container, use the format below:
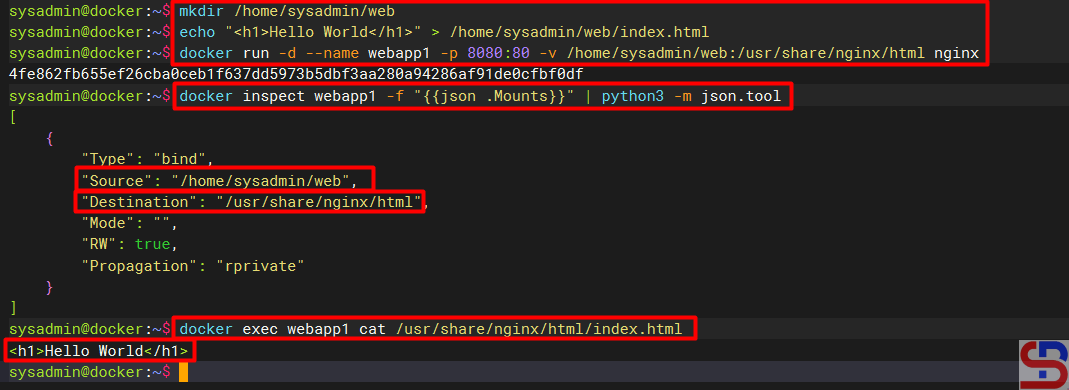
For example, you want to create a container with a nginx webserver that can be accessed with port 8080 with sources in folder /home/sysadmin/web and destination to the folder /usr/share/nginx/html on container, so first make a web folder in the server, and create a simple site then create a container using the command below:
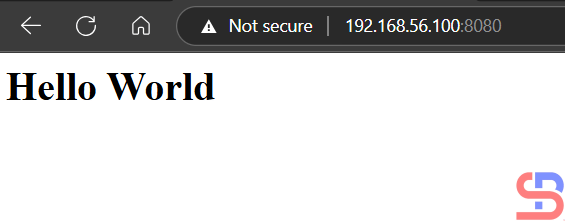
You can see from the image above that the index.html file in the container only displays the hello world sentence, so when you open the browser then the displays in the browser as shown below:
The display of the website
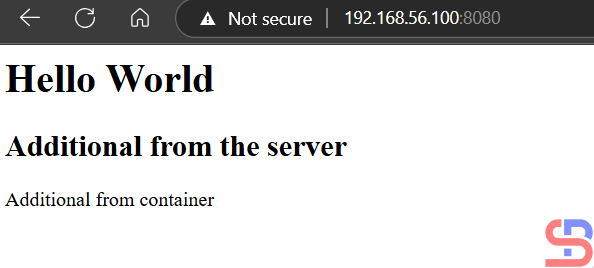
You can change the appearance of the website in the index.html file on the server or in the container. For example, you add the script below to the file on the server:
echo "<h2>Additional from server</h2>" >> web/index.html
Likewise, if you add the script below to the container:
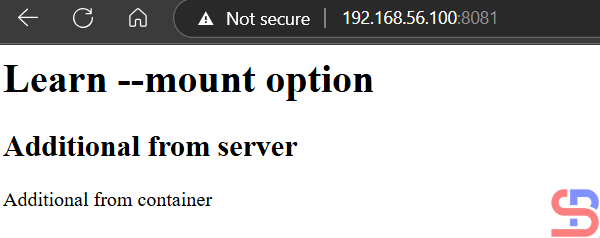
Both scripts will be included in the index.html file and will be displayed on the website as shown below:
Display of the website after additional scripts
B. Using ‐-mount Option
In general, these options are more explicit and verbose. This option consists of multiple key-value pairs, separated by commas, and each consisting of a <key>=<value> tuple. The biggest difference is that the -v syntax combines all the options in one field, while the –mount syntax separates them. The –mount syntax is more verbose than -v or –volume, but the order of the keys is not significant, and it is easier to understand. To use this option, use the format below:
docker run -d --namecontainer_name--mount type=type_mount,source=/path/folder/in/server,destination=/path/folder/in/container[,<key>=<value>...] image_name:tag
INFO
The third field is optional, and is separated by commas like readonly, bind-propagation, and so on. You can see the options and their descriptions on this page.
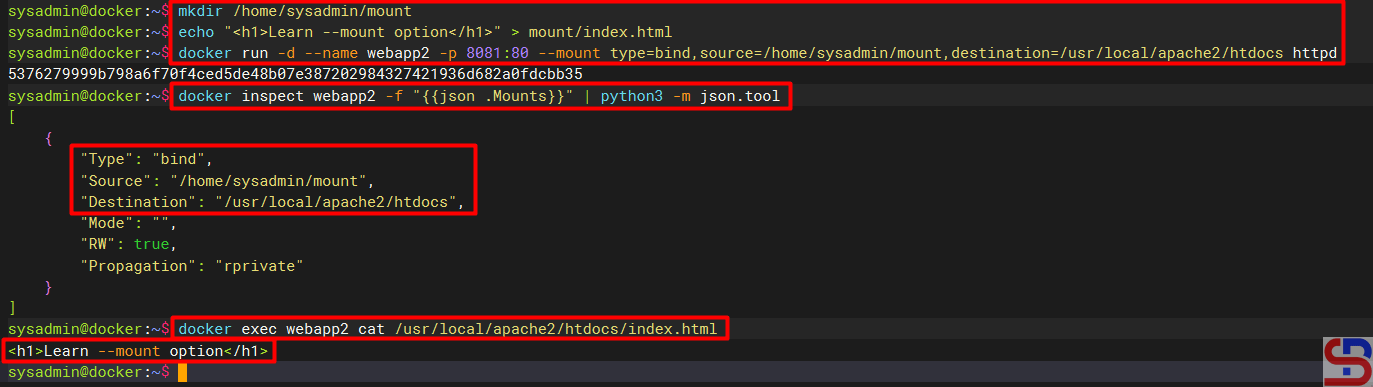
For example, you want to create a container with an Apache web server that can be accessed on port 8081 with sources in the folder /home/sysadmin/mount and destination to the folder /usr/local/apache2/htdocs on the container, so first make the mount folder in the server, then make the container using the command below:
Like using the -v option, you can change the appearance of the website in the index.html file on the server or in the container. For example, you add the script below to the file on the server:
echo "<h2>Additional from server</h2>" >> mount/index.html
Likewise, if you add the script below to the container:
NFS or Network File Sharing is a protocol that allows you to share directories and files with other Linux clients over a network. Similar to locally created folders, an NFS file share is accessible when mounted on a client computer. When you have limited disk space and need to share public data between client machines, NFS is especially helpful.
Problem
How to install and configure NFS on Linux?
Solution
This article will explain how to install and configure NFS on 3 Linux distros: Rockylinux, Ubuntu, and OpenSuse and this article should work in each of their derivatives of the three distros.
A. On the server
Following are the steps to install and configure NFS:
1. Install NFS
I install NFS in the server with IP 192.168.56.2, and to install the NFS application on the Linux server, use the command below:
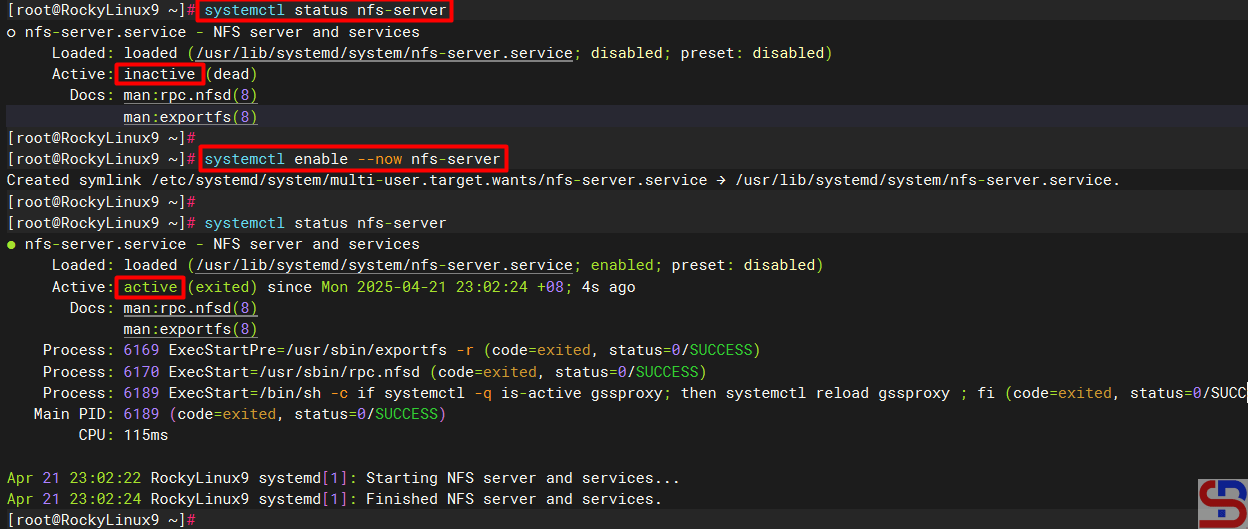
If you see the NFS status is still not on, use the command below to turn on the NFS service:
sudo systemctl enable --now nfs-server
Check the NFS service status
Sometimes you have to check the nfs-mountd service using the command below:
sudo systemctl status nfs-mountd
If the service is not on the server, then use the command below to turn on the service:
sudo systemctl start nfs-mountd
3. Check the rpcbind status
Make sure that the rpcbind service is actively used by NFS for the mapping port. Use the command below to check the status of the service:
sudo systemctl status rpcbind
If the service is not active, use the command below to start the service:
sudo systemctl enable -now rpcbind
4. Check NFS and Portmap
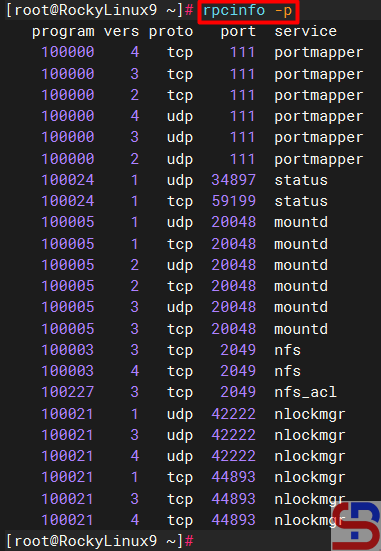
To see if NFS and portmap (Portmap is a server that converts RPC program numbers into DARPA protocol port numbers. It must be running to make RPC calls) are running on the server, use the command below:
sudo rpcinfo -p
Check whether NFS and portmap run in the server or not
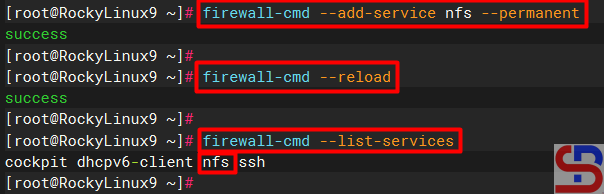
5. Configure firewall
If you still turn on the firewall on Linux, use the command below to open the NFS port (Port NFS is TCP Port 2049):
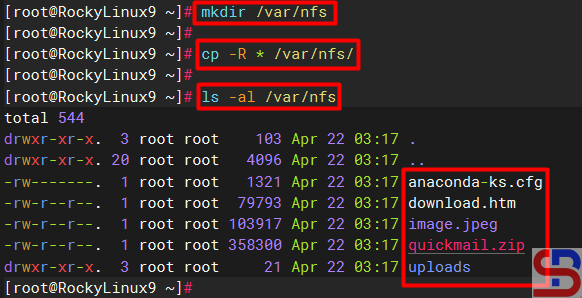
Create a folder to collect NFS files and folders and I make it in the folder /var/nfs using the command below:
mkdir /var/nfs
After that, copy the file(s) and folder(s) that you want to share into the folder as shown below:
Copy the file(s) and folder(s) into the folder sharing
7. Define an Export File
To grant access to NFS clients, you need to define an export file and it is typically located at /etc/exports. Use the format below to define an export file:
/folder/path accessible-host-ip-address(options)
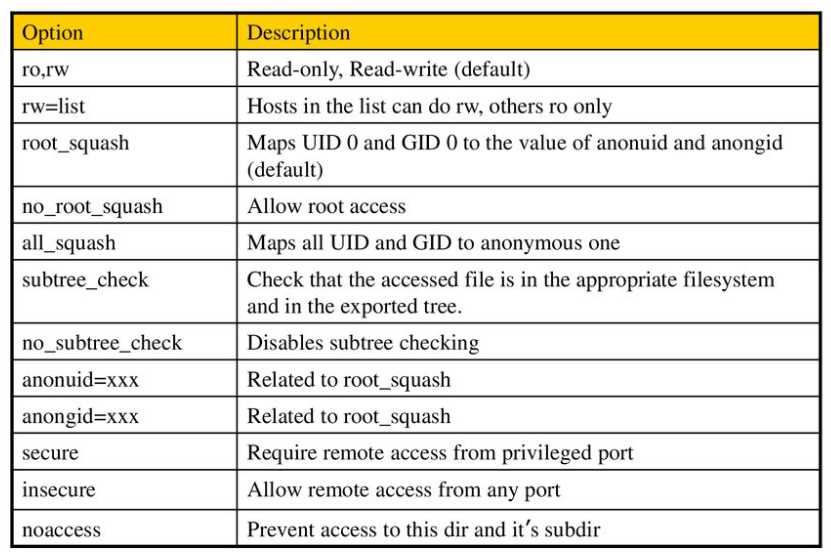
The options you can use can be seen in the image below:
You can use more than one option like (rw,sync,no_subtree_check). By default, NFS uses the ro option where the client can only read the file or folder in the folder sharing. In this article, I only want the folder sharing can only be accessed by users who only use IP 192.168.56.0/24 and the folder can be changed by the users, then use the command below to enter the script into the exports file:
Use the command below to make the folder sharing available to the clients:
sudo exportfs -r
Use the command below to view the exports file:
showmount -e
To see which hosts access file sharing, use the command below:
sudo netstat -an | grep 2049
B. On the client
Following are the steps to install and configure NFS:
1. Install NFS client
Use the command below to install the NFS client:
RockyLinux
sudo dnf install -y nfs-utils
Ubuntu
sudo apt-get install -y nfs-common
OpenSUSE
zypper install -y nfs-client*
2. Check the ports in the NFS server
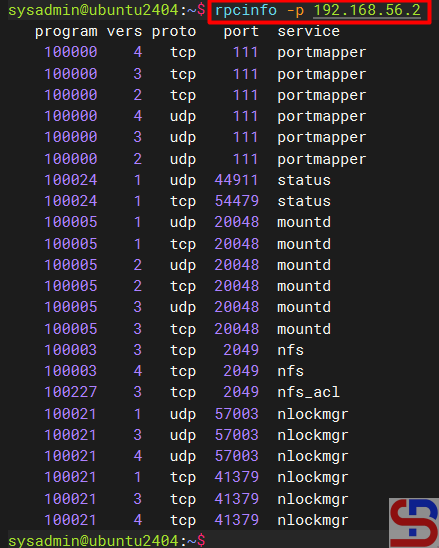
Use the command below to check whether the client can access the ports (port 2049 and 111) in the NFS server or not (the IP server NFS is 192.168.56.2):
rpcinfo -p 192.168.56.2
Check the connection between the client to the NFS server
2. Make and mount a folder
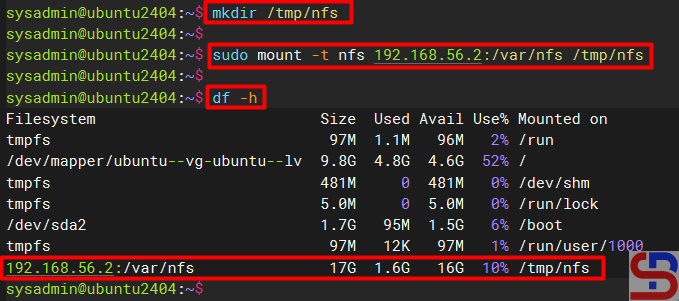
Make the folder where we want to mount the NFS shares from the server, for example, I made a folder in /tmp/nfs:
mkdir /tmp/nfs
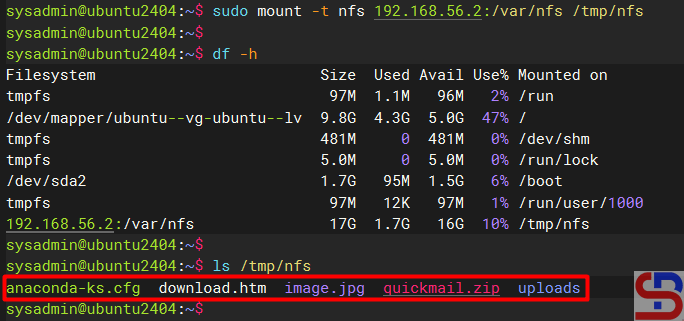
After that the mount folder with the NFS server using the format below:
sudo mount -t nfs 192.168.56.2:/var/nfs /tmp/nfs
Mount the folder to the folder-sharing
INFO
You can use the -v option so that the above command becomes: sudo mount -v -t nfs 192.168.56.2:/var/nfs /tmp/nfs
to display the logs when mounting so that you can know if there is an error when mounting.
You should access the folder sharing on the NFS server as shown below:
Access to the NFS server
You can use the command below to see the NFS client connection:
sudo mount | grep -i nfs
Check the status of the NFS client
4. Simulation test
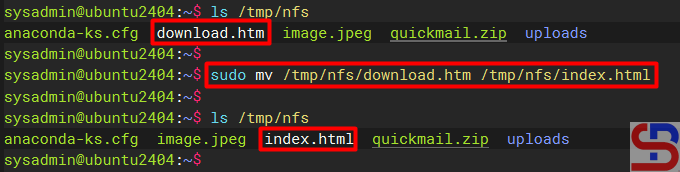
Try to do the simulation by changing the file name in the folder sharing. I try to rename the download.htm file to index.html using the command below:
sudo mv /tmp/nfs/download.htm /tmp/nfs/index.html
The file was successfully changed as shown below:
Rename the file in NFS
5. Configure the fstab file
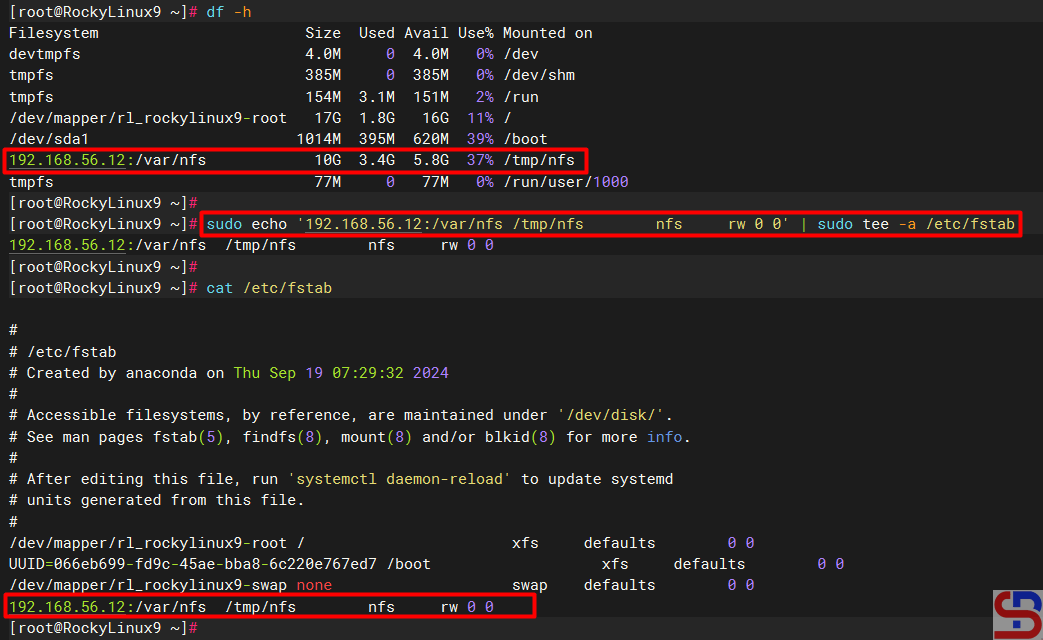
To keep the folder sharing is still connected in the client after the client is rebooted, configure the /etc/fstab file using the command below:
echo '192.168.56.2:/var/nfs /tmp/nfs nfs rw 0 0' | sudo tee -a /etc/fstab
Insert the script to fstab file
C. Errors and solutions
Below are errors that often appear and their solutions:
1. No options for /var/nfs
Sometimes when you run the exportfs -r command, there is an error as below:
exportfs: No options for /var/nfs/192.168.56.0/24(rw) : suggest (sync) to avoid warning exportfs: Failed to stat /var/nfs/192.168.56.0/24(rw): No such file or directory
Error failed to stat
To eliminate the error, check in the /etc/exports file and you have to fix the writing in the file from:
/var/nfs/192.168.56.0/24(rw)
changed into
/var/nfs 192.168.56.0/24(rw)
After that, run the exportfs -r command again and the error should disappear.
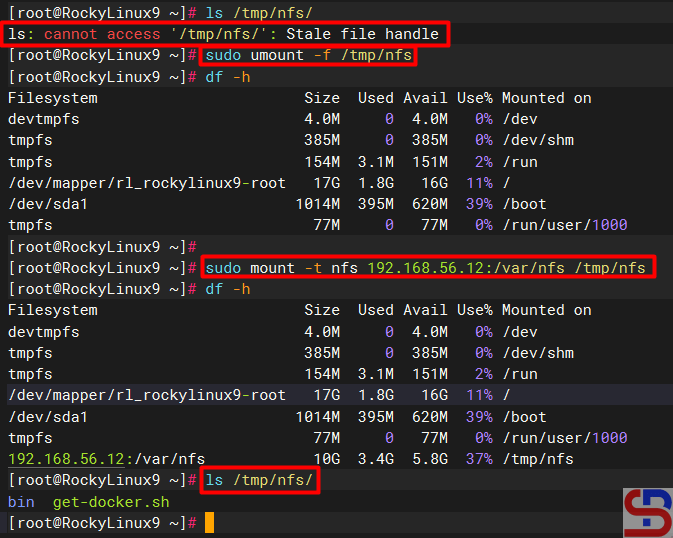
2. Error Stale file handle
When you want to connect a client to the NFS server there is an error like the below (usually this happens if there is an error like number 1 or other causes on the NFS server):
Stale file handle
Stale file handle error
To solve this error you have to unmount on the side of the client and then mount back as shown below:
Solve the stale file handle error
3. RPC: Program not registered
When typing the showmount -e command on the NFS server there is an error as below:
clnt_create: RPC: Program not registered
Error Program Not Registered
The solution is that you have to run the command below so that the nfs-mountd service runs on the server:
systemctl start nfs-mountd
4. Permission denied
When you want to connect to the NFS server or when you want to change the file in the NFS, there is an error like this:
Permission denied
Error Permission denied
The solution is to check the exports file on the NFS server and make sure that the folder has been given permissions as in step 5 in the server section.
Note
If you want to block an IP address of a host so the host can’t access the NFS server, use the command below to block the IP host:
In my experience, you can’t immediately block a client to NFS if the client is still connected to the NFS. You have to wait until the client disconnects to the NFS server, either the host reboots or others.