How to Monitor Containers in Docker?

After you run containers in Docker on your server or your Docker Host, you should monitor all existing containers to find out the performance of each container.


Problem

How to monitor containers in Docker?


Solution

There are 2 methods for container monitors in Docker:

A. Via CLI

In CLI, to monitor all containers in Docker, you can use the command:

docker stats


You will see the display as below:

Using the docker stats command


From the image above, you can see that the command displays the results in streaming, and to exit from the command above, press Ctrl+Z or Ctrl-C. If you don’t want to display the results in streaming mode, then use the command below:

docker stats --no-stream 

Display monitor containers in Docker without stream


B. Via Website

If you want to monitor Docker via a website, you can use the Portainer tool. Portainer is a tool for managing containers through a browser that can support Docker host, Docker Swarm, Nomad, and Kubernetes. It has 2 components, namely Portainer Server, which is used to manage containers, networks, and environments, and Portainer Agent is the component installed on another Docker system to enable communication with the server. Portainer has 2 editions, namely Portainer Business Edition or PBE and Portainer Community Edition or PCE, where both editions at the time of this writing (April 2025) have version 2.27.3. This article will discuss how to install Portainer Community Edition. Here are the steps:

1. Create Docker Volume

Type the command below to create a new volume in Docker:

docker volume create portainer_data


2. Install Portainer

Type the command below to install the latest version of Portainer:

docker run -d \
-p 8000:8000 \
-p 9443:9443 \
--name portainer \
--restart=always \
-v /var/run/docker.sock:/var/run/docker.sock \
-v portainer_data:/data portainer/portainer-ce

Install portainer


3. Check the Portainer

The following command can be used to determine whether Portainer is operating or not:

docker ps

Check the container


4. Access the Portainer

After that, open your browser and type:

https://your_IP_server:9443


There will be an image like below:

Click Advanced


A picture similar to the one below will appear when you click the Advanced button:
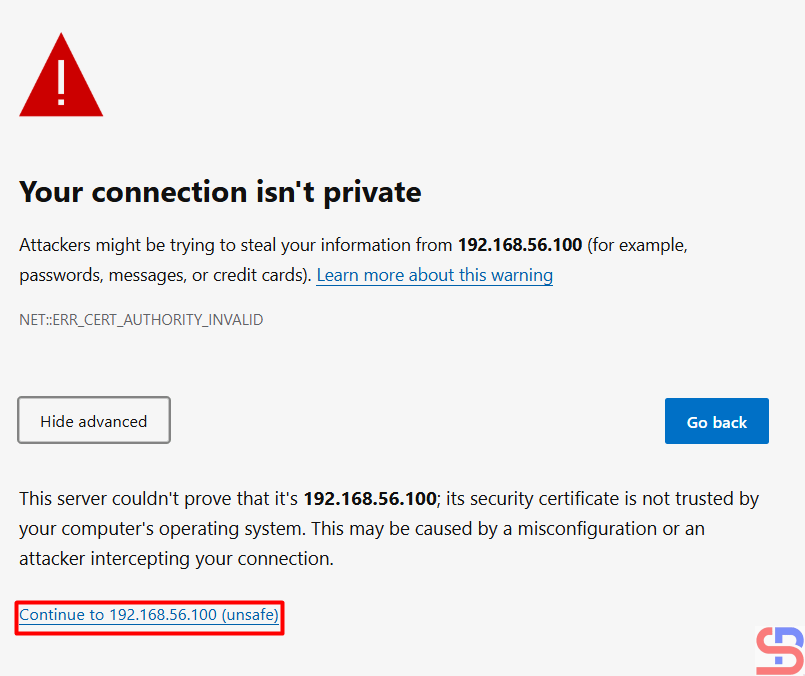
Click the unsafe link


Click the unsafe link in your browser, and then there will be an image like below:
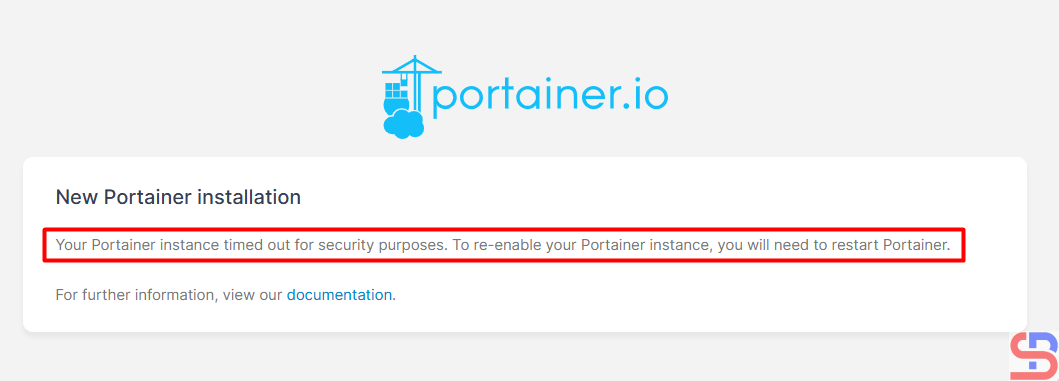
Restart Portainer


If you have an error like the picture above, then restart Portainer by running the command below:

docker restart portainer


Enter the desired name and password, then click the Create user button, and you  will see an image below:
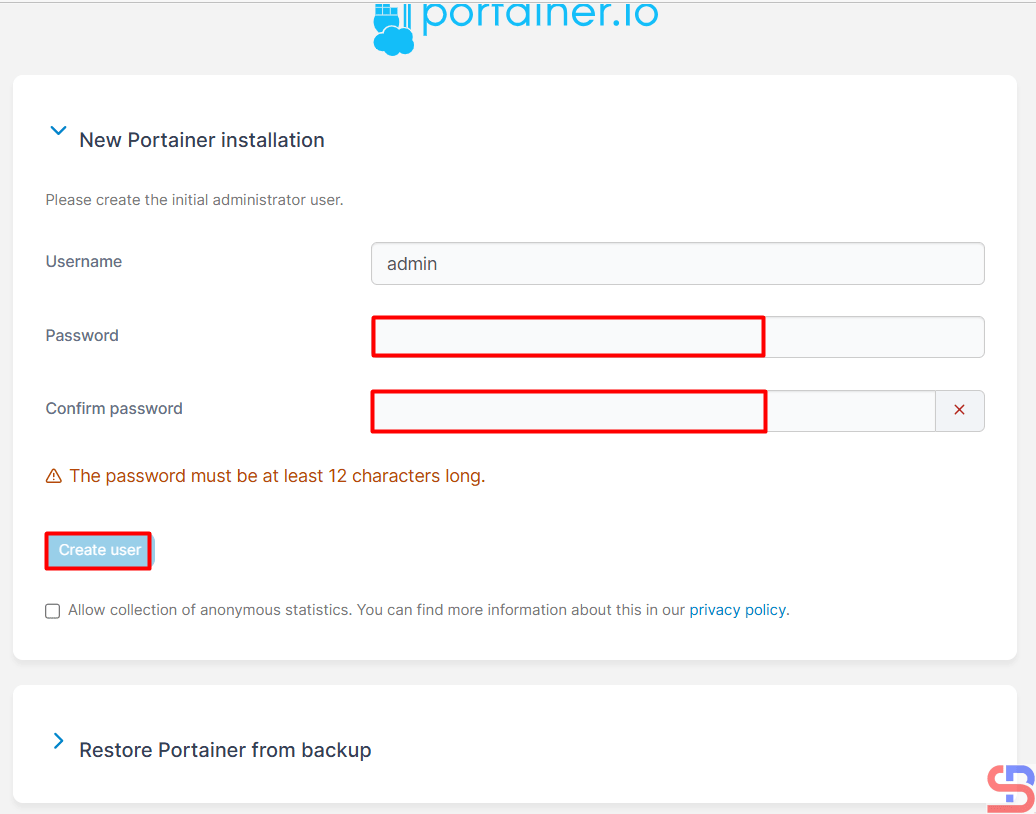
Write the username and password


The Portainer dashboard will appear. Click the Get Started box like in the above image, and there will be an image below:

Click the Get Started box


There will be an image below:

The Portainer dashboard


Click on the red box, and there will be an image below:
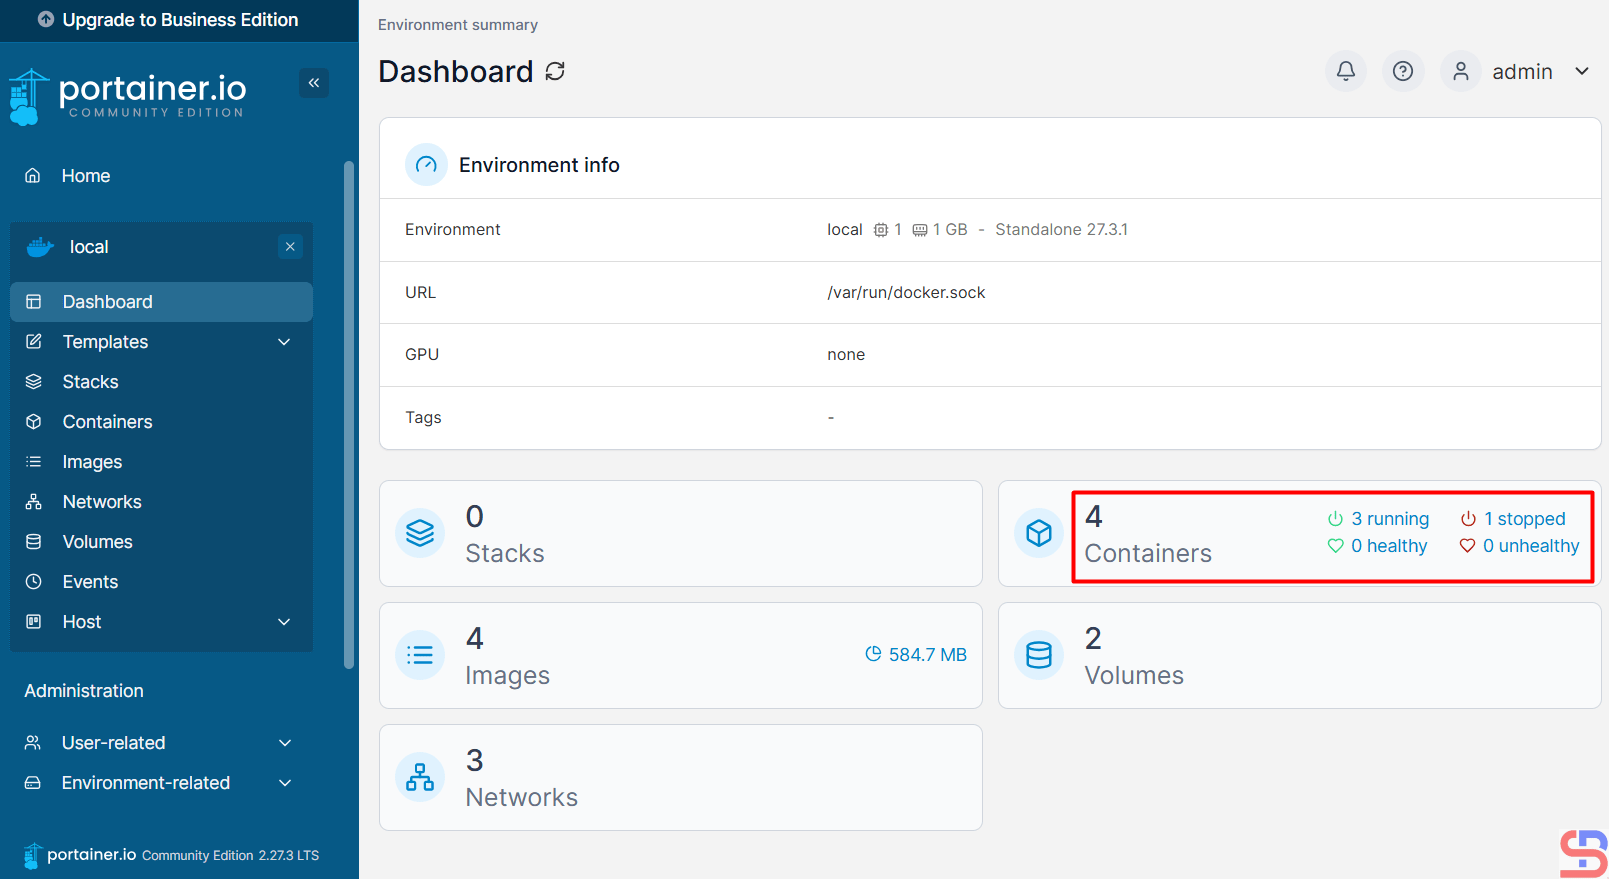
The information about the container(s) in Docker


I have 4 containers in my server, but I want to detail each container, so I click in the red box, and there will be an image below:

The detailed information of each container


If I want to display the resource of the Redis instance, click the icon in the red box, and there will be a display below:

The resource is displayed in a container


If I want to access a container, I click the icon like in the red box:

Click the icon to access the container


There will be a display like in the image below:

Click the Connect button after you choose the options


Select the command used in the container and select the desired user. After that, click the Connect button, and there will image like in the image below:

Access to the container


You can access the inside of the container and give the Linux command from your browser to the container. From this tool, you can see the images in your Docker when you click Images, like in the image below:

Display the Images


You can display the Volume in Docker after you click the Volumes, like in the image below:
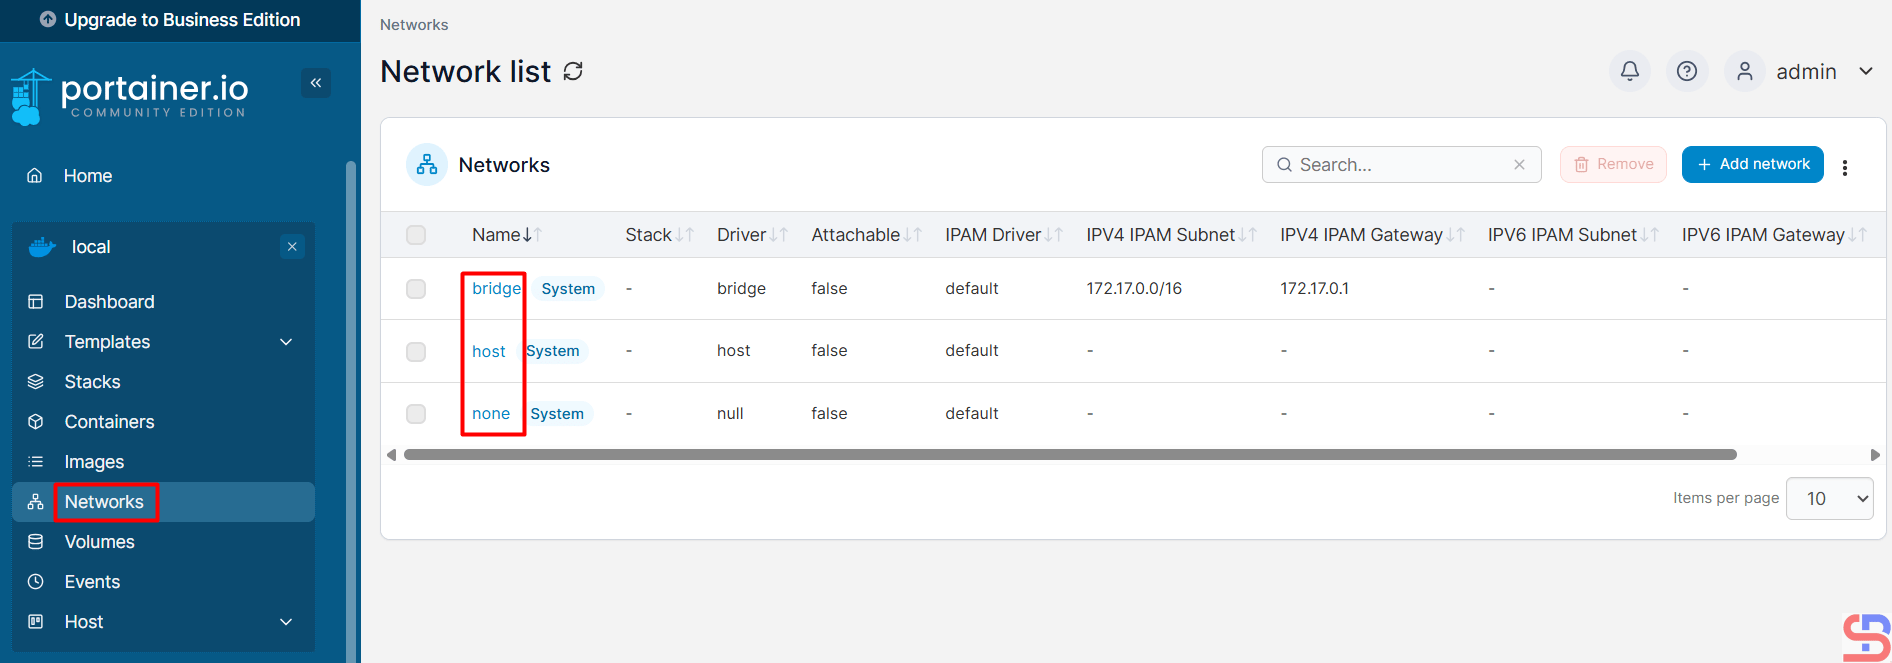
Display the Volumes


Note

If you want to monitor Docker on another server using Portainer, you have to install the agent using the command below:

curl -L https://downloads.portainer.io/agent-stack.yml -o agent-stack.yml && docker stack deploy --compose-file=agent-stack.yml portainer-agent


References

youtube.dimas-maryanto.com
docs.portainer.io
phoenixnap.com
musaamin.web.id
letscloud.io


How to Back up and Restore Docker Image(s)?

By default, if you want to create a Docker container on your server, you can download the required image directly using the docker pull command. But sometimes, there are some cases where you cannot download the image directly from the internet, and you have to back up the existing image and then restore the image to a server.


Problem

How to back up and restore Docker image(s)?


Solution

I have a server that, due to security issues, cannot be connected to the internet, while on the server, many applications run using Docker. Because it cannot directly download the Docker image, I have to download the Docker image on a server that is connected to the internet, and then the image will be installed on this server.

A. Backup Docker image

To back up a Docker image, use the format below:

docker image save -o image_name.tar image_name:tag


For example, if you want to back up the nginx image, then use the command below:

docker image save -o nginx.tar nginx


Wait until the process is complete, and if it is finished, the backup image file will be formed as shown below:

Back up one Docker image


But use the format below if you want to back up more than one image:

docker image save -o image1_name.tar image2_name:tag ...


I have more than one Docker image on my server, so I want to back up all the images so I can run the images on my other server, which is not connected to the internet. Then use the command below to back up the docker image of more than one Docker image:

docker image save -o all_images.tar alpine redis nginx


And the backup image file should be formed according to the image below:

Backup more than one docker image


B. Restore Image Docker

After you back up the Docker image, move your Docker image to the desired server. To restore the Docker image, use the format below:

docker image load -i image_name.tar


So I restored the Docker image backup file using the command below:

docker image load -i nginx.tar


Then the Nginx image will be restored on the server as shown below:

Restore one Docker image


With the same command, you can also restore more than one image using the command below:

docker image load -i all_images.tar


Then all Docker images will be restored on that server, like in the image below:

Restore more than one Docker image


Note

You can use the command below to back up the Docker image using the format below:

docker save image_name | gzip -c > image_name.tgz


So if you want to back up the Nginx image, use the command below:

docker save nginx | gzip -c > nginx.tgz


The advantage of using this command is that the size of the backup file is much smaller than using the previous command, as shown in the image below:

Back up the Docker image using another command


To restore, use the format below:

gunzip -c filename.tgz | docker load


So if you want to restore more than one image, use the command below:

gunzip -c all_images.tgz | docker load


And the Docker image will be restored on the server.

Restore the backup Docker image using another command


References

youtube.dimas-maryanto.com
youtube.com
docs.docker.com
stackoverflow.com


How to Limit the Use of CPU in Linux?

A large application that consumes a lot of CPU on a Linux server will cause unusual server conditions. Therefore, you have to limit the use of the CPU for the application.


Problem

How to limit the use of CPU in Linux?


Solution

You can use the cpulimit tool to limit CPU use. Below is the command to install the tool in Linux:

Debian/Ubuntu

sudo apt update
sudo apt-get install cpulimit -y


RockyLinux/AlmaLinux/CentOS

yum install epel-release -y
yum install cpulimit -y


OpenSUSE15

zypper install -y cpulimit


Here are some methods using the cpulimit command:

A. Using ‐-pid option

To use the ‐-pid or -p option, you need to know the PID of an application that you want to limit its CPU usage. To run this cpulimit tool, use the format below:

cpulimit --pid xxx --limit xxx --background


Where PID is the ID number of the ongoing application, you can see by using the format below:

ps aux | grep application_name


The limit is a percentage figure from the CPU that you want to limit for the use of the application. We will use the bash script to simulate this CPU server to be high. Create a high_cpu.sh file and copy the script below

#!/bin/bash

# Simple infinite loop that uses 100% CPU
while true
do
    :  # No-op (no operation) to keep CPU busy
done


Run the command below to give permission and run this bash script:

chmod +x high_cpu.sh
./high_cpu.sh &


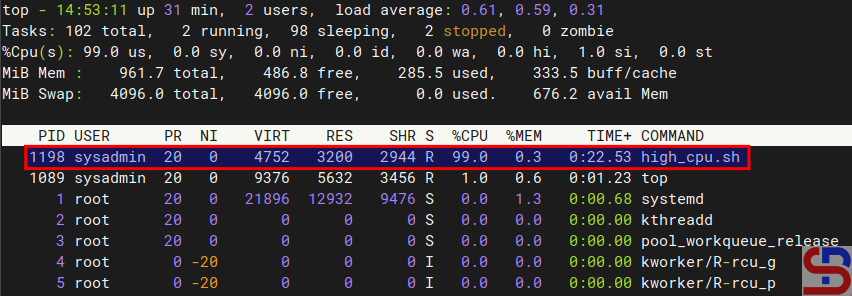
Run the top command on another terminal, and as you can see in the image below, the script uses 99 percent of the CPU on the server:

Before using the cpulimit command


Now run the cpulimit command by limiting this script to run using only 50 percent of the CPU on this server:

cpulimit --pid 1198 --limit 50 --background

Run the cpulimit command


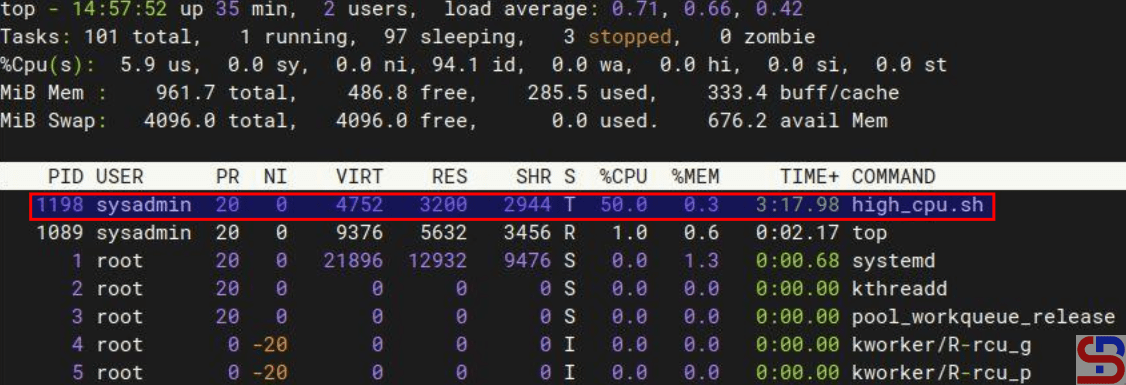
If you look at the top command, this script is no longer utilizing 99 percent of the CPU on this server.

After using the cpulimit command


WARNING
I don’t think there is a problem when an application consumes the CPU more than the limit you set after running the cpulimit command. For example, you limit the CPU to 50 percent using the cpulimit command, but in reality, the application runs with more than 50 percent in the use of CPU usage on your server. But at least the application doesn’t take up a lot of CPU.


The disadvantage of using the ‐-pid option is that if the application is restarted, the PID of the application will change, and you have to change the cpulimit command. So, there is another option where you just write the name of the application in the cpulimit command using the ‐-exe option.


B. Using ‐-exe option

To use the ‐-exe or -e option, you need to know the application name that you want to limit its CPU usage. To run this cpulimit tool, use the format below:

cpulimit --exe application_name --limit xxx --background


We will use the bash script to simulate a CPU server to be high with many PIDs. Create a pids_high_cpu.sh file in the folder /etc and copy the script below:

#!/bin/bash

# Number of processes to spawn
num_processes=5

# Function to keep the CPU busy in each child process
cpu_intensive_task() {
    while true
    do
        :  # No-op command to keep the CPU busy
    done
}

# Spawn the specified number of processes, redirecting output to /dev/null
for ((i=0; i<num_processes; i++))
do
    cpu_intensive_task > /dev/null 2>&1 &  # Run the task in the background and suppress output
done

# Optionally, wait for all background processes to complete (won't happen unless manually killed)
wait


Run the command below to give permission and run this bash script:

chmod +x /etc/pids_high_cpu.sh
/etc/pids_high_cpu.sh &


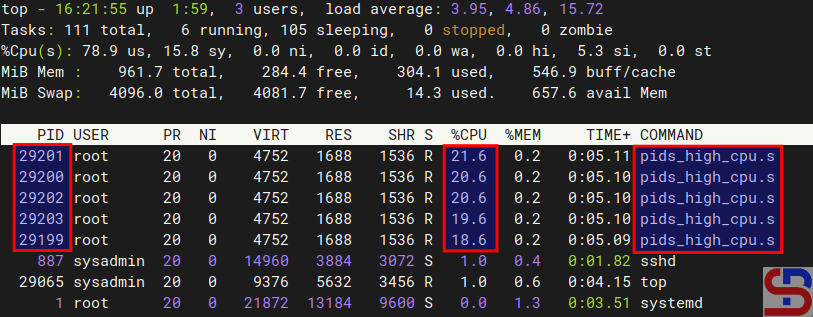
Run the top command on another terminal. As you can see in the image below, the script has many PIDs and uses a lot of CPU resources on the server:

Display the app with many PIDs


Run the cpulimit command  to restrict this script to utilizing just 50% of the server’s CPU:

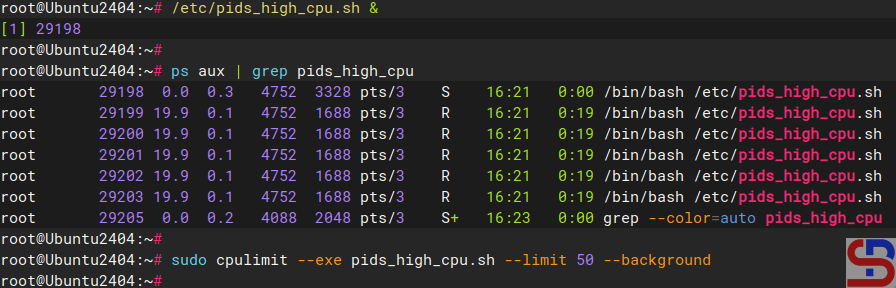
sudo cpulimit --exe pids_high_cpu.sh --limit 50 --background

Run the cpulimit command with the ‐-exe option


C. Using ‐-path option

Besides using the ‐-exe option, you can also use the ‐-path option or -P option. To use this option, you have to know the path of the application that you want to limit its CPU usage. Use the format below to run the ‐-path option in the cpulimit command:

cpulimit --path /folder/path/of/the/application --limit xxx --background


For the same case, type the command below to use the cpulimit command with the ‐-path option to limit CPU usage to 65 percent for pids_high_cpu.sh application in the /etc folder:

cpulimit --path /etc/pids_high_cpu.sh --limit 65 --background


WARNING
You can enter the cpulimit command into the crontab so the command will run automatically after the device restarts. But, the cpulimit command that you enter into the crontab can only use the ‐-exe or ‐-path option because, by default, the application name or application path will never change after the server restarts. Here is an example of the crontab:

@reboot        cpulimit --path /etc/pids_high_cpu.sh --limit 65 --background


Note

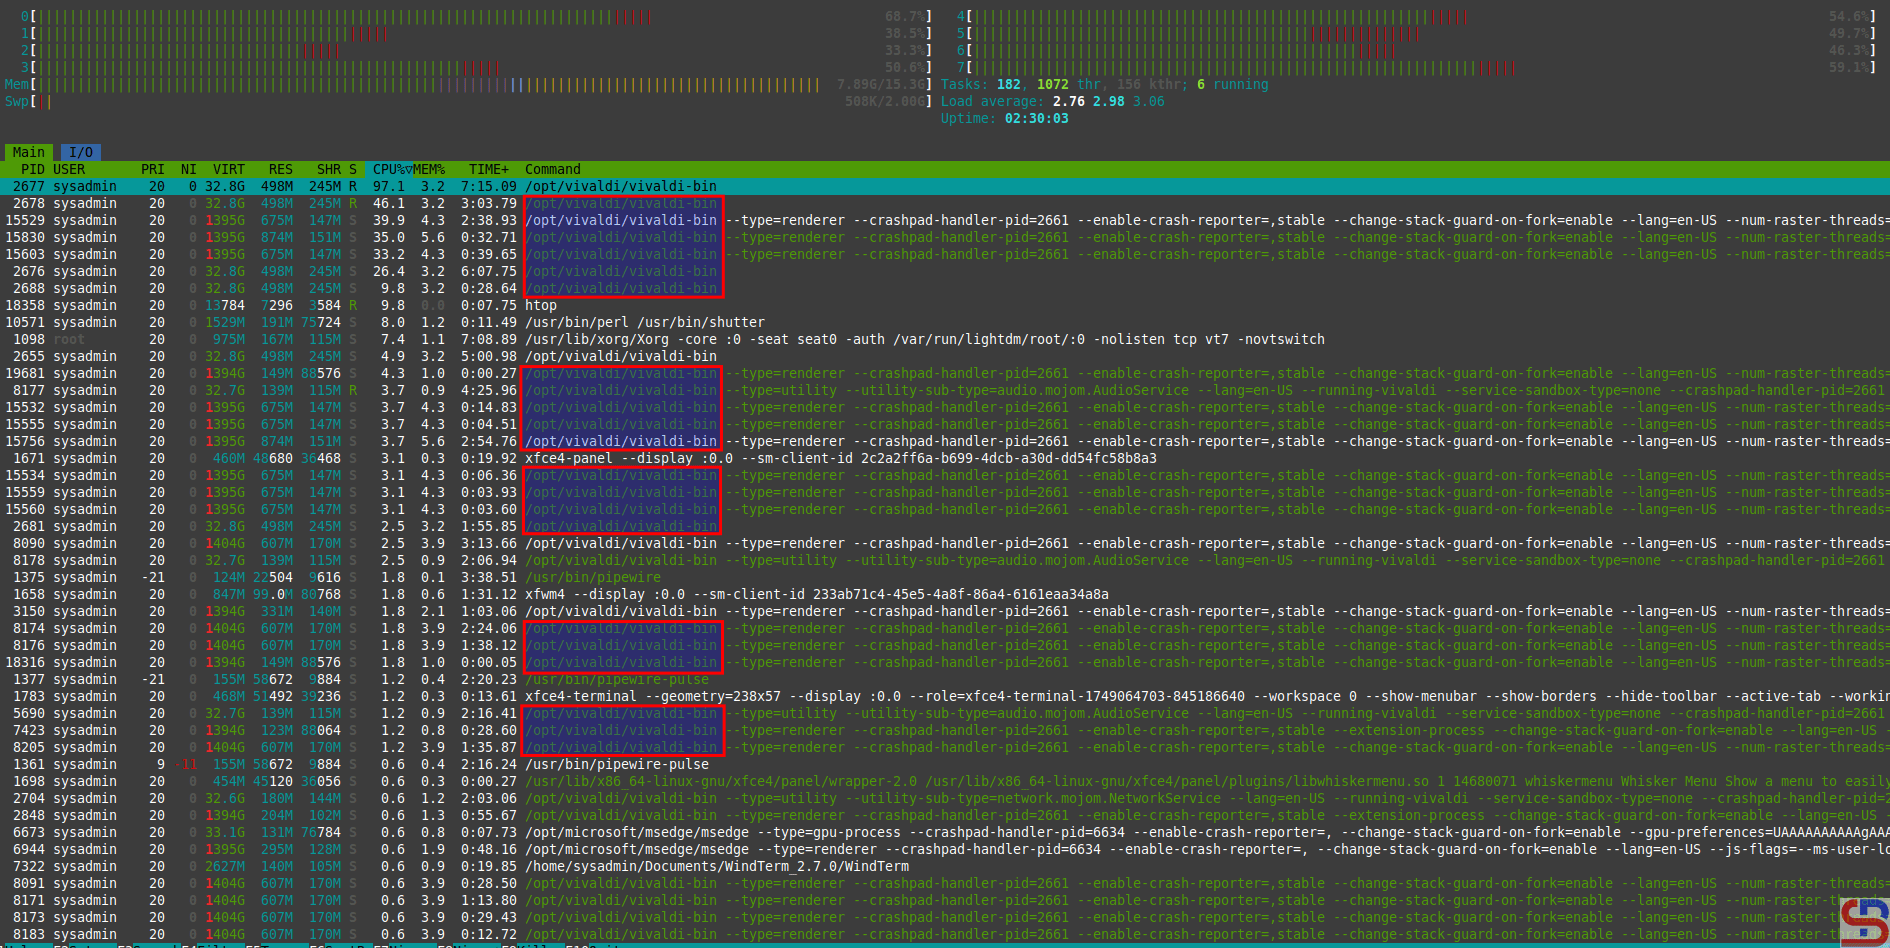
If you see an application running that generates a lot of PIDs, as shown in the image below:

The application with many PIDs


From the picture above, you can see that the application Vivaldi has many PIDs. So, you have to write a script to restrict apps with numerous PIDs. Here is a copy of the bash script:

#!/bin/bash

LIMIT=50
PROCESS_NAME="vivaldi-bin"

# Kill existing cpulimit instances related to vivaldi-bin
pkill -f "cpulimit -p" 2>/dev/null

# Get all vivaldi PIDs
PIDS=$(pidof $PROCESS_NAME)

if [[ -z "$PIDS" ]]; then
  echo "[$(date)] $PROCESS_NAME not running."
  exit 0
fi

echo "[$(date)] Limiting CPU for PIDs: $PIDS"

# Start cpulimit for each PID in background
for pid in $PIDS; do
  cpulimit -p "$pid" -l "$LIMIT" > /dev/null 2>&1 &
done


Change the LIMIT and PROCESS_NAME sections according to your needs and permit the script to be executed. If the script runs, it will limit the CPU to the PIDs.

Check the cpulimit command that runs in the background


Enter the script into the crontab using the script below: 

#Limit CPU vivaldi
*/30 * * * *     /root/limit_vivaldi.sh
@reboot         /root/limit_vivaldi.sh


The script will restart every 30 minutes, and if the device restarts, the script will start automatically.


References

tecmint.com
linuxsec.org
id.ubunlog.com
linuxsec.org
youtube.com


How to Upgrade Ubuntu to the Latest Version?

I have a Linux Ubuntu server version 22.04, and I want to upgrade to the latest version of Ubuntu.


Problem

How to upgrade Ubuntu to the latest version?


Solution

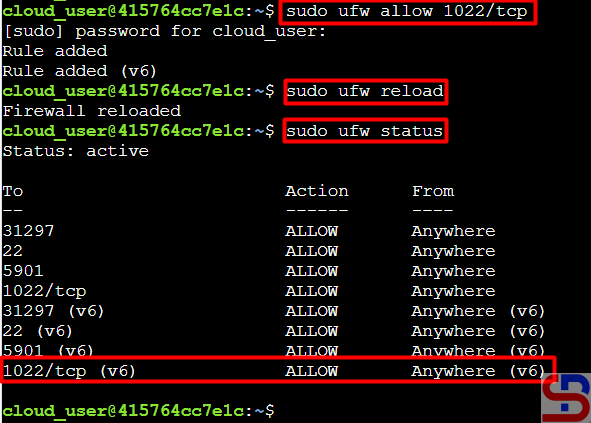
Before you upgrade your Ubuntu version, I think you have to back up your important data to other devices, and have internet to download the packages needed to upgrade. After that, open port 1022 on your laptop or server if you use the firewall using the below commands:

sudo ufw allow 1022/tcp
sudo ufw reload
sudo ufw status

Open the port


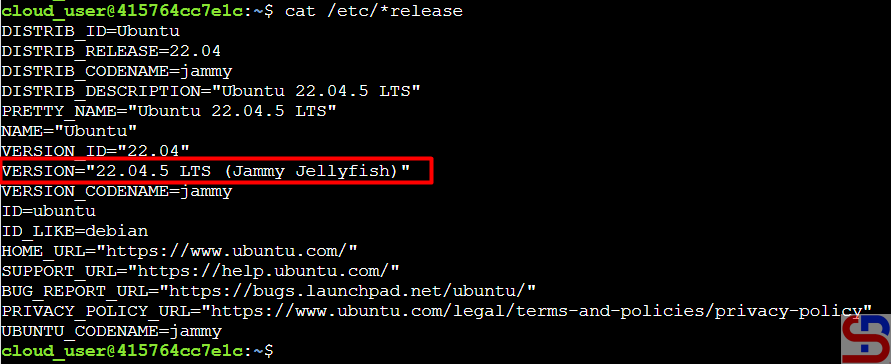
You should know that the Ubuntu version upgrade process can only be done to one major LTS version. So if you have Ubuntu version 20.04 and want to upgrade to the latest version (version 24.04 in November 2024), you have to do a 2x upgrade process, upgrading to version 22.04 first and then to version 24.04. I have Ubuntu version 22.04, like in the image below:

Check the version of Ubuntu


So, I type the command below:

sudo apt update
sudo apt upgrade -y


After that, reboot the server using the command below:

sudo reboot


After reboot, run the command below:

sudo do-release-upgrade


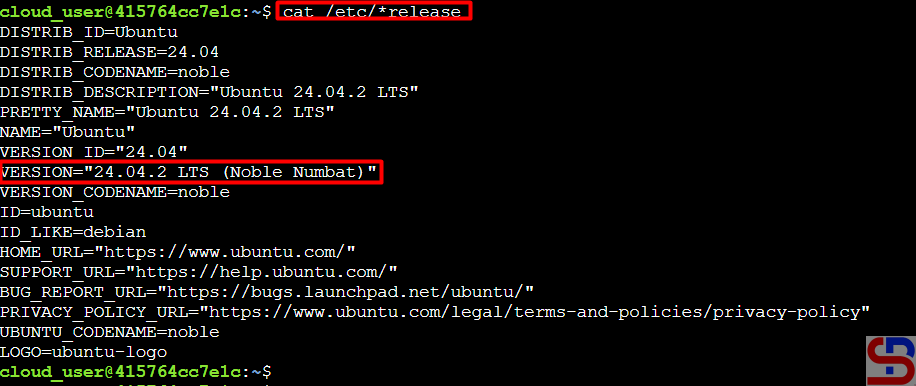
The server will start upgrading to Ubuntu version 24.04. Wait until finished, and sometimes you have to answer the questions asked by the Linux system when upgrading. After the upgrade finishes, check the version of Ubuntu, like in the image below:

Ubuntu was successfully upgraded


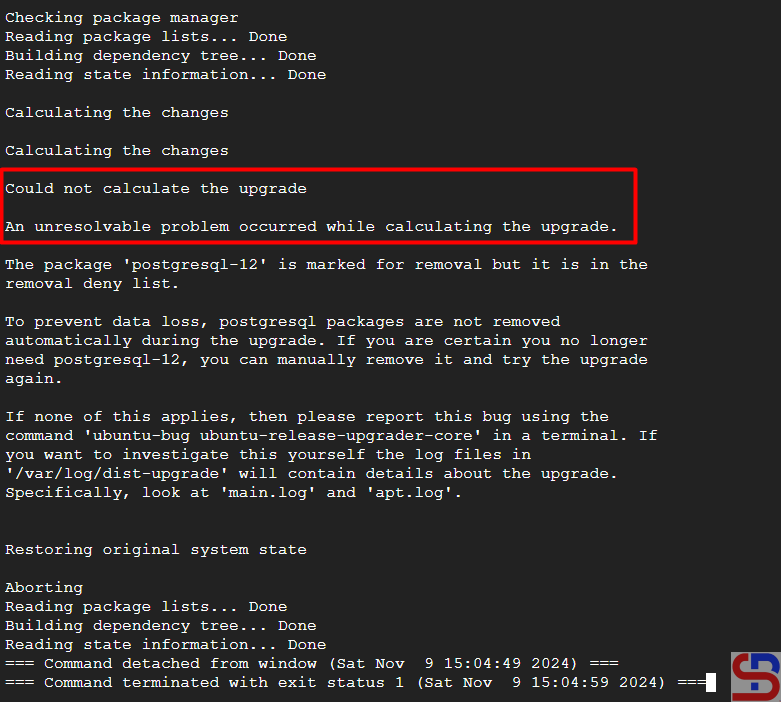
If during the upgrade process, there is a notification like the picture below:

Could not calculate the upgrade

An unresolvable problem occurred while calculating the upgrade.

Error when upgrading Ubuntu


Type the command below to see the errors that occurred during the upgrade process:

cat /var/log/dist-upgrade/main.log | grep ERROR


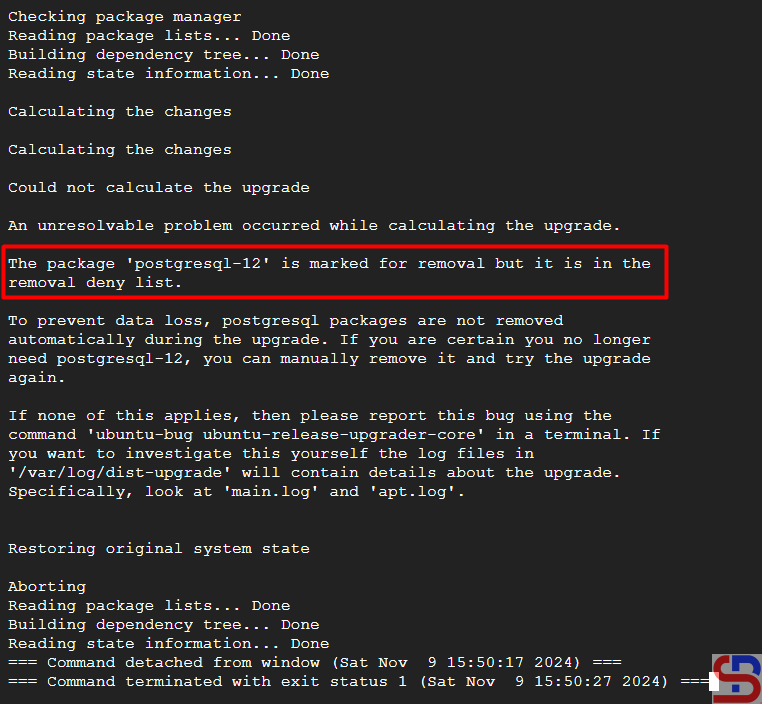
In the log, you have to search for the cause of the error, but actually, you can find the root cause in the notification, like in the image below:

Find the root cause of the error


The root cause is in the postgresql-12 package, so I removed the package and then ran the command below to carry out the upgrade process again:

sudo do-release-upgrade


The Ubuntu upgrade process should be completed until it is finished.


Note

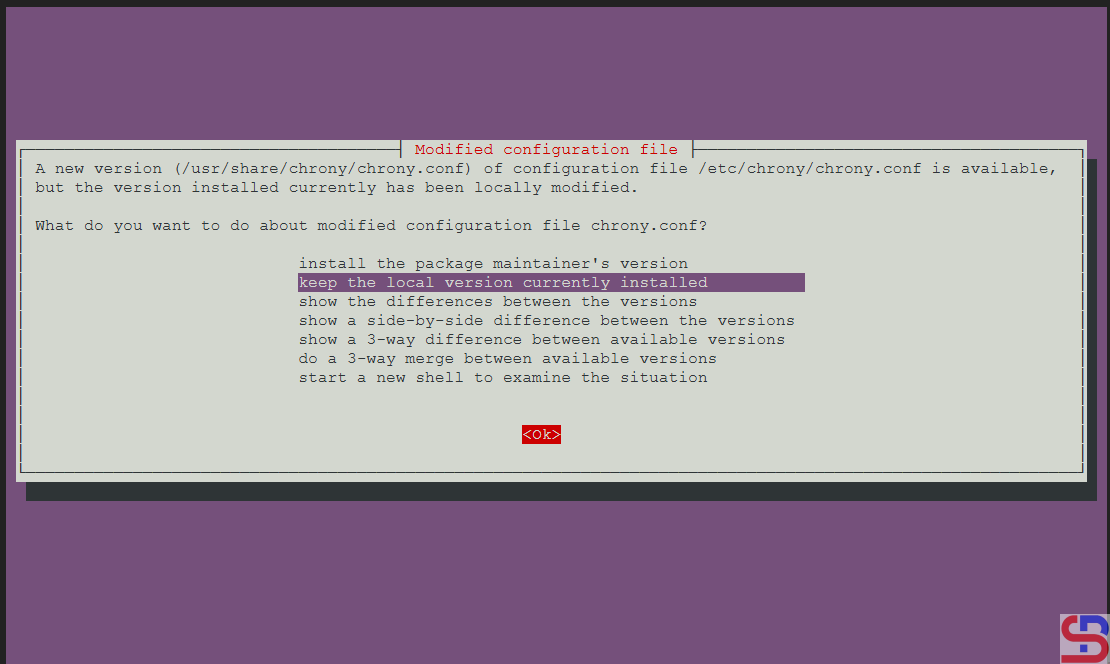
When you upgrade Ubuntu, you have to answer the questions from the Ubuntu system, like in the image below:

Choose the answer when upgrading to Ubuntu


If you don’t want to be bothered by the questions asked by the Linux system during the upgrade process, then use the command below:

sudo do-release-upgrade -f DistUpgradeViewNonInteractive


References

ubuntu.com
serverpilot.io
jumpcloud.com
askubuntu.com


How to Remove a Swap File?

The previous article explained how to create a swap file on the Linux server. This article will explain how to remove a swap file, whether your filesystem uses ext4 or xfs, or btrfs.


Problem

How to remove a swap file?


Solution

Check whether the Linux server you have has a swap or not by using the command below:

cat /proc/swaps


Then use the command below:

sudo swapoff /swapfile

Delete the swap file


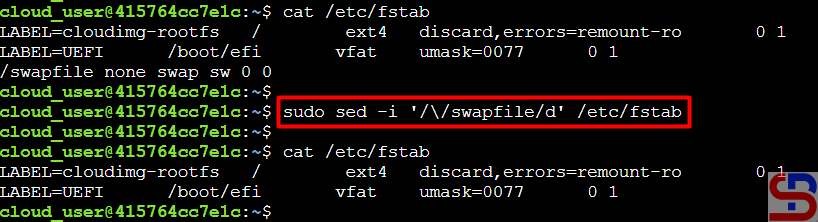
After that, delete the entry for the swap file or swap partition in /etc/fstab:

sudo sed -i '/\/swapfile/d' /etc/fstab

remove a swap file
Delete the swap script from the fstab file


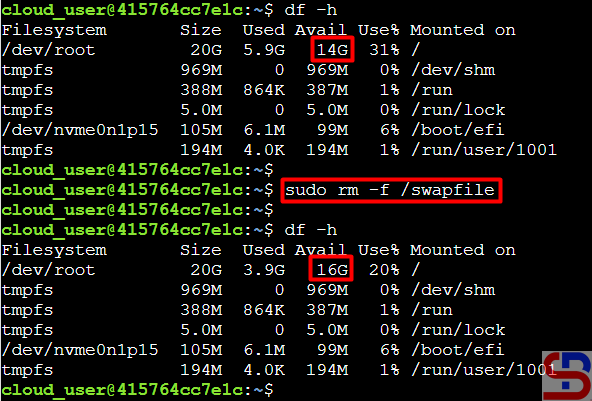
You can delete the swap file using the command below:

sudo rm -f /swapfile


And the hard disk size on your Linux server will increase by 2 GB.

remove a swap file
Check the hard disk


Note

If you want to change the swap size, you must first delete the existing swap files using with steps in this article and then create a new swap file with a larger or smaller size using this article.


References

docs.oracle.com
docs.rackspace.com
docs.redhat.com
askubuntu.com


How to Create a Swap File in the btrfs filesystem?

The previous article explained how to create a swap file on the Linux server. But the steps in the article can only run if you use the xfs or ext4 filesystem. If you use btrfs in your filesystem, then the article will not be able to run.


Problem

How to create a swap file in the btrfs filesystem?


Solution

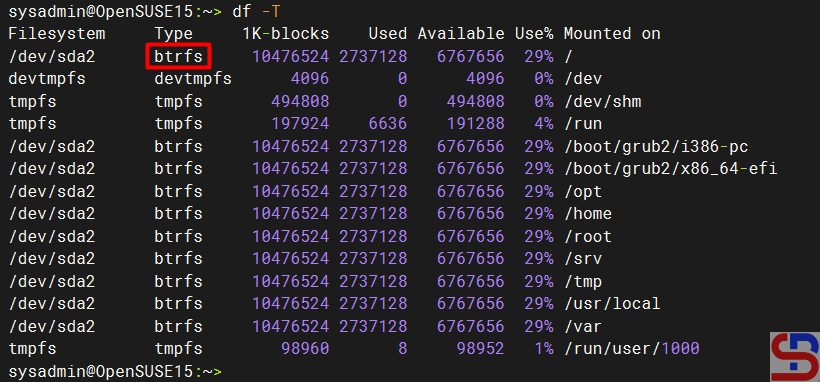
I have an openSUSE server and use the btrfs filesystem as shown in the image below:

create a swap file in the btrfs
Check the filesystem


And my server does not have a swap space:

Check the swap


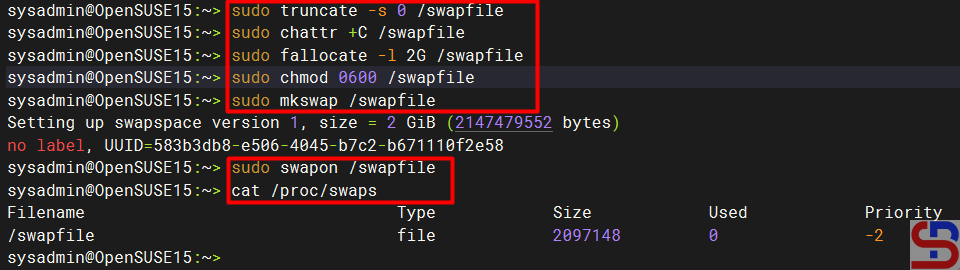
Therefore, so that my server can have a 2GB swap space, I have to create a swap file by running the commands below:

sudo truncate -s 0 /swapfile
sudo chattr +C /swapfile
sudo fallocate -l 2G /swapfile
sudo chmod 0600 /swapfile
sudo mkswap /swapfile
sudo swapon /swapfile
cat /proc/swaps

Process to create a swap file in btrfs filesystem


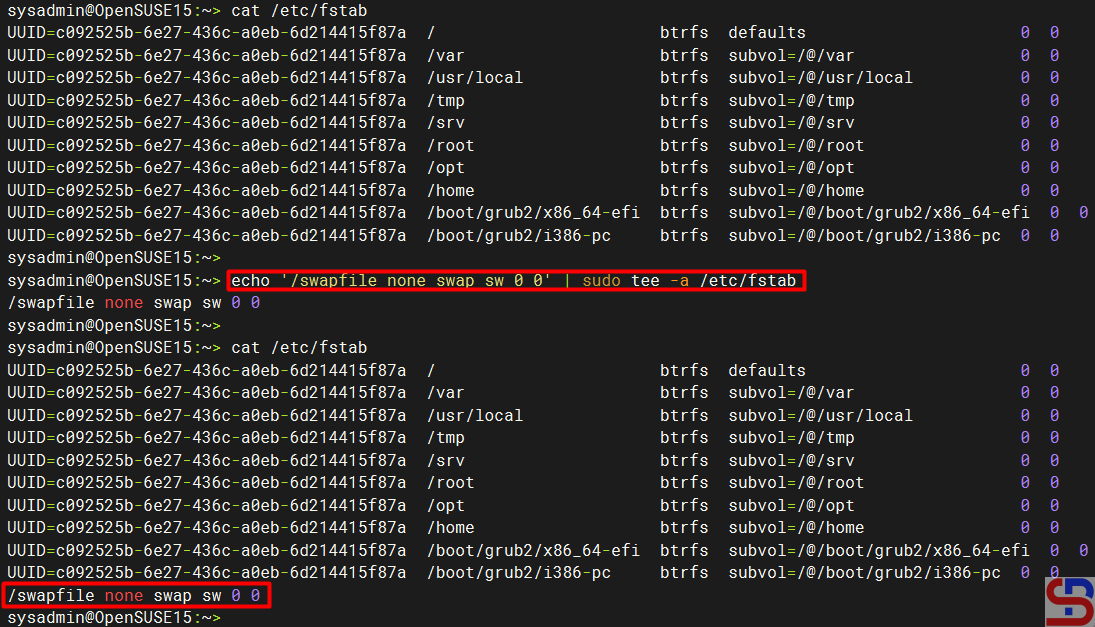
From the picture above, you can see that the server has a swap space. After that, you have to add the below script to /etc/fstab so that the swap space remains when you reboot the server by running the script below:

echo '/swapfile none swap sw 0 0' | sudo tee -a /etc/fstab

create a swap file in the btrfs
Add the swap in the fstab file


Note

Swap files in btrfs are supported with the following limitations:

  • A swap file can’t be on a snapshotted subvolume. Instead, we recommend that you create a subvolume on which to place the swap file.
  • Btrfs doesn’t support swap files on file systems that span several devices.


References

btrfs.readthedocs.io
forum.endeavouros.com
docs.oracle.com
askubuntu.com


How to Create a Swap File as a Swap Space?

Swap space is a portion of hard drive storage that has been set aside for the operating system to temporarily store data that it can no longer hold in RAM. So, if the system needs more memory resources and the RAM is full, inactive pages in memory are moved to the swap space. Swap space can be a dedicated swap partition (recommended), a swap file, or a combination of swap partitions and swap files. You can use a swap file as a swap space if your server does not create a partition when installing Linux.


Problem

How to create a swap file as a swap space?


Solution

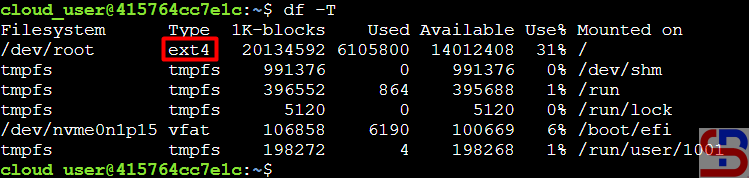
First, you have to check the type of filesystem that you use by running the command below:

df -T

Check the filesystem type


If you use the ext4 or xfs filesystem, you can use the steps below in this article. Type the command below to see whether the swap is already on your Linux server or not:

cat /proc/swaps


If the above command results are as shown below, then your server hasn’t used a swap:

Check the swap


After that, check how much hard disk size on your Linux server and determine the size of the swap file you need. You should know that the size of the swap file will reduce the size of your hard disk. Generally, the swap size is twice the size of the RAM server, so if your Linux server RAM is 1 GB, the swap size is 2 GB. In this article, we use 2GB for the swap file. Type the command below to create a 2GB swap file:

sudo fallocate -l 2G /swapfile
ls -lh /swapfile

Create the size of the swap file


Then give the command below so that the users can not read the swap file:

sudo chmod 0600 /swapfile


Set up the swap file with the command:

sudo mkswap /swapfile

Set up the swap file


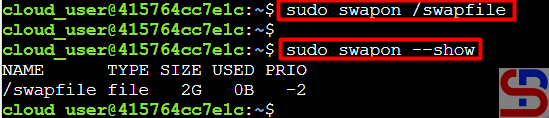
Enable the new swap space for paging and swapping by typing the following:

sudo swapon /swapfile


And then run this command to verify:

sudo swapon --show

Enable the swap file


You can see if the swap space is available on your Linux server after creating a swap file:

Check the swap space after creating the swap file


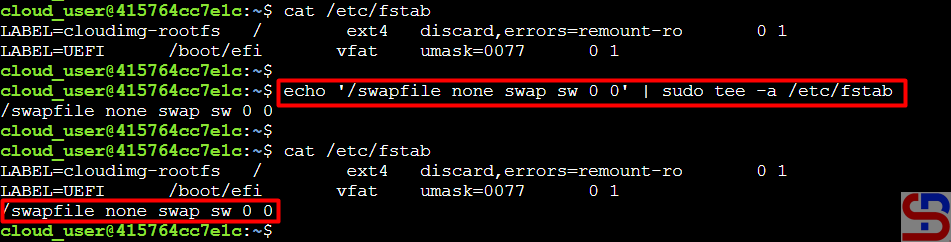
To make the swap file permanent, you have to add the swap file to the fstab file using the command below:

echo '/swapfile none swap sw 0 0' | sudo tee -a /etc/fstab

Add the swap file to the fstab file


If you want, you can reboot the server to see whether the swap is still there after you reboot the server.


Note

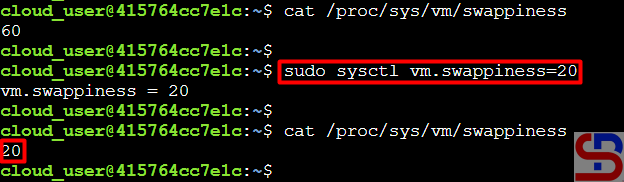
You can determine how often your Linux system exchanges data from RAM to the swap space using swappiness parameters by giving a value between 0 to 100, representing the percentage. If you give a value that is close to zero, the Linux system will not write data to the disk unless it is necessary. But if you give a value that is close to 100, the Linux system will write more data into the swap to keep more free RAM space. By default, the Linux system gives a value of 60 in the file/proc/sys/vm/swappiness, and if you want to change the value, for example, to 20, then you can change it using the command below:

sudo sysctl vm.swappiness=20

Change the swappiness parameter


But if you reboot the server, the swappiness value will return to the initial value. So if you want the swappiness value to remain, add the script below to the /etc/sysctl.conf file:

vm.swappiness=20


References

digitalocean.com
docs.redhat.com
docs.oracle.com