How to Display the Progress Bar in Linux Commands?

The previous article has explained how to display progress in a process, but unfortunately, this application is limited to displaying the copy and move process. This article will explain how to display a progress that not only displays the copy and move process, but can also display the backup process and restore a database.


Problem

How to display the progress bar in Linux commands?


Solution

By default, Linux commands do not display a progress bar, so you don’t know when the process is complete, like in the image below:

Copy the file without using pv application


Therefore, Andrew Wood, An Experienced Unix Sysadmin, created an application to display a progress bar named Pipe Viewer or PV. To install the application, use the command below:

RockyLinux/AlmaLinux/CentOS

yum install epel-release
yum install pv


Ubuntu/Debian

sudo apt update
sudo apt install pv


OpenSUSE

sudo zypper install pv 


If you want to install pv applications in addition to the operating system shown above, you can go to this page. Here are some methods when using the pv application:

A. Copy

1. Copy the file

Use the format below to copy the file:

pv file1 > /folder/filename

So, if you want to copy an instances.sql to the /tmp folder, use the command below:

pv instances.sql > /tmp/instance.sql

Copy the file using pv application


2. Copy more than one file

If you want to copy more than one file to the folder, use the format below:

tar cf - file1 file2 file3 | pv | tar xf - -C /folder


Here is the command to copy more than one file to the /tmp folder

tar cf - babel.sql babel.sql.gz babel.sql.tar.gz  | pv | tar xf - -C /tmp

Copy more than one file in pv application


3. Copy the folder

If you want to copy the folder, use the format below:

tar cf - folder_name/ | pv | tar xf - -C /folder


If you want to copy the example folder to the /tmp folder, use the command below:

tar cf - example/ | pv | tar xf - -C /tmp

Copy some files using pv application


4. Copy more than one folder

If you want to copy more than one folder, use the format below:

tar cf - folder1/ folder2/ | pv | tar xf - -C /folder


So, if you want to copy more than one folder to the /tmp directory, use the command below:

tar cf - example/ test-project/ | pv | tar xf - -C /tmp

Copy some folders using pv application

B. Move

If you want to use the move command on the PV application, then you can actually use the command to copy number 1, but add the command && rm -rf file1/folder1 behind it.

1. Move the file

So, if you want to move an instances.sql to the /tmp folder, use the command below:

pv instances.sql > /tmp/instance.sql && rm -rf instances.sql 

Move the file in pv application


2. Move more than one file

If you want to move some files to the /tmp folder, use the command below:

tar cf - babel.sql babel.sql.gz babel.sql.tar.gz  | pv | tar xf - -C /tmp && rm -rf babel.sql babel.sql.gz babel.sql.tar.gz 

Move more than one file in pv application


3. Move the folder

If you want to move a folder to the /tmp folder, use the command below:

tar cf - example/ | pv | tar xf - -C /tmp && rm -rf example/

Move the folder in pv application


4. Move more than one folder

If you want to move some folders to the /tmp folder, use the command below:

tar cf - example/ test-project/ | pv | tar xf - -C /tmp && rm -rf example/ test-project/ 

Move more than one folder in pv application


C. Compress

1. Using gz
Use the format below to run the gz command in pv application:

pv filename | gzip > filename.gz

For example, you want to compress babel.sql using gz, so use the command below:

pv babel.sql | gzip > babel.sql.gz

Compress the file using gz in pv application


2. Using tar

Use the format below to run the tar command in pv application:

tar cf - filename | pv | gzip > filename.tar.gz

For example, you want to compress babel.sql using tar, use the command below:

tar cf - babel.sql | pv | gzip > babel.sql.tar.gz

Compress the file using tar in pv application


3. Using bz2

Use the format below to run the tar command in pv application:

pv filename | bzip2 > filename.bz2

For example, you want to compress babel.sql using bz2, use the command below:

pv babel.sql | bzip2 > babel.sql.bz2

Compress the file using bzip2 in pv application


4. Using zip

Use the format below to run the tar command in pv application:

pv filename | zip filename.zip -q -

For example, you want to compress babel.sql using bz2, use the command below:

pv babel.sql | zip babel.sql.zip -q -

Compress the file using zip in pv application

D. Extract

1. Using gunzip
Use the format below to extract the gz compression in pv application:

pv filename.gz | gunzip > filename

For example, you want to extract babel.sql.gz, so use the command below:

pv babel.sql.gz | gunzip > babel.sql

Extract the file using gunzip in pv application


2. Using tar.gz

Use the format below to extract the gz compression in pv application:

pv filename.tar.gz | tar zxf -

For example, you want to extract babel.sql.tar.gz, so use the command below:

pv babel.sql.tar.gz | tar xzf -

Extract the file using tar in pv application


3. Using bunzip2

Use the format below to extract the bz2 compression in pv application:

pv filename.sql.bz2 | bunzip2 > filename.sql

For example, you want to extract babel.sql.bz2, so use the command below:

pv babel.sql.bz2 | bunzip2 > babel.sql

Extract using bunzip2 in pv application


4. Using unzip

Use the format below to extract the zip compression in pv application:

unzip filename.zip | pv

For example, you want to extract babel.sql.zip, so use the command below:

unzip babel.sql.zip | pv

Extract the file in pv application

E. Backup DB

If you use MariaDB, you can use the commands below:
1. Without compressing the database 
Use the format below to back up the database without compression in pv application:

mariadb-dump -u username -p dbname | pv > dbname.sql

So, use the command below to back up the database without compression in pv application:

mariadb-dump -uroot -p babel | pv > babel.sql

Backup database without compression in pv application


2. Back up the database using gz

Use the format below to back up the database using gz compression in pv application:

mariadb-dump -u username -p dbname | pv | gzip > dbname.sql.gz

Use the command below to back up the database using gz compression in pv application:

mariadb-dump -uroot -p babel | pv | gzip > babel.sql.gz

Backup using gz compression in pv application


3. Backup the database using bz2

Use the format below to back up the database using bz2 compression in pv application:

mariadb-dump -u username -p dbname | pv | bzip2 > dbname.sql.bz2

Use the command below to back up the database using bz2 compression in pv application:

mysqldump -uroot -p babel | pv | bzip2 > babel.sql.bz2

Backup using bz2 compression in pv application


F. Restore DB

If you use MariaDB, you can use the commands below:
1. Restore the database without compression
Use the format below to restore the database without compression in pv application:

pv backup_file.sql | mariadb -u username -p

So, use the command below to restore the database without compression in pv application:

pv babel.sql | mariadb -uroot -p

Restore the database without compression in pv application


2. Restore the database with gz compression

Use the format below to restore the database using gz compression in pv application:

pv backup_file.gz | gunzip | mysql -u username -p

Use the command below to restore the database using gz compression in pv application:

pv babel.sql.gz | gunzip | mariadb -uroot -p 

Restore the database using gz in pv application


3. Restore the database with bz2 compression

Use the format below to restore the database using bz2 compression in pv application:

pv backup_file.sql.bz2 | mariadb -u username -p

Use the command below to restore the database using bz2 compression in pv application:

pv babel.sql.bz2 | bunzip2 | mariadb -uroot -p babel

Restore the database using bz2 in pv application

Note

If you are using a MySQL database, then you can use the commands in point E to back up the database and the commands in point F to restore the database by changing the mariadb-dump command to mysqldump and changing the mariadb command to mysql.


References

superuser.com
howtogeek.com
dba.stackexchange.com
tecmint.com
catonmat.net


How to Fix the Hard Disk Size After Deleting Large Files?

I once deleted large files on my Linux server, but when I saw the disk size using the df -h command, it turned out that the hard disk size on the server had not changed.


Problem

How to fix the hard disk size after deleting large files?


Solution

I have a Linux server that has a hard disk size as shown below:

Initial Harddisk size


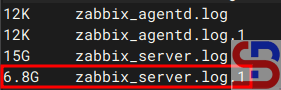
And you see the partition / only 17 percent left, and I want to delete large files on the server. After seeing in various partitions, I saw a large file in the log folder, as shown below:

The big file


And I did the command to delete the file. But after deletion, the size of the hard drive on the server is still the same as in the image above. After I find out the reason why the hard disk size has not changed, it turns out this is due to the deleted files still held open by a process commonly known as the zombie file. As a result, the system cannot release the disk space occupied by these files. Because these files are marked as deleted, the df and du commands cannot account for their space usage. So, to see files that are still open by a process, use the lsof command. If on your Linux server, there is no lsof package, use the commands below to install the lsof package:

RockyLinux/AlmaLinux/CentOS

dnf install lsof


Ubuntu/Debian

sudo apt update
sudo apt install lsof


Use the command below to see the deleted files still held open by a process:

lsof +L1


And in my case, it will look like in the image below:

The file(s) are still open by a process


After that, use the command to delete the files using the kill command based on the pid number, as shown in the image below:

kill -9 111119 119254 119255 119256


And the above command should delete the process that uses the PID number, as shown in the image below:

The files that we have deleted are no longer on the list


And if you run the df -h command,  the size of the hard disk on the Linux server should be reduced according to the size of the files that we deleted earlier, like in the image below:

The final hard disk size


Note

If, after you delete using a kill based on the PID number, but the size of the hard disk on the Linux server still hasn’t changed, then the server must be restarted, and after you restart the server, the size of the hard disk will correspond to the number of files you deleted earlier.


References

pietervogelaar.nl
howtoforge.com
access.redhat.com
alibabacloud.com


How to Install NagiosQL in Ubuntu/Debian?

After you install the Nagios application on the Ubuntu/Debian server, by default, Nagios Core does not provide a web-based interface to manage Nagios configuration for adding/deleting/changing hosts and services. Therefore, some developers create a web-based interface so users can manage the hosts and services easily. This article will explain how to install the NagiosQL application to set up the device or service on Nagios.


Problem

How to install NagiosQL in Ubuntu/Debian?


Solution

NagiosQL is a professional, web-based configuration tool for Nagios 2.x/3.x/4.x and other Nagios-based monitoring tools. It is designed for large enterprise requirements as well as small environments, and any Nagios functionality is supported. I ran the steps below in Ubuntu 24.04, and I think it will work in Debian too. Here are the steps to install the NagioSQL application, and 

A. Install the dependencies

Use the following command to install the dependencies:

sudo apt update
sudo apt-get install -y php libmcrypt-dev php-cli php-gd php-curl php-mysql php-ldap php-zip php-fileinfo php-pear gcc php-dev php zlib1g-dev libssh2-1 libssh2-1-dev php-ssh2  mariadb-server build-essential
sudo pear channel-update pear.php.net
sudo pear install HTML_Template_IT


B. Install PHP Modules

After that, install PHP Modules using the following command:

sudo pecl install mcrypt


C. Configure PHP

Type the following commands to configure PHP:

echo "extension=mcrypt.so" >> /etc/php/*/apache2/php.ini
echo "date.timezone=Asia/Singapore"  >> /etc/php/*/apache2/php.ini
sudo systemctl restart apache2


D. Configure the database

Start MariaDB and give the password using the following commands:

sudo systemctl start mariadb
sudo mariadb-secure-installation


Access to MariaDB using the following command:

mariadb -uroot -p


Type your root password and then run the following commands to create a database for NagiosQL:

CREATE DATABASE nagiosql;
GRANT ALL PRIVILEGES ON nagiosql.* TO `nagiosql_user`@`%` IDENTIFIED BY 'qwerty';
FLUSH PRIVILEGES;


E. Download NagiosQL

Download the latest release of the NagiosQL application, as of this writing (August 2025), has reached version 3.5.0, and configure it by typing the commands below:

cd /tmp/
wget https://sourceforge.net/projects/nagiosql/files/latest/download -O nagiosql.tar.gz
tar -zxvf nagiosql.tar.gz
sudo cp -vprf nagiosql-*/ /usr/local/nagios/share/nagiosql


F. Configure files and folders

Copy the commands below to configure files and folders:

sudo mkdir /usr/local/nagios/etc/nagiosql;
sudo mkdir /usr/local/nagios/etc/nagiosql/hosts;
sudo mkdir /usr/local/nagios/etc/nagiosql/services;
sudo mkdir /usr/local/nagios/etc/nagiosql/backup;
sudo mkdir /usr/local/nagios/etc/nagiosql/backup/hosts;
sudo mkdir /usr/local/nagios/etc/nagiosql/backup/services;
sudo chown nagios:nagcmd /usr/local/nagios/var/rw 
sudo chown nagios:nagcmd /usr/local/nagios/var/rw/nagios.cmd
sudo chown nagios:www-data /usr/local/nagios/etc/nagios.cfg;
sudo chown nagios:www-data /usr/local/nagios/etc/cgi.cfg;
sudo chown nagios:www-data /usr/local/nagios/etc/resource.cfg;
sudo chown nagios:www-data /usr/local/nagios/var/spool/checkresults;
sudo chown nagios:www-data /usr/local/nagios/bin/nagios;
sudo chmod 775 /usr/local/nagios/etc/
sudo chmod 777 /usr/local/nagios/bin/nagios
sudo chmod -R 777 /usr/local/nagios/share/nagiosql/config
sudo chmod -R 6775 /usr/local/nagios/etc/nagiosql;
sudo chmod 660 /usr/local/nagios/var/rw/nagios.cmd;
sudo chmod 775 /usr/local/nagios/etc/;
sudo chmod 664 /usr/local/nagios/etc/nagios.cfg;
sudo chmod 664 /usr/local/nagios/etc/cgi.cfg;
sudo chmod g+x /usr/local/nagios/var/rw/;
sudo chgrp www-data /usr/local/nagios/etc/;
sudo chgrp www-data /usr/local/nagios/etc/nagios.cfg;
sudo chgrp www-data /usr/local/nagios/etc/cgi.cfg;
sudo sed -i 's/^cfg/#cfg/' /usr/local/nagios/etc/nagios.cfg
echo "" | sudo tee -a /usr/local/nagios/etc/nagios.cfg
echo "cfg_dir=/usr/local/nagios/etc/nagiosql" | sudo tee -a /usr/local/nagios/etc/nagios.cfg


G. Configure NagiosQL in the browser

Next, configure the application in the browser by typing the command in the browser:

http://your_ip_server/nagios/nagiosql


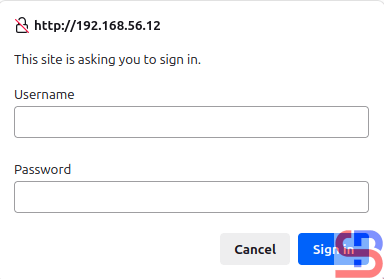
If the browser asks to insert the username and password, insert your Nagios username and password. 

Insert username and password


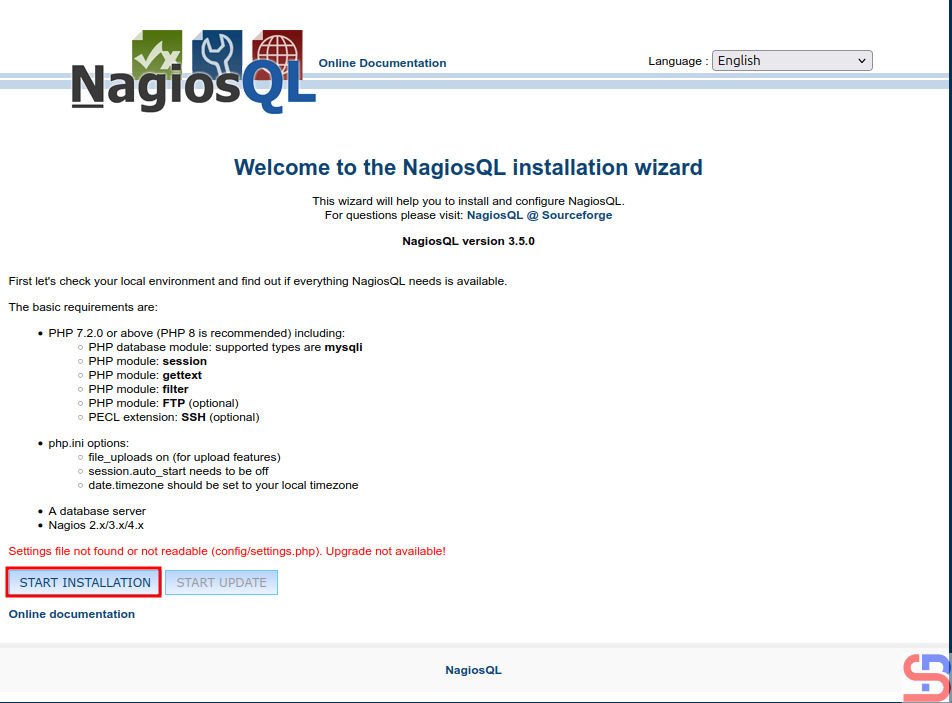
After you insert the password, there will be a display like this:

Configure the NagiosQL button


Click the START INSTALLATION button, and there is a display like the image below:

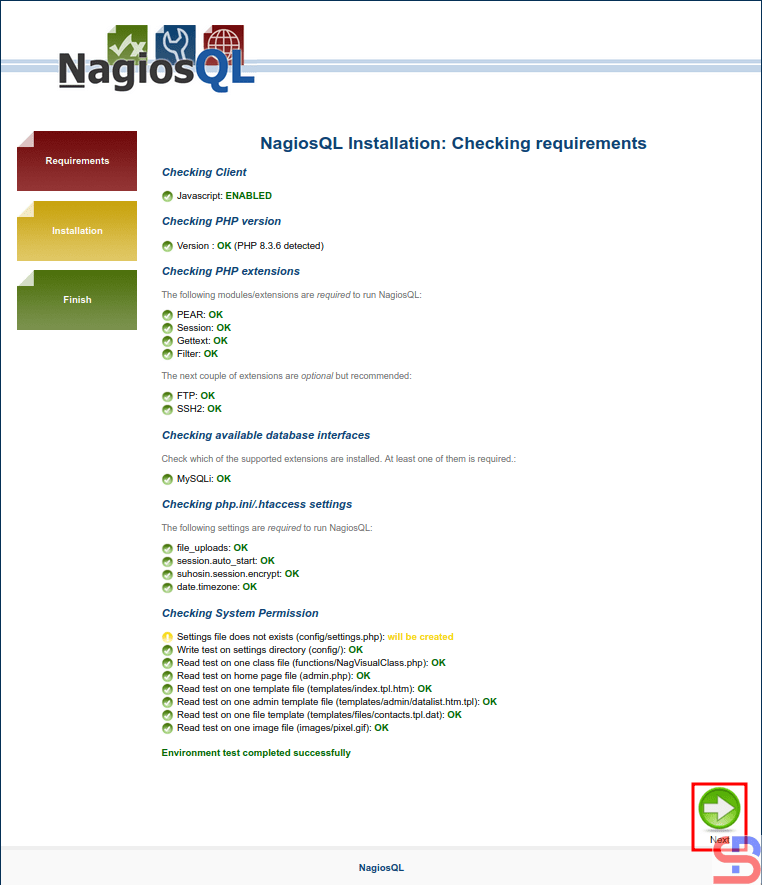
Checking requirements


Make sure there is no error like in the image above. Click the Next button, and it will be an image like this:

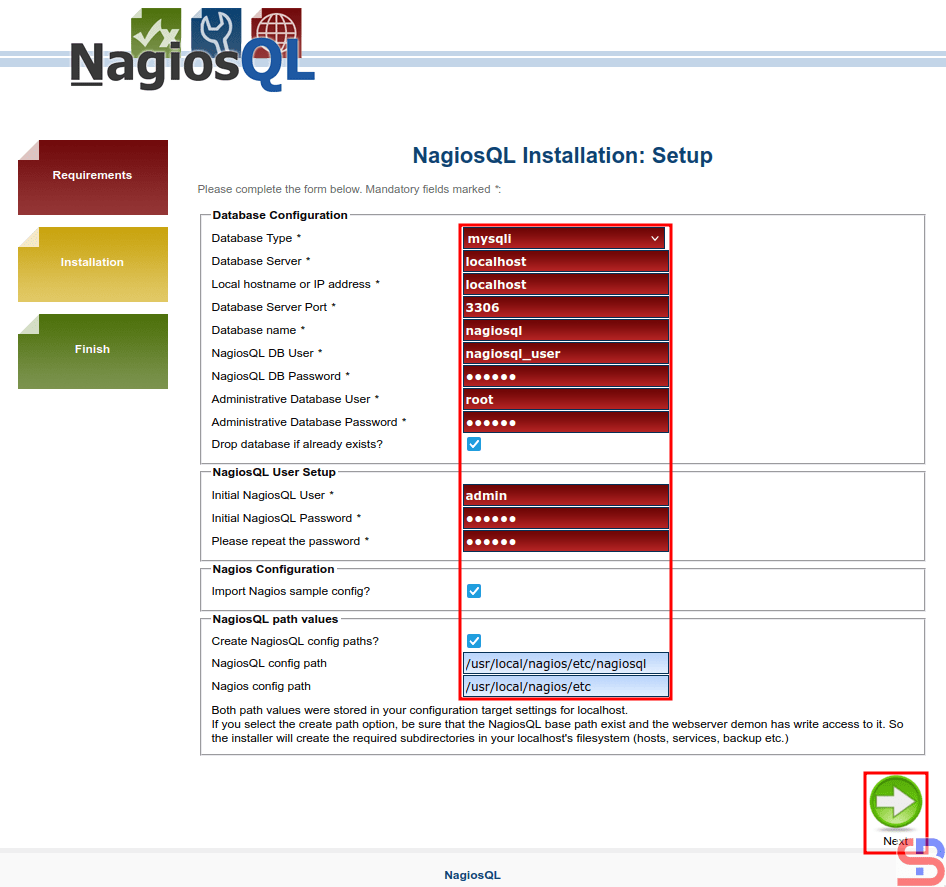
Setup NagiosQL


You must fill in the configuration columns, and I fill in like in this image above. After you fill it out, press the Next button, and there is a display like the image below:

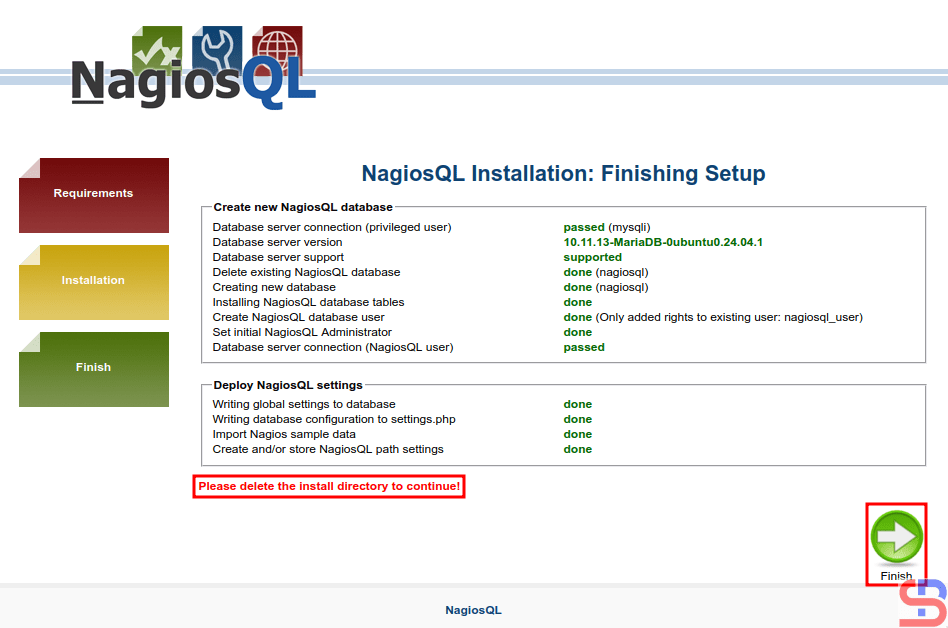
The finishing setup


Before you click the Finish button, use the command below to delete the install directory:

rm -rf /usr/local/nagios/share/nagiosql/install/


After that, click the Finish button, and it should display an image like the image below:

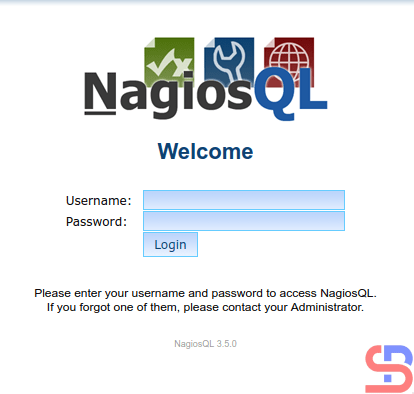
The NagiosQL login


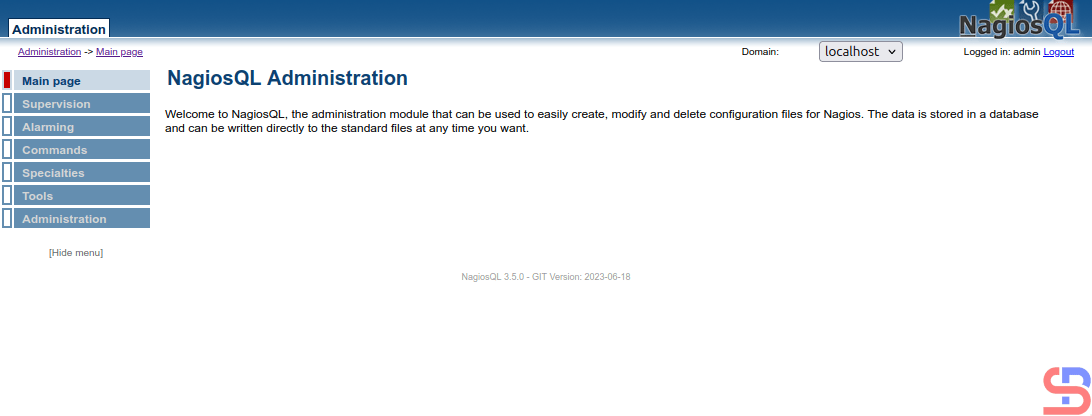
Enter the username (admin) and password, and if nothing is wrong, the NagiosQL application will appear like the image below:

The page of NagioQL administration


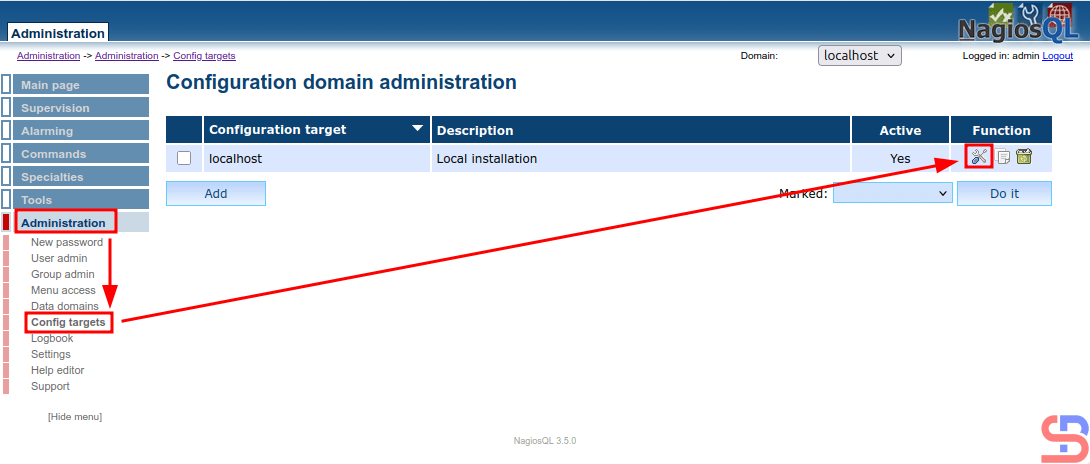
Now, configure the NagiosQL application to integrate it with Nagios. Click Administration > Config targets > Modify, like in the image below:

Configure domain administration


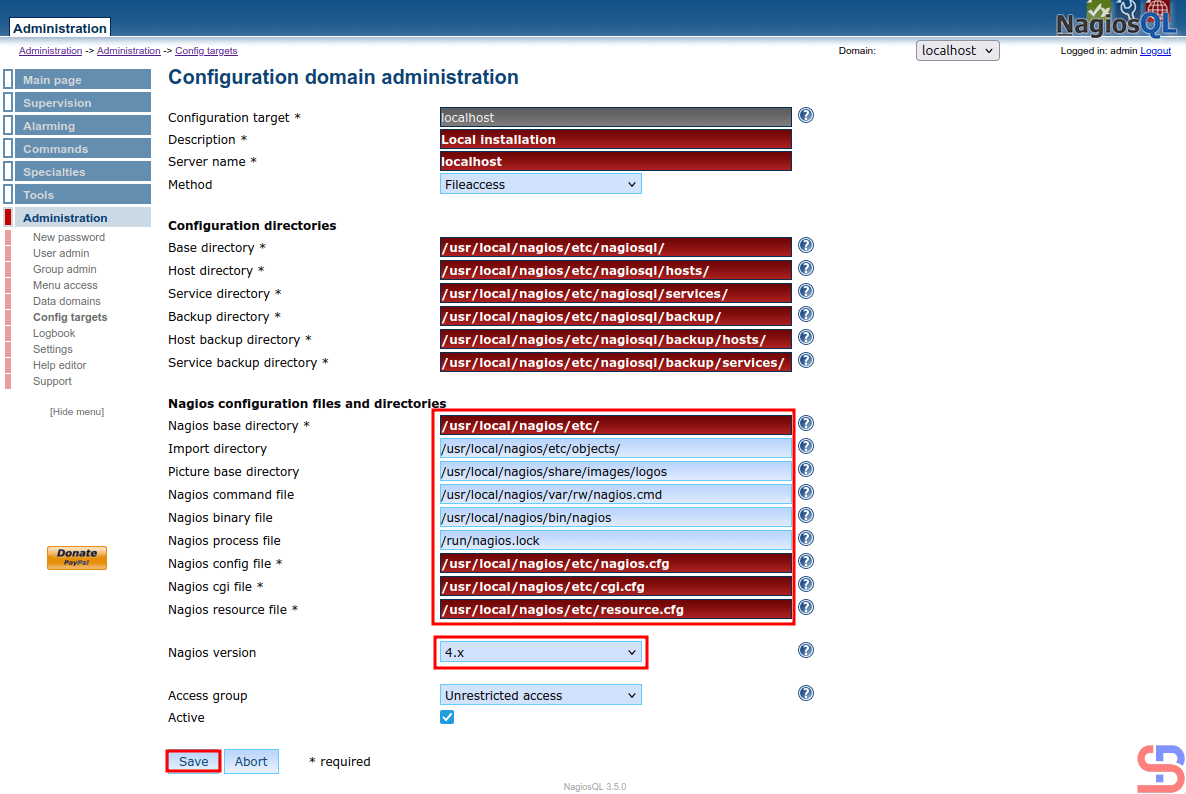
And there will be a display like the image below:

Configure the NagiosQL


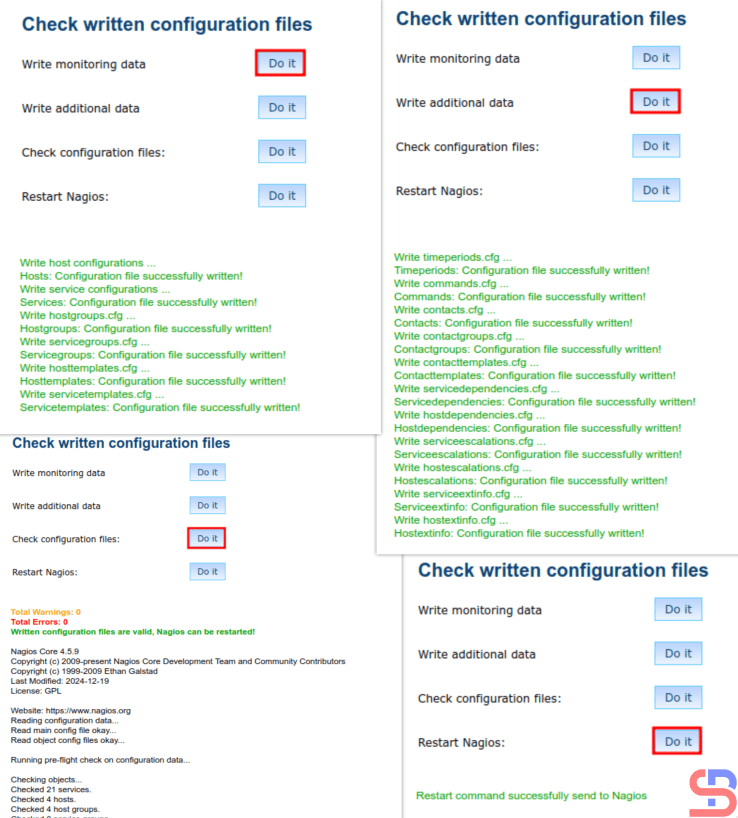
Configure in the red box like my configuration in the image above, and click the Save button. After that, go to Tools > Nagios control and click all the buttons like the image below, and make sure there is no error:

Click all the Do it buttons


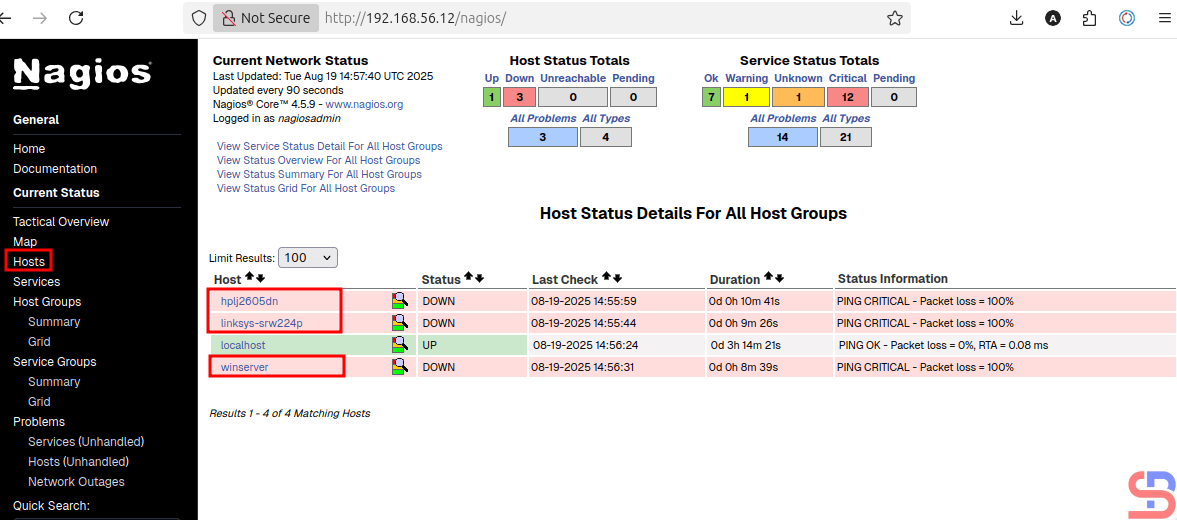
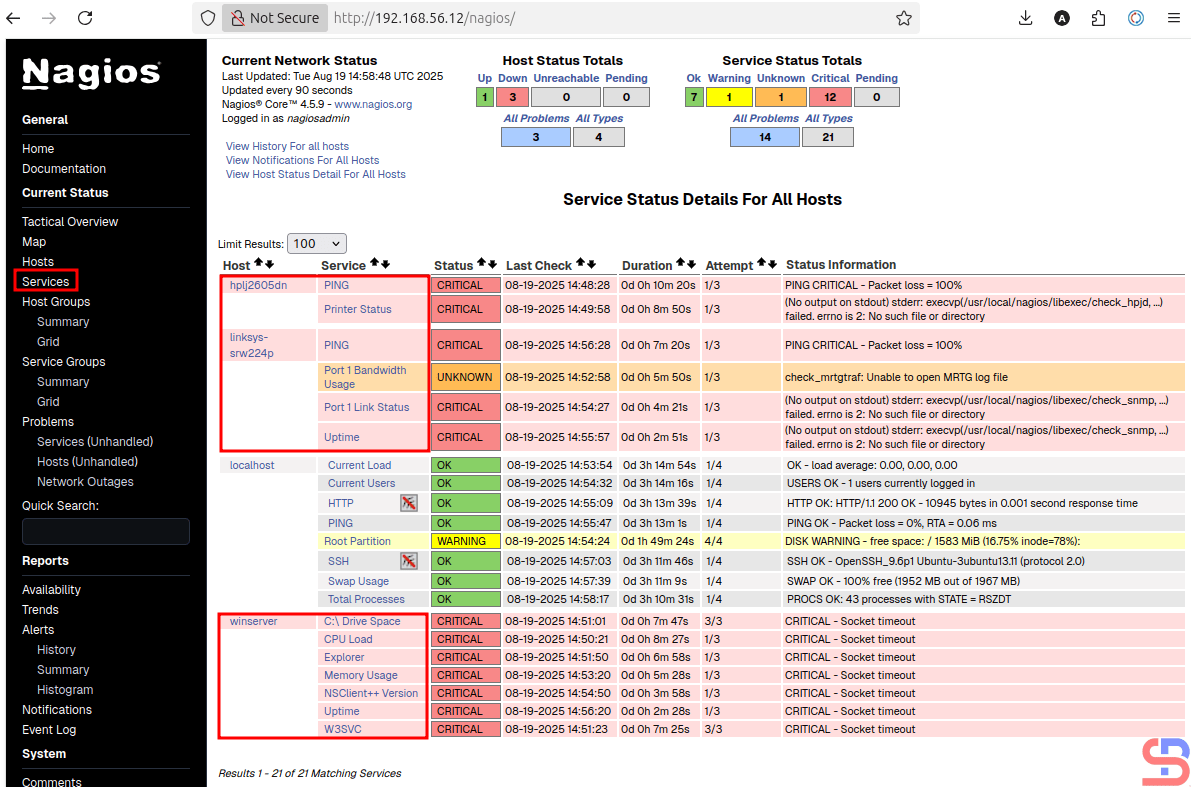
Now go to the Nagios application in the Hosts page and make sure that on the page, 3 default hosts appear in Nagios (hplj2605dn, linksys-srw224p, and winserver) besides localhost, like in the image below:

3 new hosts in the Hosts page on Nagios


Now go to the Services section, and there should be services that appear on the 3 new default hosts:

Services in the 3 new hosts


If there are 3 additional hosts in the Hosts and Services section in Nagios, you have successfully integrated the Nagios application with the NagiosQL application.

Note

You have to be careful when filling in the Configuration domain administration section, because if it is wrong in this section, then the NagiosQL application will not run properly


References

sourceforge.net
tecadmin.net


How to Create a File of a Certain Size in Linux?

The previous article has explained how to reduce the size of a file in Linux. This article will explain how to increase the size of a file in Linux.


Problem

How to create a file of a certain size in Linux?


Solution

By default, if you want to create a file, it will use the command:
touch example.txt


And the command above will generate an example.txt file with a size of 0 bytes, as shown in the image below:

Create a file in Linux


However, sometimes there are situations where you have to create a file of a certain size for a purpose, e.g., you have to create a test.txt file with a size of 2 GB, Then there are several methods to generate such files of a certain size:

1. Using the fallocate command

Use the command below to create a test.txt file with a size of 2 GB:

fallocate -l 2048MB test.txt

Using the fallocate command


2. Using the truncate command

Create a test.txt file with a size of 2 GB using the command below:

truncate -s 2048MB test.txt

Using the truncate command


3. Using the dd command

To produce a test.txt file that is 2 GB in size, run the command below:

dd if=/dev/zero of=test.txt bs=1M count=2048MB

Using the dd command


4. Using the head command

Use the command below to generate a test.txt file of size 2 GB:

head --bytes 2048MB /dev/zero > test.txt

create a file of a certain size
Using the head command


5. Using the tail command

Utilize the following command to generate a 2 GB test.txt file:

tail --bytes 2048MB /dev/zero > test.txt

create a file of a certain size
Using the tail command


6. Using Perl commands

Below is the command to create a 2 GB test.txt file (the number 2147483648 comes from 2048x1024x1024):

perl -e 'print '0' x 2147483648' > test.txt

create a file of a certain size
Using the Perl command


7. Using the base64 command

Create a 2 GB test.tx file, followed by (the number 2147483648 comes from 2048x1024x1024):

base64 /dev/urandom | head -c 2147483648 > test.txt

create a file of a certain size
Using the base64 command


Note

To get quick results when creating a file of a certain size, you can use the truncate or fallocate command.


References

baeldung.com
tutorialspoint.com
ostechnix.com
unix.stackexchange.com
stackoverflow.com


How to Reduce the Size of a File on Linux?

One that often causes the hard drive on the Linux device to decrease its size is the number of very large files that are usually logged by an application. Therefore, as a Sysadmin, you must maintain and supervise the files so that the size is not too large. This article will explain how to reduce the size of a file on Linux.


Problem

How to reduce the size of a file on Linux?


Solution

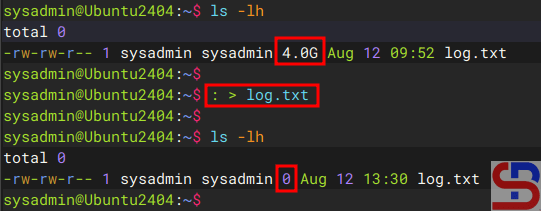
There are several methods to reduce a file in Linux, and assume that you have a log.txt file measuring 4 GB.

A. Up to 0 Bytes

There are several methods to reduce the file size to 0 bytes:

1. Using the colon command

Use the below command to reduce the file to 0 bytes:

: > log.txt

Reduce the file size up to 0 bytes using the colon command


2. Using the cat command

To decrease the file to 0 bytes, use the command below:

cat /dev/null > log.txt

Reduce the file size up to 0 bytes using the /dev/null command


3. Using the echo command

Use the command below to reduce the file size to zero bytes.:

echo -n > log.txt

Reduce the file size up to 0 bytes using the echo command


4. Using the redirection command

To get the file down to zero bytes, use the command below:

> log.txt

Reduce the file size up to 0 bytes using the redirection command


5. Using the truncate command

To shrink the file to zero bytes, use the command below:

truncate -s 0 log.txt

Reduce the file size up to 0 bytes using the truncate command


B. Up to 1 Byte

To reduce the file size to 1 byte, use the command below:

echo "" > log.txt

Reduce the file size to 1 byte


C. Reduce the file size to a certain size

To reduce the file size to a certain size (for example, make the file size 100 M), use the following command:

truncate -s 100M log.txt

Reduce the file size to a certain size


Note

By using the command above, you can reduce the size of a file, causing the size of the hard disk on the Linux device to increase. And if you experience failure in reducing the file size, then usually the problem is with the write permissions on the file. Use the command below so that the file gets write permission to reduce the file size:

sudo sh -c '> filename'


Change the filename to your real filename. After that, run one of the commands above, and the file size should be reduced.


References

namehero.com
phoenixnap.com
operavps.com
linuxconfig.org


How to Use the Trash-cli as Recycle Bin in Linux?

The previous article explained how to create a recycle bin in the Linux CLI without installing an application. This article will explain how to create a recycle bin in the Linux CLI using the trash-cli application.


Problem

How to use the trash-cli as a recycle bin in Linux?


Solution

Trash-cli is an application to trash files, recording the original path, deletion date, and permissions, which can function as a recycle bin in the Linux CLI.

A. Install the app

RockyLinux/AlmaLinux/CentOS

yum install epel-release
yum install trash-cli


Ubuntu/Debian

sudo apt update
sudo apt-get install trash-cli


OpenSUSE

zypper addrepo https://download.opensuse.org/repositories/home:siegel/openSUSE_Leap_15.1/home:siegel.repo
zipper refresh
zypper install python-trash-cli


You can also install this application from GitHub by using the command below:

git clone https://github.com/andreafrancia/trash-cli.git
cd trash-cli
python setup.py install


To see the trash-cli version installed, you can use the command:

trash --version

Display version of trash-cli


B. Delete item(s)

If you want to delete a file, for example, the images.zip file, then use the command below:

trash images.zip


If you want to delete more than one file, you can delete them directly using, for example, the command below:

trash test.txt chatgpt.png 


You can also delete folder(s) using the format above.


C. Displays deleted item(s)

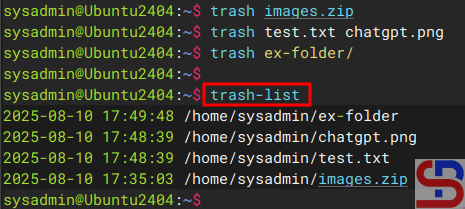
To show deleted file(s) and folder(s), use the command below:

trash-list

Displays the contents in the trash


D. Restore item(s)

To restore deleted item(s), use the command below:

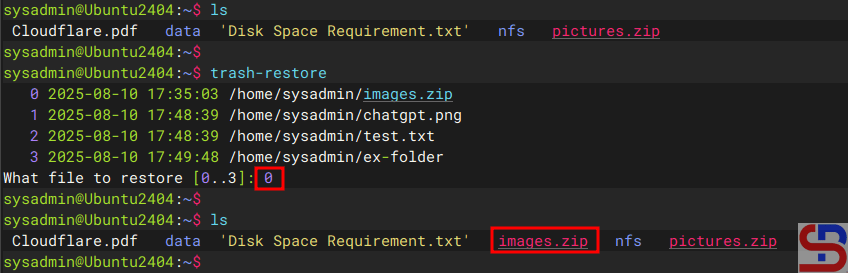
trash-restore


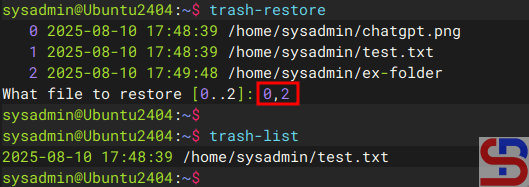
It will display all the items that have been deleted, and you will be asked to select the files to be restored. Enter the file number, and the file will be restored to its original location as in the image below:

Restoring the content from the trash


If you want to restore more than one item, you can write file numbers separated by commas.

Restoring the contents from the trash


E. Empty the trash bin

If you want to empty the trash bin, use the command below:

trash-empty


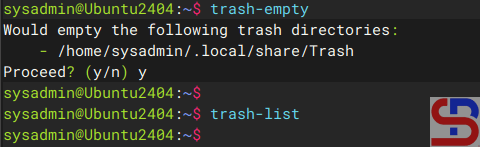
All items in the trash can be deleted as shown in the image below:

Empty the trash


In addition, you can delete some items that are more than 3 days old by using the command:

trash-empty 7


You can also delete items with the .zip extension by using the command:

trash-empty *.zip


F. Combine the rm command with the trash application

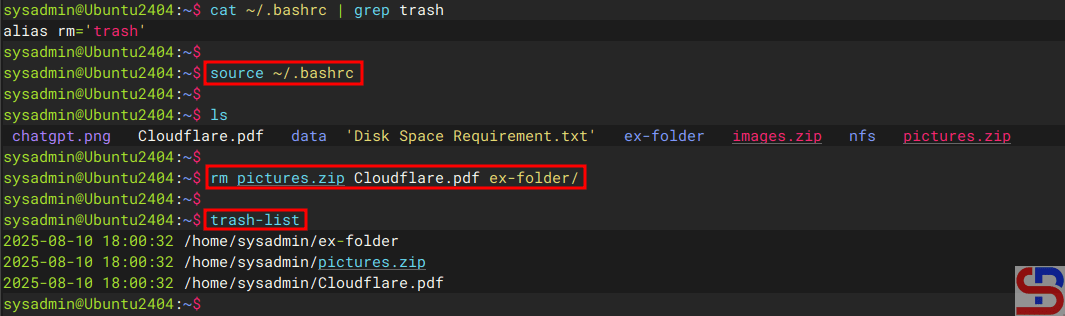
By default, you have to use the trash command to delete a file or folder when using the trash-cli application. However, Linux uses the rm command to delete a file or folder. Therefore, you can combine the rm command and the trash command by adding the script below to the .bashrc file:

alias rm=`trash`


After that, run the command:

source ~/.bashrc


Then, try deleting files or folders using the rm command, then the items that have been deleted using the rm command should be in the trash can using the trash-list command, as in the image below:

Combine the rm command with trash-cli


Warning
If you combine the rm command with the trash application, you can delete the folder without using -rf option like in the image above.


Note

You have to manually change the .bashrc file for each user who wants to combine the rm command and this trash application. You can also use crontab for each user to delete items in the trash can. Just like the previous method, the weakness of this method is that if you use sudo to delete a file or folder, the file or folder will be immediately deleted from the Linux system and will not be saved in the Recycle bin that has been created. So be careful about that.


References

github.com
tecmint.com
vitux.com
installati.one


How to Share a Folder Between Container Hosts?

The previous articles have explained storage connections using volume and bind mount. This article will describe how to share a folder so that containers on other hosts can access it.


Problem

How to share a data folder between container hosts?


Solution

In this article, I use 3 servers where 1 server runs an NFS server with an IP of 192.168.56.12, and 2 servers run Docker with IPs 192.168.56.2 (docker1) and 192.168.56.102 (docker2). You can go to this article about NFS, and I use the /var/nfs folder as a data folder for all containers. After installing NFS on the server, type the following commands to configure NFS in the NFS server:

sudo mkdir /var/nfs
sudo chmod -R 777 /var/nfs
sudo echo "/var/nfs 192.168.56.0/24(rw,sync,no_subtree_check,no_root_squash)" | sudo tee /etc/exports
sudo exportfs -r
sudo touch /var/nfs/test.txt
sudo bash -c 'echo "This is from NFS server" > /var/nfs/test.txt'


Warning
I think you should know the version of NFS you are using by typing the command nfsstat -s so that when creating the container for the nfsvers option, you can fill the option with that version of NFS.


On 2 other Docker hosts, type the command below to make a volume Docker:

docker volume create --driver local \
  --opt type=nfs \
  --opt o=addr=192.168.56.12,rw,nfsvers=4,noatime,nodev,nosuid \
  --opt device=:/var/nfs \
  nfs_volume


After that, type the command below on those 2 Docker hosts to run the container connected to your NFS server:

docker run --rm -it -u root --workdir /root \
  --mount source=nfs_volume,target=/root \
  alpine ash


INFO
The docker run ‐-rm -it image_name shell command is used to run a container, and then you go to the folder / in the container. Add the  ‐-workdir /root option if you want to directly access the /root folder automatically after the container is formed. And if you exit from the container, the container is deleted instantly.


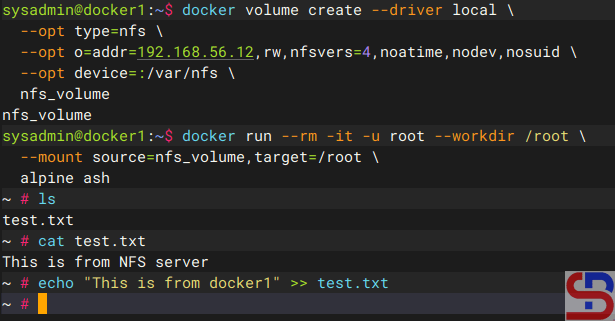
The image below is an example of when a container from docker1 host (192.168.56.2) accesses the NFS server:

Access the NFS folder from the docker1 host


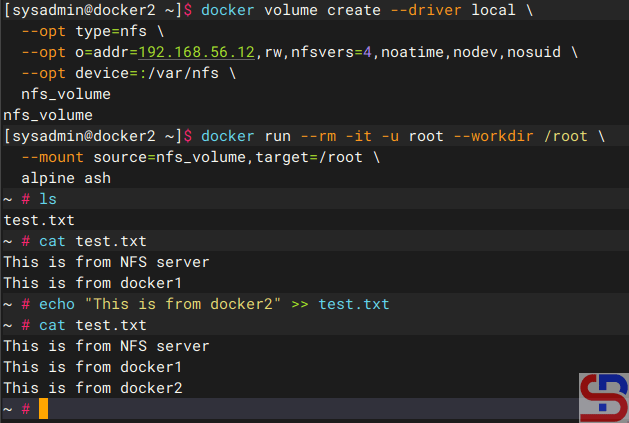
The image below is an example of when a container from the docker2 host (192.168.56.102) accesses the NFS server:

Access the NFS folder from docker2 host


As you can see in the images above, all containers can access the NFS server and can change the files on the NFS server.


Note

On the internet, some developers make a Docker plugin to access NFS servers from containers, such as plugins docker-volume-netshare, nfs- volume-plugin, nfsvol, and so on. I have tried the first 3 plugins, but I always failed when accessing the NFS server using the plugins. But, there is a Docker plugin called docker-volume-sshfs that can access a folder, but the connection does not use NFS; but uses SSH, so you don’t need to install and configure NFS. As long as the folder can still be accessed using SSH, then this Docker plugin can still be used. For example, I create /home/sysadmin/data  as a data folder in IP 192.168.56.12, so I use the commands below to create the folder:

mkdir /home/sysadmin/data
cd /home/sysadmin/data
echo "This is from server" > test.txt


On the 2 Docker hosts, use the command below to install the Docker plugin:

docker plugin install --grant-all-permissions vieux/sshfs DEBUG=1
docker plugin ls

Install Docker plugin vieux/sshfs


Use the command below to create a volume in Docker:

docker volume create \
-d vieux/sshfs \
-o sshcmd=sysadmin@192.168.56.12:/home/sysadmin/data \
-o port=22 \
-o password=qwerty \
ssh_volume 


After that, use the command below to run the container to connect to the folder:

docker run -it --rm \
--workdir /root  \
-v ssh_volume:/root  \
alpine sh


The image below is an example of when a container from docker1 host (192.168.56.2) accesses the data folder:

Access the data folder from docker1 host


The image below is an example of when a container from docker2 host (192.168.56.102) accesses the data folder:

Access the data folder from docker2 host


As you can see in the images above, all containers can access the data folder and can change the files in the folder.


References

youtube.dimas-maryanto.com
docs.docker.com