How to Display a Partition That is Not Visible in Linux?

I installed dual-boot Windows 11 with Linux Mint on my laptop and allocated almost 110 GB of hard disk size for Linux Mint. However, after Linux Mint is installed, only 49 GB of hard disk size is displayed.


Problem

How to display a partition that is not visible in Linux?


Solution

I have a hard disk of almost 500GB and I installed dual-boot Linux Mint alongside Windows Boot Manager where the last two partitions are used as Linux partitions like in the image below:

Display the partitions


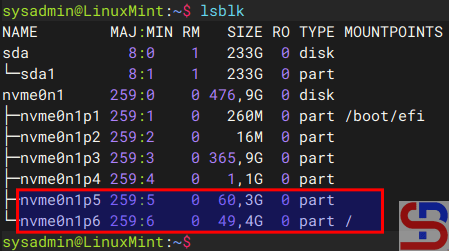
From the image above you can see that 2 partitions in Linux have a hard disk size of 60 GB and 49 GB respectively. But when I display the hard disk size using df -h command, I just see only one partition like in the image below:

Only one partition appears

After I searched on the internet, the root cause of the invisible partition was not mounted. Here are the steps to display an invisible Linux partition and I want to mount it to my /home folder:

1. Backup the folder

Backup first the folder you want and in this case the /home folder I will backup first:

sudo cp -a /home /home_backup


2. Check the filesystem

Check the filesystem of the partition using the command below:

sudo lsblk -f

Check the filesystem


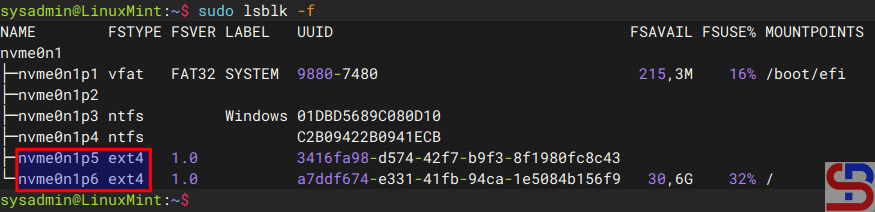
From the image above, the “invisible” partition has an ext4 format type. If the partition is not formatted, format it using the command below if you want an ext4 format for the partition and adjust it to the name of your Linux partition:

sudo mkfs.ext4 /dev/nvme0n1p5


3. Create a temporary mount

Now, create a temporary mount and move existing home data using the commands below:

sudo mkdir /mnt/new_home
sudo mount /dev/nvme0n1p5 /mnt/new_home
sudo cp -a /home/. /mnt/new_home/


4. Unmount the temporary mount

Use the command below to unmount the temporary mount:

sudo umount /mnt/new_home


5. Update the fstab file

Now, update the /etc/fstab file to it at /home on boot so the folder remains after the device restarts. Copy the script below and paste to the file:

/dev/nvme0n1p5  /home  ext4  defaults  0  2


6. Mount the folder

Now, mount the /home folder using the commands below:

sudo mount /home
sudo systemctl daemon-reload
df -h


For more details see the image below:

display a partition that is not visible
The commands to mount /home


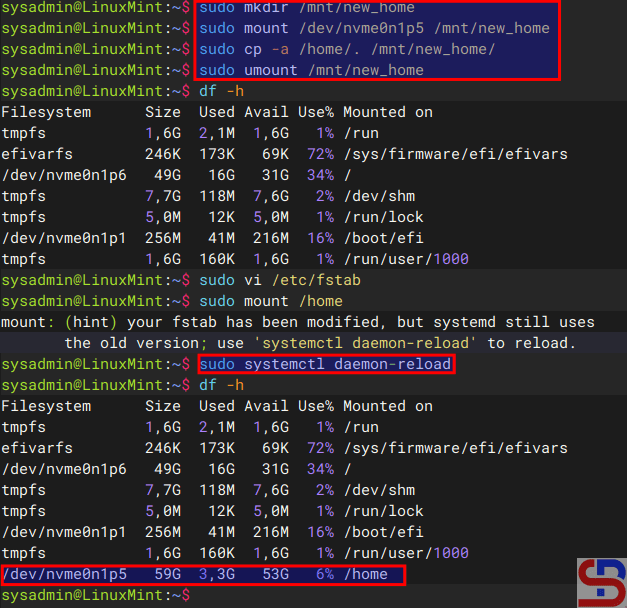
From the image above, you see that the invisible partition is already mounted to the /home folder.


Note

Try to reboot the device to make sure the folder remains after the device reboots and the /home folder should be mounted from /dev/nvme0n1p5. If something goes wrong, you can restore the old home with the command below:

sudo mv /home_backup /home


And then remove the fstab entry to boot normally. Once you have restarted the appliance and you see that there is no error so that you can access the folder you just created (in this case the /home folder), you can delete the /home_backup folder by using the command below:

rm -rf /home_backup


References

geeksforgeeks.org
hivelocity.net
forums.linuxmint.com


How to Share a Folder Between a Windows Host and a Linux Guest in VirtualBox?

The previous article explained how a folder is shared between a Windows host and a Windows guest in VirtualBox. This article will explain how to share a folder between a Windows host and a Linux guest in VirtualBox.


Problem

How to share a folder between a Windows host and a Linux guest in VirtualBox?


Solution

I use VirtualBox version 7.1.4 in this article and below are the steps so that you can share a folder between a Windows host and a Windows guest in VirtualBox:

A. In the Host

Create a folder on your host and I create a VirtualBox folder on drive D like in the image below:

The shared folder


B. In the Guest

You don’t need to install a driver if you use Linux as a guest. You need to configure the shared folder in VirtualBox. Go to SettingsShared Folders and click the icon like in the image below:

Click the icon in the Shared Folders section


Fill the columns like in the image below:

Settings the shared folders


Click the OK button and the shared folder will appear like in the image below:

The shared folder appears


Click the OK button. After that, turn on your virtual machine by clicking the Start button like in the image below:

Turn on the VM


Make a folder in Linux and I created a folder /mnt/shared using the command below:

sudo mkdir /mnt/shared


Execute the below command to mount the shared folder with your folder:

sudo mount -t vboxsf VirtualBox /mnt/shared


And you should be able to access the shared folder as shown in the image below:

Accessing the shared folder


You can add or remove the file in the shared folder like in the image below:

Create a new file in the shared folder


Note

If you restart the Linux on your virtual machine, you will lose your shared folder and you have to be recreated. To avoid that, then use the command below to configure the /etc/fstab file so that the shared folder is not lost when this virtual machine is restarted:

echo 'VirtualBox       /mnt/shared     vboxsf  rw 0 0' | sudo tee -a /etc/fstab


Any guest using any Linux distribution should be able to follow the above instructions.


References

docs.oracle.com
debugpoint.com


How to Share a Folder Between a Windows Host and a Windows Guest in VirtualBox?

VirtualBox has a feature where you can access the files on a folder in your host from your virtual machine. For example, your host is Windows and you want to send some files to your Windows virtual machine. 


Problem

How to share a folder between a Windows host and a Windows guest in VirtualBox?


Solution

You can view or change the files from your host system from within the guest system using Oracle VM VirtualBox’s shared folders capability. Shared folders physically reside on the host and are then shared with the guest, which uses a special file system driver in the Guest Additions to talk to the host. For Windows guests, shared folders are implemented as a pseudo-network redirector and the Guest Additions provide a virtual file system For Linux and Oracle Solaris guests. I use VirtualBox version 7.1.4 in this article and below are the steps so that you can share a folder between a Windows host and a Windows guest in VirtualBox:

A. In the Host

Create a folder on your host and I create a VirtualBox folder on drive D like in the image below:

The shared folder


B. In the Guest (VirtualBox)

To connect the folder, you need the driver to connect them and the driver has been provided by VirtualBox that is available in an ISO file. Go to this page to install the driver. After you install the driver, configure the shared folder in VirtualBox. Go to SettingsShared Folders and click the icon like in the image below:

share a folder between a Windows host and a Windows guest in VirtualBox
Click the icon in the Shared Folders section


Fill the columns like in the image below:

share a folder between a Windows host and a Windows guest in VirtualBox
Settings the shared folders


Click the OK button and the shared folder will appear like in the image below:

share a folder between a Windows host and a Windows guest in VirtualBox
The shared folder appears


Click the OK button. After that, turn on your virtual machine by clicking the Start button like in the image below:

share a folder between a Windows host and a Windows guest in VirtualBox
Turn on the VM


Go to This PC page and you will see the view in the image below:

This PC image


Double-click the VirtualBox (Z:) and you should be able to access the folder like in the image below:

Access the shared folder


Now, you can access the shared folder and you should add the file like in the image below:

Add the file to the shared folder


Note

You can configure the shared folder or mount the iso after you turn on the virtual machine like in the image below:

Configure the shared folder after turning on the VM


References

virtualbox.org
youtube.com
docs.oracle.com
blogs.oracle.com


How to Install the VirtualBox Guest Additions?

The Guest Additions in VirtualBox is used to optimize the guest operating system for better performance and usability.


Problem

How to install the VirtualBox Guest Additions?


Solution

The Oracle VM VirtualBox Guest Additions for all supported guest operating systems are provided as a single CD-ROM image file which is called VBoxGuestAdditions.iso. This image file is located in the installation directory of Oracle VM VirtualBox. These are the steps to install the ISO in the Windows and Linux guests.

A. In the Windows guest

Open your VirtualBox, click your guest or your virtual machine, click SettingsStorage, and then click the icon like in the below image:

Click the icon in the Storage


Choose the VBoxGuestAdditions.iso like in the below image:

install the Guest Additions in VirtualBox
Choose the iso


Click the Choose button and the iso will appear like in the image below:

install the Guest Additions in VirtualBox
The iso appear


After that, turn on your virtual machine by clicking the Start button like in the image below:

install the Guest Additions in VirtualBox
Turn on the VM


Go to This PC page and you will see the view in the image below:

Right-click the CD


Right-click the CD Drive and click Open, so there is a display like in the image below:

Choose the installer


Double-click on the installer in the red box if your guest is 64-bit, and display it like in the image below:

The installation will start


Click the Next button and continue until the driver installation is successful until it displays as shown in the image below:

The installation ends


Choose the Reboot now and click the Finish button.


B. In the Linux guest

Open your VirtualBox, click your guest or your virtual machine, click SettingsStorage, and then click the icon like in the below image:

Click the icon in the Storage section


Choose the VBoxGuestAdditions.iso like in the below image:

install the Guest Additions in VirtualBox
Choose the ISO


Click the Choose button and the iso will appear like in the image below:

install the Guest Additions in VirtualBox
The ISO appear


After that, turn on your virtual machine by clicking the Start button like in the image below:

install the Guest Additions in VirtualBox
Turn on the VM


Make a folder in Linux and I created a folder /mnt/cdrom using the command below:

sudo mkdir /mnt/cdrom


Execute the below command to mount the shared folder with your folder:

sudo mount /dev/sr0 /mnt/cdrom/


Install some packages by running the command below:

Ubuntu

sudo apt update
sudo apt install -y bzip2 tar gcc make perl


RockyLinux/AlmaLinux/CentOS

sudo dnf install -y bzip2 tar gcc make perl


OpenSUSE

sudo zypper install -y bzip2 tar gcc make perl


After installation, go to the folder cdrom:

cd /mnt/cdrom


Execute the command below and wait until finish:

sudo sh VBoxLinuxAdditions.run


After that, reboot your virtual machine.


Note

Guest Addition will be very useful if your guest uses graphics such as Windows OS or Linux that have graphics because it will improve performance and usability such as Mouse pointer integration, better video support, shared clipboard, and so on. But if you use the Linux CLI in the guest, this guest addition will not be useful.


References

virtualbox.org
blogs.oracle.com
greenwebpage.com


How to Configure UFW to be Port Forwarding?

The previous article explained how to configure the firewalld to become a port forwarding. This article will explain how to configure ufw applications in Ubuntu to become a port forwarding.


Problem

How to configure ufw to be port forwarding?


Solution

There are 2 methods of port forwarding: forward the connection of a port to one IP/device and forward the connection of a port to a different IP/device.

A. Forward to the same IP/device

Suppose you have an Ubuntu server with IP address 192.168.56.102 and want to close port 22 but open port 43210 if someone wants to access the server via SSH. Change the SSH port like in this article, and you have to enable ufw in the server using the command below:

sudo ufw enable


Answer the question by pushing the y button. Now type the below commands to open port 22 and port 43210:

 sudo ufw allow 43210/tcp


Check the SSH port using the below command and make sure the SSH port is pointed to the new port (port 43210) like in the below image:

Check the port


If the port is still connected to port 22, you can go to this article to change the SSH port. Now, try to access the server using the command below:

ssh sysadmin@192.168.56.102 -p 43210

Access to the server via SSH using the port


You should access the server like in the image above. Now, you want to implement the port forwarding in the ufw so the sysadmin doesn’t need to write -p 43210 anymore. So, you have to configure the before.rules file in the /etc/ufw folder. In short, before.rules typically contains rules that handle essential network traffic before ufw’s User-Defined Rules are applied. I think you have to backup the file before you configure the file using the below command:

sudo cp /etc/ufw/before.rules /etc/ufw/before.rules.ori
sudo vi /etc/ufw/before.rules


After that, copy the script below to the file before the *filter section:

# Port forwarding from port 22 to port 43210
*nat
:PREROUTING ACCEPT [0:0]
-A PREROUTING -p tcp --dport 22 -j REDIRECT --to-port 43210
COMMIT

Configure the before.rules file


Restart ufw using the command below:

sudo ufw reload


Now, try to access using the command below:

ssh sysadmin@192.168.56.102


You should access to the server without writing the port anymore like in the image below:

Access to the server without writing the port


B. Forward to the different IP/device

Suppose you have a Ubuntu server with IP address 192.168.56.102 and port 22 is available. You would like users who access the server using SSH to forward to port 22 with IP address 192.168.56.2 using RockyLinux. So, these are the steps:

1. Configure ufw

Check your Ubuntu server to see whether UFW is running on the server using the command below:

sudo ufw status


If it still doesn’t run, use the command below to have ufw run on that server:

sudo ufw enable


Answer the question by pushing the y button. Then, open port 22 by using the command below:

sudo ufw allow 22/tcp


To run the forwarding port on UFW, you must configure the before.rules file in the /etc/ufw folder. In short, before.rules typically contains rules that handle essential network traffic before ufw’s User-Defined Rules are applied. I think you have to backup the file before you configure the file using the below command:

sudo cp /etc/ufw/before.rules /etc/ufw/before.rules.ori
sudo vi /etc/ufw/before.rules


After that, copy the script below to the file before the *filter section:

*nat
:PREROUTING ACCEPT [0:0]
:POSTROUTING ACCEPT [0:0]

# Forward traffic from 192.168.56.102:22 → 192.168.56.2:22
-A PREROUTING -d 192.168.56.102 -p tcp --dport 22 -j DNAT --to-destination 192.168.56.2:22

# Masquerade outgoing traffic (adjust eth0 to your outgoing interface)
-A POSTROUTING -s 192.168.56.0/24 -o eth0 -j MASQUERADE

COMMIT

configure ufw to be a port forwarding
Configure the before.rules file


2. Enable IP Forwarding

Go to the /etc/default/ufw file  and change the file from:

DEFAULT_FORWARD_POLICY="DROP"

to

DEFAULT_FORWARD_POLICY="ACCEPT"


After that, go to the /etc/sysctl.conf file and uncomment or add in the file:

net.ipv4.ip_forward=1


And run the below commands:

sudo sysctl -p
sudo ufw reload


3. Test the result

Now, try to access the Ubuntu server which has an IP 192.168.56.102 and you should be forwarded to the Rockylinux server that uses IP 192.168.56.2 like the below image:

ssh sysadmin@192.168.56.102

configure ufw to be a port forwarding
Test access


If you have a display like the image above, you have succeeded in making ufw as a forwarding port to a different IP/device.


Note

If you get an error like this:

WARNING: REMOTE HOST IDENTIFICATION HAS CHANGED!

Error when connecting the server via SSH


When you get this error, the system gives the clue to solve this error. Based on the picture above, you can go to the /home/sysadmin/.ssh/known_hosts file and delete line 6 or you run the command below:

ssh-keygen -f '/home/sysadmin/.ssh/known_hosts' -R '192.168.56.102'


References

baeldung.com
gist.github.com
tecadmin.net
bobcares.com


How to Access the Server via SSH After Changing the SSH Port?

The previous article explained how to change the SSH port. Nevertheless, after I changed the port, I could not access the server via SSH using the new port.


Problem

How to access the server via SSH after changing the SSH port?


Solution

Let’s say you have changed the SSH port from port 22 to port 43210 by changing it in the /etc/ssh/sshd_config file and checking the port by typing the command below:

sudo grep -E "^Port" /etc/ssh/sshd_config


After that, restart the SSH using the command below:

sudo systemctl restart sshd

resolve the issue after changing the port in SSH
Change to the new port in SSH


However, you can’t access the server via SSH using port 43210 but can still access via SSH port 22 as shown in the image below:

resolve the issue after changing the port in SSH
Test the result


In the remote, type the command below to check if the SSH port has changed to Port 43210 or not:

sudo ss -tulnp | grep sshd 


If you find the result as shown in the image below:

resolve the issue after changing the port in SSH
Check the port


It means the SSH is still connected to port 22 and not to port 43210. Therefore, type the commands below:

sudo systemctl stop ssh.socket
sudo systemctl disable ssh.socket
sudo systemctl mask ssh.socket
sudo systemctl restart sshd


Run the previous command to check the port:

sudo ss -tulnp | grep sshd

access the server via SSH
Check the port


You can see in the image above that the SSH port has changed to port 43210 and you should be able to access the server via SSH using port 43210.

access the server via SSH
Test the result


Note

The socket statistics, or ss, is a tool to display network socket information. This tool has the same function as netstat but has several advantages such as faster, filtering by connection state (e.g., established, time-wait), debugging high-performance networks, and so on.


References

askubuntu.com
rome-rohani.medium.com
discourse.ubuntu.com
community.clearlinux.org
redhat.com


How to Configure Firewalld to be Port Forwarding?

Port forwarding is a networking technique used to redirect communication requests from one port number to another port number, typically across a network boundary such as a router or firewall. This technique can be used with Firewalld, available in RockyLinux, or derivative distros from RHEL such as AlmaLinux, CentOS, and others.


Problem

How to configure Firewalld to be port forwarding?


Solution

If you want to see the command in firewalls to run port forwarding, type the below command:

firewall-cmd --help | grep forward

The commands in firewalld for port forwarding


There are 2 methods of port forwarding: forward the connection of a port to one IP/device and forward the connection of a port to a different IP/device.

A. Forward to the same IP/device

By default, you must use the format below to forward a port in a device:

firewall-cmd --add-forward-port=port=port-number:proto=tcp|udp|sctp|dccp:toport=port-number


You can add an option  ‐-permanent if you want the rule to remain after reloading or rebooting the system. For example, you have a server with IP 192.168.56.2 where port 22 on the server is closed so to access the server via SSH must use port 43210. If you follow this article, then you must type the command below to access the server:

ssh sysadmin@192.168.56.2 -p 43210

Access the server via SSH using the port


However, by implementing a port forwarding you can access the server without typing the port. Let’s say, the firewalld is in the device, then on the device open port 43210 using the command:

sudo firewall-cmd --add-port=43210/tcp --permanent
sudo firewall-cmd --reload


In the file /etc/sshd/sshd_config, change the port to be as below:

Port 43210


After that restart SSH by using the command:

sudo systemctl restart sshd


After that, type the commands below to configure the forwarding port in the firewalld:

firewall-cmd --add-masquerade --permanent
firewall-cmd --add-forward-port=port=22:proto=tcp:toport=43210 --permanent
firewall-cmd --reload
firewall-cmd --list-all

The commands to configure firewalld to be port forwarding


type the command below to access the server via SSH:

ssh sysadmin@192.168.56.2


You should be able to enter the server without having to type the 43210 port as shown below:

Access the server via SSH without writing the port


B. Forward to a different IP/device

By default, use the format below to forward a port to a different IP/device:

firewall-cmd --add-forward-port=port=port-number:proto=tcp|udp|sctp|dccp:toport=port-number:toaddr=ip_address


If you want the rule to stay in place after a system reboot or reload, you can add a ‐-permanent option. As an illustration, suppose you have a server with IP address 192.168.56.2 and port 22 is available. You would like users who access port 22 to forward to port 22 with IP address 192.168.56.102. Use the command below to configure firewalls:

firewall-cmd --add-masquerade --permanent
sudo firewall-cmd --add-forward-port=port=22:proto=tcp:toport=22:toaddr=192.168.56.102 --permanent
firewall-cmd --reload
firewall-cmd --list-all

configure Firewalld to be port forwarding
Add a forwarding port to a different IP in firewalld


If you type the command below:

ssh sysadmin@192.168.56.2


You will be forwarded to a server that uses IP 192.168.56.102 as shown below:

configure Firewalld to be port forwarding
Forward a port to another IP/device


Note

To see rule forwarding is in the rule in the firewall, besides being able to use the firewall-cmd ‐-list-all command, you can also use the command below:

sudo firewall-cmd --list-forward-ports


then you will see the results as shown below:

configure Firewalld to be port forwarding
Using –list-forward-ports option


And if you want to delete a rule port forwarding in the firewall, then you can simply change the options ‐-add-forward-port to ‐-remove-forward-port so the command will change like in the command below:

sudo firewall-cmd --add-forward-port=port=22:proto=tcp:toport=22:toaddr=192.168.56.102 --permanent

configure Firewalld to be port forwarding
Remove a forwarding port rule


References

docs.redhat.com
youtube.com
musaamin.web.id
faun.pub