How to Manage a Database and its Table(s) in MariaDB?
After installing MariaDB on your Linux server, you must know some basic MariaDB commands.
Problem
How to manage a database and its table(s) in MariaDB?
Solution
Below are the basic commands of MariaDB to manage a database and its table(s):
1. Access to the MariaDB database
Use the format below to access MariaDB:
mariadb -h ip_address -u username -p
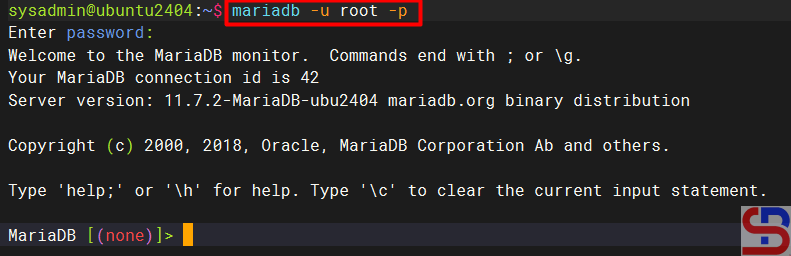
If you access MariaDB from the server using the root user directly, type the command below:
mariadb -u root -p
Enter the password for the root in MariaDB, and if the password is appropriate then you can access MariaDB as in the image below:
2. Creating a new database
Use the format below to create a new database:
CREATE DATABASE database_name;
You can see the options for this command on this page. For example, if you want to create a new database called db_office, use the command below;
CREATE DATABASE db_office;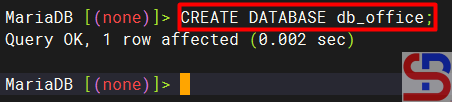
3. See the entire database
Type the command below to see all the databases stored in MariaDB:
SHOW DATABASES;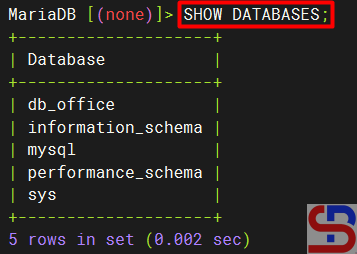
4. Select a database
Use the format below to select the database you want to access:
USE db_name;
For example, if you want to access the db_office database, then type the command below:
USE db_office;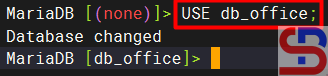
5. Create a table
Use the format below to create a new table:
CREATE TABLE table_name (name_of_column1 column_data_type1, name_of_column2 column_data_type2, ...);
You can see the options for this command on this page. Type the command below to create an employee table:
CREATE TABLE employee (name varchar (100), age int (3));
You can see data types that can be used on this page.
6. Display the entire table(s)
Use the command below to display the entire table in a database:
SHOW TABLES;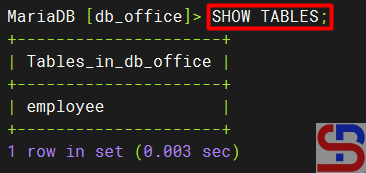
7. Display the table structure
Use the command below to display the table structure:
DESC table_name;
For example, if you want to see the employee table structure, then use the command below:
DESC employee;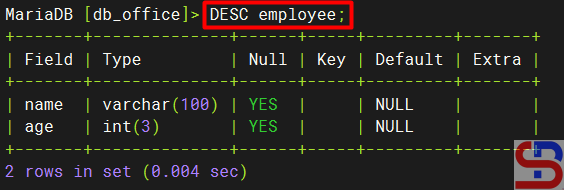
8. Add a column
Use the format below to make a column in table:
ALTER TABLE db_name ADD COLUMN column_name type (nnn);
You can see the options for this command on this page. For example, if you want to add to the city column in the employee table, use the command below:
ALTER TABLE employee ADD COLUMN city VARCHAR (100);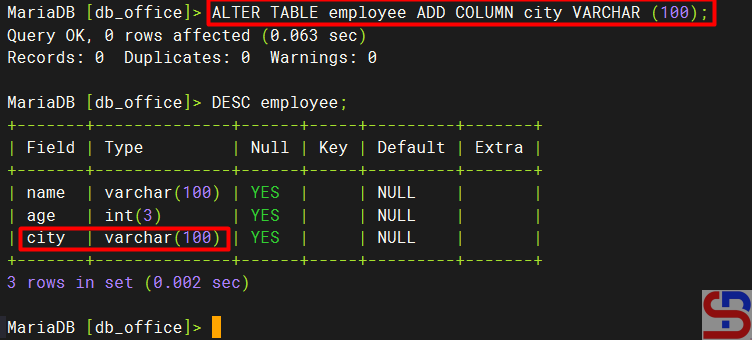
9. Insert data into the table
Use the format below to enter data in a table:
INSERT INTO table_name (Column1, Column2,…, ColumnN) VALUES (Value1,…ValueN), (Value1,…ValueN);
You can see the options for this command on this page. Type the command below if you want to insert 2 data to the employee table:
INSERT INTO employee (name,age,city) VALUES ('bob',21,'New York'), ('John',22,'Chicago');
10. Displays data in a table
Use the format below to display all data in a table:
SELECT option1 FROM table_name option2;
You can see the options for this command on this page. For example, use the command below to display all data in the employee table:
SELECT * FROM employee;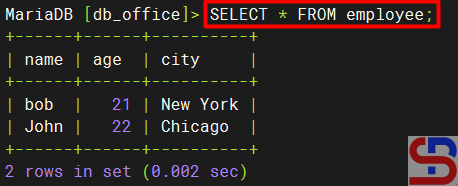
Or, if you want to display the name of the user who lives in the city of Chicago then use the command below:
SELECT name FROM employee where city='Chicago';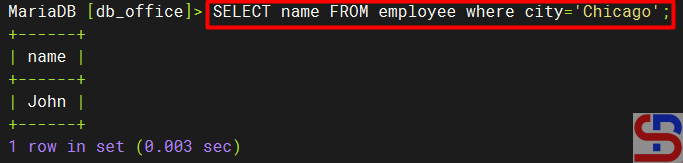
11. Update data
Use the format below to update data in a table:
UPDATE table_name SET columnX=valueX WHERE columnY=valueY;
You can see the options for this command on this page. For example, if you want to update the age of the employee named Bob, use the command below:
UPDATE employee SET age=23 WHERE name='bob';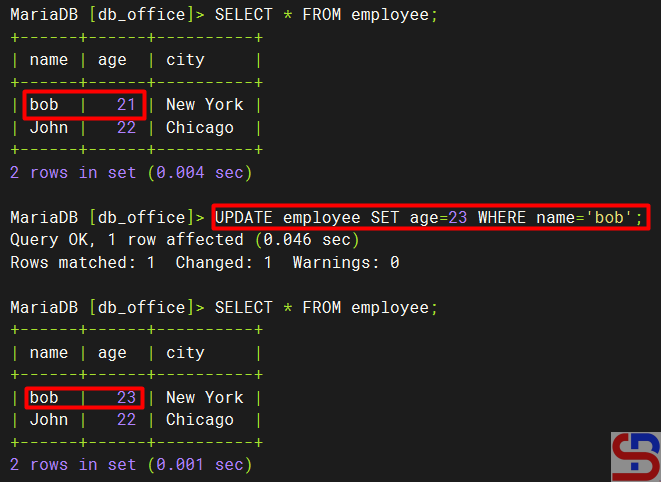
12. Delete Data
Use the format below to delete one or more rows of a table:
DELETE FROM table_name WHERE column=value;
You can see the options for this command on this page. For example, if you want to delete the data where the user is in Chicago, then use the command below:
DELETE FROM employee WHERE city='Chicago';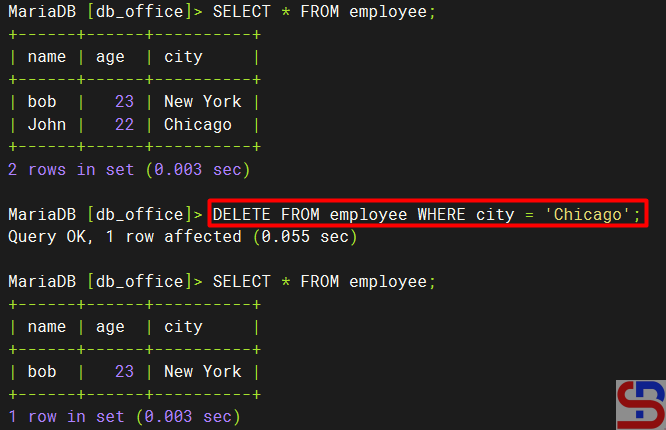
13. Delete the column
Use the format below to make changes in the table:
ALTER TABLE db_name DROP COLUMN column_name;
If you want to delete the column, for example, city, you can use the following command:
ALTER TABLE employee DROP COLUMN city;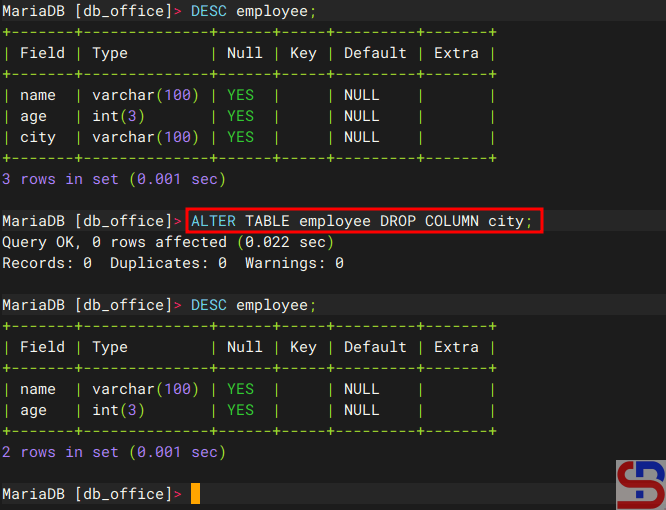
14. Empty the table
You can delete all data in a table with the format as below:
TRUNCATE table_name;
You can see the options for this command on this page. For example, if you want to delete all the data in the employee table, then type the command below:
TRUNCATE employee;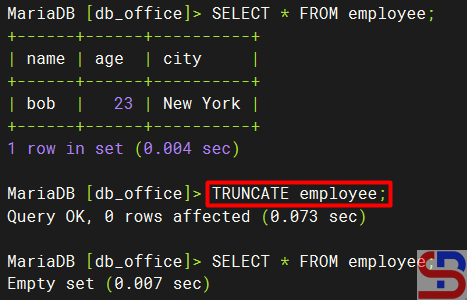
15. Change a table name
You can change the name of the table using the format below:
RENAME TABLE old_table_name TO new_table_name;
You can see the options for this command on this page. Use the command below if, for example, you want to change the name of the employee table to employees:
RENAME TABLE employee to employees;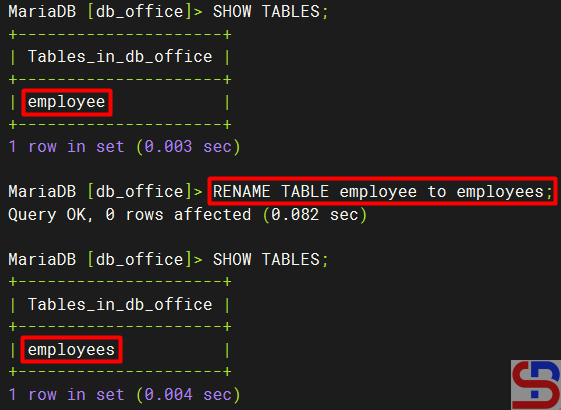
16. Delete a table
Use the format below to delete a table:
DROP TABLE table_name;
You can see the options for this command on this page. For example, if you want to delete the employee table, then use the command below:
DROP TABLE employees;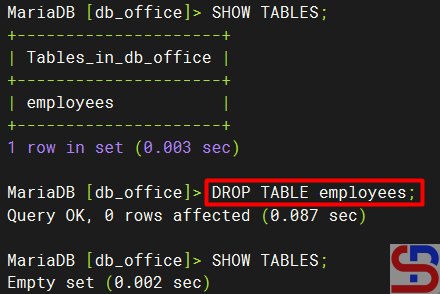
17. Delete a database
To delete a database, use the format below:
DROP DATABASE database_name;
You can see the options for this command on this page. For example, if you want to delete the db_office database, then type the command below:
DROP DATABASE db_office;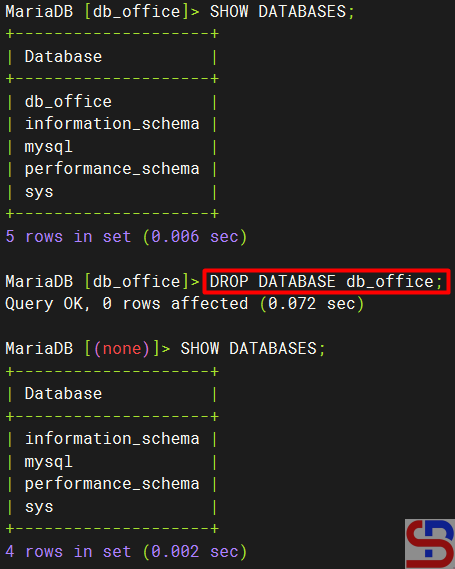
18. Quit from the database
To quit from the database, run the command below:
\q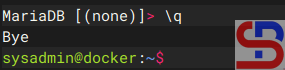
Note
The next article will explain how to access a database using a user.
References
MariaDB.com
bertvv.github.io
zuar.com
educba.com
gist.github.com