How to Manage the User(s) in MariaDB?

The previous article already explained how to create a database and a table in MariaDB. This article will explain how to manage the user(s) in MariaDB.


Problem

How to manage the user(s) in MariaDB?


Solution

Here are the commands to manage user(s) in MariaDB:

INFO
The use of capital letters in this article is only to distinguish between original commands from MariaDB and data from the user. You don’t have to use the capital letters when running these commands, but you can use all lowercase letters.


1. Display all users

Type the command below to display all the users in MariaDB:

SELECT User,Host FROM mysql.user;

Display all users in MariaDB


You can see in the picture above that by default, there are only 3 users in MariaDB.


2. Create a user with a password

Use the format below to create a user with a password:

CREATE USER 'username'@'ip_address' IDENTIFIED BY 'password_user';


For example, If you want to create a user with the name james and its password 123456, then type the command below:

CREATE USER 'james'@'localhost' IDENTIFIED BY '123456';


If you want to create a John user with a qwerty password but the user can only access the database via the IP with subnet 192.168.56.0/24, type the command below:

CREATE USER 'john'@'192.168.56.%' IDENTIFIED BY 'qwerty';


But if you also want to create a judith user with a password 1q2w3e4r and the user can access the database from any network, then type the command below:

CREATE USER 'judith'@'%' IDENTIFIED BY '1q2w3e4r';

Create the users


To see the options for this command, you can go to this page.


4. Rename user

Use the format below to change the user name:

RENAME USER 'username1'@'ip_address' TO 'username2'@'ip_address'


For example, you want to change the name of james to bob by typing the command below:

RENAME USER 'james'@'localhost' TO 'bob'@'localhost';

Rename the user


You can also change the IP address using the command:

RENAME USER 'bob'@'localhost' TO 'bob'@'192.168.56.%';
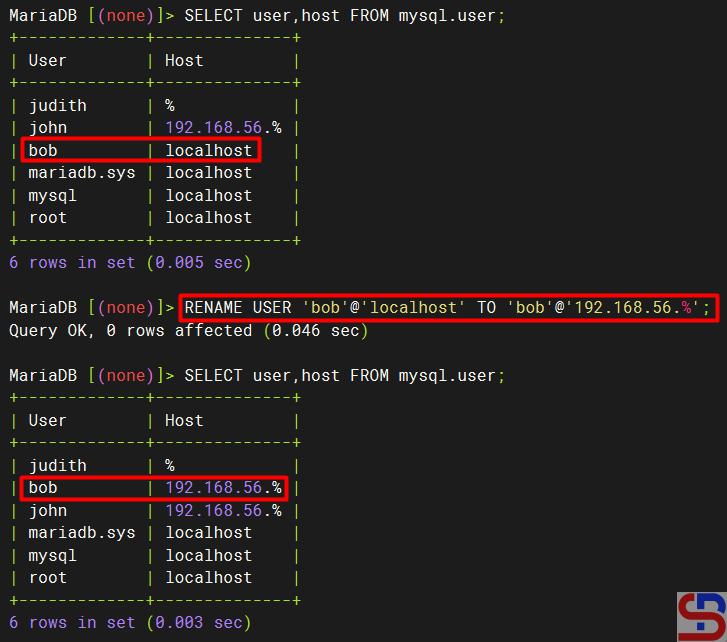
Rename the IP address


To see the options for this command, you can go to this page.


5. Alter user

Use the format below to change the user in MariaDB:

ALTER USER 'username' option1 option2 ... optionN;


For example, if you want to change the user james’ password, then use the command below:

ALTER USER 'james'@'localhost' IDENTIFIED BY 'qwerty';

Change the password using the alter command


To see the options for this command, you can go to this page.


6. Grant a user

If you only make a user in Mariadb without giving access to the user, then the user will not be able to enter the existing database in Mariadb. By default, only the root user gets access to all databases in Mariadb. To add a user to have access, use the format below:

GRANT option1 ON option2 TO 'username'@'ip_address;


Option1 is for privileges options at a database or a table level, and option2 is for which database or table the user can access by the user. To see the options for this command, you can go to this page. For example, the user bob can only access the db_office database and then use the command below:

GRANT ALL ON db_office.* TO 'bob'@'192.168.56.%'; 


If you want to provide access to the user john to only be able to do the select command for the employee table in the db_office database, then use the command below:

GRANT SELECT ON db_office.employees TO 'john'@'192.168.56.%';


and provide a judith user to access the entire database, use the command below:

GRANT ALL ON *.* TO 'judith'@'%'; 


You can also combine the grant command by giving a password to a user by typing the command below:

GRANT ALL ON db_office.* TO 'richard'@'192.168.56.%' IDENTIFIED BY 'qwerty';


To see the grant of a user, for example, a judith user, type the command below:

SHOW GRANTS for 'judith';

Display grant for a user


Warning
If you want to see the grant of a user but you do not enter the IP address of the user’s host, as in the picture above, then by default, MariaDB will assume ‘%’ as the host. Therefore, it is recommended that you type the IP address of the user to display the grant status of the user.


If you want to see what grant access is given to a user but forget each IP host address from the user-user in MariaDB, then use this command:

select distinct concat('SHOW GRANTS FOR ', QUOTE(user), '@', QUOTE(host), ';') as query from mysql.user;

Display all grants for each user


7. Make a role

By default, if you have many users and sometimes these users have the same access, it is recommended to create a role. A role bundles many privileges together. Use the format below to create a role:

CREATE ROLE role_name;


To see the options in this command, please go to this page. For example, if you want to make a qa and a dev role in MariaDB, then use the command below to make the role:

CREATE ROLE qa;
CREATE ROLE dev;


To see all the roles in MariaDB, use the command below:

SELECT User FROM mysql.user WHERE is_role='Y';

Create the role


After that, use the grant command to access the db_office database based on the roles as the command below:

GRANT SELECT ON db_office.* TO qa;
GRANT ALL ON db_office.* TO dev;


Then enter the user bob into the qa role and judith into the dev role with the command below:

GRANT qa TO 'bob'@'192.168.56.%';
GRANT dev to 'judith'@'%';


To see users who have entered into the roles in Mariadb, use the command below:

SELECT * FROM mysql.roles_mapping;

Grant role to the user


8. Delete access

If you want to delete access to a user, whether it’s a role or a grant. Use the format below if you want to delete a user’s role:

REVOKE role_name FROM 'user'@'ip_address';


For example, if you want to delete the qa role from the user bob, use the command below:

REVOKE qa FROM 'bob'@'192.168.56.%';

Revoke a user’s role


Use the format below if you want to delete a grant:

REVOKE option1 ON option2 FROM 'user'@'ip_address';


Option1 is for privileges options at a database or a table level, and option2 is for which database or table. If you want to see a deeper explanation of this command, go to this page. For example, if you want to delete richard’s grant in the db_office database, then use the command below:

REVOKE ALL PRIVILEGES ON db_office.* FROM 'richard'@'192.168.56.%';

Revoke the user’s grant


9. Delete a user

To delete a user, use the format below:

DROP USER username;


If you want to see a deeper explanation of this command, please go to this page. For example, if you want to delete the judith user in MariaDB, then use the command below:

DROP USER judith;

Delete the user


But if you find a user who has 2 names that are the same, but the IP host address is different, then you must use the format below:

DROP USER 'username'@'ip_address';


For example, you want to delete one of the user bobs that has an IP 192.168.56.%, Then use the command below:

DROP USER 'bob'@'192.168.56.%';

Delete the user with a certain IP


Note

To provide grant access to one of the users, it must first be asked what his needs are for accessing a database so that the MariaDB database can be more secure.
 

References

mariadb.com
gist.github.com
cyberciti.biz
severalnines.com


How to Manage a Database and its Table(s) in MariaDB?

After installing MariaDB on your Linux server, you must know some basic MariaDB commands.


Problem

How to manage a database and its table(s) in MariaDB?


Solution

Below are the basic commands of MariaDB to manage a database and its table(s):

1. Access to the MariaDB database

Use the format below to access MariaDB:

mariadb -h ip_address -u username -p


If you access MariaDB from the server using the root user directly, type the command below:

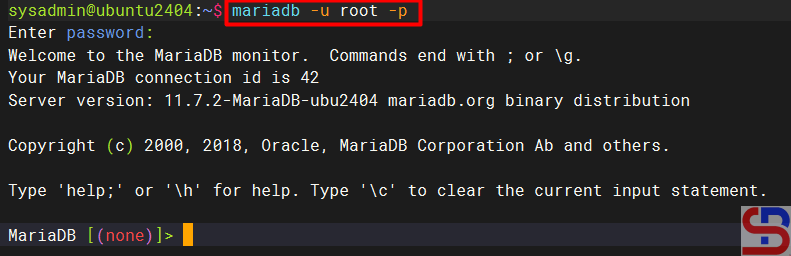
mariadb -u root -p


Enter the password for the root in MariaDB, and if the password is appropriate then you can access MariaDB as in the image below:

Access to MariaDB


INFO
The use of capital letters in this article is only to distinguish between original commands from MariaDB and data from the user. You don’t have to use the capital letters when running these commands, but you can use all lowercase letters.


2. Creating a new database

Use the format below to create a new database:

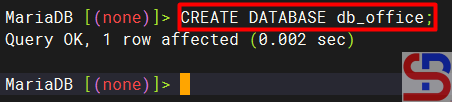
CREATE DATABASE database_name;


You can see the options for this command on this page. For example, if you want to create a new database called db_office, use the command below;
CREATE DATABASE db_office;

Create a new database


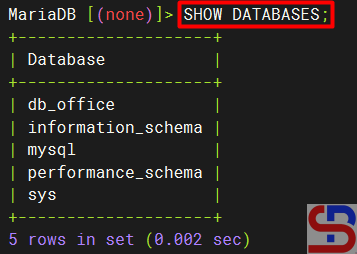
3. See the entire database

Type the command below to see all the databases stored in MariaDB:

SHOW DATABASES;

Display all databases


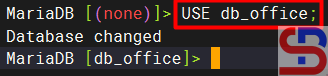
4. Select a database

Use the format below to select the database you want to access:

USE db_name;


For example, if you want to access the db_office database, then type the command below:

USE db_office;

Select the database


5. Create a table

Use the format below to create a new table:

CREATE TABLE table_name (name_of_column1 column_data_type1, name_of_column2 column_data_type2, ...);


You can see the options for this command on this page. Type the command below to create an employee table:

CREATE TABLE employee (name varchar (100), age int (3));

Create a new table


You can see data types that can be used on this page.


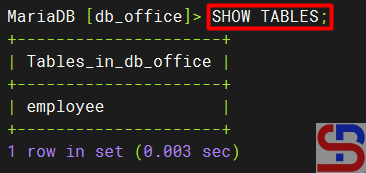
6. Display the entire table(s)

Use the command below to display the entire table in a database:

SHOW TABLES;

Show all tables


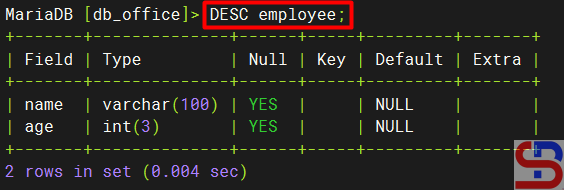
7. Display the table structure

Use the command below to display the table structure:

DESC table_name;


For example, if you want to see the employee table structure, then use the command below:

DESC employee;

Display a table structure


8. Add a column

Use the format below to make a column in table:

ALTER TABLE db_name ADD COLUMN column_name type (nnn);


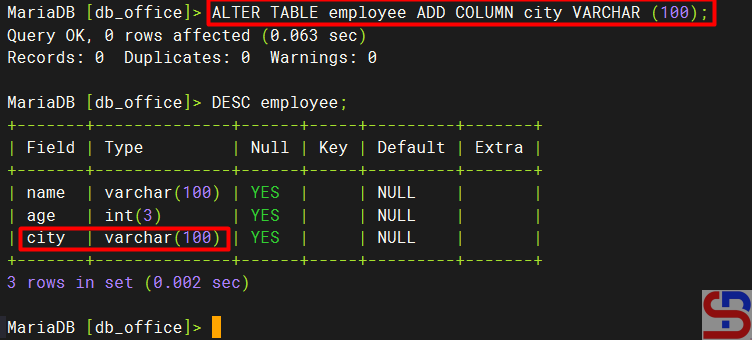
You can see the options for this command on this page. For example, if you want to add to the city column in the employee table, use the command below:

ALTER TABLE employee ADD COLUMN city VARCHAR (100);

Add a new column


9. Insert data into the table

Use the format below to enter data in a table:

INSERT INTO table_name (Column1, Column2,…, ColumnN) VALUES (Value1,…ValueN), (Value1,…ValueN);


You can see the options for this command on this page. Type the command below if you want to insert 2 data to the employee table:

INSERT INTO employee (name,age,city) VALUES ('bob',21,'New York'), ('John',22,'Chicago');

Insert data into the table


INFO
If you want to insert a value in the form of a number, the number does not have to be flanked with an apostrof (‘…’) sign, whereas if it is a character or a combination of characters and numbers, it must be flanked with an apostrof (‘…’).


10. Displays data in a table

Use the format below to display all data in a table:

SELECT option1 FROM table_name option2;


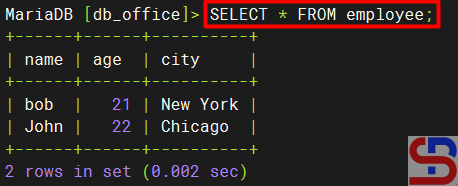
You can see the options for this command on this page. For example, use the command below to display all data in the employee table:

SELECT * FROM employee;

manage a database and its table(s) in MariaDB
Display all the data


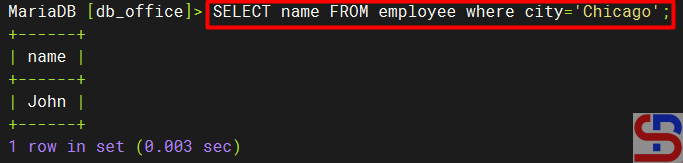
Or, if you want to display the name of the user who lives in the city of Chicago then use the command below:

SELECT name FROM employee where city='Chicago';

Display the data with a condition


11. Update data

Use the format below to update data in a table:

UPDATE table_name SET columnX=valueX WHERE columnY=valueY;


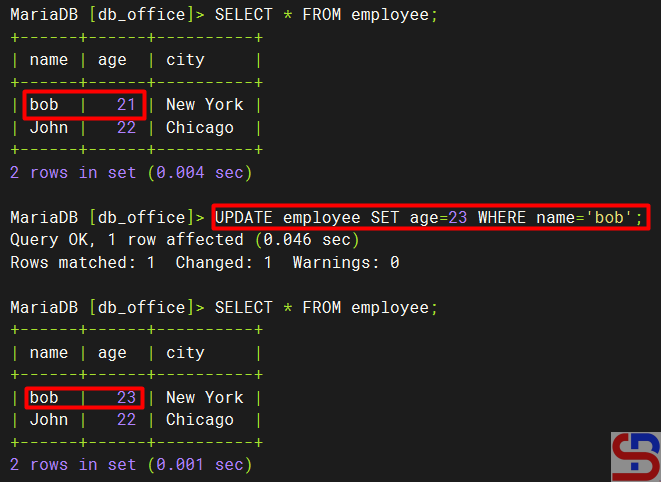
You can see the options for this command on this page. For example, if you want to update the age of the employee named Bob, use the command below:

UPDATE employee SET age=23 WHERE name='bob';

manage a database and its table(s) in MariaDB
Update data


12. Delete Data

Use the format below to delete one or more rows of a table:

DELETE FROM table_name WHERE column=value;


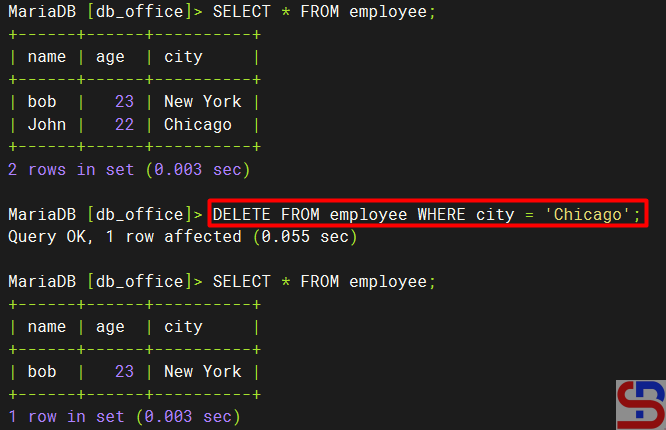
You can see the options for this command on this page. For example, if you want to delete the data where the user is in Chicago, then use the command below:

DELETE FROM employee WHERE city='Chicago';

manage a database and its table(s) in MariaDB
Delete the data


13. Delete the column

Use the format below to make changes in the table:

ALTER TABLE db_name DROP COLUMN column_name;


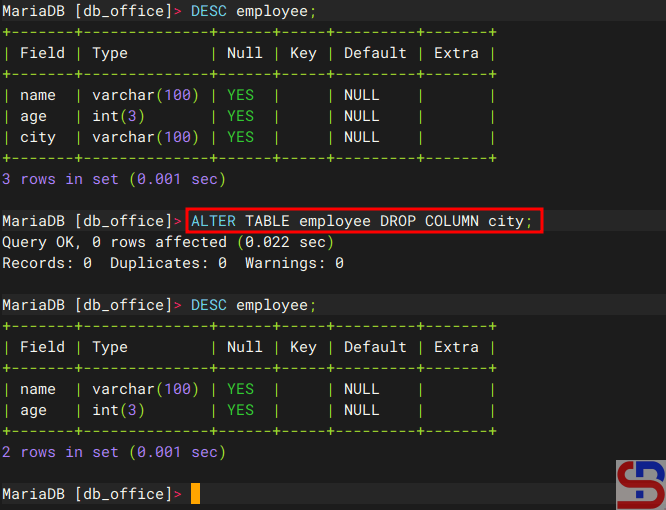
If you want to delete the column, for example, city, you can use the following command:

ALTER TABLE employee DROP COLUMN city;

Delete the column


14. Empty the table

You can delete all data in a table with the format as below:

TRUNCATE table_name;


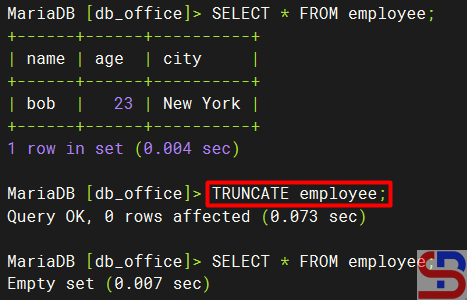
You can see the options for this command on this page. For example, if you want to delete all the data in the employee table, then type the command below:

TRUNCATE employee;

manage a database and its table(s) in MariaDB
Truncate the table


15. Change a table name

You can change the name of the table using the format below:

RENAME TABLE old_table_name TO new_table_name;


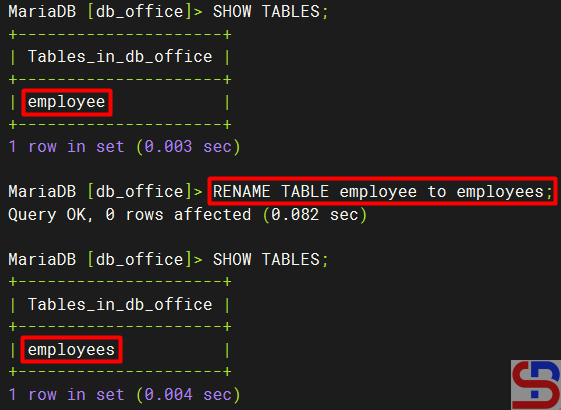
You can see the options for this command on this page. Use the command below if, for example, you want to change the name of the employee table to employees:

RENAME TABLE employee to employees;

manage a database and its table(s) in MariaDB
Rename the table


16. Delete a table

Use the format below to delete a table:

DROP TABLE table_name;


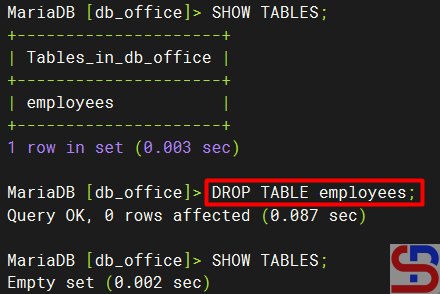
You can see the options for this command on this page. For example, if you want to delete the employee table, then use the command below:

DROP TABLE employees;

manage a database and its table(s) in MariaDB
Delete the table


17. Delete a database

To delete a database, use the format below:

DROP DATABASE database_name;


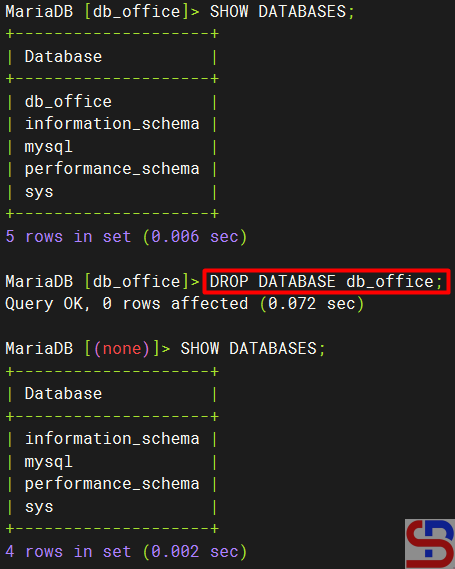
You can see the options for this command on this page. For example, if you want to delete the db_office database, then type the command below:

DROP DATABASE db_office;

manage a database and its table(s) in MariaDB
Delete the database


18. Quit from the database

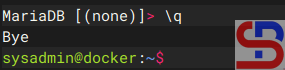
To quit from the database, run the command below:

\q

Quit from the database


Note

The next article will explain how to access a database using a user.


References

MariaDB.com
bertvv.github.io
zuar.com
educba.com
gist.github.com


How to Manage Networking in Docker?

Docker has a network system to regulate communication between one container and another container, your Docker host(server), and the outside world.


Problem

How to manage networking in Docker?


Solution

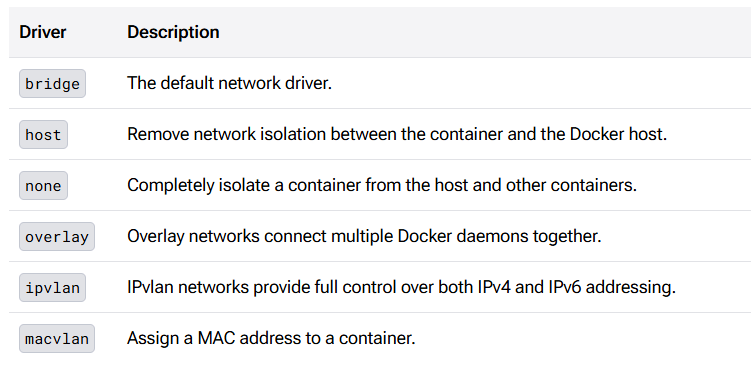
Docker provides six network drivers that you can use, as shown in the image below:

The six network drivers in Docker (Image credit for docs.docker.com)


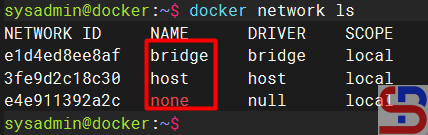
You can see from the image above that the bridge is a default network driver, so if you do not specify a driver, then this type of network is created. To see the types of network drivers on your server, use the command below:

docker network ls

List the network drivers in Docker on your server


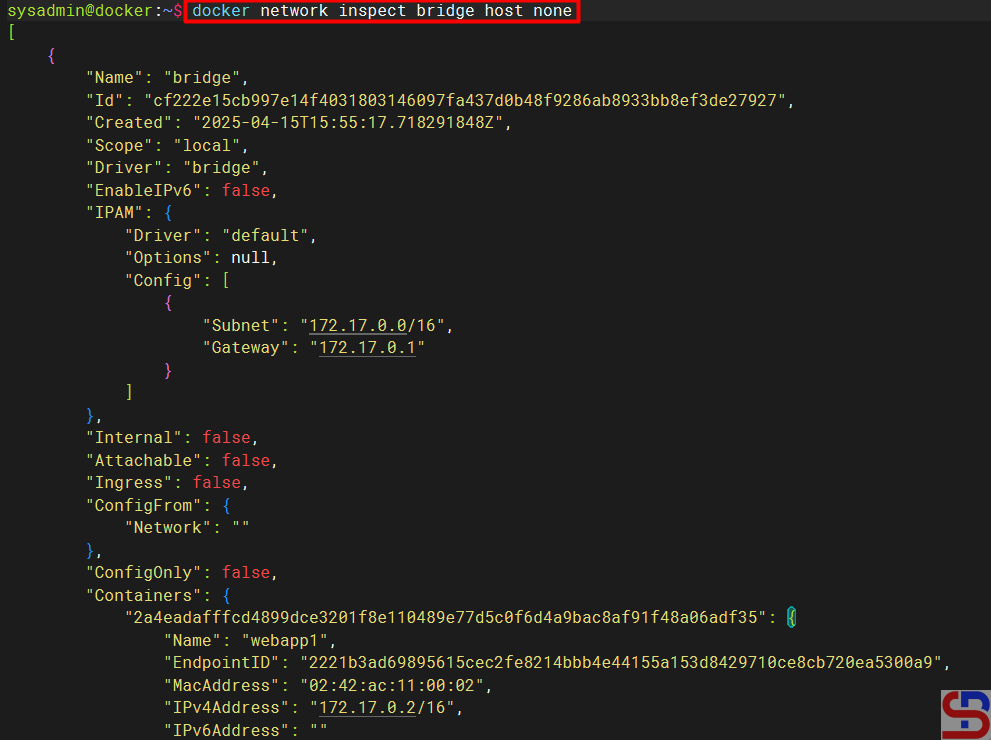
To see the configuration details of each network driver, use the command below:

docker network inspect bridge host none

Display detailed information about the network on each network driver


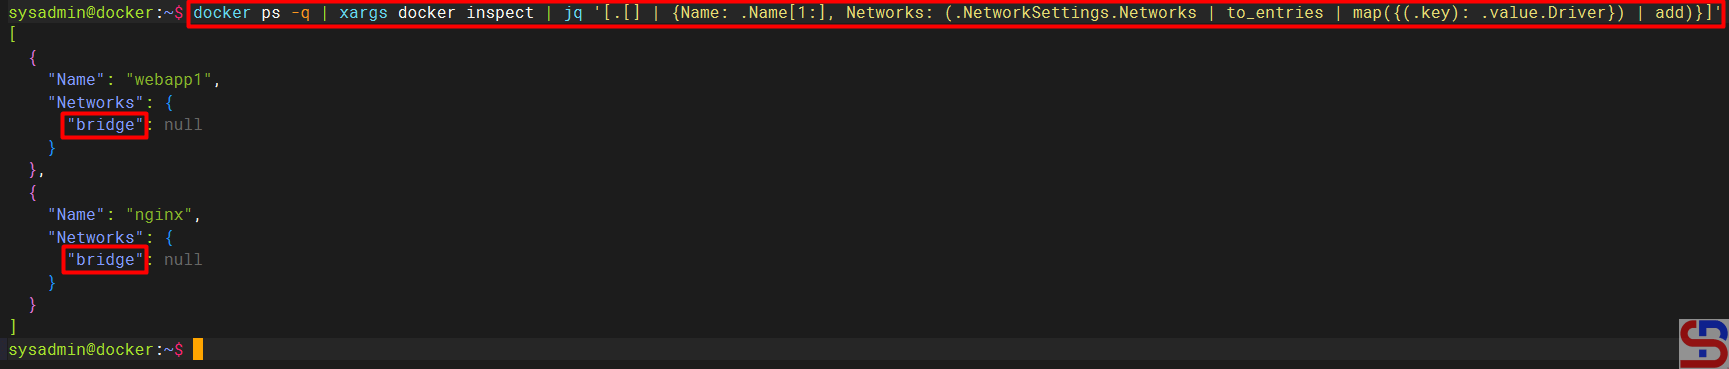
To see the type of driver network used in each container, use the command below:

docker ps -q | xargs docker inspect | jq '[.[] | {Name: .Name[1:], Networks: (.NetworkSettings.Networks | to_entries | map({(.key): .value.Driver}) | add)}]'

Display the network drivers in each container


To see the IP of each container, for example, in the nginx container, use the command below:

docker inspect -f '{{range.NetworkSettings.Networks}}{{.IPAddress}}{{end}}' nginx

Display of the IP of a container


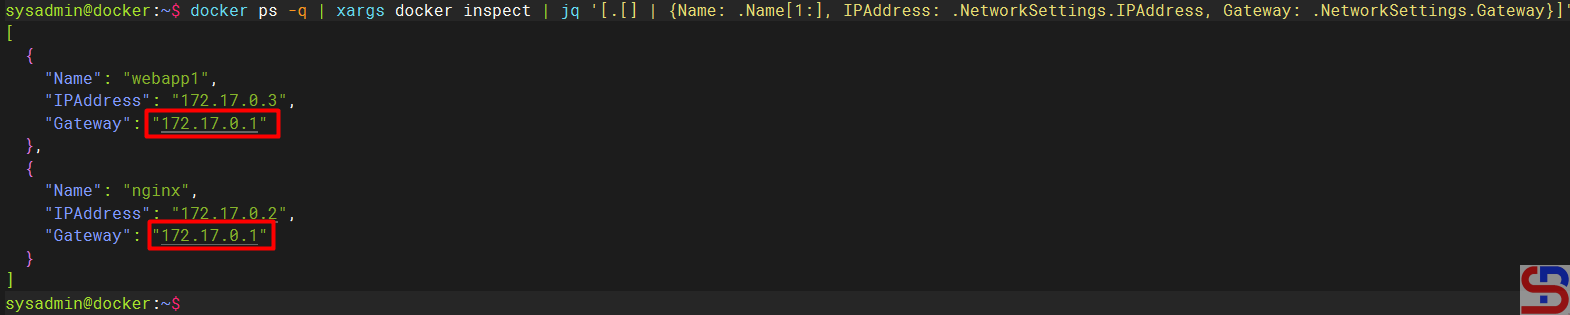
To communicate between one container with another container, both containers must have the same gateway. For example, you have made two containers, so by default, the two containers will use a network bridge driver so that it has the same gateway. Use the command below to see the two container IPs:

docker ps -q | xargs docker inspect | jq '[.[] | {Name: .Name[1:], IPAddress: .NetworkSettings.IPAddress, Gateway: .NetworkSettings.Gateway}]'

Display all the IPs in each container


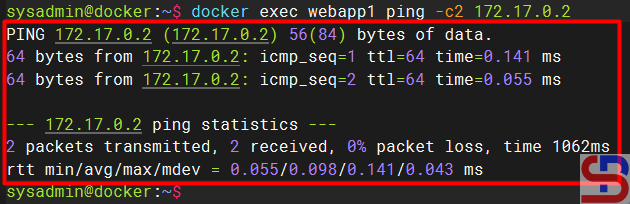
Then try to enter one of the containers and ping to another container using the command:

docker exec webapp1 ping -c2 172.17.0.2

Ping between containers


And the containers should be able to communicate with each other like the image above.

WARNING
If you can’t ping on your container, then you have to install ping in your container by accessing one of your containers and installing the ping package. If your container uses Ubuntu, then you can install it using the command:
apt update;apt install iputils-ping


A. Create a new network

You can create a new network on the server for your own needs using the format below:

docker network create network_name --driver driver_name


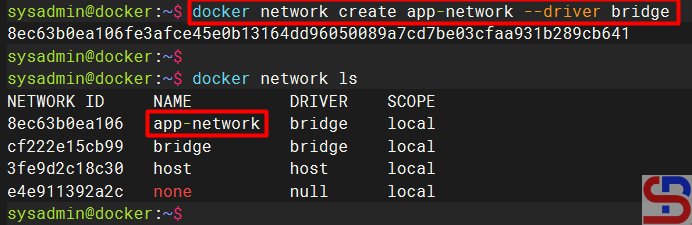
For example, you want to create an app-network network using a bridge driver, then use the command below:

docker network create app-network --driver bridge

Create a new network


INFO
You may not write the option ‐-driver if you want to create a new network using a bridge driver because bridge is a default network driver in Docker.


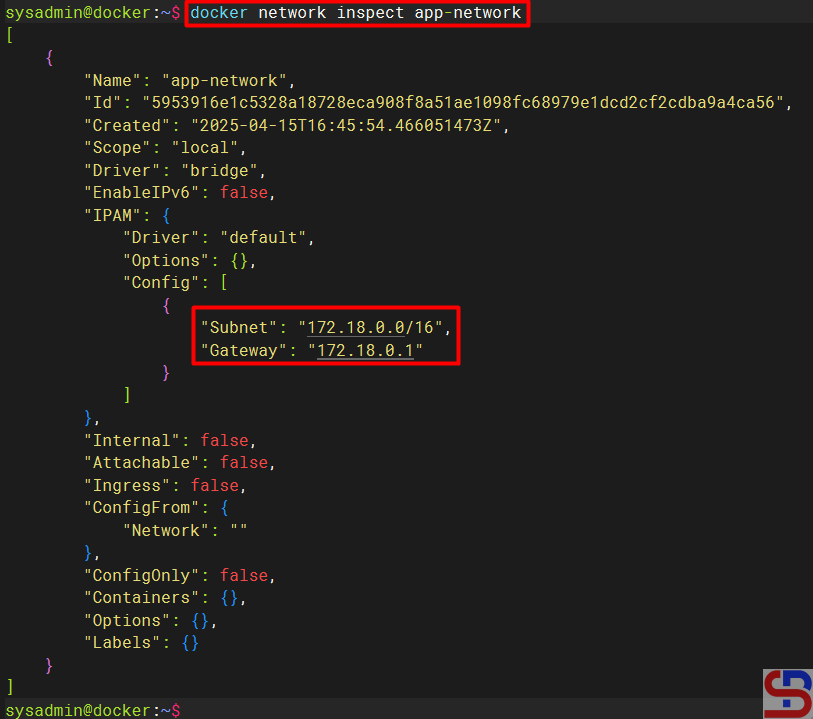
After that, try to use the command below to see the detailed information of the app-network:

docker network inspect app-network


You can see from the picture above that the IP and Gateway from the app-network have been made automatically. You can make an IP and a Gateway according to what you want. For example, you want to create a new network with the name db-network, which has a range of IP 10.10.1.0/24 and Subnet 10.10.0.0/16 and Gateway 10.10.1.254, then use the command below:

docker network create -d bridge db-network \
--subnet=10.10.0.0/16 \
--ip-range=10.10.1.0/24 \
--gateway=10.10.1.254

Create a new network with the custom values


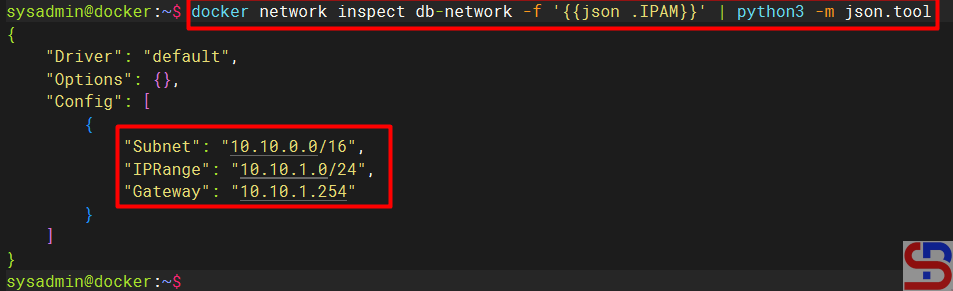
Use the command below to display network information details easily:

docker network inspect db-network -f '{{json .IPAM}}' | python3 -m json.tool

manage networking in Docker
Display the value of the network in a container


From the image above, you can see that the IP, Subnet, and Gateway on the network are the same as what you want.

B. Connecting a network to a container

If you connect the current container to a network, use the format below:

docker network connect network-name container-name


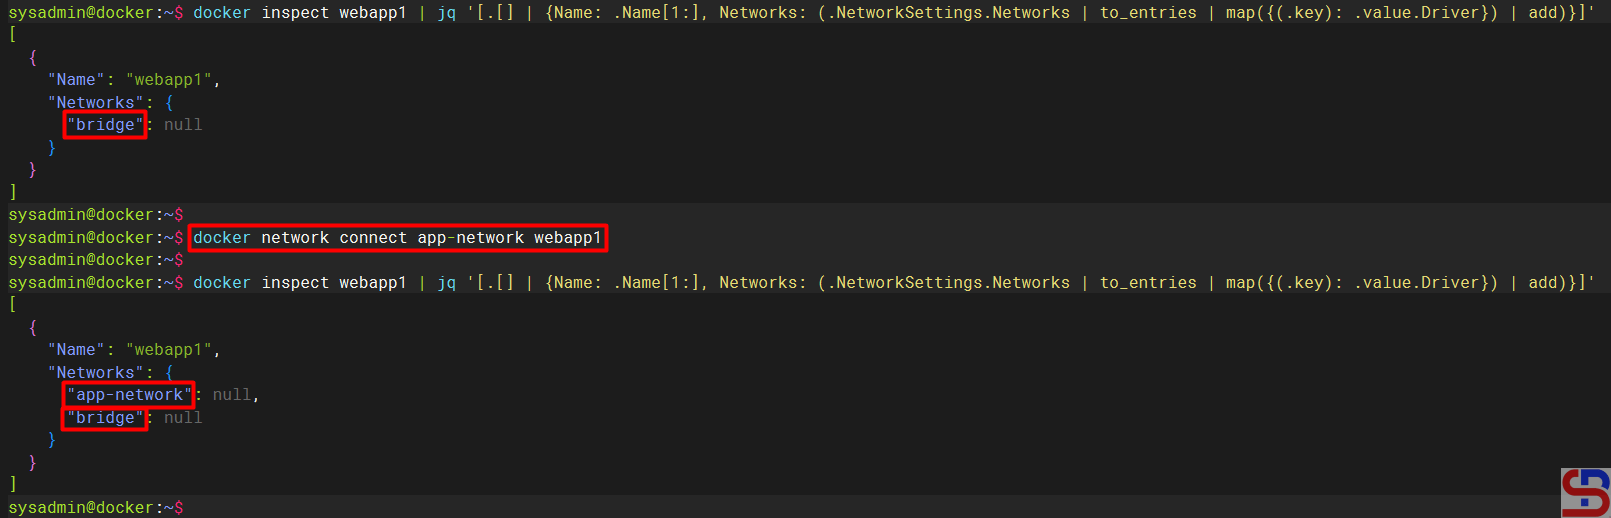
For example, if you want to connect the webapp1 container to the app-network network, use the command below:

docker network connect app-network webapp1

manage networking in Docker
Connecting a network to a container


If you want to create a new container by directly connecting to a network, use the format below:

docker container run --name container_name --network network_name image:tag


For example, if you want to create a db-mysql container on the db-network network, use the command below:

docker run -d --name db-mysql --network db-network -e MYSQL_ROOT_PASSWORD='q1w2e3r4' mysql

manage networking in Docker
Connecting a network when creating a new container


C. Disconnect a network in the container

To disconnect a network in the container, use the format below:

docker network disconnect network_name container_name


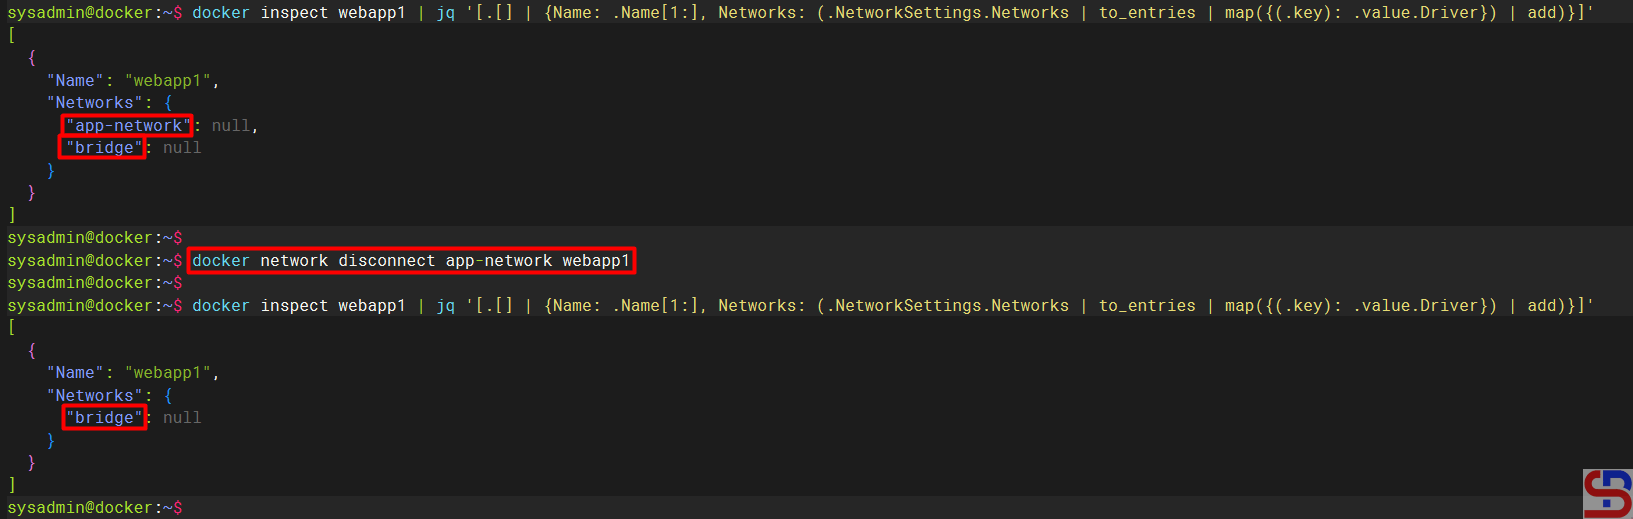
For example, if you want to break the app-network network from the webapp1 container, use the format below:

docker network disconnect network1 webapp1

manage networking in Docker
Disconnect a network from a container


D. Removing a network

To remove a network, use the format below:

docker network rm network_name


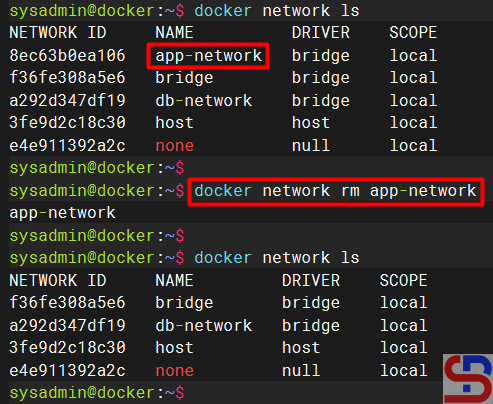
For example, I want to delete the app-network network, use the command below:

docker network rm app-network

manage networking in Docker
Remove a network


WARNING
You cannot remove a network if the network is still connected to a container. First, disconnect the network connection from the container, and then you can delete the network.


Note

You must be careful when setting the network in Docker because if you set the wrong network, one or several containers will not be connected, which causes the application that runs on the Docker will be disturbed.


References

docs.docker.com
spacelift.io
youtube.dimas-maryanto.com
stackoverflow.com
youtube.com


How to Move a File/Folder From the Server to the Container And Vice Versa?

The previous article explained how to access a container in Docker. Now, I need to move a file/folder from the server to the container and vice versa.


Problem

How to move a file/folder from the server to the container and vice versa?


Solution

These are how to move a file/folder from the server to the container and vice versa:

A. Move from the server to the container

To move a file from the server to the container, use the format below:

docker cp src_path container:dest_path


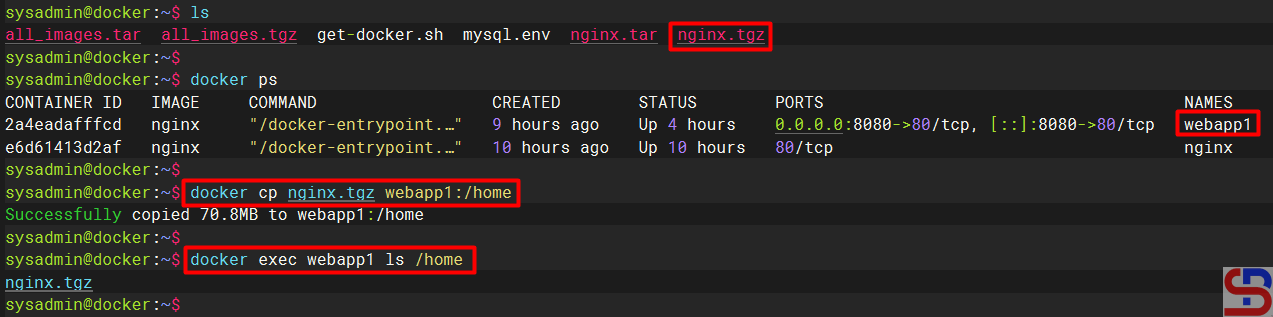
For example, I want to move the nginx.tgz file from the server to the webapp1 container in the folder /home, so I use the command below:

docker cp nginx.tgz webapp1:/home


And the file will move to the /home folder in the container, like in the image below:

Move the file from the server to the container


B. Move from the container to the server

To move a file from the server to the container, use the format below:

docker cp container:src_path dest_path


For example, you want to move the docker-entrypoint.sh file in the container to the server in the folder /tmp, use the command below to move the file:

docker cp webapp1:docker-entrypoint.sh /tmp


And the file should be transferred to the folder /tmp on the server as shown below:

move a file/folder from the server to the container and vice versa
Move the file from the container to the server


Note

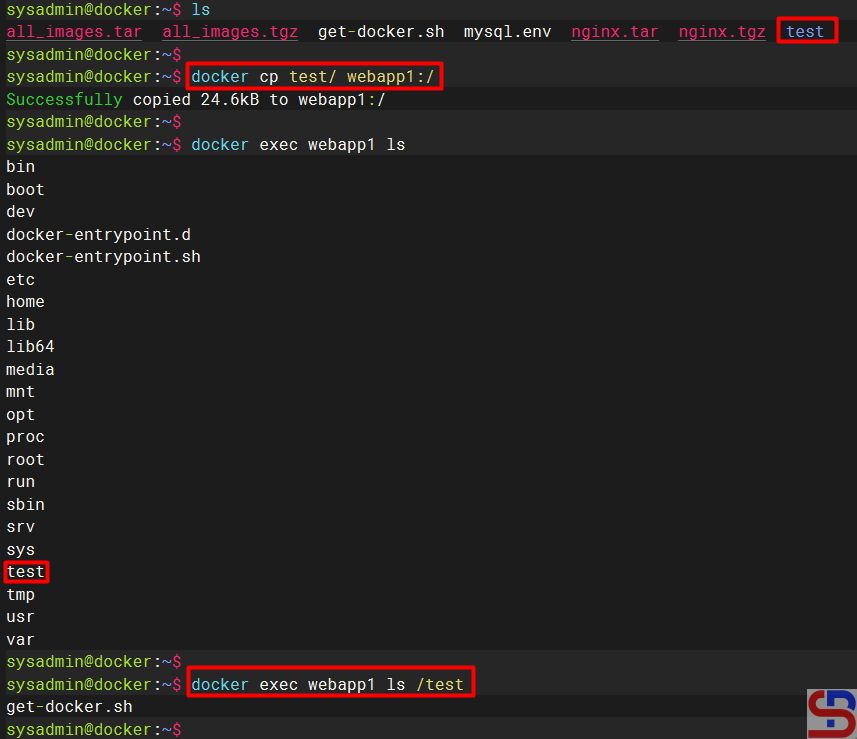
You can move the folder and its contents from the server to the container and vice versa by using the format above without the need to add the -r option, as shown in the image below:

move a file/folder from the server to the container and vice versa
Move the folder into and out of the container


WARNING
You cannot move more than one file or folder from the server to the container or vice versa.


References

youtube.dimas-maryanto.com
docs.docker.com
mkyong.com


How to Reboot Windows OS in One Click?

The previous article explained how to shut down Windows OS in one click. This article will explain how to reboot Windows OS in one click.


Problem

How to reboot Windows OS in one click?


Solution

The following steps to reboot the Windows OS in one click:

1. Create a shortcut

Go to the desktop, then right click and select NewShortcut as shown below:

Click New – Shortcut


2. Write a script

Write the script below:

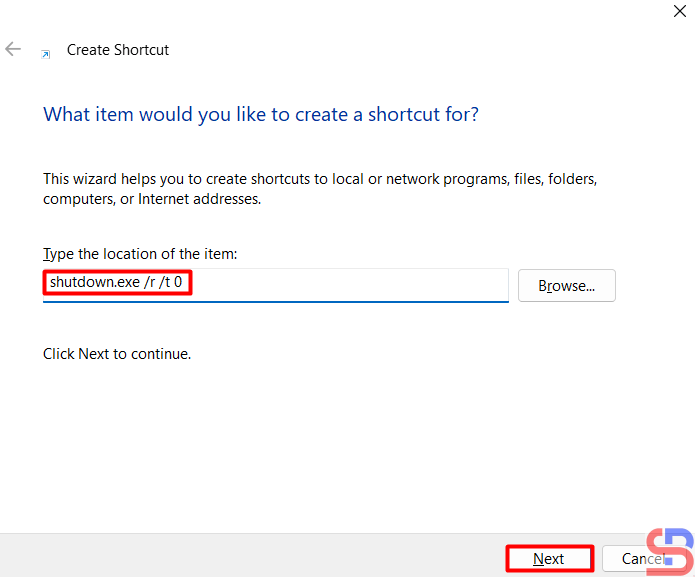
shutdown.exe /r /t 0


In the section as shown below:

Write the script


Then press the Next button, and then there will be a display as below:

Create a name for the shortcut


You can change the name for the shortcut, and after that, press the Finish button, then there will be a display as below:

Display of the shortcut icon


3. Change the icon

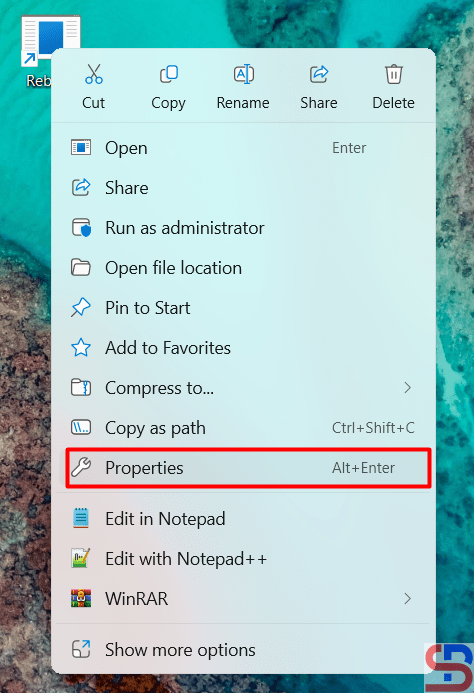
Right-click on the icon, select Properties as shown below:

Click the Properties


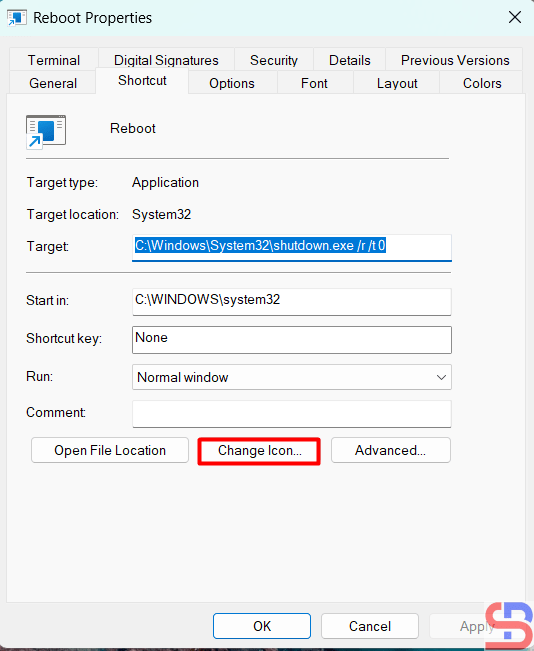
Then click the Change Icon button, and there will be a display as below:

Click the Change Icon button


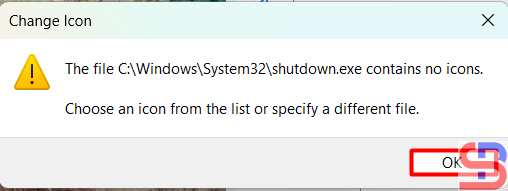
There will be a display as below:

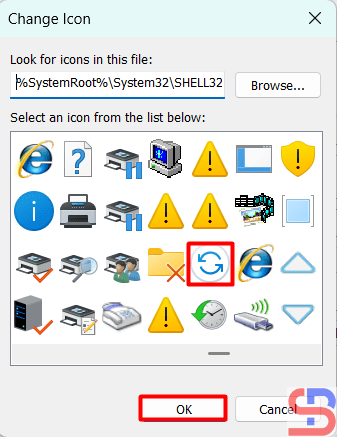
reboot Windows OS in one click
Click the OK button


Click the OK button, and after that, you can choose the icon you like, but I chose the icon like in the red box, press OK, then there will be a display as below:

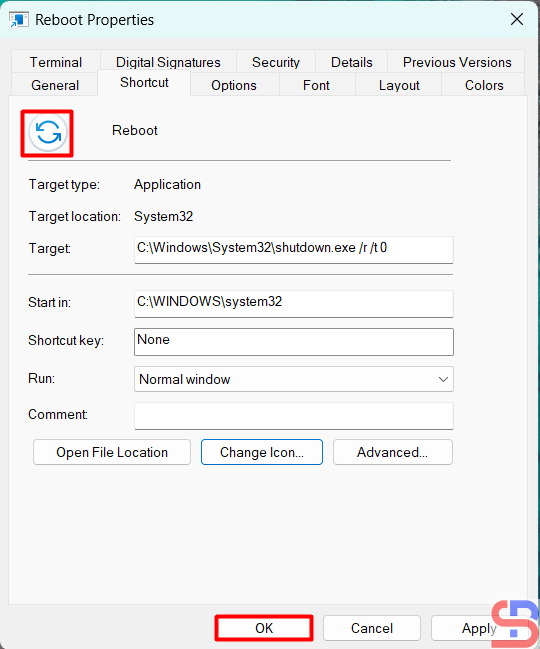
reboot Windows OS in one click
Choose the icon


The shortcut icon will change to what you chose in the previous section. After that, press OK, the shortcut icon will change the image according to what you choose.

reboot Windows OS in one click
The icon is changed


4. Move the icon

Move the icon to the taskbar by dragging it as shown below:

reboot Windows OS in one click
Drag the icon to the Taskbar


After the icon has been moved to the taskbar, you can delete the icon from the desktop.

5. Test the result

After that, try clicking the icon in the taskbar, and your Windows OS should do the shutdown process.


Note

In this article, the time used is 0, so there is no time lag after you click the icon with the shutdown process. You can change it to the time you want, for example, to 5 seconds, so that the script becomes like below:

shutdown.exe /r /t 5


Then there will be a break of 5 seconds after you finish clicking the icon and the shutdown process.


References

boostitco.com
isumsoft.com
wikihow.com


How to Run Environment Variables In Docker?

Besides providing application images, Docker also provides database images such as PostgreSQL, MySQL, MariaDB, MongoDB, and so on for its users. As with databases installed on a physical server, which requires entering a username and password to access it, Docker also requires you to enter a username and password to use the database, commonly known as an environment variable.


Problem

How to run environment variables in Docker?


Solution

An environment variable is a dynamically named value that can affect how running processes behave on a computer. They are part of the environment in which a process runs. For example, a running process can query the value of the TEMP environment variable to discover a suitable location to store temporary files, or the HOME or USERPROFILE variable to find the directory structure owned by the user running the process. To find out whether a Docker image can use environment variables, you must check the documentation of the Docker image. Still, in general, Docker images in the form of databases such as MySQL, PostgreSQL, or MongoDB use environment variables.

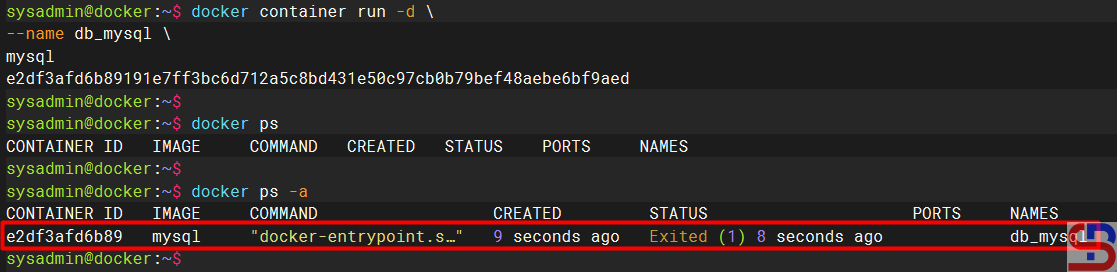
Please note that if you install an image container that uses an environment variable, for example, installing a MySQL database in a container, but you don’t include an environment variable like in the command below:

docker container run -d \
--name db_mysql \
mysql


The container will not run as shown in the image below:

Create a container without using environment variables


Docker has parameters that we can use to send environment variables to the application contained in the container by adding the ‐-env or -e option when we create the container, following the format below:

docker container run -d --name container_name --env KEY1="value" --env KEY2="value" image:tag


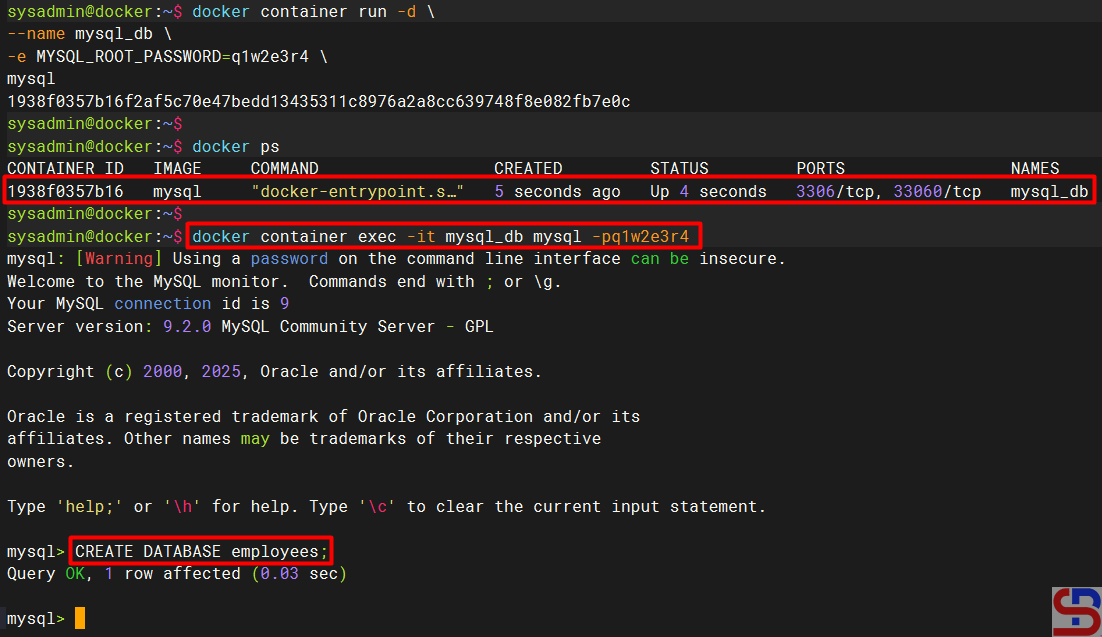
This article will use the MySQL Docker image as a case example. In the documentation, several variables are provided, such as MYSQL_ROOT_PASSWORD, MYSQL_DATABASE, and so on. So, if you want to install MySQL in the container, you have to insert the environment variable. So, if you want to create a MySQL container with root password q1w2e3r4, then run the command below:

docker container run -d \
--name mysql_db \
-e MYSQL_ROOT_PASSWORD=q1w2e3r4 \
mysql


After that, try to access the MySQL database by running the command below:

docker container exec -it db_mysql mysql -pq1w2e3r4


You will enter the database in the container, like in the image below:

Create the container using environment variables


And you can use database commands as usual, like in the image above.


Note

Besides using the -e or ‐-env parameter arguments, you can use a file to save the environment variables, commonly known as Env-File, using the VAR=VALUE format. Use the format below to run the container that uses Env-File like in the format below:

docker container run -d --name container_name --env-file=filename container_name


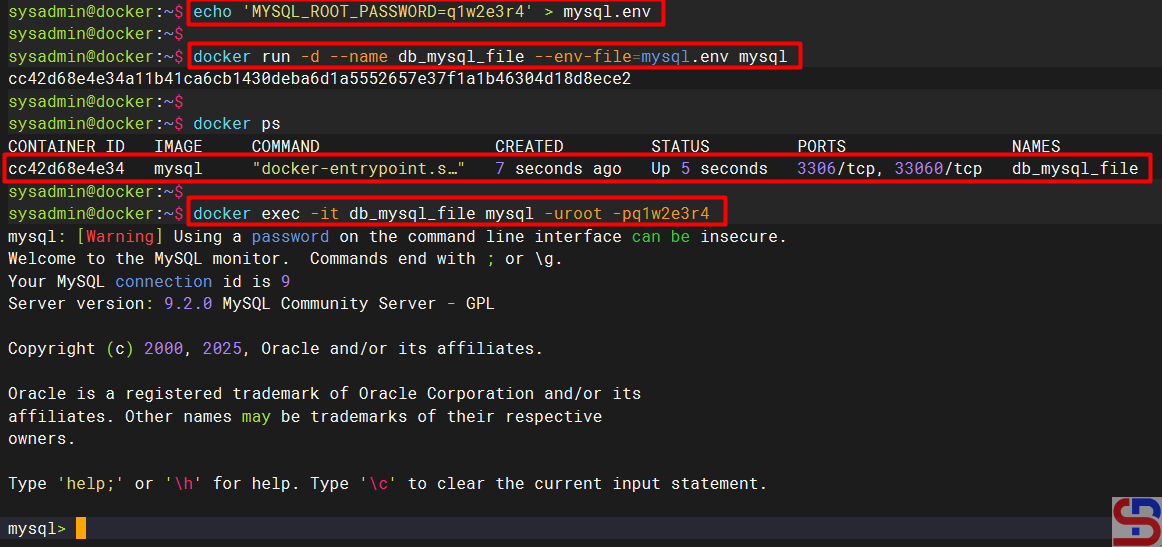
First, you create the file, which usually ends with .env or .env.prod or .env.dev, and I create mysql.env. After that, you add to the file the script below:

MYSQL_ROOT_PASSWORD=q1w2e3r4


Run the command below to create a new container for MySQL using the environment file:

docker run -d --name db_mysql_file --env-file=mysql.env mysql


The MySQL container will be created, and you can access the database in the container like in the command below:

Create the container with the Env-File


References

youtube.dimas-maryanto.com
youtube.com
stackoverflow.com


How to Access a Container in Docker?

After you install Docker and learn some basic Docker commands to set up a container, this article will explain how to access a container in Docker.


Problem

How to access a container in Docker?


Solution

There are 2 ways to access a container in Docker:

A. Via CLI

If you want to access a container in Docker, use the format below:

docker exec -it container_id/container_name shell


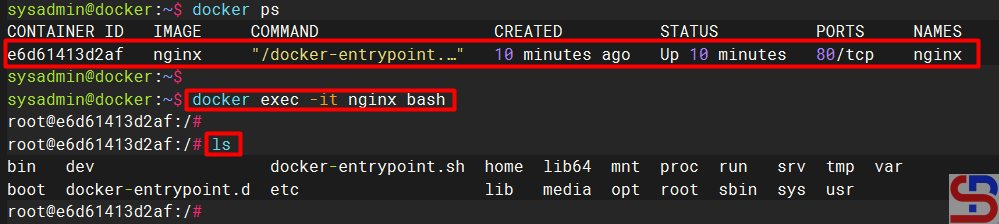
where the -i option is interactive to keep the input active, the -t option is an argument for pseudo -tty (terminal access) allocation, and shell is the program contained in the container and it can be different to be different to the code used in the container likes bash or sh shell, but for more details, please look at the documentation of each image). For example, there is an nginx container that is running, and if you want to access the nginx container, you can use the command below:

docker exec -it nginx bash


After that, you should be able to access the container as shown below:

Access into the container


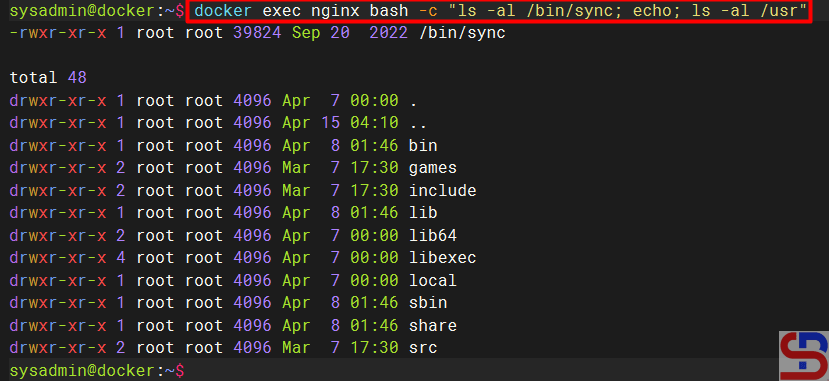
If you want the results of the command in the container to be shown on the server, then use the format below:

docker exec container_name/container_id bash -c "your-linux-commands"


For example, use the command below:

docker exec webapp1 bash -c "ls -al /bin/sync; echo; ls -al /usr"

Run some Linux commands in the container


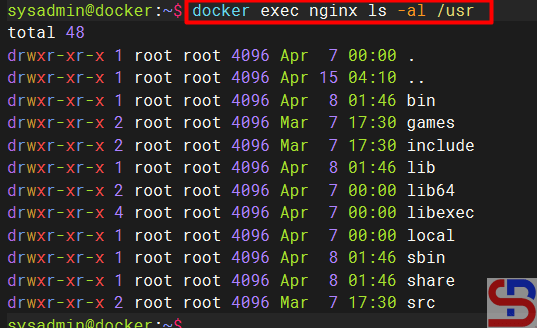
Or you can also use the format below if you only run a command in the container:

docker exec container_name/container_id linux-command


For example, use the command below:

docker exec nginx ls -al /usr

Run a command in the container


B. Via website

You can access a container through the website, but this method only produces applications that run in the container on the website and do not run commands in the container. Usually, these containers use a web server image such as Apache or Nginx, or applications made by developers. If you want to run these applications and access the application in the browser, use the format below:

docker container run -d --name container_name -p port_server:port_container image_name:tag


For example, you want to run an nginx container whose application can be seen by using port 8080 on the server, then use the command below:

docker container run -d --name webapp1 -p 8080:80 nginx

Run the container with the accessed port


Open your browser and type the url below:

http://your_ip_server:8080


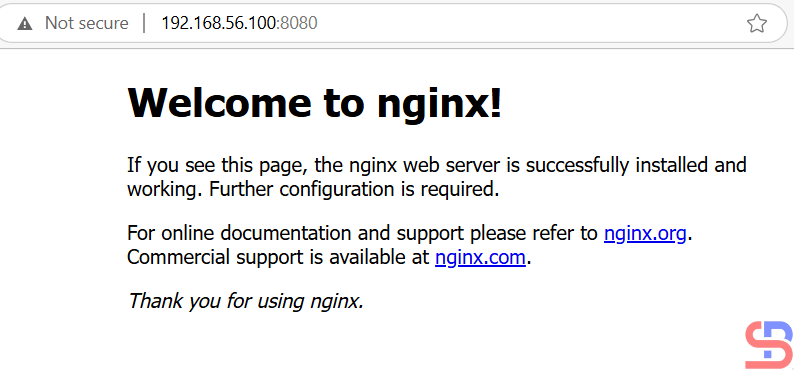
There should be a display as below:

Display the application on the website


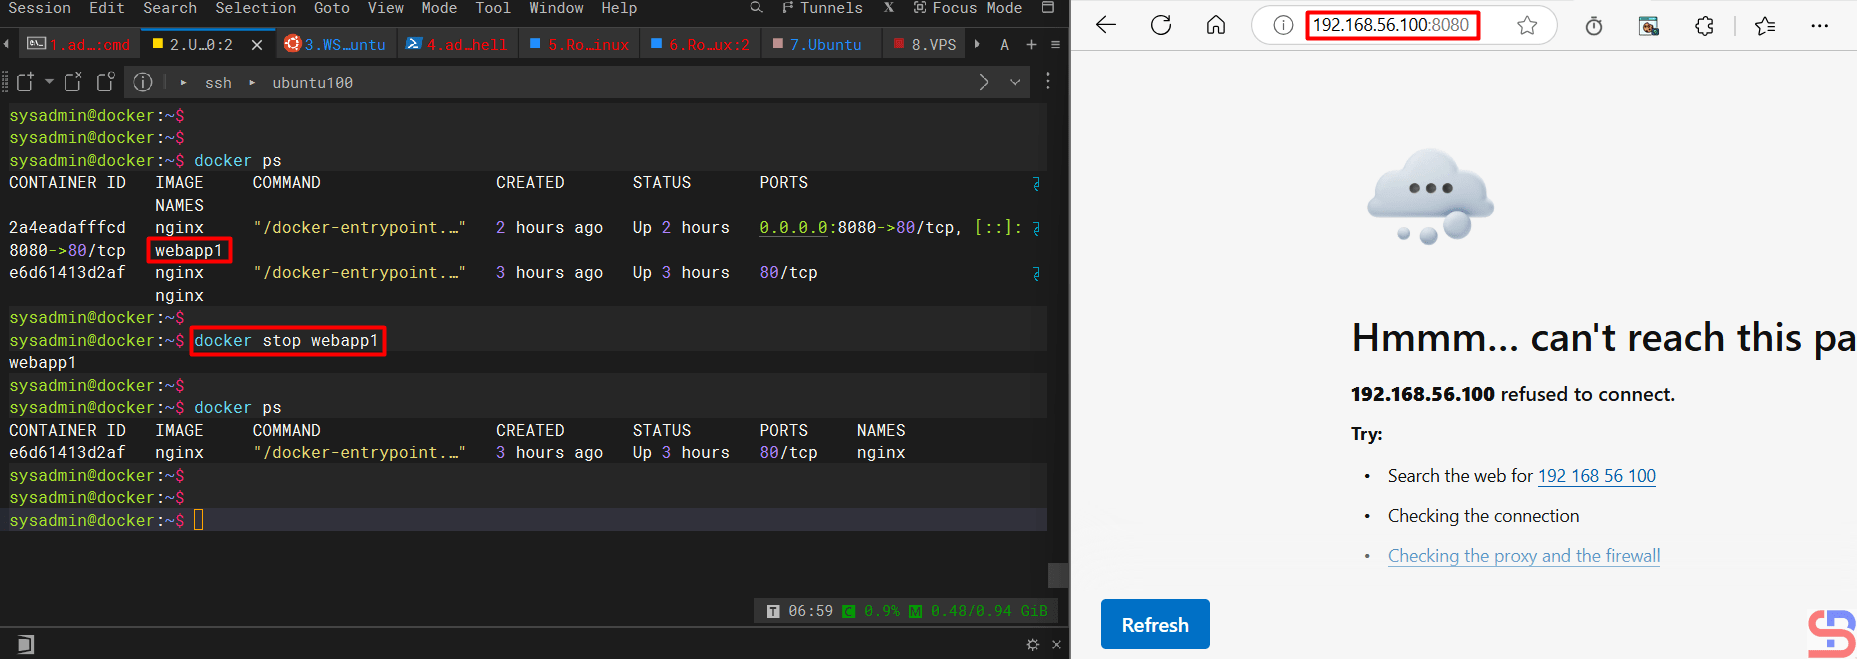
If you stop the container, then the application cannot be accessed through a browser as below:

Turn off the container


Note

You can also access a database installed in a container using the commands in this article.


References

docs.docker.com
spacelift.io
youtube.com