How to Share a Folder Between a Windows Host and a Linux Guest in VirtualBox?

The previous article explained how a folder is shared between a Windows host and a Windows guest in VirtualBox. This article will explain how to share a folder between a Windows host and a Linux guest in VirtualBox.


Problem

How to share a folder between a Windows host and a Linux guest in VirtualBox?


Solution

I use VirtualBox version 7.1.4 in this article and below are the steps so that you can share a folder between a Windows host and a Windows guest in VirtualBox:

A. In the Host

Create a folder on your host and I create a VirtualBox folder on drive D like in the image below:
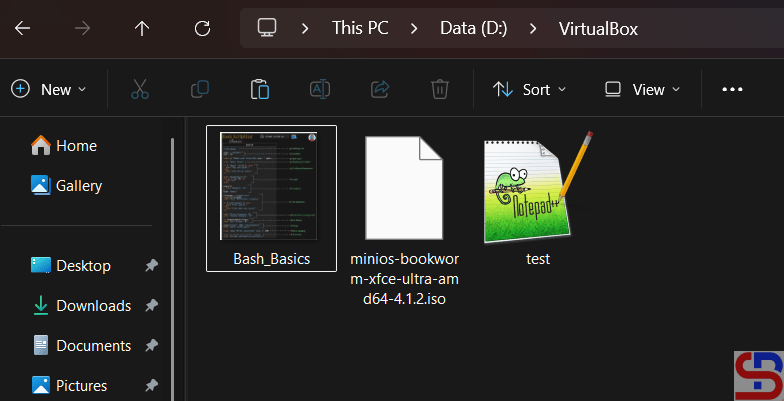
The shared folder


B. In the Guest

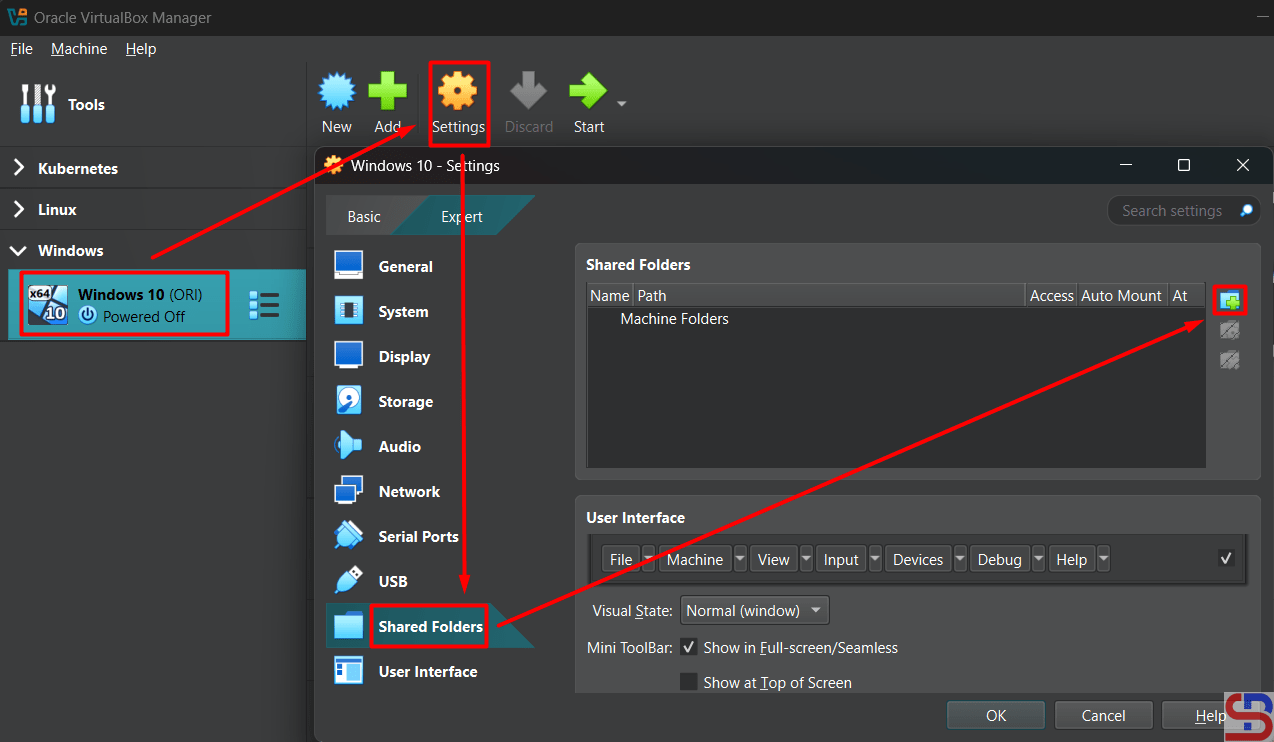
You don’t need to install a driver if you use Linux as a guest. You need to configure the shared folder in VirtualBox. Go to SettingsShared Folders and click the icon like in the image below:

Click the icon in the Shared Folders section


Fill the columns like in the image below:

Settings the shared folders


Click the OK button and the shared folder will appear like in the image below:
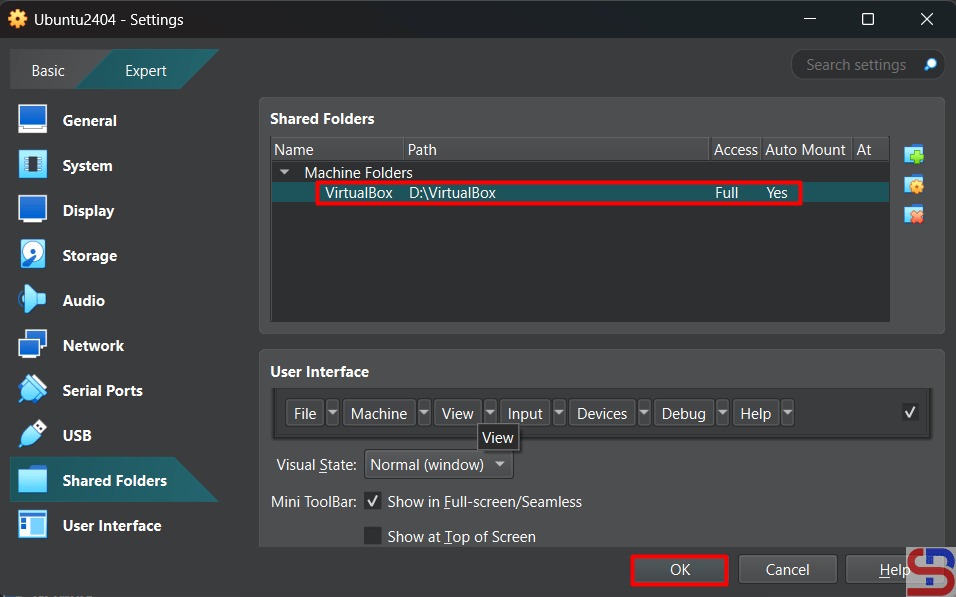
The shared folder appears


Click the OK button. After that, turn on your virtual machine by clicking the Start button like in the image below:

Turn on the VM


Make a folder in Linux and I created a folder /mnt/shared using the command below:

sudo mkdir /mnt/shared


Execute the below command to mount the shared folder with your folder:

sudo mount -t vboxsf VirtualBox /mnt/shared


And you should be able to access the shared folder as shown in the image below:
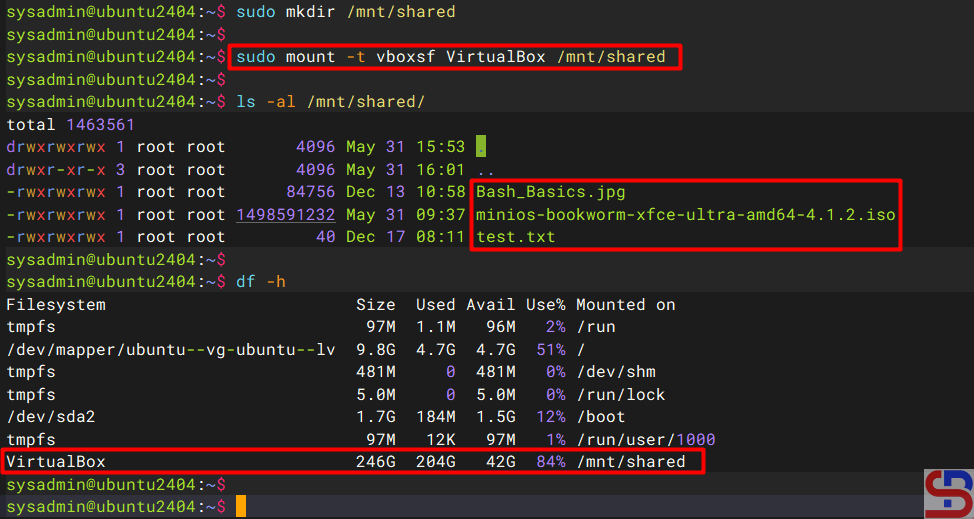
Accessing the shared folder


You can add or remove the file in the shared folder like in the image below:

Create a new file in the shared folder


Note

If you restart the Linux on your virtual machine, you will lose your shared folder and you have to be recreated. To avoid that, then use the command below to configure the /etc/fstab file so that the shared folder is not lost when this virtual machine is restarted:

echo 'VirtualBox       /mnt/shared     vboxsf  rw 0 0' | sudo tee -a /etc/fstab


Any guest using any Linux distribution should be able to follow the above instructions.
 

References

docs.oracle.com
debugpoint.com


How to Share a Folder Between a Windows Host and a Windows Guest in VirtualBox?

VirtualBox has a feature where you can access the files on a folder in your host from your virtual machine. For example, your host is Windows and you want to send some files to your Windows virtual machine. 


Problem

How to share a folder between a Windows host and a Windows guest in VirtualBox?


Solution

You can view or change the files from your host system from within the guest system using Oracle VM VirtualBox’s shared folders capability. Shared folders physically reside on the host and are then shared with the guest, which uses a special file system driver in the Guest Additions to talk to the host. For Windows guests, shared folders are implemented as a pseudo-network redirector and the Guest Additions provide a virtual file system For Linux and Oracle Solaris guests. I use VirtualBox version 7.1.4 in this article and below are the steps so that you can share a folder between a Windows host and a Windows guest in VirtualBox:

A. In the Host

Create a folder on your host and I create a VirtualBox folder on drive D like in the image below:

The shared folder


B. In the Guest (VirtualBox)

To connect the folder, you need the driver to connect them and the driver has been provided by VirtualBox that is available in an ISO file. Go to this page to install the driver. After you install the driver, configure the shared folder in VirtualBox. Go to SettingsShared Folders and click the icon like in the image below:

share a folder between a Windows host and a Windows guest in VirtualBox
Click the icon in the Shared Folders section


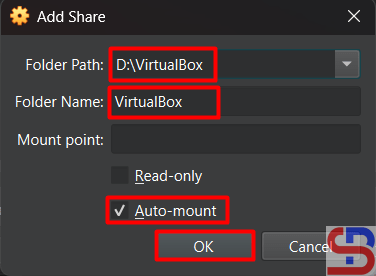
Fill the columns like in the image below:

share a folder between a Windows host and a Windows guest in VirtualBox
Settings the shared folders


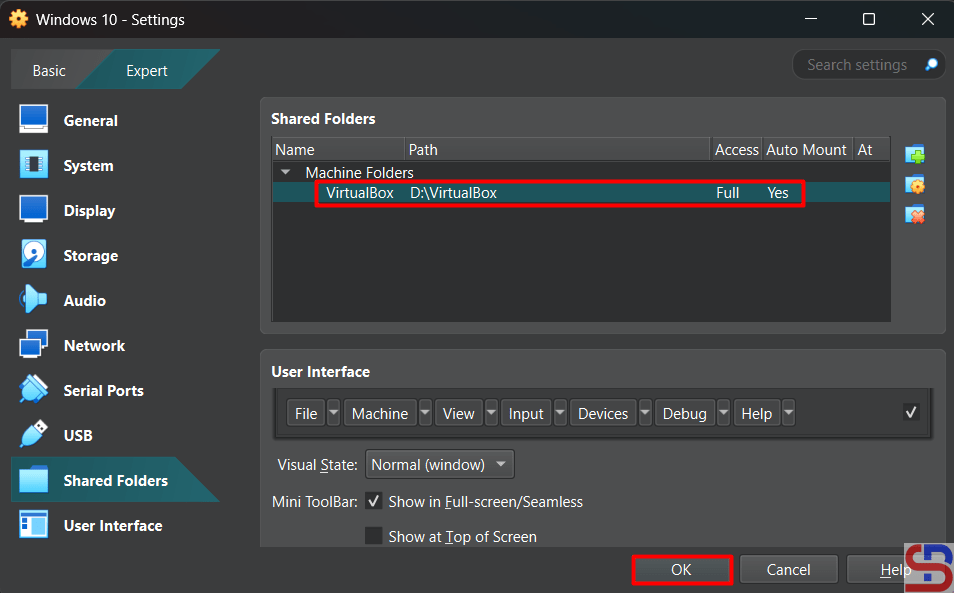
Click the OK button and the shared folder will appear like in the image below:

share a folder between a Windows host and a Windows guest in VirtualBox
The shared folder appears


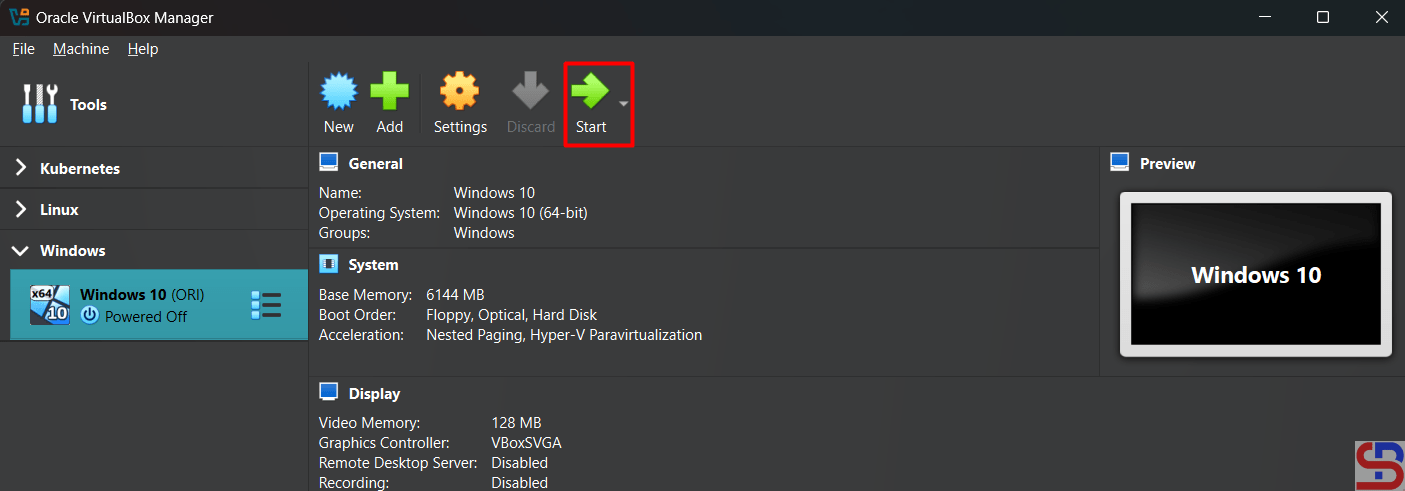
Click the OK button. After that, turn on your virtual machine by clicking the Start button like in the image below:

share a folder between a Windows host and a Windows guest in VirtualBox
Turn on the VM


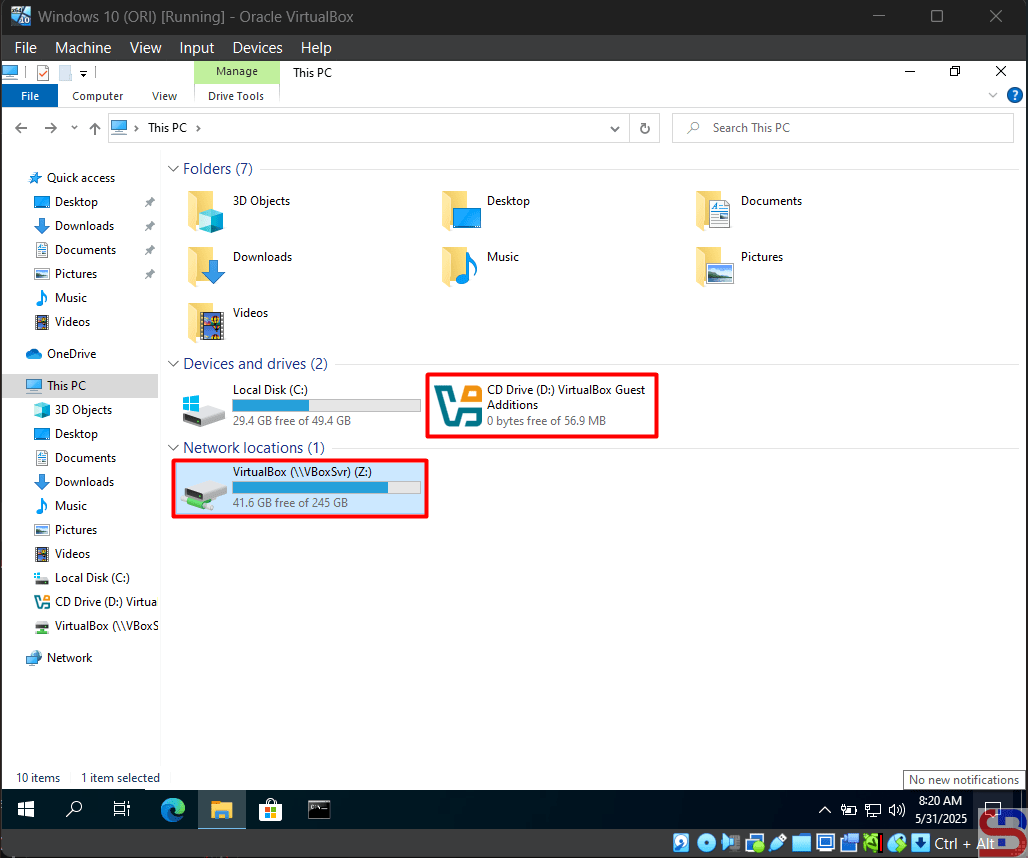
Go to This PC page and you will see the view in the image below:

This PC image


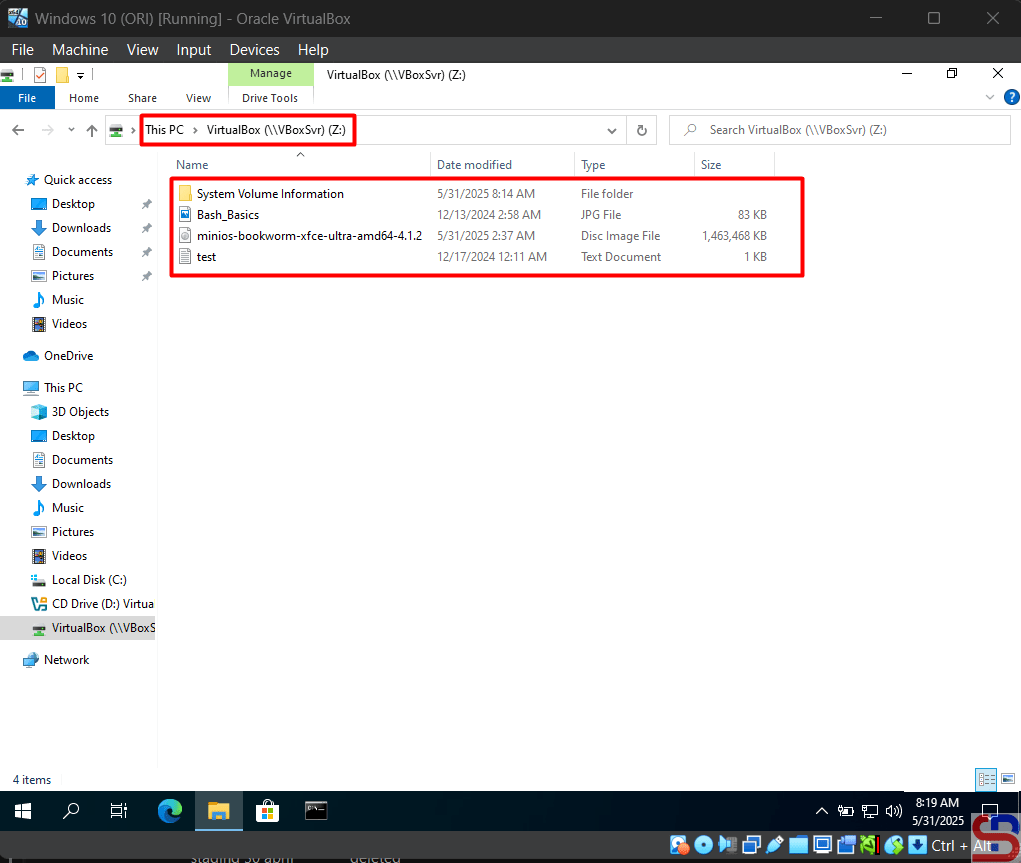
Double-click the VirtualBox (Z:) and you should be able to access the folder like in the image below:

Access the shared folder


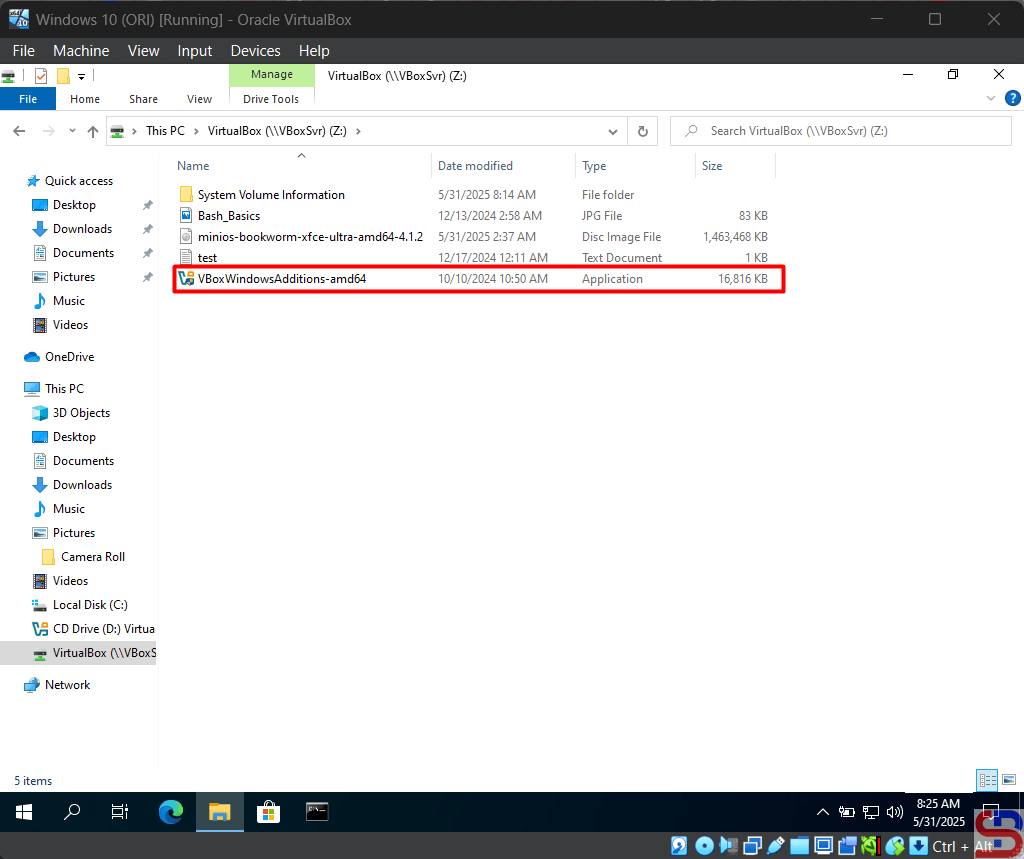
Now, you can access the shared folder and you should add the file like in the image below:

Add the file to the shared folder


Note

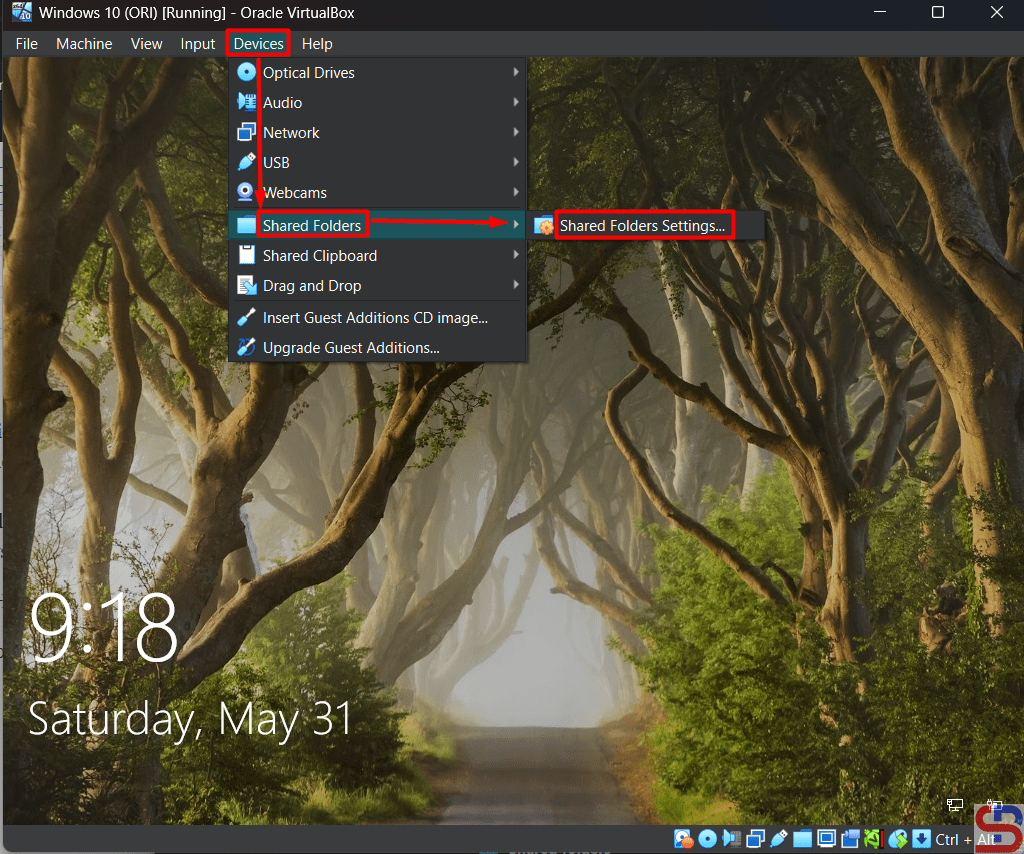
You can configure the shared folder or mount the iso after you turn on the virtual machine like in the image below:

Configure the shared folder after turning on the VM


References

virtualbox.org
youtube.com
docs.oracle.com
blogs.oracle.com


How to Install the VirtualBox Guest Additions?

The Guest Additions in VirtualBox is used to optimize the guest operating system for better performance and usability.


Problem

How to install the VirtualBox Guest Additions?


Solution

The Oracle VM VirtualBox Guest Additions for all supported guest operating systems are provided as a single CD-ROM image file which is called VBoxGuestAdditions.iso. This image file is located in the installation directory of Oracle VM VirtualBox. These are the steps to install the ISO in the Windows and Linux guests.

A. In the Windows guest

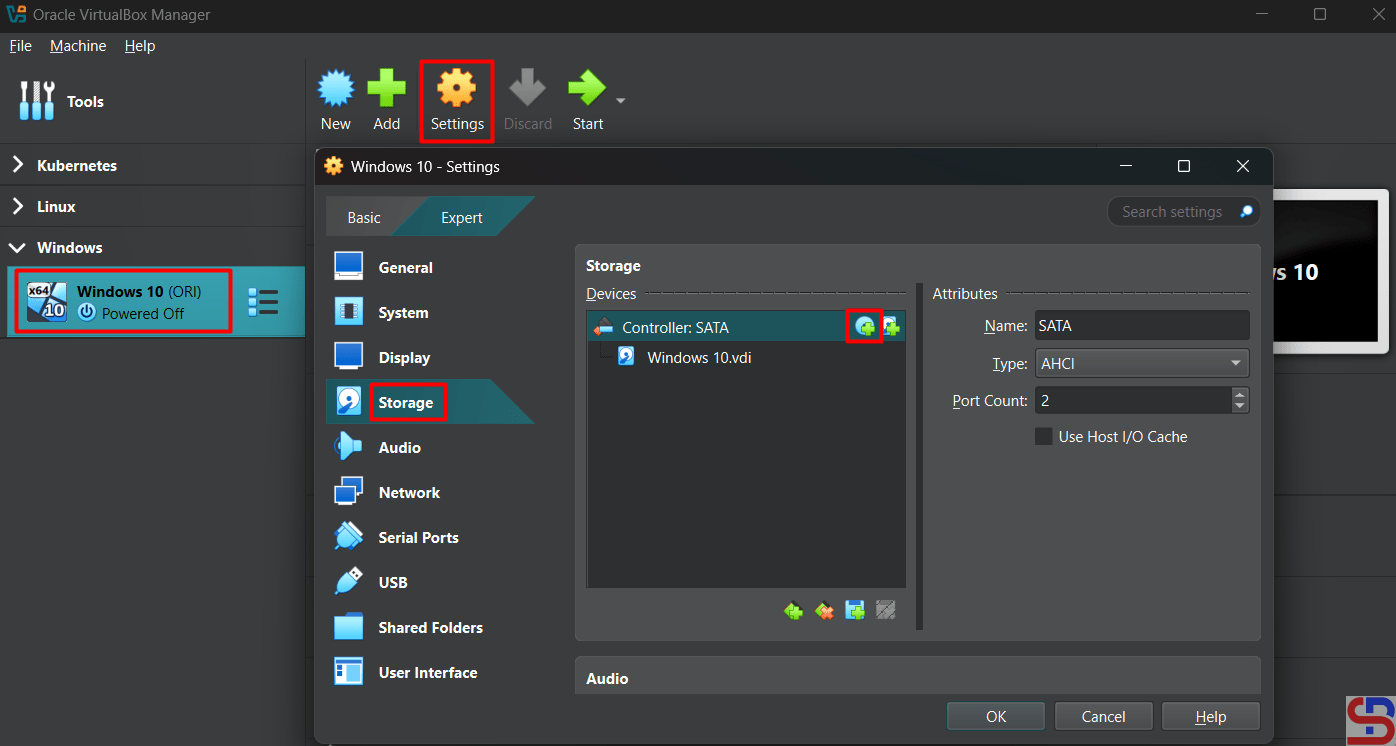
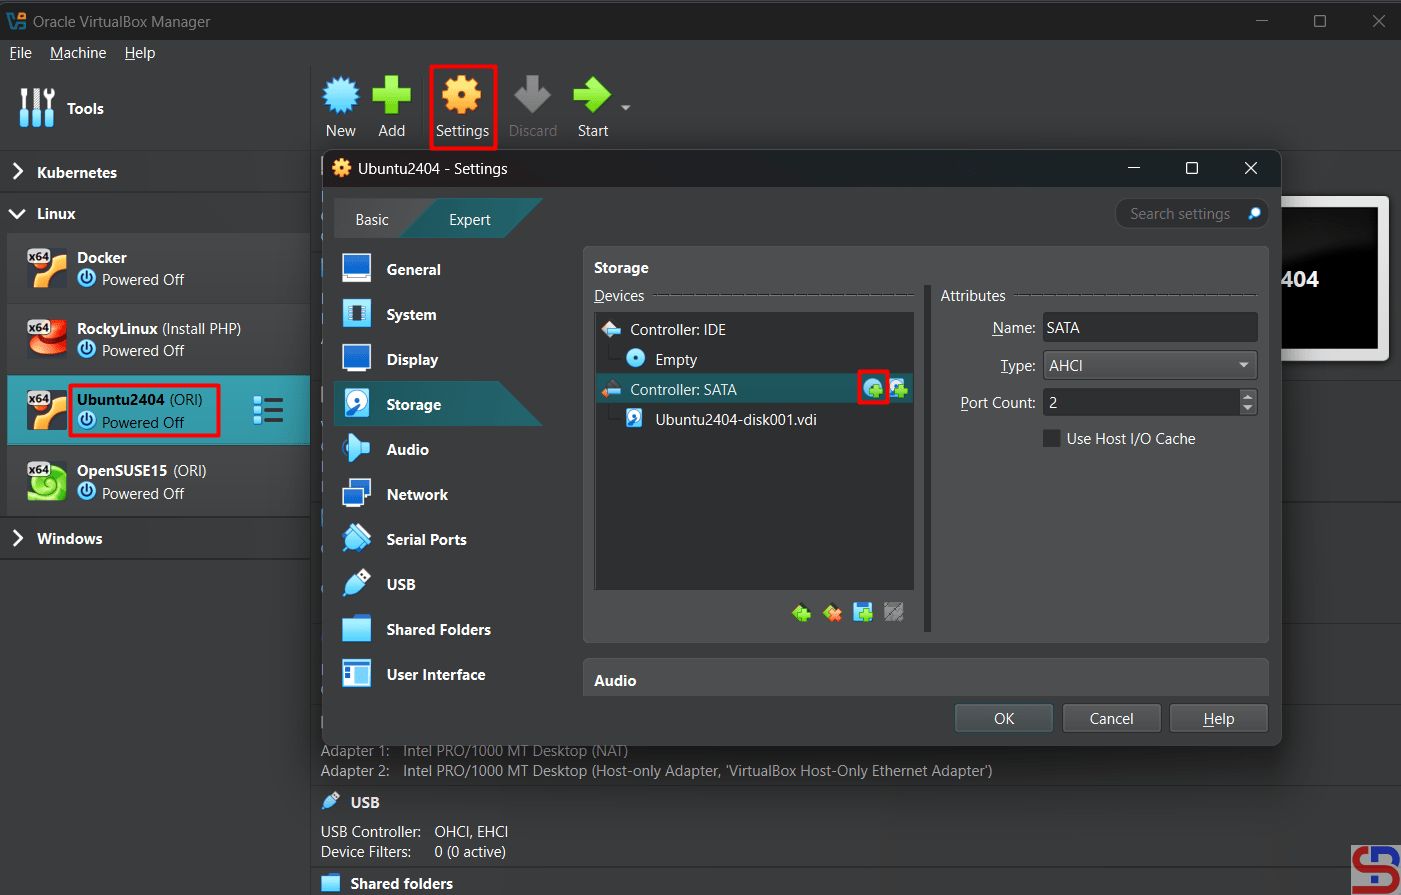
Open your VirtualBox, click your guest or your virtual machine, click SettingsStorage, and then click the icon like in the below image:

Click the icon in the Storage


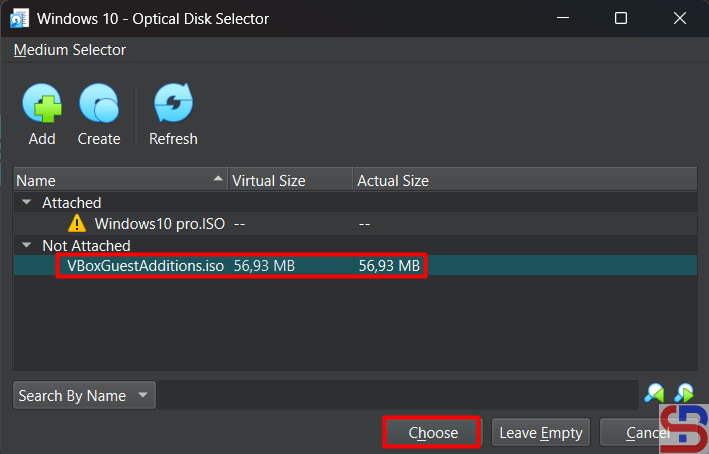
Choose the VBoxGuestAdditions.iso like in the below image:

install the Guest Additions in VirtualBox
Choose the iso


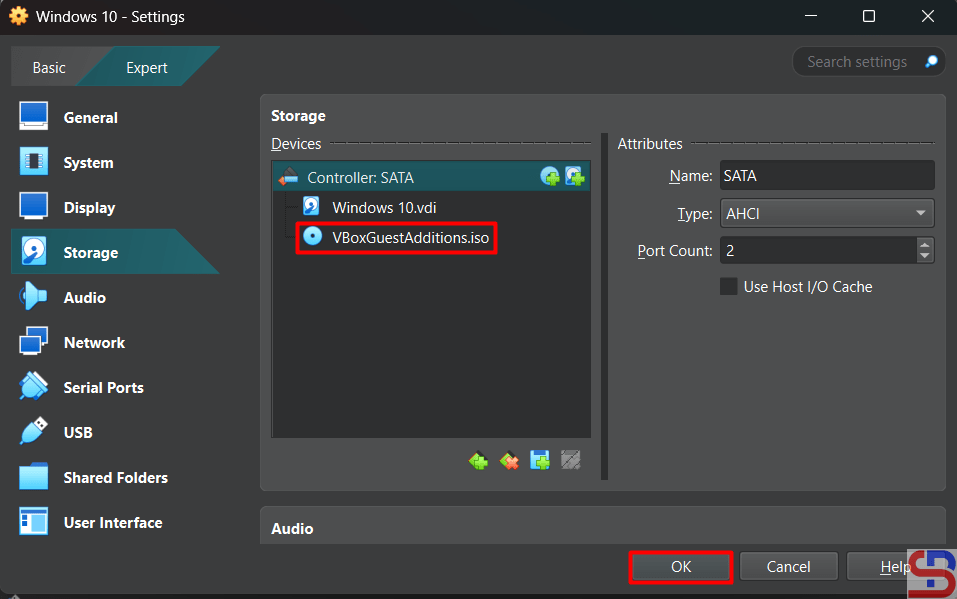
Click the Choose button and the iso will appear like in the image below:

install the Guest Additions in VirtualBox
The iso appear


After that, turn on your virtual machine by clicking the Start button like in the image below:

install the Guest Additions in VirtualBox
Turn on the VM


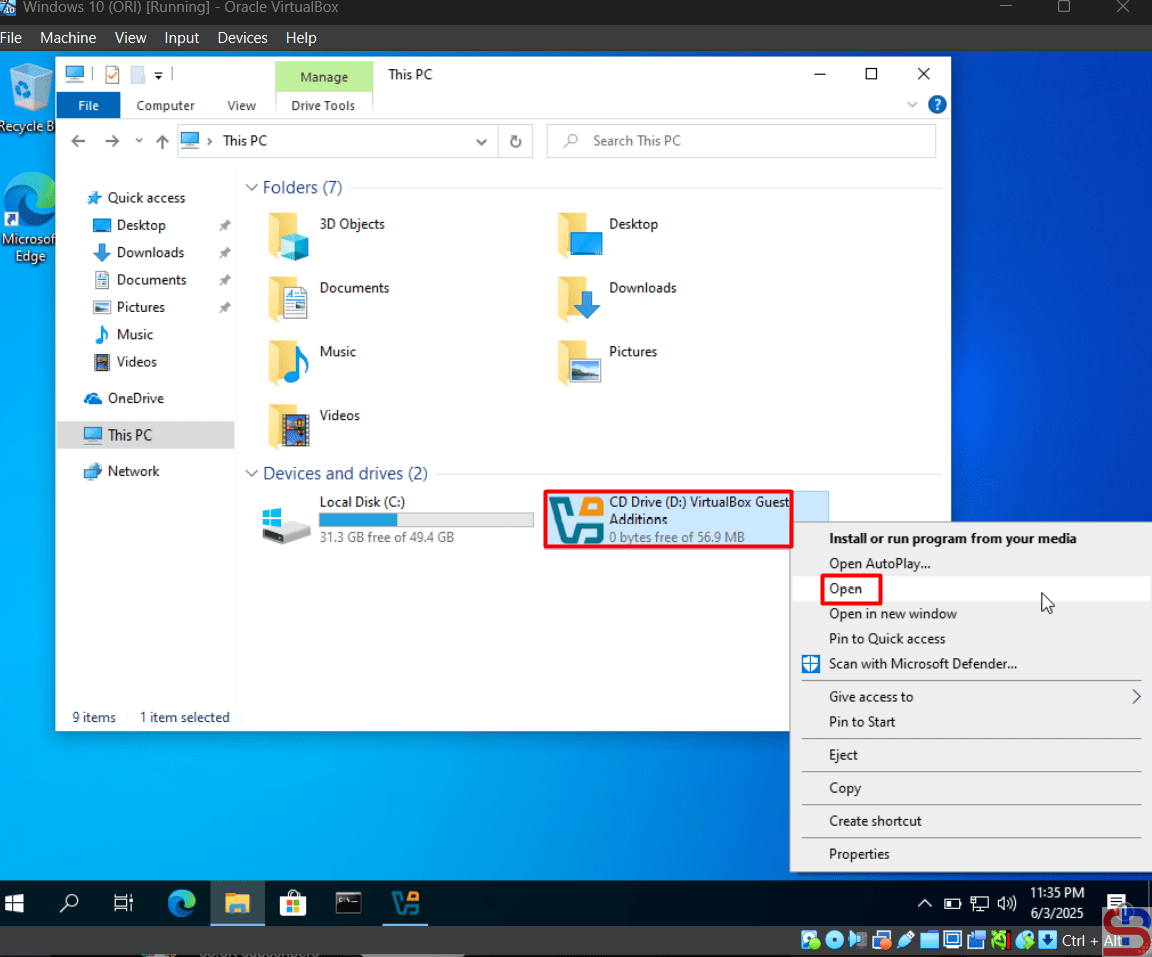
Go to This PC page and you will see the view in the image below:

Right-click the CD


Right-click the CD Drive and click Open, so there is a display like in the image below:

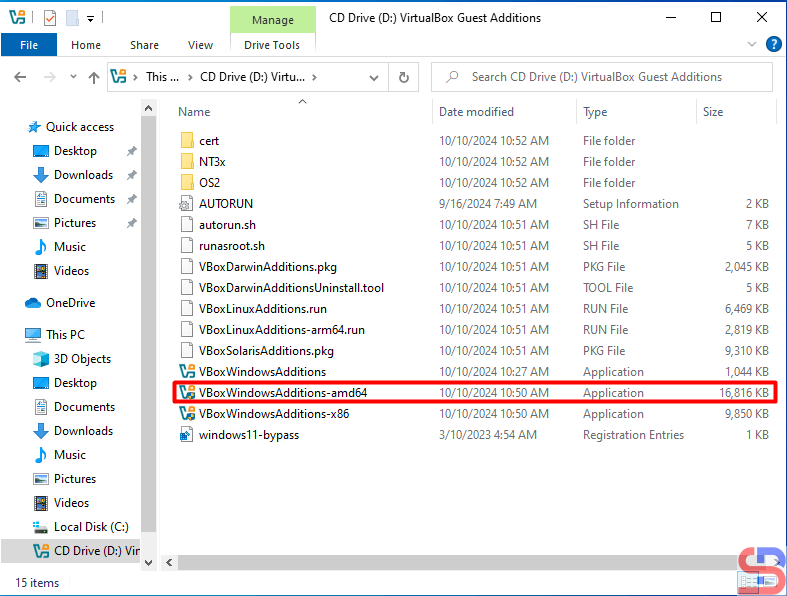
Choose the installer


Double-click on the installer in the red box if your guest is 64-bit, and display it like in the image below:

The installation will start


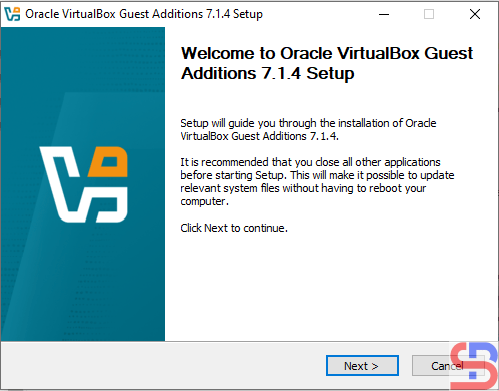
Click the Next button and continue until the driver installation is successful until it displays as shown in the image below:

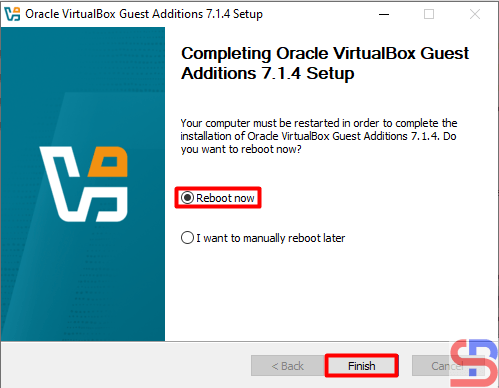
The installation ends


Choose the Reboot now and click the Finish button.


B. In the Linux guest

Open your VirtualBox, click your guest or your virtual machine, click SettingsStorage, and then click the icon like in the below image:

Click the icon in the Storage section


Choose the VBoxGuestAdditions.iso like in the below image:

install the Guest Additions in VirtualBox
Choose the ISO


Click the Choose button and the iso will appear like in the image below:

install the Guest Additions in VirtualBox
The ISO appear


After that, turn on your virtual machine by clicking the Start button like in the image below:

install the Guest Additions in VirtualBox
Turn on the VM


Make a folder in Linux and I created a folder /mnt/cdrom using the command below:

sudo mkdir /mnt/cdrom


Execute the below command to mount the shared folder with your folder:

sudo mount /dev/sr0 /mnt/cdrom/


Install some packages by running the command below:

Ubuntu

sudo apt update
sudo apt install -y bzip2 tar gcc make perl


RockyLinux/AlmaLinux/CentOS

sudo dnf install -y bzip2 tar gcc make perl


OpenSUSE

sudo zypper install -y bzip2 tar gcc make perl


After installation, go to the folder cdrom:

cd /mnt/cdrom


Execute the command below and wait until finish:

sudo sh VBoxLinuxAdditions.run


After that, reboot your virtual machine.


Note

Guest Addition will be very useful if your guest uses graphics such as Windows OS or Linux that have graphics because it will improve performance and usability such as Mouse pointer integration, better video support, shared clipboard, and so on. But if you use the Linux CLI in the guest, this guest addition will not be useful.


References

virtualbox.org
blogs.oracle.com
greenwebpage.com