How to Increase HDD Capacity on a VM in GCP?

If you have a virtual machine at GCP, by default, the Linux system will only make one partition / only. If the partition is smaller, then you have to increase the hard disk server size


Problem

How to increase HDD capacity on a VM in GCP?


Solution

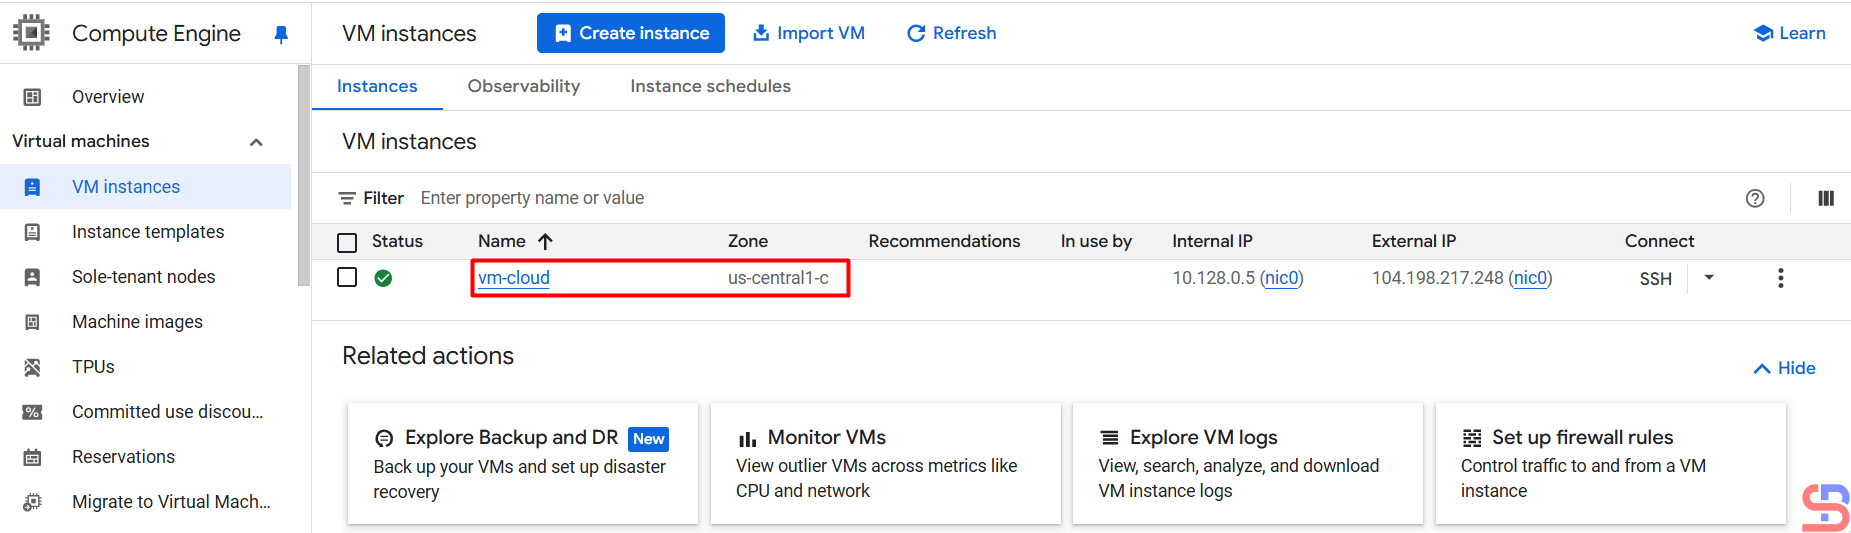
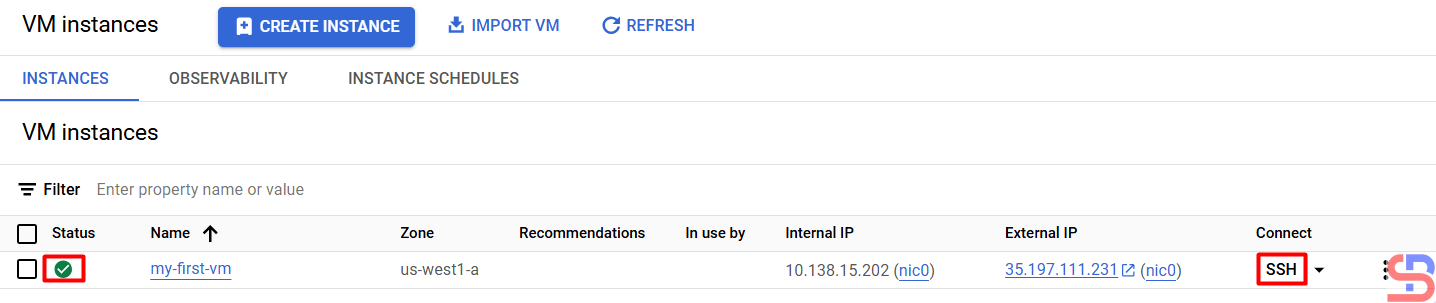
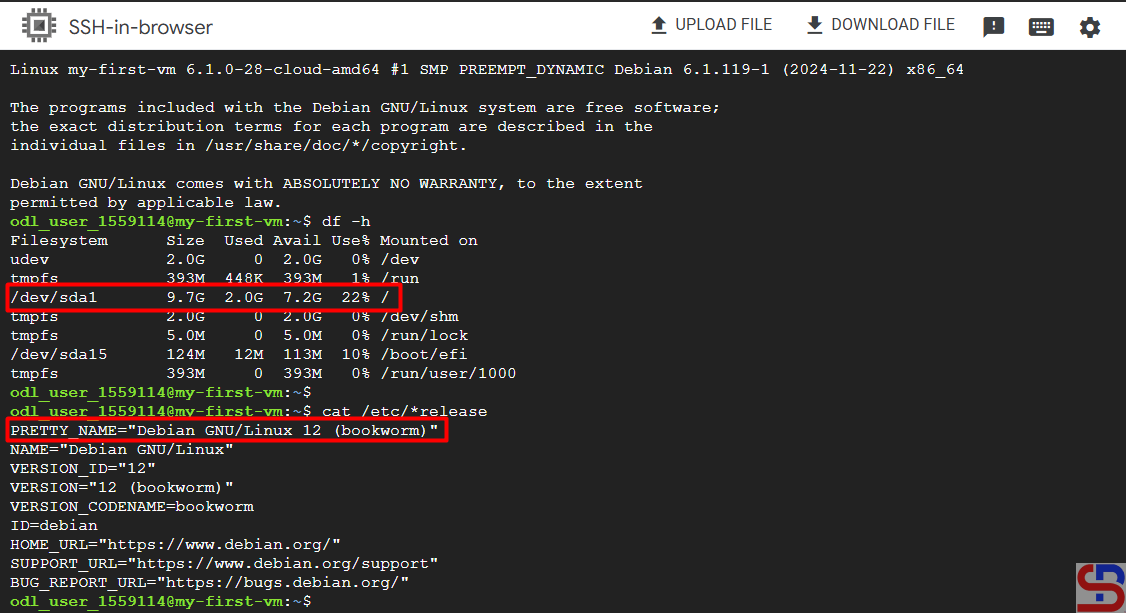
Currently, I have a VM Ubuntu Server 24.04 in GCP with an HDD capacity of 10 GB as in the image below:

The hard disk condition of my server


You can see from the image above that my partition / is very small, and here is the block device in my VM:

The block devices in my VM


I want to increase the HDD capacity to 20 GB without rebooting the server. These are the steps below (recommended as a root user to do the steps below):

1. Edit in the Disks section

You can use the command below to increase the VM’s hard disk to 20 GB in the cloud shell or from your laptop if you have already installed gcloud (change the VM name, size, and zone from the command below):

gcloud compute disks resize vm-cloud --size 20 --zone=us-central1-c


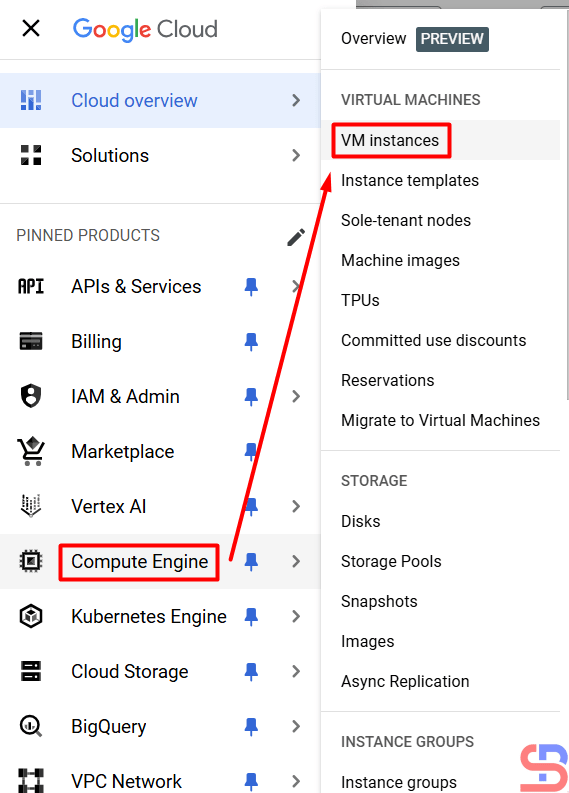
You can also increase the hard disk in GCP by entering GCP, selecting Compute Engine – Disks, and then selecting VM.

Go to Disks


After that, click Edit as below:

Click the Edit


2. Increase HDD capacity

After that, increase the HDD capacity in the section as shown in the image below:

Change the HDD to 20 GB


Change it to 20 GB, and after that, press the Save button so there will be a display like below:

Server’s HDD changed to 20 GB


WARNING
You cannot reduce the HDD capacity on a VM in GCP, for example, from 10 GB to 5 GB, but you can only increase the HDD capacity.


3. Check the block devices

Enter the VM, then we check the block devices using the command:

lsblk

The block device after increasing the hard disk

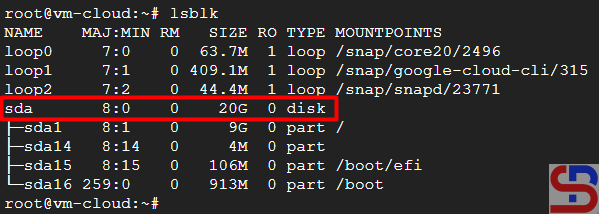
You can see in the picture above that the HDD capacity is 20 GB.

4. Check the partition tables

Then check the partition tables using the command:

parted -l

Check the partition table


If you have a warning like in the image above, you can choose Fix or Ignore, but I chose Fix. From the picture above, you can see that the HDD in this VM has number 1 in the /dev/sda partition using the ext4 extension.

WARNING
You have to be careful with the Number and Filesystem in this section because each Linux has a different Number and Filesystem.


5. Resize the partition

 Use the command below to resize the partition:

parted /dev/sda

Resize the partition /


Then type the command:

resizepart

Process to resize the partition /


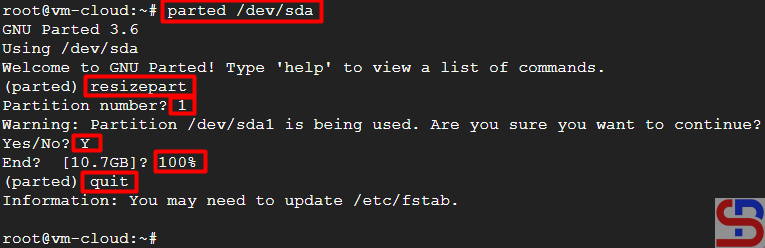
Enter number 1 (check your partition number in step 5), type Y, and type 100%. After that, type quit to exit the prompt.

6. Read the new partition table

Use the command below to read the new partition table:

partprobe /dev/sda


7. Extend the file system

Use the command below to see the types of filesystems used in your VM:

df -T


To extend the file system, use the command below if you are using ext4 (and I am using this filesystem):

sudo resize2fs /dev/sda1


If you use the xfs filesystem, use the command:

sudo xfs_growfs -d /


But if you use btrfs, then use the command:

sudo btrfs filesystem resize max /


8. Check HDD capacity

Use the df -h command to check the hard disk capacity, and it should match the additional HDD in the GCP (in my case, the HDD capacity is 20 GB):

Check the hard disk size


Note

You should back up the important data on the VM first before following the steps above. However, you can increase the HDD capacity in a VM without doing the steps above by rebooting the VM after changing the HDD capacity in the GCP console (step 2).


References

cloud.google.com
man7.org
medium.com
gist.github.com
youtube.com


How to Create a Virtual Machine Using CLI in GCP?

The previous article explained how to create a virtual machine in GCP using a GUI template. This article will explain how to create a virtual machine on GCP using the CLI.


Problem

How to create a virtual machine using CLI in GCP?


Solution

These are the steps to create a virtual machine using CLI:

A. Access to the gcloud

If you have already installed gcloud on your laptop, you can go to the next step. But, if you want to use gcloud in your GCP, go to the GCP dashboard, then click the small box as shown in the image below to activate the cloud shell (or you push the G then S button):

Click the Activate Cloud Shell button


There will be a display below at the bottom:

The Cloud Shell


After you click Continue and wait a minute, the screen shown in the picture below will appear:

Click Authorize


Click Authorize, and the cloud shell is ready to use. If you want the cloud shell to have a larger screen, you can click the button below:

Click the icon


And the existing cloud shell will be inactive, as shown in the image below, so that the cloud shell will move to a new tab:

The inactive cloud shell


B. Run the command

By default, you can use the command below to display the options to create a virtual machine:

gcloud compute instances create --help


From the image above, you can see that you have many options. But actually, you can only use 3 options to make a VM: the zone, machine types, and image options. You have to know that by default, a VM will automatically get a hard drive size of 10 GB, so you don’t need to determine the size of a hard drive on a VM. To see the available zone options, use the command below:

gcloud compute zones list


Use the following command to view the machine type you wish to use:

gcloud compute machine-types list 


To see the available images, use the command below:

gcloud compute images list


So, if you want to create a virtual machine in zone us-central1-c, use machine-type e2-standard-2, and use OS Ubuntu 24.04, use the command below:

gcloud compute instances create vm-cloud \
--zone=us-central1-c \
--machine-type "e2-standard-2" \
--image-project "ubuntu-os-cloud" \
--image-family "ubuntu-2404-lts-amd64" \
--subnet "default"


After that, check the existing VM in GCP using the command below:

gcloud compute instances list


The VM should be made as shown below:

Create the VM using CLI


Or you can see the list of the VMs in the VM instances page in the image below:

The new VM appears in the GCP


Note

If you want to create  a VM with a 50GB hard drive, use the command below:

gcloud compute instances create vm-cloud \
--zone=us-central1-c \
--machine-type "e2-standard-2" \
--image-project "ubuntu-os-cloud" \
--image-family "ubuntu-2404-lts-amd64" \
--boot-disk-size=50GB \
--boot-disk-type=pd-standard \
--subnet "default"


References

cloud.google.com
medium.com
diana-moraa.medium.com
youtube.com


How to Install gcloud on a Linux Server?

The previous articles explained how to install gcloud on Ubuntu/Debian distros and RockyLinux/AlmaLinux/CentOS distros. This article will explain how to install gcloud on Linux.


Problem

How to install gcloud on a Linux server?


Solution

If you use Linux other than the Ubuntu/Debian distro and the RockyLinux/AlmaLinux/CentOS distro, and you want to install gcloud on your Linux distro, then below are the steps (I use OpenSUSE 15 distro):

A. Install gcloud

As far as I know, there are 2 methods for installing on a Linux server, and both methods recommend using a user other than root.

1. Use the script

Before you install gcloud using the script, make sure there are tar and curl packages, and Python version 3.8 and up on your server. You can check it with the following command:

python3 --version


After that, use the following command to download and install the script:

curl https://sdk.cloud.google.com | bash


Then you will see a display like the one below:

Install gcloud using the script


Wait until it’s finished, and you will see a display like the one below:

install gcloud on a Linux server
Installation complete


From the image above, you are asked to create a new SSH connection so that the effect can be seen, and type the command below:

./google-cloud-sdk/bin/gcloud version

Execute the gcloud version command


If you want to type the gcloud command without having to type ./google-cloud-sdk/bin/gcloud, then run the command below:

echo "alias gcloud=./google-cloud-sdk/bin/gcloud" >> ~/.bashrc
source ~/.bashrc

Make an alias for gcloud


2. Using the installer

Run the following commands to install gcloud on your Linux server:

curl -O https://dl.google.com/dl/cloudsdk/channels/rapid/downloads/google-cloud-cli-linux-x86_64.tar.gz
tar -xf google-cloud-cli-linux-x86_64.tar.gz 
./google-cloud-sdk/install.sh


After installation completes, use the following command to test the gcloud command:

./google-cloud-sdk/bin/gcloud version


B. Connect to GCP

After you install gcloud on your server, type the command below:

gcloud init


Then there will be a display like the image below:

Click the link


Click the Ctrl+Click button in the red box to open the link in a browser, or if you have difficulty, copy what is in the red box and place it in your browser so you will see a display like the one below:

Click the account


Click on the Google account that will access GCP, then there will be a display like the image below:

Click the Continue button


Click the Continue button, then the display below will appear:

Click the Allow button


Click the Allow button, then the display below will appear:

Click the Copy button


Click the Copy button, and paste it into the CLI on your server as in the image below:

Paste the code


Select the project and configure the zone as in the image above. After that, the gcloud configuration is complete.

C. Test gcloud

Now, try gcloud to access your GCP. I try to list my virtual machine in GCP using the below command:

gcloud compute instances list


Then the display below will appear:

install gcloud on a Linux server
Display virtual machine in GCP using gcloud


If you get a display like the one above, you have successfully used gcloud to access your GCP.


Note

If you have many projects on your GCP, you can choose one of these projects as the starting point for your gcloud on GCP. You can switch projects using the command:

gcloud config set project PROJECT_ID

Change PROJECT_ID to the project ID you want to switch to.


References

cloud.google.com
liquidweb.com
bacancytechnology.com


How to Install gcloud on Ubuntu?

The previous article explained how the install gcloud on RockyLinux/AlmaLinux/CentOS. This article will explain how to install gcloud on Ubuntu.


Problem

How to install gcloud on Ubuntu?


Solution

Here are the steps to install gcloud on Ubuntu/Debian:

A. Install gcloud

As far as I know, there are 3 methods to install gcloud on Ubuntu/Debian and the methods recommend using a user other than root.

1. Using the script

Before you download the script, install the packages using the command below:

sudo apt update
sudo apt-get install curl tar


Use the below command to download and install the script:

curl https://sdk.cloud.google.com | bash


Then you will see a display like the one below:

install gcloud on Ubuntu
Install gcloud using the script


Wait until it’s finished, and you will see a display like the one below:

install gcloud on Ubuntu
Installation complete


From the image above, you are asked to create a new SSH connection so that the effect can be seen, and type the command below:

gcloud version


However, you can use the command below:

source /home/sysadmin/.bashrc


So you don’t need to create a new SSH connection to run the gcloud version command, which results in the image below:

Check the result of the installation


2. Using the repository

Type the following commands to install gcloud on the Ubuntu/Debian distro:

sudo apt update
echo 'deb [signed-by=/usr/share/keyrings/cloud.google.gpg] https://packages.cloud.google.com/apt cloud-sdk main' | sudo tee -a 
sudo apt-get -y install apt-transport-https ca-certificates gnupg
curl https://packages.cloud.google.com/apt/doc/apt-key.gpg | sudo apt-key --keyring /usr/share/keyrings/cloud.google.gpg add -
sudo apt update
sudo apt-get install -y google-cloud-sdk


3. Using the snap

Run the below command to install gcloud:

sudo snap install google-cloud-sdk --classic 


B. Connect to GCP

After you install gcloud on your server, type the command below:

gcloud init 


Then there will be a display like the image below:

Click the link


You can open the link in a browser by clicking the Ctrl+Click button located in the red box. If you are having trouble doing so, copy what is included in the red box and paste it into your browser. This will allow you to view a display similar to the one that is shown below:

Click the account


When you click on your Google account, that will allow you to access GCP, and a display similar to the one shown below will appear:

Click the Continue button


After you click the Continue button, the screen below will show:

Click the Allow button


When you click the Allow button, the screen below will show:

Click the Copy button


Click the Copy button, and paste it into the CLI on your server as in the image below:

Paste the code


Select the project and configure the zone as in the image above. After that, the gcloud configuration is complete, like in the image below:

install gcloud on Ubuntu
Installation of GCP is complete


C. Test gcloud

Now, try gcloud to access your GCP. I try to list my virtual machine in GCP using the below command:

gcloud compute instances list


Then the display below will appear:

install gcloud on Ubuntu
Display virtual machine in GCP using gcloud


If you get a display like the image above, then you have successfully used your GCloud to access your GCP.


Note

If you have many projects on your GCP, you can choose one of these projects as the starting point for your gcloud on GCP. You can switch projects using the command:

gcloud config set project PROJECT_ID

Change PROJECT_ID to the project ID you want to switch to.


References

cloud.google.com
liquidweb.com
bacancytechnology.com
attuneops.io
tecadmin.net


How to Install gcloud on RockyLinux?

If you use GCP in daily operations, it is recommended to use the commands in the CLI known as gcloud. This is because many commands can only be executed using gcloud rather than using the Console in the browser.


Problem

How to install gcloud on RockyLinux?


Solution

Before you access GCP and run GCP commands through your server, you must first install gcloud on your server.

A. Install gcloud

As far as I know, there are 2 methods to install gcloud on RockyLinux/AlmaLinux/CentOS, and both methods recommend using a user other than root.

1. Using the script

Before you download the script, install the packages using the command below:

yum install tar curl


Use the command below to download and install the script:

curl https://sdk.cloud.google.com | bash


Then you will see a display like the one below:

install gcloud on RockyLinux
Install gcloud using the script


Wait until it’s finished, and you will see a display like the one below:

install gcloud on RockyLinux
Installation complete


From the image above, you are asked to create a new SSH connection so that the effect can be seen, and type the command below:

gcloud version


However, you can use the command below:

source /home/sysadmin/.bashrc


So you don’t need to create a new SSH connection to run the gcloud version command, which results in the image below:

install gcloud on RockyLinux
Check the result of the installation


2. Using the Repository

You have to add the Google Cloud SDK repository to your server using the following command:

sudo tee -a /etc/yum.repos.d/google-cloud-sdk.repo << EOM
[google-cloud-cli]
name=Google Cloud CLI
baseurl=https://packages.cloud.google.com/yum/repos/cloud-sdk-el9-x86_64
enabled=1
gpgcheck=1
repo_gpgcheck=0
gpgkey=https://packages.cloud.google.com/yum/doc/rpm-package-key.gpg
EOM


After that, install gcloud using the command below:

yum install google-cloud-sdk


After the installation finishes, run the following command to test the gcloud command:

gcloud version


B. Connect to GCP

After you install gcloud on your server, type the command below:

gcloud init


Then there will be a display like the image below:

Click the link


Click the Ctrl+Click button in the red box to open the link in a browser, or if you have difficulty, copy what is in the red box and place it in your browser so you will see a display like the one below:


Click the account


Click on the Google account that will access GCP, then there will be a display like the image below:

Click the Continue button


Click the Continue button, then the display below will appear:

Click the Allow button


Click the Allow button, then the display below will appear:

Click the Copy button


Click the Copy button, and paste it into the CLI on your server as in the image below:

Paste the code


Select the project and configure the zone as in the image above. After that, the gcloud configuration is complete.

C. Test gcloud

Now, try gcloud to access your GCP. I try to list my virtual machine in GCP using the below command:

gcloud compute instances list


Then the display below will appear:

install gcloud on RockyLinux
Display virtual machine in GCP using gcloud


If you get a display like the image above, you have successfully used your gcloud to access your GCP.


Note

If you have many projects on your GCP, you can choose one of these projects as the starting point for your gcloud on GCP. You can switch projects using the command:

gcloud config set project PROJECT_ID

Change PROJECT_ID to the project ID you want to switch to.


References

liquidweb.com
cloud.google.com
bacancytechnology.com


How to Create a Virtual Machine in GCP?

Many people use cloud technology provided by cloud providers such as AWS, GCP, and Azure to support their business operations. One of the features of this technology is the use of a virtual machine, or VM.


Problem

How to create a virtual machine in GCP?


Solution

There are several ways to create a virtual machine or a VM in GCP, but this article will explain how to create a virtual machine in the GCP console. In the GCP Console, at the top left corner, click the Navigation menu, which is symbolized by three lines as in the image below:

Click the icon


Then click Compute Engine > VM Instances as in the image below:

Click the VM instance


After that, click the CREATE INSTANCE button, then a display will appear as below:

Click the button


You will see a display like the image below:

Fill in the columns in the machine configuration section


In the Machine Configuration section, you have to write the name of the VM, the location of the VM, the CPU, the RAM, and the type of machine that will be used in your VM. I wrote down my VM requirements as in the picture above. After filling in this section, click the OS and storage section. Here you can choose the OS you use and how many hard disk sizes you want in the VM using the CHANGE button:

Fill in the OS and storage section


After that, in the Networking section, you have to fill in the network requirements for the VM. I filled it in as shown in the image below. I don’t fill in the Observability, Security, and Advanced sections because I don’t need them for my virtual machine.

Fill in the Networking section


After that, I press the CREATE button and wait until the virtual machine creation process completes:

The new VM has been created


If you want to access your VM, then press the SSH button, and you can see the OS and HDD size on your VM in the image below:

Access to the VM using the SSH button

Note

At first glance, it seems easy to create a virtual machine in GCP. However, if you work in real conditions, there will be many options that must be filled in when creating your virtual machine.


References

diana-moraa.medium.com
techrepublic.com