If you have a virtual machine at GCP, by default, the Linux system will only make one partition / only. If the partition is smaller, then you have to increase the hard disk server size
Problem
How to increase HDD capacity on a VM in GCP?
Solution
Currently, I have a VM Ubuntu Server 24.04 in GCP with an HDD capacity of 10 GB as in the image below:

You can see from the image above that my partition / is very small, and here is the block device in my VM:

I want to increase the HDD capacity to 20 GB without rebooting the server. These are the steps below (recommended as a root user to do the steps below):
1. Edit in the Disks section
You can use the command below to increase the VM’s hard disk to 20 GB in the cloud shell or from your laptop if you have already installed gcloud (change the VM name, size, and zone from the command below):
gcloud compute disks resize vm-cloud --size 20 --zone=us-central1-c
You can also increase the hard disk in GCP by entering GCP, selecting Compute Engine – Disks, and then selecting VM.

After that, click Edit as below:

2. Increase HDD capacity
After that, increase the HDD capacity in the section as shown in the image below:

Change it to 20 GB, and after that, press the Save button so there will be a display like below:

3. Check the block devices
Enter the VM, then we check the block devices using the command:
lsblk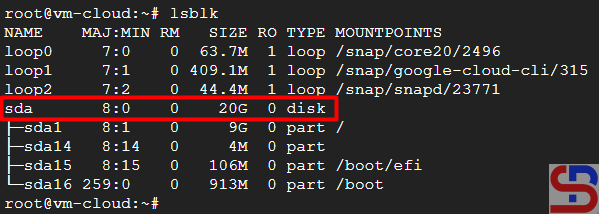
You can see in the picture above that the HDD capacity is 20 GB.
4. Check the partition tables
Then check the partition tables using the command:
parted -l
If you have a warning like in the image above, you can choose Fix or Ignore, but I chose Fix. From the picture above, you can see that the HDD in this VM has number 1 in the /dev/sda partition using the ext4 extension.
5. Resize the partition
Use the command below to resize the partition:
parted /dev/sda
Then type the command:
resizepart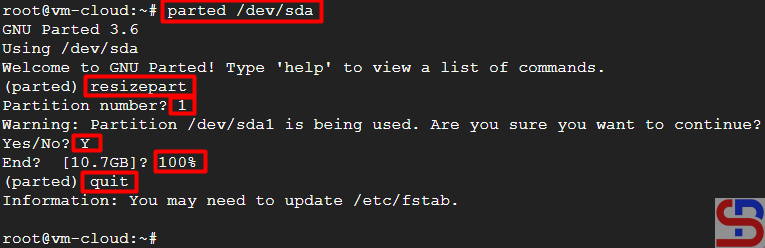
Enter number 1 (check your partition number in step 5), type Y, and type 100%. After that, type quit to exit the prompt.
6. Read the new partition table
Use the command below to read the new partition table:
partprobe /dev/sda
7. Extend the file system
Use the command below to see the types of filesystems used in your VM:
df -T
To extend the file system, use the command below if you are using ext4 (and I am using this filesystem):
sudo resize2fs /dev/sda1
If you use the xfs filesystem, use the command:
sudo xfs_growfs -d /
But if you use btrfs, then use the command:
sudo btrfs filesystem resize max /
8. Check HDD capacity
Use the df -h command to check the hard disk capacity, and it should match the additional HDD in the GCP (in my case, the HDD capacity is 20 GB):

Note
You should back up the important data on the VM first before following the steps above. However, you can increase the HDD capacity in a VM without doing the steps above by rebooting the VM after changing the HDD capacity in the GCP console (step 2).
References
cloud.google.com
man7.org
medium.com
gist.github.com
youtube.com

