How to Connect Storage Mount Using Volume Mount on Docker?

The previous article explained how to access the database installed in a container. But you must know that if you delete the container, it will automatically delete the database too. Therefore, you must create a storage to store a database so that if you delete the container, either intentionally or unintentionally, the database will remain. By default, Docker supports the following types of storage mounts for storing data outside of the container’s writable layer: volume mounts, bind mounts, and tmpfs mounts, each with its unique characteristics and use cases. This article will explain how to connect storage mount using volume mount. You can see a summary of the three types of storage here.


Problem

How to connect storage mount using volume mount on Docker?


Solution

Volumes are persistent storage mechanisms managed by the Docker daemon. It is stored in the filesystem on the host in /var/lib/docker/volumes folder, but to interact with the data in the volume, you must mount the volume to a container. Volumes are ideal for performance-critical data processing and long-term storage needs and are also suitable for sharing data between containers since volumes can be attached to multiple containers.

A. List, remove and create the volume

To see the volume on the server, use the command below:

docker volume ls


To remove a volume, use the command below:

docker volume rm volume_name


Use the command below to remove all unused volumes:

docker volume prune


By default, there is no volume if there is no container on the server. But if there is a container that uses storage like a container that uses a database image, the volume will form automatically. To see which containers that use volume can use the command below:

docker container inspect webapp postgresdb mysqldb -f '{{ .Name }} => {{json .Mounts}}'

 

Display the container that uses volume


You can create a new volume using the format below:

docker volume create volume_name


Use the command below if you want to create a mysql_vol volume:

docker volume create mysql_vol


To see this volume information in detail, use the command below:

docker volume inspect mysql_vol
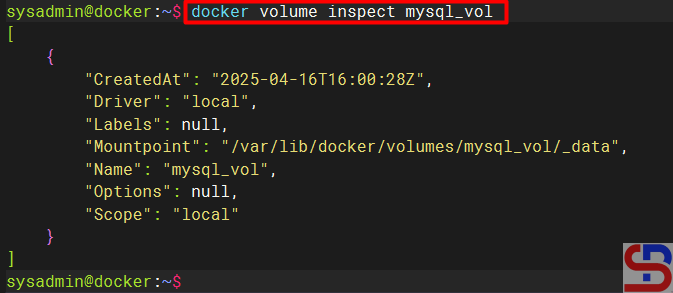
make storage using volume mount on Docker
Inspect the volume


B. Connect storage mount to a container

After that, make a new container where the container mounts to the volume you created using the format below:

docker run -d --name container_name -v volume_name:/path/folder/in/container image_name


You can see more detailed information on mounting a container, using the format below:

docker inspect container_name -f "{{json .Mounts}}" | python3 -m json.tool


For example, use the command below if you want to create a db_mysql container with a password q1w2e3r4 using mysql_vol volume in the folder /var/lib/mysql :

docker run -d --name db_mysql -e MYSQL_ROOT_PASSWORD='q1w2e3r4' -v mysql_vol:/var/lib/mysql  mysql
docker inspect db_mysql -f "{{json .Mounts}}" | python3 -m json.tool
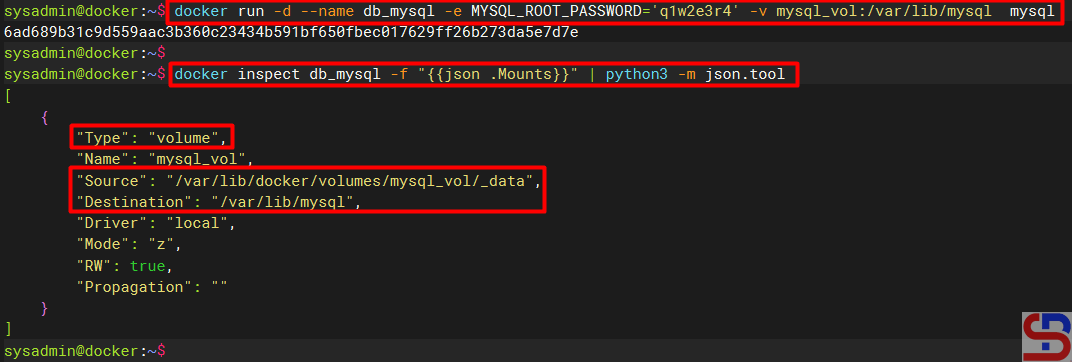
 

Run the container and check the mount


C. Simulate remove the container

After that, try to enter the container by using the command below:

docker exec -it db_mysql mysql -uroot -pq1w2e3r4


Create a database and fill it as shown in the image below:
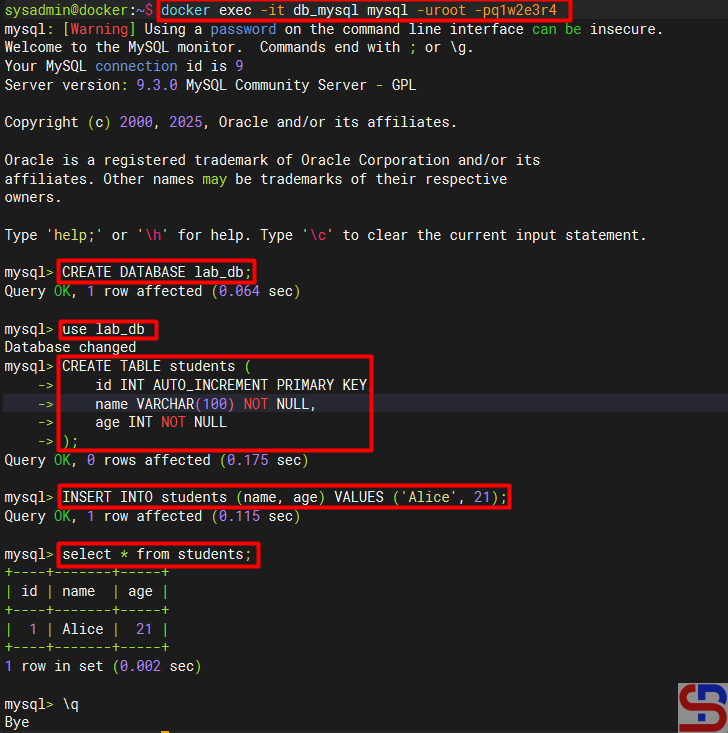
make storage using volume mount on Docker
Create a database


Then, try to simulate by deleting the container and creating a new container where the data is put into the mysql_vol volume in the /var/lib/mysql folder using the command below:

docker stop db_mysql
docker rm db_mysql
docker run -d --name db_mysql_new -e MYSQL_ROOT_PASSWORD='q1w2e3r4' -v mysql_vol:/var/lib/mysql mysql


Access the container by using the command:

docker exec -it db_mysql_new mysql -uroot -pq1w2e3r4


The lab_db database should still be accessible using the container you just created, as shown in the image below:
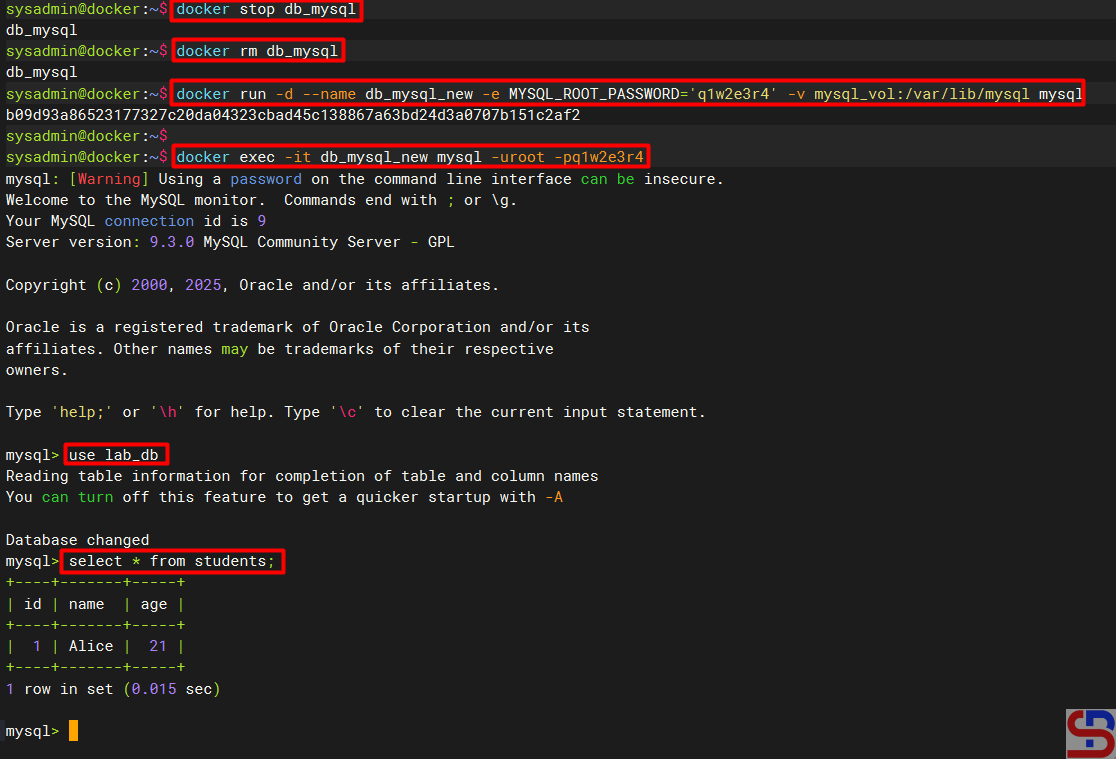
make storage using volume mount on Docker
The database can still be accessed


D. Share data in the volume among containers

Let’s do a simulation to share the data that is in the volume with more than one container on a single server. In this article, 2 containers will be created that are connected to a mysql_vol volume. Type the command below to make 2 containers:

docker run -d --name db_mysql1 -e MYSQL_ROOT_PASSWORD='q1w2e3r4' -v mysql_volume:/var/lib/mysql  mysql
docker run -d --name db_mysql2 -e MYSQL_ROOT_PASSWORD='q1w2e3r4' -v mysql_volume:/var/lib/mysql  mysql
docker ps
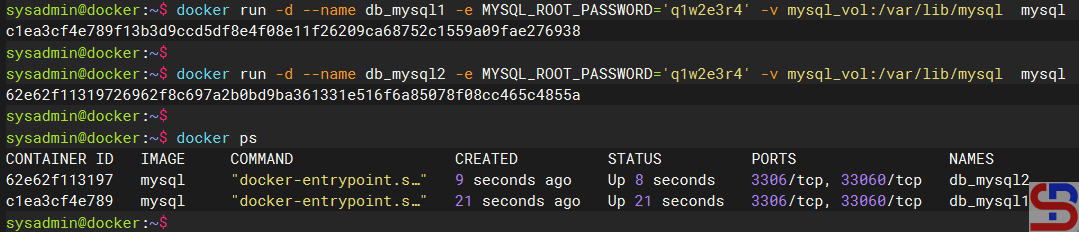
Create 2 containers


After that, type the command below to create a database and insert the data via container db_mysql1:

docker exec db_mysql bash -c "mysql -uroot -pq1w2e3r4 -e \"CREATE DATABASE db_school; USE db_school; CREATE TABLE students (id INT AUTO_INCREMENT PRIMARY KEY, name VARCHAR(100) NOT NULL, age INT NOT NULL); INSERT INTO students (name, age) VALUES ('bob', 21), ('John', 22);select * from students;\""


Then there will be a display below:

Execute the command to create a database and insert data


From the picture above, there are 2 data in the student table in the db_school database. Type the command below to add data to the table from container db_mysql2:

docker exec db_mysql1 bash -c "mysql -uroot -pq1w2e3r4 -e \"USE db_school; INSERT INTO students (name, age) VALUES ('Laura', 20), ('Andrew', 23);select * from students;\""

Execute the command to add data


In the picture above, there are 4 data in the student table so that the Docker volume data can be shared between containers on a server well.


Note

You can see the picture below to see the difference between the three storage:
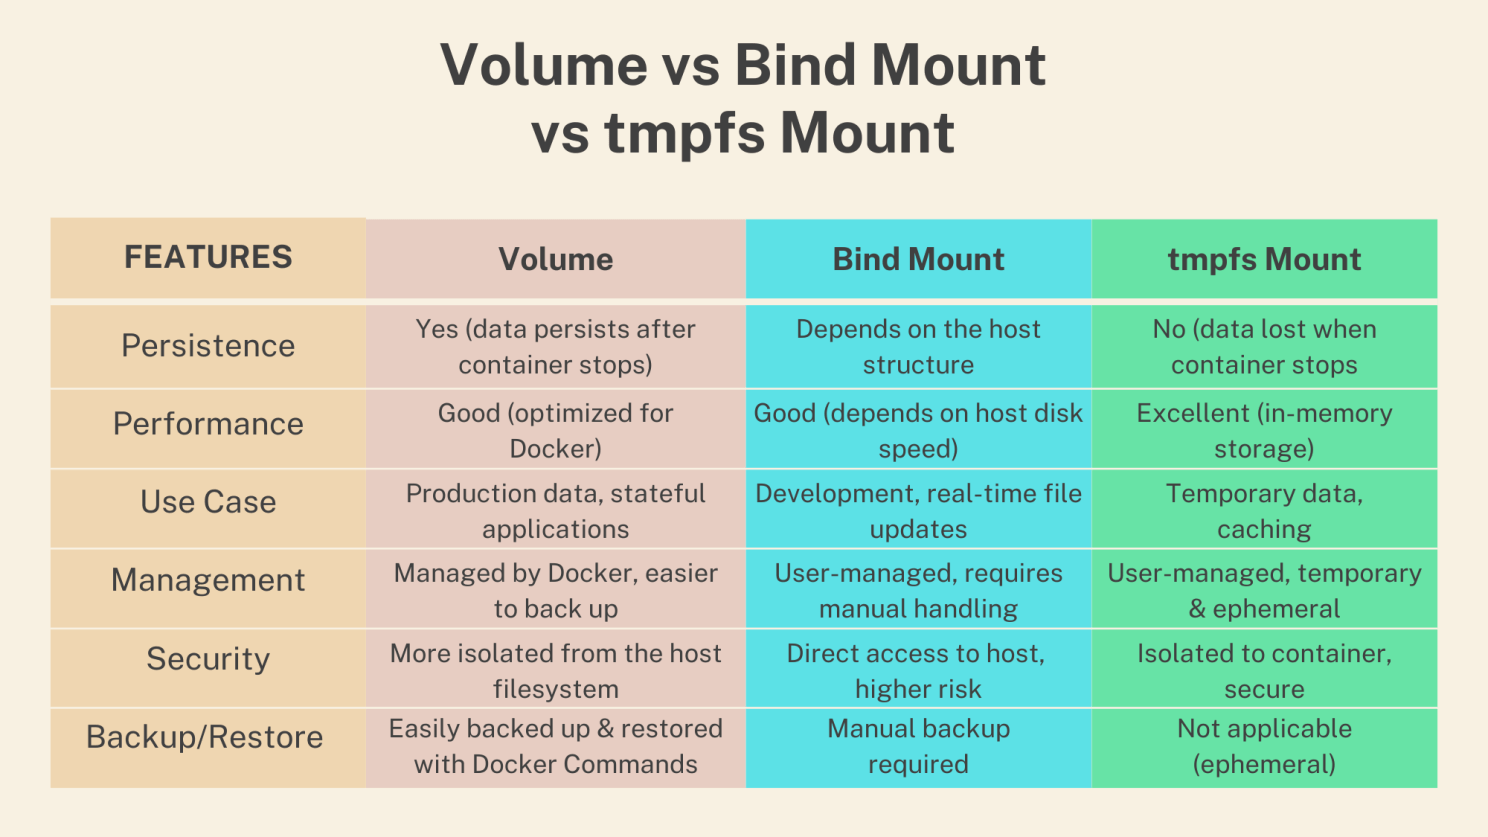
Types of storage in Docker (Image credit from linkedin.com)


References

docs.docker.com
medium.com
linkedin.com
hub.docker.com
youtube.com


How to Download a Package With Its Dependencies in RockyLinux?

To install a package on RockyLinux distro which is a derivative of RHEL and derivatives such as AlmaLinux or CentOS and others, just type yum install or dnf install and follow by the name of the package to be installed, then the package will be directly installed immediately on the server. But sometimes I just want to download a package with its dependencies for some purposes like installing into the server that can’t connect to the internet or just for some experiments.


Problems

How to download a package with its dependencies in RockyLinux?


Solution

There are 2 methods to download a package with all its dependencies without installing the package on the server and both methods work successfully on RockyLinux9:

A. Using downloadonly plugin

To execute this method, use the format below:

yum install --downloadonly --downloaddir=/folder/path/in/linux package_name -y


For example, suppose you want to download nginx packages along with their dependencies, and all the packages are contained in the /tmp/nginx folder, use the following command:

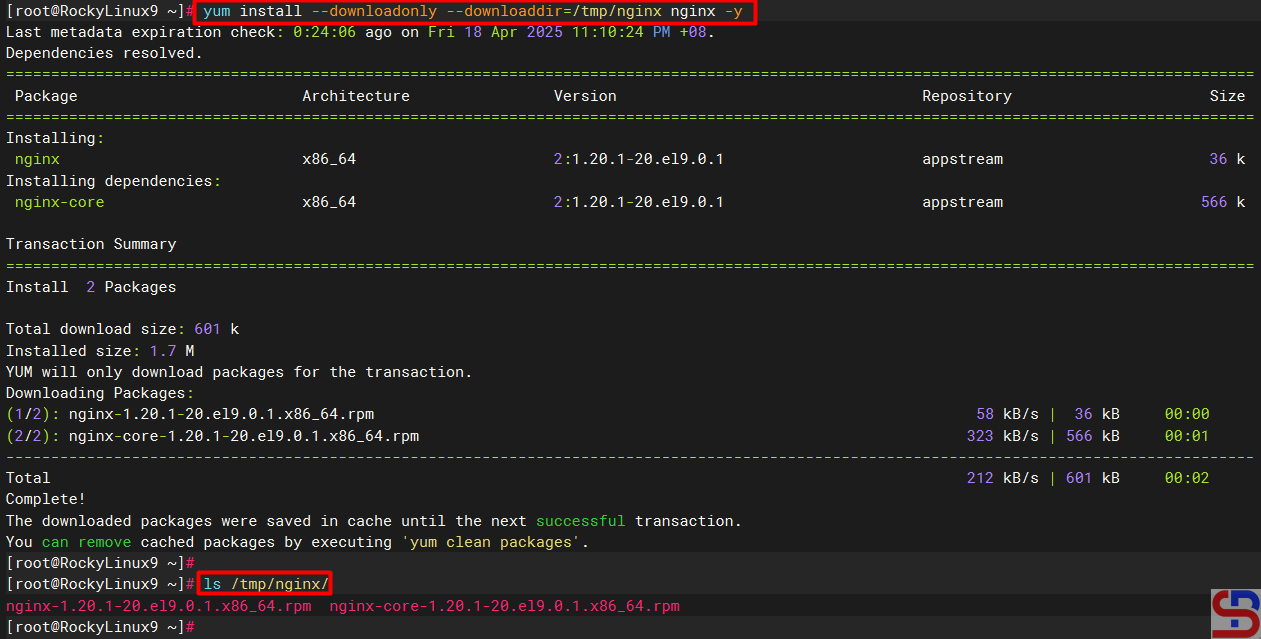
yum install --downloadonly --downloaddir=/tmp/nginx nginx -y


After you run the above command, the nginx package and its dependencies files should be in the /tmp/nginx folder as shown below:

Download a nginx file using downloadonly option


By default, if you forget to type the ‐-downloaddir option, it will be stored in the /var/cache/dnf/appstream-*/packages folder.


B. Using yumdownloader

Run the command below to install the yum-utils package:

yum install yum-utils


Then to execute this method, use the format below:

yumdownloader --destdir=/path/in/linux --resolve package_name -y


For example, suppose you want to download a vim package and it is stored in the /root/vim folder, then use the command below:

yumdownloader --destdir=/root/vim --resolve vim -y


After you run the above command, the vim package and its dependencies files should be in the /root/vim folder as shown below:

Download a vim package using yumdownloader


By default, if you forget to type the ‐-destdir option, the package and its dependencies will be saved in the folder where the command is run. If for example the command is executed in /root then the package and its dependencies files will be stored in the /root folder.


Warning
You can download more than one package either using the first method or the second method, but this is not recommended because there will be mixing between dependencies files in one folder so that it makes confusion. So it is recommended to download only one package in one folder.


Note

If you have installed a package on the server and you want to download the package along with the dependencies files, but you use the downloadonly plugin then you can’t download the package like in the image below:

Failed to download a package


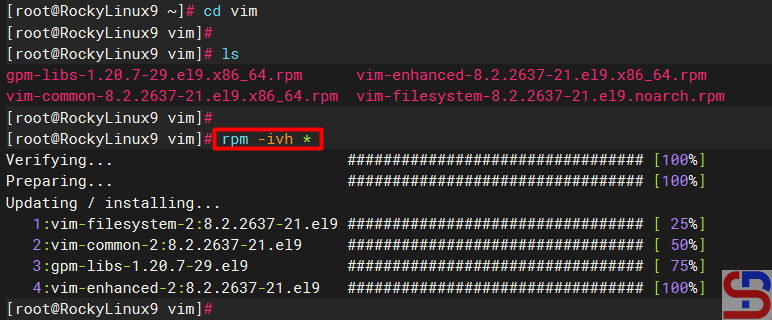
so you have to remove the package from the server first and then you can download the package by running the previous command. However, you can still download packages that are already installed on the server if you use yumdownloader. And if you want to install the downloaded package along with its dependency files then go to the downloaded folder and type the command below:

rpm -ivh *


so you can install the package easily and quickly like in the image below:

Install a package with its dependencies


References

access.redhat.com
dbpilot.net
ostechnix.com


How to Manage Networking in Docker?

Docker has a network system to regulate communication between one container and another container, your Docker host(server), and the outside world.


Problem

How to manage networking in Docker?


Solution

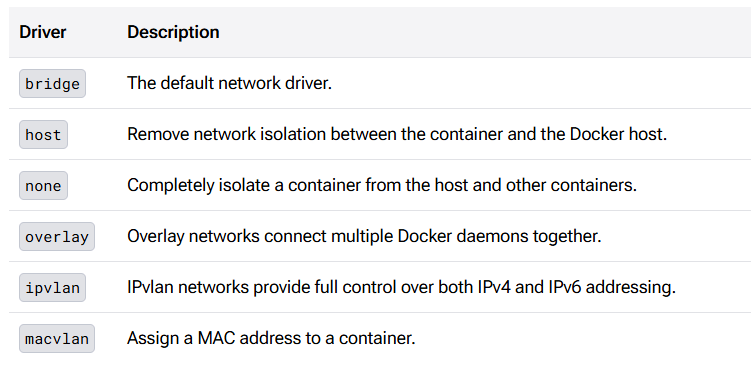
Docker provides six network drivers that you can use, as shown in the image below:

The six network drivers in Docker (Image credit for docs.docker.com)


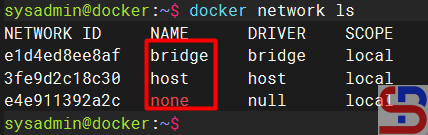
You can see from the image above that the bridge is a default network driver, so if you do not specify a driver, then this type of network is created. To see the types of network drivers on your server, use the command below:

docker network ls

List the network drivers in Docker on your server


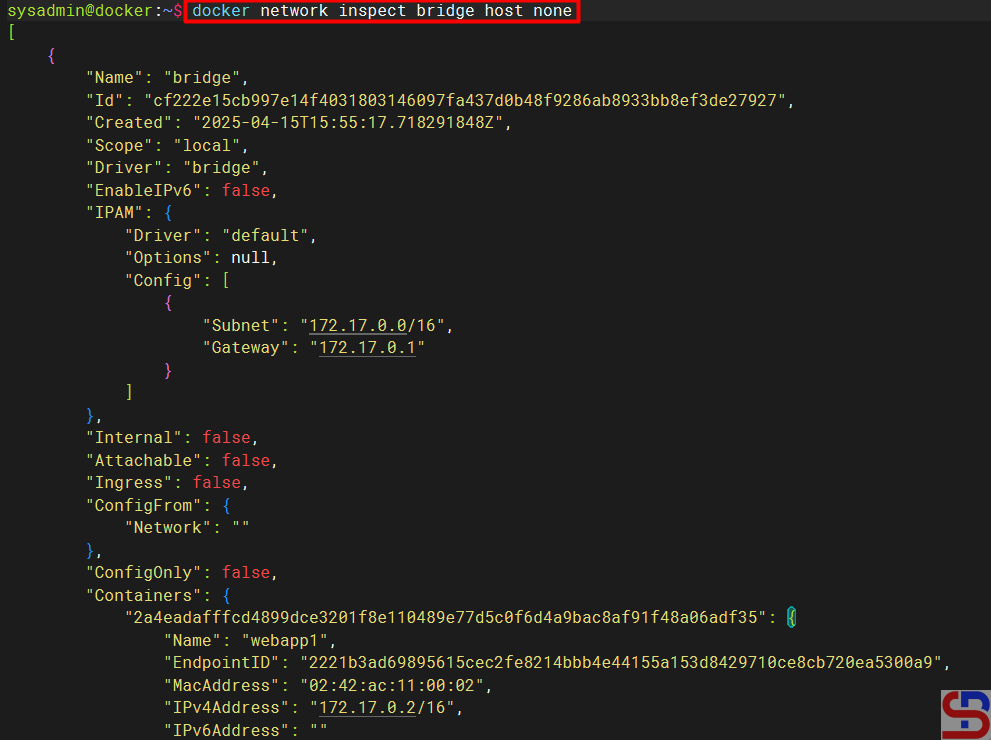
To see the configuration details of each network driver, use the command below:

docker network inspect bridge host none

Display detailed information about the network on each network driver


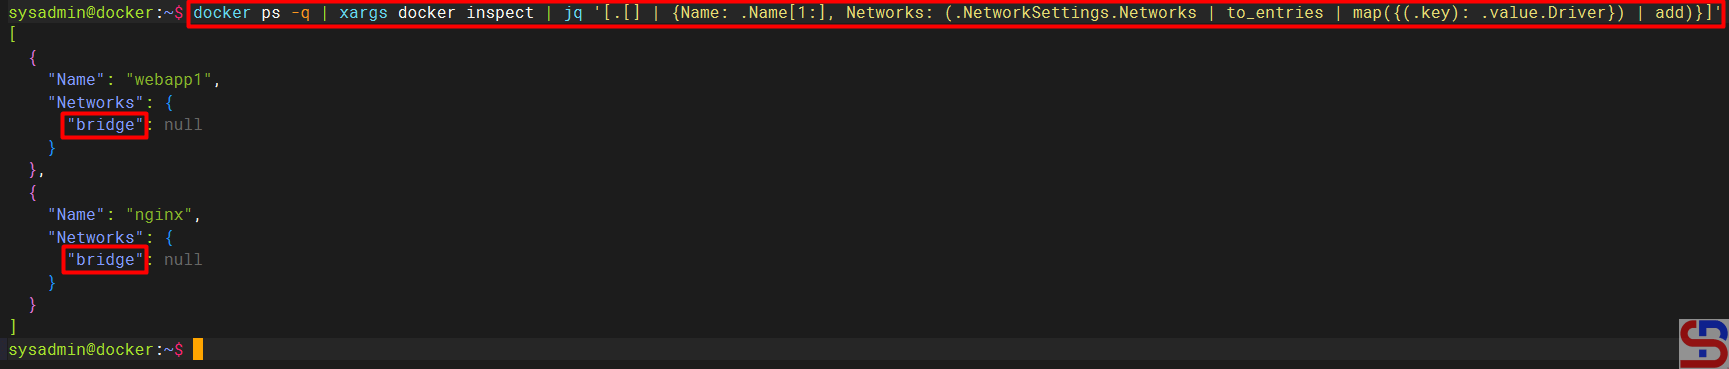
To see the type of driver network used in each container, use the command below:

docker ps -q | xargs docker inspect | jq '[.[] | {Name: .Name[1:], Networks: (.NetworkSettings.Networks | to_entries | map({(.key): .value.Driver}) | add)}]'

Display the network drivers in each container


To see the IP of each container, for example, in the nginx container, use the command below:

docker inspect -f '{{range.NetworkSettings.Networks}}{{.IPAddress}}{{end}}' nginx

Display of the IP of a container


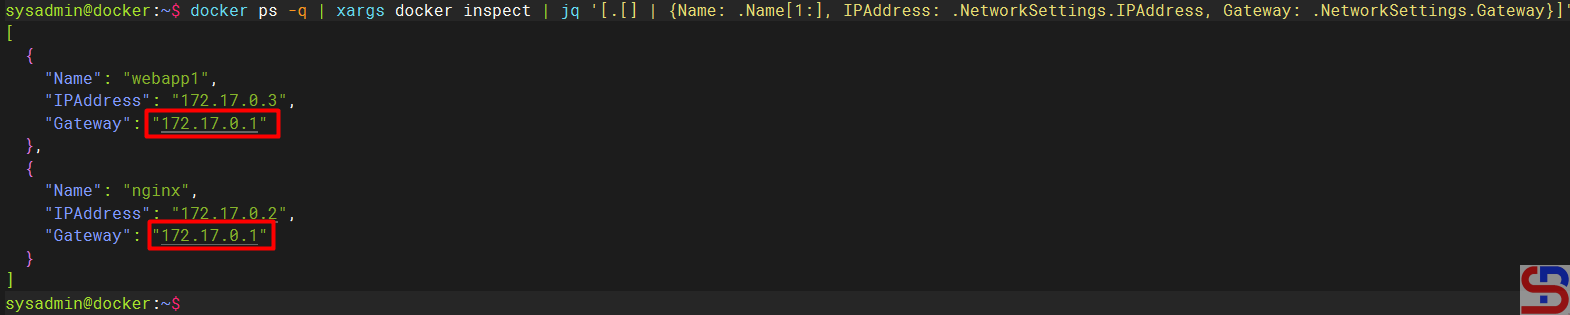
To communicate between one container with another container, both containers must have the same gateway. For example, you have made two containers, so by default, the two containers will use a network bridge driver so that it has the same gateway. Use the command below to see the two container IPs:

docker ps -q | xargs docker inspect | jq '[.[] | {Name: .Name[1:], IPAddress: .NetworkSettings.IPAddress, Gateway: .NetworkSettings.Gateway}]'

Display all the IPs in each container


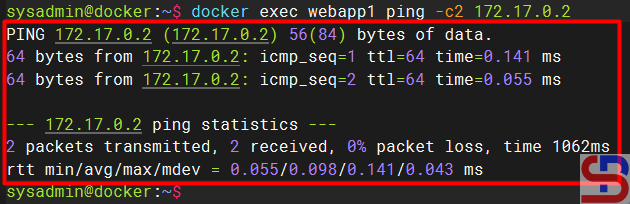
Then try to enter one of the containers and ping to another container using the command:

docker exec webapp1 ping -c2 172.17.0.2

Ping between containers


And the containers should be able to communicate with each other like the image above.

WARNING
If you can’t ping on your container, then you have to install ping in your container by accessing one of your containers and installing the ping package. If your container uses Ubuntu, then you can install it using the command:
apt update;apt install iputils-ping


A. Create a new network

You can create a new network on the server for your own needs using the format below:

docker network create network_name --driver driver_name


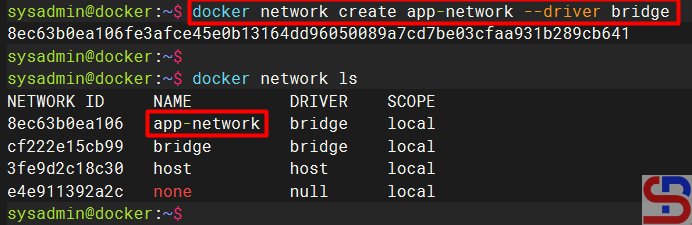
For example, you want to create an app-network network using a bridge driver, then use the command below:

docker network create app-network --driver bridge

Create a new network


INFO
You may not write the option ‐-driver if you want to create a new network using a bridge driver because bridge is a default network driver in Docker.


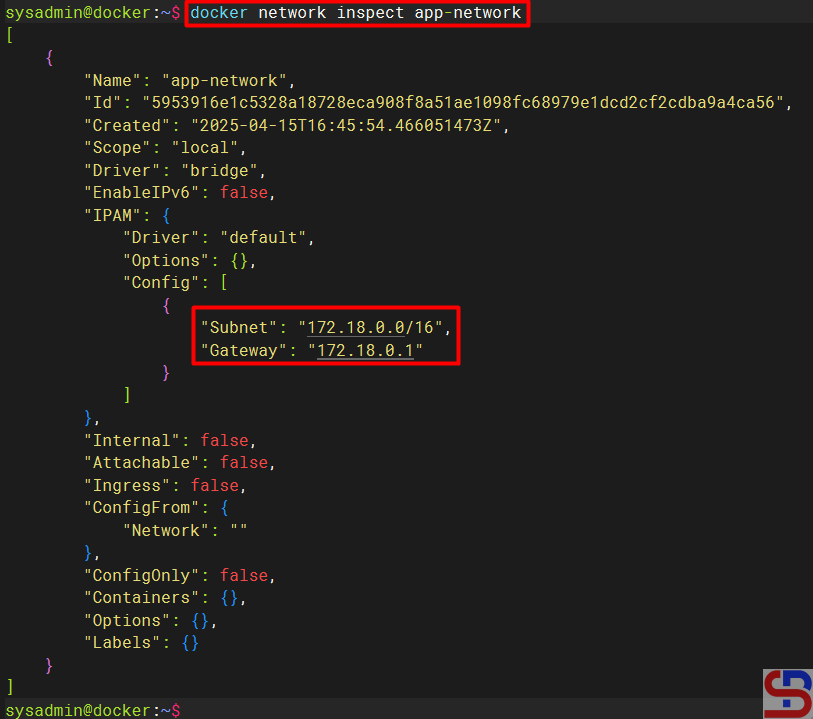
After that, try to use the command below to see the detailed information of the app-network:

docker network inspect app-network


You can see from the picture above that the IP and Gateway from the app-network have been made automatically. You can make an IP and a Gateway according to what you want. For example, you want to create a new network with the name db-network, which has a range of IP 10.10.1.0/24 and Subnet 10.10.0.0/16 and Gateway 10.10.1.254, then use the command below:

docker network create -d bridge db-network \
--subnet=10.10.0.0/16 \
--ip-range=10.10.1.0/24 \
--gateway=10.10.1.254

Create a new network with the custom values


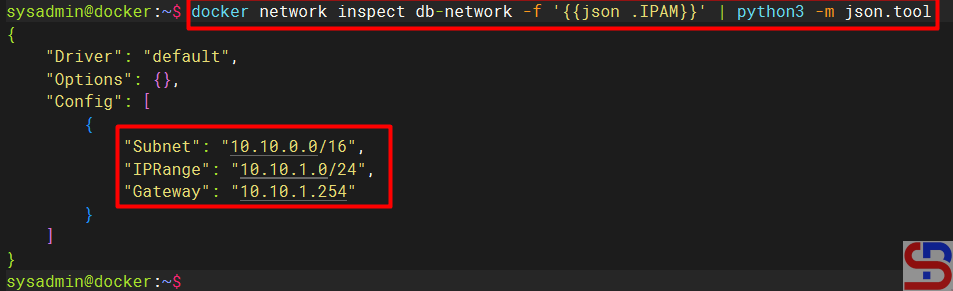
Use the command below to display network information details easily:

docker network inspect db-network -f '{{json .IPAM}}' | python3 -m json.tool

manage networking in Docker
Display the value of the network in a container


From the image above, you can see that the IP, Subnet, and Gateway on the network are the same as what you want.

B. Connecting a network to a container

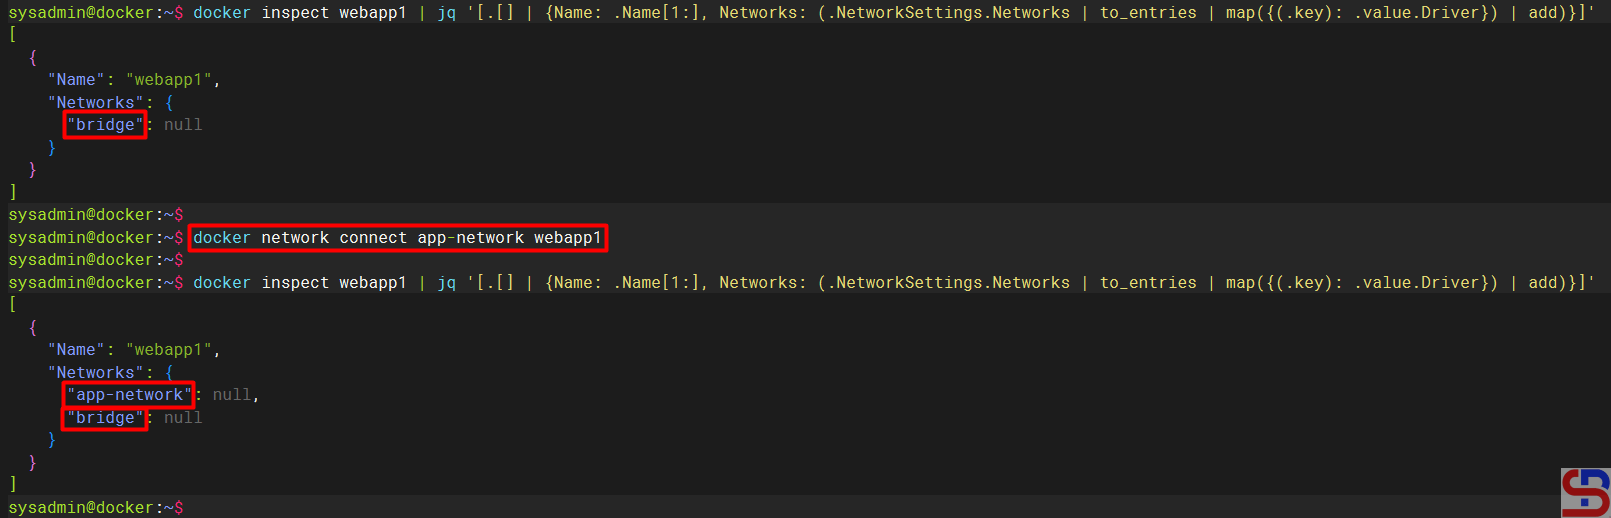
If you connect the current container to a network, use the format below:

docker network connect network-name container-name


For example, if you want to connect the webapp1 container to the app-network network, use the command below:

docker network connect app-network webapp1

manage networking in Docker
Connecting a network to a container


If you want to create a new container by directly connecting to a network, use the format below:

docker container run --name container_name --network network_name image:tag


For example, if you want to create a db-mysql container on the db-network network, use the command below:

docker run -d --name db-mysql --network db-network -e MYSQL_ROOT_PASSWORD='q1w2e3r4' mysql

manage networking in Docker
Connecting a network when creating a new container


C. Disconnect a network in the container

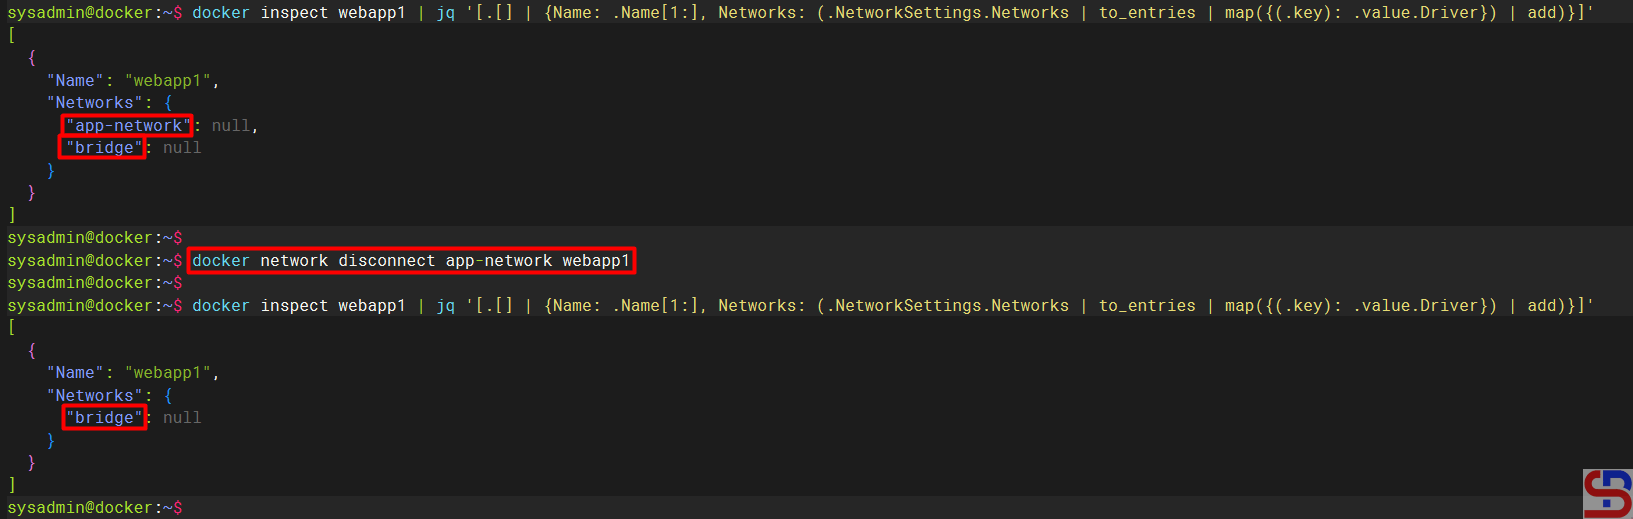
To disconnect a network in the container, use the format below:

docker network disconnect network_name container_name


For example, if you want to break the app-network network from the webapp1 container, use the format below:

docker network disconnect network1 webapp1

manage networking in Docker
Disconnect a network from a container


D. Removing a network

To remove a network, use the format below:

docker network rm network_name


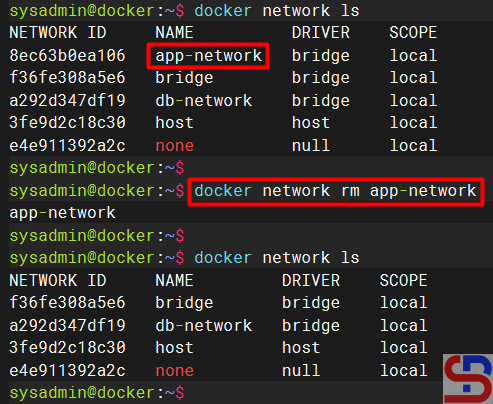
For example, I want to delete the app-network network, use the command below:

docker network rm app-network

manage networking in Docker
Remove a network


WARNING
You cannot remove a network if the network is still connected to a container. First, disconnect the network connection from the container, and then you can delete the network.


Note

You must be careful when setting the network in Docker because if you set the wrong network, one or several containers will not be connected, which causes the application that runs on the Docker will be disturbed.


References

docs.docker.com
spacelift.io
youtube.dimas-maryanto.com
stackoverflow.com
youtube.com


How to Move a File/Folder From the Server to the Container And Vice Versa?

The previous article explained how to access a container in Docker. Now, I need to move a file/folder from the server to the container and vice versa.


Problem

How to move a file/folder from the server to the container and vice versa?


Solution

These are how to move a file/folder from the server to the container and vice versa:

A. Move from the server to the container

To move a file from the server to the container, use the format below:

docker cp src_path container:dest_path


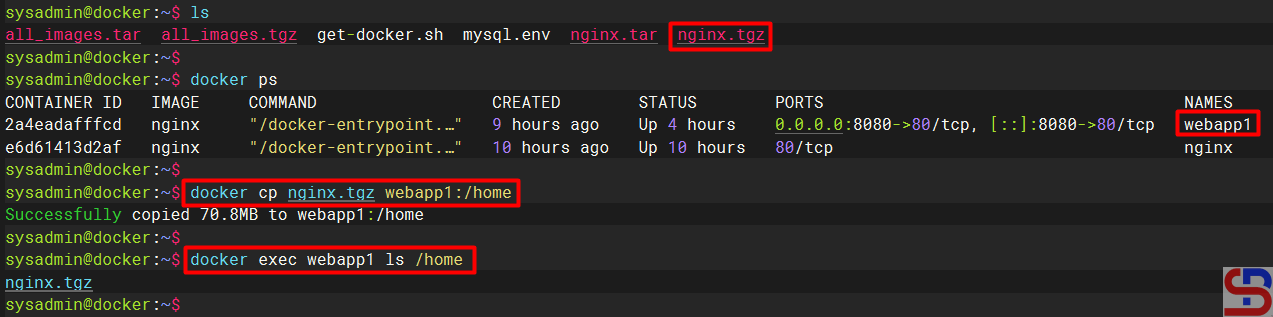
For example, I want to move the nginx.tgz file from the server to the webapp1 container in the folder /home, so I use the command below:

docker cp nginx.tgz webapp1:/home


And the file will move to the /home folder in the container, like in the image below:

Move the file from the server to the container


B. Move from the container to the server

To move a file from the server to the container, use the format below:

docker cp container:src_path dest_path


For example, you want to move the docker-entrypoint.sh file in the container to the server in the folder /tmp, use the command below to move the file:

docker cp webapp1:docker-entrypoint.sh /tmp


And the file should be transferred to the folder /tmp on the server as shown below:

move a file/folder from the server to the container and vice versa
Move the file from the container to the server


Note

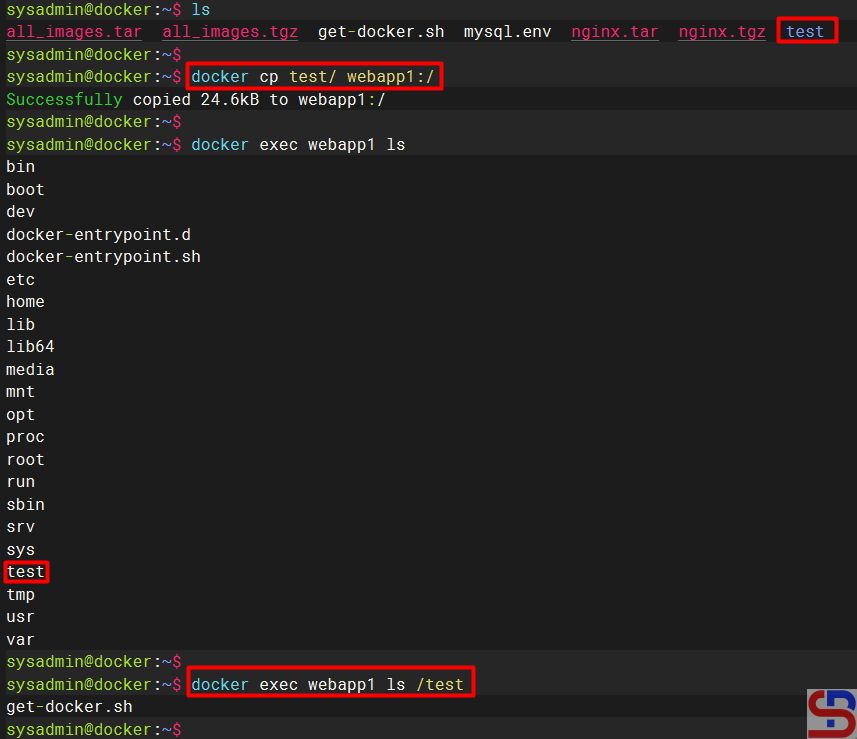
You can move the folder and its contents from the server to the container and vice versa by using the format above without the need to add the -r option, as shown in the image below:

move a file/folder from the server to the container and vice versa
Move the folder into and out of the container


WARNING
You cannot move more than one file or folder from the server to the container or vice versa.


References

youtube.dimas-maryanto.com
docs.docker.com
mkyong.com


How to Run Environment Variables In Docker?

Besides providing application images, Docker also provides database images such as PostgreSQL, MySQL, MariaDB, MongoDB, and so on for its users. As with databases installed on a physical server, which requires entering a username and password to access it, Docker also requires you to enter a username and password to use the database, commonly known as an environment variable.


Problem

How to run environment variables in Docker?


Solution

An environment variable is a dynamically named value that can affect how running processes behave on a computer. They are part of the environment in which a process runs. For example, a running process can query the value of the TEMP environment variable to discover a suitable location to store temporary files, or the HOME or USERPROFILE variable to find the directory structure owned by the user running the process. To find out whether a Docker image can use environment variables, you must check the documentation of the Docker image. Still, in general, Docker images in the form of databases such as MySQL, PostgreSQL, or MongoDB use environment variables.

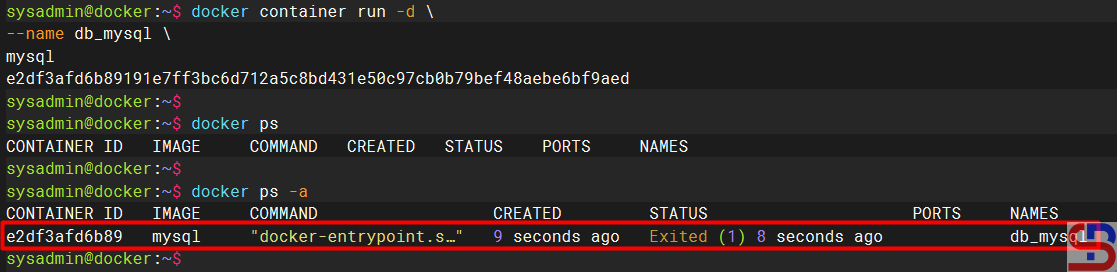
Please note that if you install an image container that uses an environment variable, for example, installing a MySQL database in a container, but you don’t include an environment variable like in the command below:

docker container run -d \
--name db_mysql \
mysql


The container will not run as shown in the image below:

Create a container without using environment variables


Docker has parameters that we can use to send environment variables to the application contained in the container by adding the ‐-env or -e option when we create the container, following the format below:

docker container run -d --name container_name --env KEY1="value" --env KEY2="value" image:tag


This article will use the MySQL Docker image as a case example. In the documentation, several variables are provided, such as MYSQL_ROOT_PASSWORD, MYSQL_DATABASE, and so on. So, if you want to install MySQL in the container, you have to insert the environment variable. So, if you want to create a MySQL container with root password q1w2e3r4, then run the command below:

docker container run -d \
--name mysql_db \
-e MYSQL_ROOT_PASSWORD=q1w2e3r4 \
mysql


After that, try to access the MySQL database by running the command below:

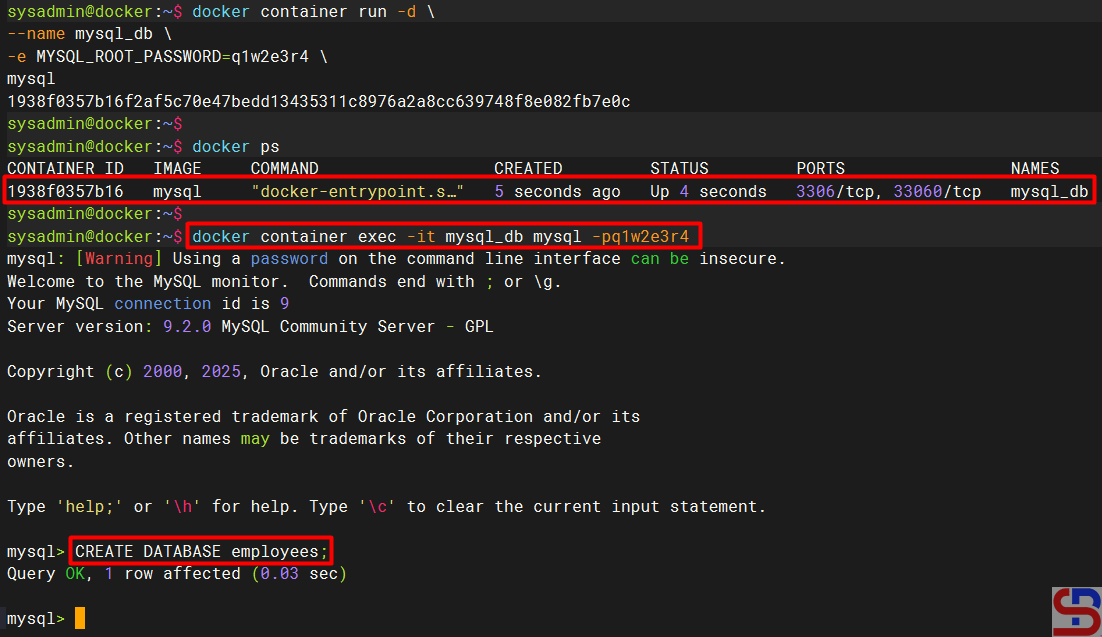
docker container exec -it db_mysql mysql -pq1w2e3r4


You will enter the database in the container, like in the image below:

Create the container using environment variables


And you can use database commands as usual, like in the image above.


Note

Besides using the -e or ‐-env parameter arguments, you can use a file to save the environment variables, commonly known as Env-File, using the VAR=VALUE format. Use the format below to run the container that uses Env-File like in the format below:

docker container run -d --name container_name --env-file=filename container_name


First, you create the file, which usually ends with .env or .env.prod or .env.dev, and I create mysql.env. After that, you add to the file the script below:

MYSQL_ROOT_PASSWORD=q1w2e3r4


Run the command below to create a new container for MySQL using the environment file:

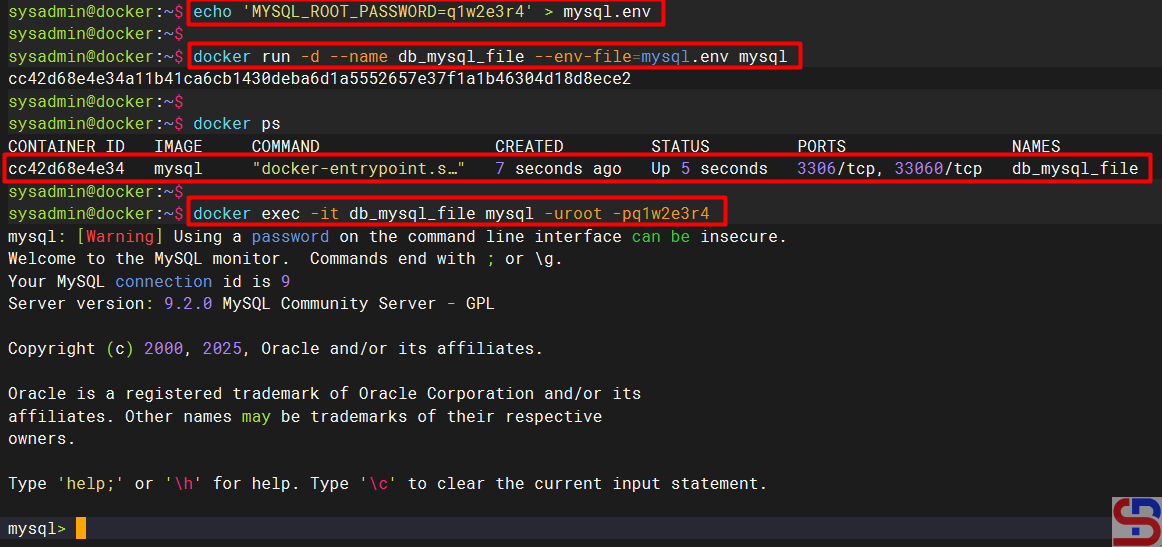
docker run -d --name db_mysql_file --env-file=mysql.env mysql


The MySQL container will be created, and you can access the database in the container like in the command below:

Create the container with the Env-File


References

youtube.dimas-maryanto.com
youtube.com
stackoverflow.com


How to Access a Container in Docker?

After you install Docker and learn some basic Docker commands to set up a container, this article will explain how to access a container in Docker.


Problem

How to access a container in Docker?


Solution

There are 2 ways to access a container in Docker:

A. Via CLI

If you want to access a container in Docker, use the format below:

docker exec -it container_id/container_name shell


where the -i option is interactive to keep the input active, the -t option is an argument for pseudo -tty (terminal access) allocation, and shell is the program contained in the container and it can be different to be different to the code used in the container likes bash or sh shell, but for more details, please look at the documentation of each image). For example, there is an nginx container that is running, and if you want to access the nginx container, you can use the command below:

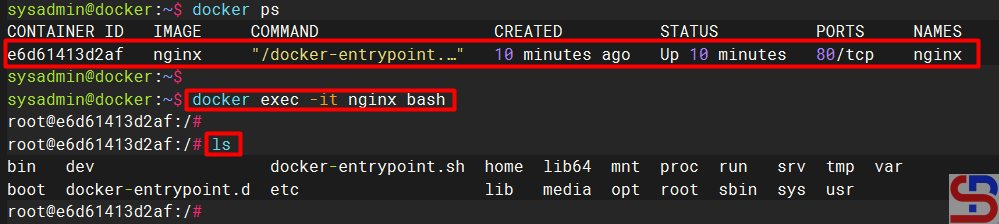
docker exec -it nginx bash


After that, you should be able to access the container as shown below:

Access into the container


If you want the results of the command in the container to be shown on the server, then use the format below:

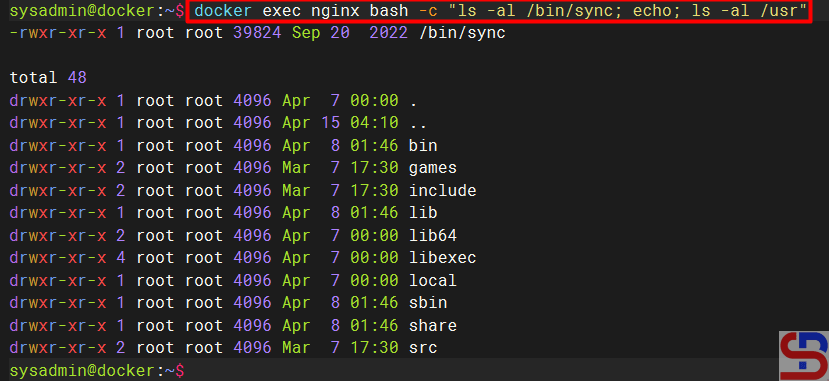
docker exec container_name/container_id bash -c "your-linux-commands"


For example, use the command below:

docker exec webapp1 bash -c "ls -al /bin/sync; echo; ls -al /usr"

Run some Linux commands in the container


Or you can also use the format below if you only run a command in the container:

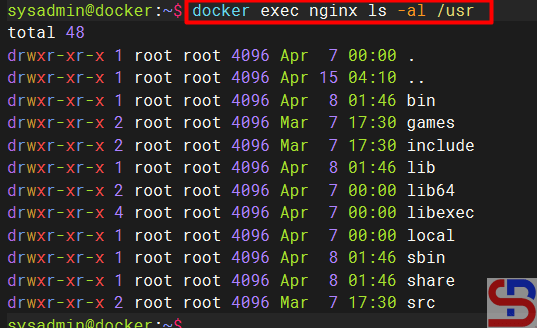
docker exec container_name/container_id linux-command


For example, use the command below:

docker exec nginx ls -al /usr

Run a command in the container


B. Via website

You can access a container through the website, but this method only produces applications that run in the container on the website and do not run commands in the container. Usually, these containers use a web server image such as Apache or Nginx, or applications made by developers. If you want to run these applications and access the application in the browser, use the format below:

docker container run -d --name container_name -p port_server:port_container image_name:tag


For example, you want to run an nginx container whose application can be seen by using port 8080 on the server, then use the command below:

docker container run -d --name webapp1 -p 8080:80 nginx

Run the container with the accessed port


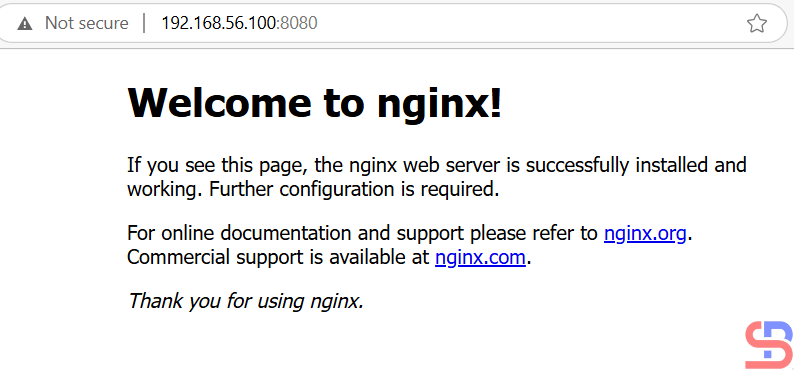
Open your browser and type the url below:

http://your_ip_server:8080


There should be a display as below:

Display the application on the website


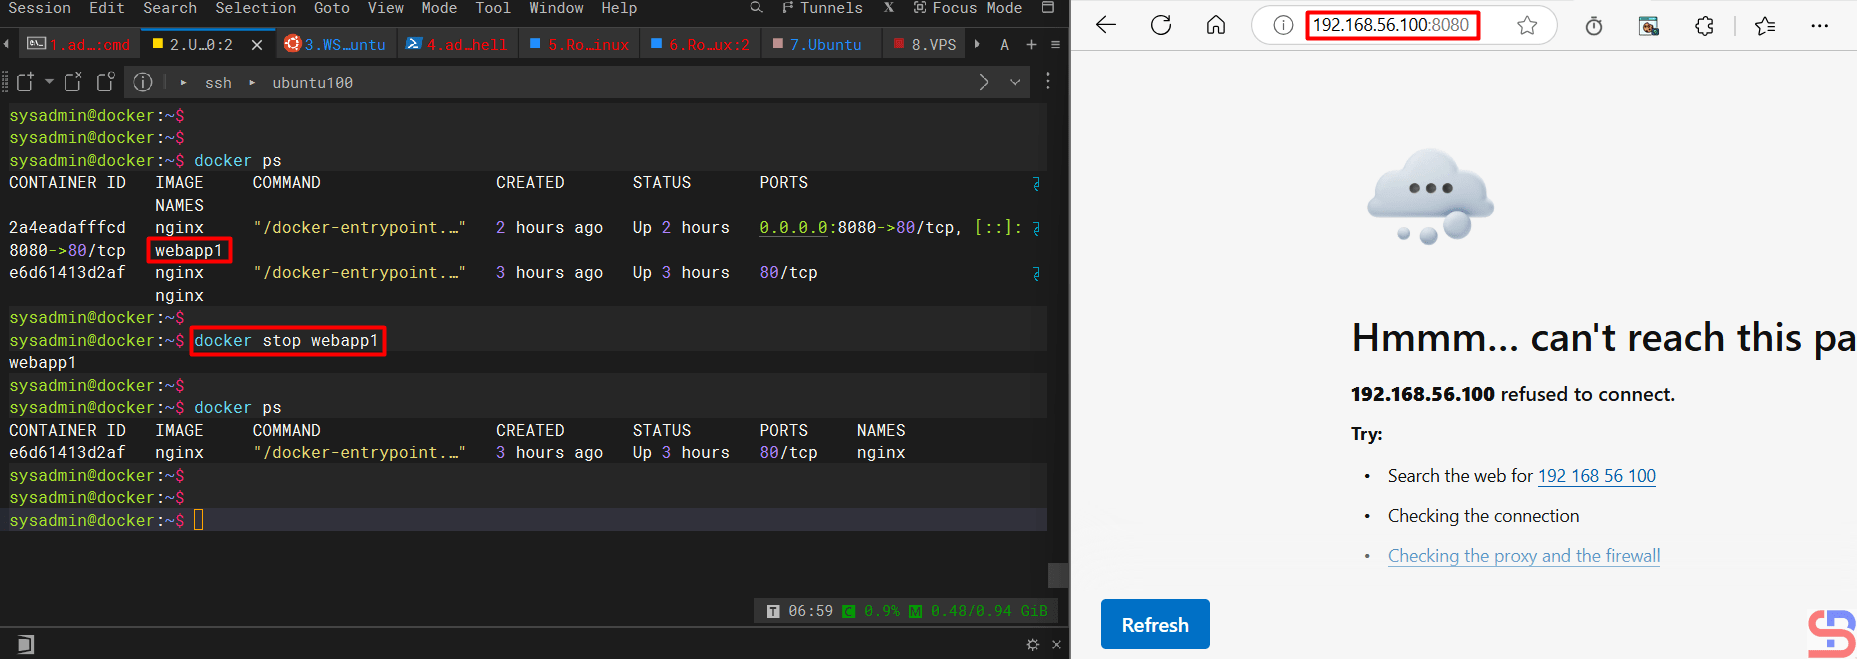
If you stop the container, then the application cannot be accessed through a browser as below:

Turn off the container


Note

You can also access a database installed in a container using the commands in this article.


References

docs.docker.com
spacelift.io
youtube.com



How to Limit Resources in Docker?

The previous article explained how to monitor an entire container in Docker. In addition to monitoring, you should also limit the resource usage of each container so that server performance remains in good condition.


Problem

How to limit resources in Docker?


Solution

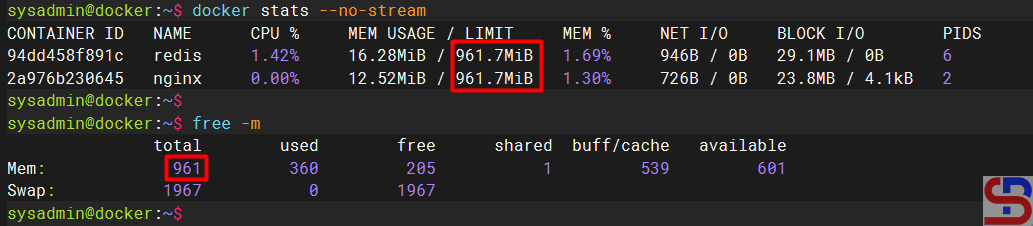
If you run the docker stats command, the command will display the resource container as shown in the image below:

Display stats of the Docker


As you can see in the image above, there are 2 containers running, and both containers have a memory limit of 941 MB, where the memory size is the size of the memory of the server. This is dangerous because the application in the container can use all the memory or CPU on the server, causing the server to run abnormally. Therefore, you should limit the use of resources in the container.

A. RAM limitation

There are 2 types of memory limitations in Docker:

  • The hard limit is a maximum value that cannot be exceeded. When a container exceeds a hard memory limit, Docker takes aggressive actions such as terminating the container so that there will be an OOM or Out Of Memory error in the container. The options used in Docker are ‐‐memory or -m.
  • The soft limit is a limit that can be temporarily exceeded. When a soft limit is reached, Docker warns the user but does not take immediate action. The option used is ‐‐memory-reservation.

If you use swap on the server, you can use the ‐‐memory-swap option to allocate available swap memory to the container. This swap memory must be larger than the hard limit, usually twice larger than the hard limit. If you want to use a percentage for memory swap, use the ‐‐memory-swappiness option.

To limit the memory on the new container, use the format below:

docker run -d --memory='hard_limit_value' --name docker_name docker-image


For example, if you want to limit the memory on a container of 512 MB with a soft limit of 256 MB, then I run the command below:

docker run -d --memory='512m' --name nginx nginx

Run Docker with limited memory


You can immediately change the container memory when the container is running using the format below:

docker update docker_name --memory='hard_limit_value'


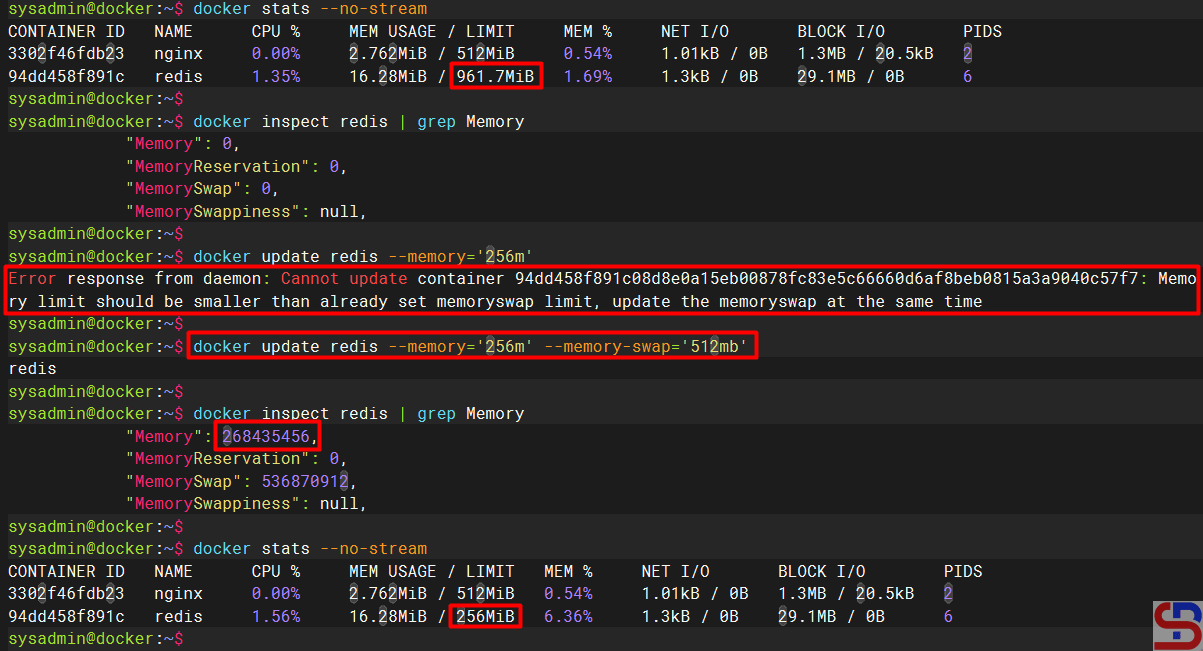
For example, I want to change the Redis container memory from 971 MB to 256 MB using the command below:

Error when updating memory


But when running the command, there is an error as below:

Error Response from Daemon: Cannot Update Container 94DD458F891C08D8E0A15EB00878FC83E5C6660D6AF8Beb0815A3A9040C57F7: Memory Limit Should Be Smaller Than Already Set Time
To overcome the error, update the memory container swap, whose value must be greater than the memory value. Therefore, use the command below to increase the memory of a container:

docker update redis --memory='256m' --memory-swap='512mb'


And the container memory value should have changed as shown below:

Update the memory in a container


B. CPU limitation

Before you limit the CPU in the container, you need to know how many CPU cores there are on your server by using the command below:

nproc


To limit the CPU used in the container, use the ‐‐cpus option to determine how many CPU cores can be used in a container. If your server has two CPUs and you set ‐‐cpus=’1.5′, the container is guaranteed at most one and a half of the CPUs and this is the equivalent of setting ‐‐cpu-period=’100000′ and ‐‐cpu-quota=’150000′ (cpu-period is used with cpu-quota to configure the CPU scheduler with defaults to 100000 microseconds and cpu-quota is used with cpu-period to configure the CPU scheduler). Use the format below to limit the CPU in the container:

docker run -d --cpus='cpu_value' --name docker_name docker_image:tag


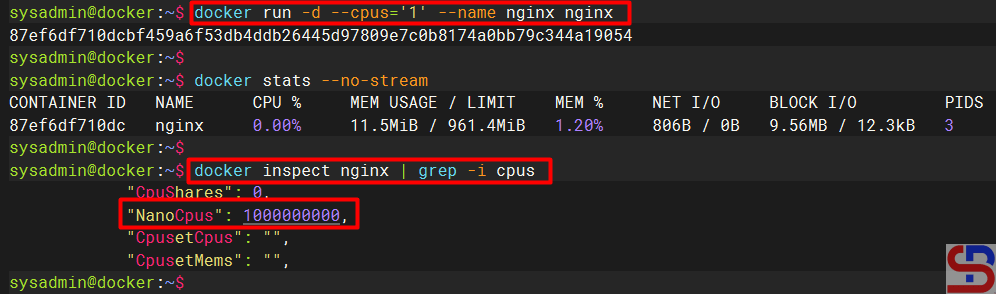
You can see the details of the CPU used by a container by using the format below:

docker inspect nginx | grep -e Cpu -e cpu


For example, I want to limit the CPU to 1, so I run the command below:

docker run -d --cpus='1' --name nginx nginx

Run a container with a limited CPU


Warning
You have to be careful in determining the CPU limitations of a container because if you limit the CPU too much (for example, giving 0.5 CPU to the container even though the container can run using 1 CPU) or give a CPU limitation that is greater than the CPU the server uses (for example The server CPU only has 1 CPU but you give the container 2 CPUs) then the container will immediately turn off automatically.


You can use the ‐‐cpu-shares option for a container to control the share of CPU cycles available, whose default value is 1024. This option is like a soft limit option on memory, so if you run the command below:

docker run -d --cpu-shares='2048' --name webapp1 nginx


If there is more than 1 container on a host and CPU cycles are constrained, then the webapp1 container will receive 2x more CPU than the other containers. You can update the CPU in a running container using the format:

docker update docker_name --cpus='cpu_value'


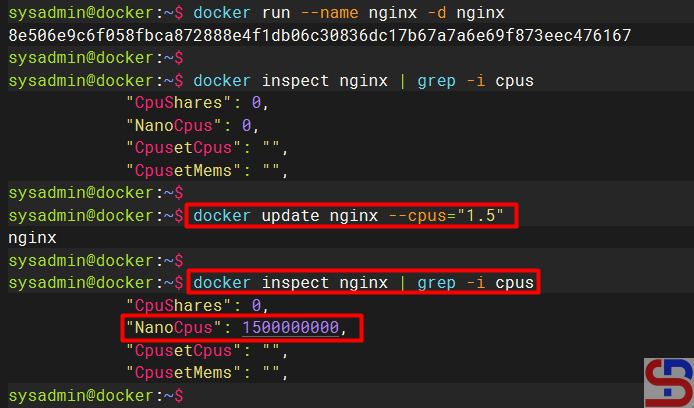
For example, I have 2 CPUs on the server, and initially, I use all the CPUs in the webapp1 container. Then, I wanted to update the CPU on the container to 1.5, so I ran the command below:

docker update webapp1 --cpus='1.5' nginx

Update the CPU in a container


C. HDD limitation

As of this writing (April 2025), the HDD limitation can only be used for btrfsoverlay2windowsfilter, and zfs storage drivers. For the overlay2 storage driver, the size option is only available if the backing filesystem is xfs and mounted with the pquota mount option. Type the command below to see the Docker settings on the server:

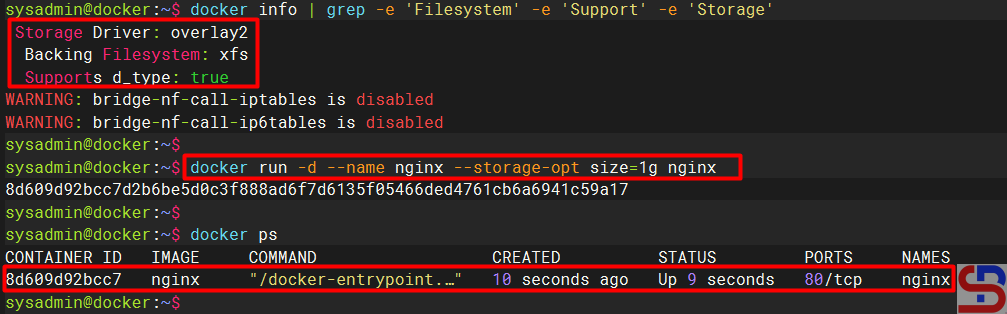
docker info | grep -e 'Filesystem' -e 'Support' -e 'Storage'


Run the command above, and here is the result:

Check the filesystem


To limit the hard disk in a container, follow the format below:

docker run -d --name nginx --storage-opt size=1g nginx


If I want to limit my hard disk in a container, I run the command below:

docker run -d --name nginx --storage-opt size=1g nginx


But, I have an error like the image below:

docker: Error response from daemon: –storage-opt is supported only for overlay pver xfs with ‘pquota’ mount option

Error when limiting HDD for a container


From the image above,  I can’t limit the HDD to the container because my Backing Filesystem in my server still uses extfs, not xfs. So, if I want to limit my HDD in my containers, I have to change my Backing Filesystem in my server. So I made an experiment by turning off Docker and deleting the Docker folder using the command below:

sudo systemctl stop docker
sudo rm -rf /var/lib/docker && sudo mkdir /var/lib/docker


Then I inserted an additional hard disk into the existing server, and then I converted the file system to xfs using the commands below:

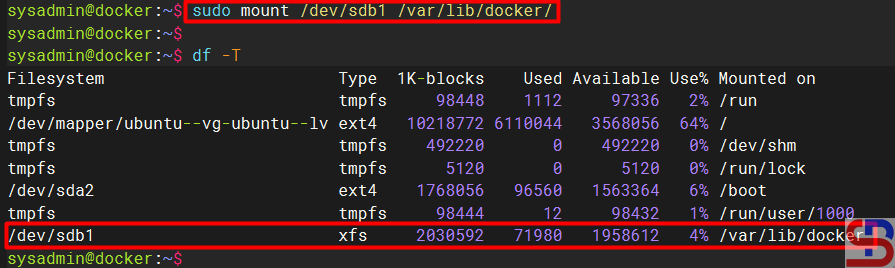
sudo mkfs.xfs /dev/sdb1
sudo mount /dev/sdb1 /var/lib/docker

Create xfs filesystem


And I added to the /etc/fstab file the script below:

echo '/dev/sdb1 /var/lib/docker xfs defaults,quota,prjquota,pquota,gquota 0 0' | sudo tee -a /etc/fstab


I rebooted the server to test whether the fstab file settings were correct. After that, I tried to create a container by limiting the container’s hard disk to 1GB using the command below:

docker run -d --name nginx --storage-opt size=1g nginx

Limiting HDD in a container


Note

You can combine more than one restriction above by using one command. For example, if you want to limit memory, CPU, and HDD in a container, then you can run the command below:

docker run -d --name webapp1 -m 512m --cpus=1.5 --storage-opt size=1g nginx


As far as I know, Sysadmin only limits the use of RAM and CPU in Docker, but rarely limits HDD in Docker. If you want to limit resources in Docker, you must discuss it with the developers so that there are no problems with the application in the future.


References