How to Create a Docker Image?

Previously, you often used a Docker image that you downloaded from Docker Hub. But now, you want to create a Docker image for your own application needs.


Problem

How to create a Docker image?


Solution

To create a Docker image, you must create a Dockerfile.

A. Dockerfile

Dockerfile is a script that contains a set of instructions used to create a Docker image using the format:

#comment
INSTRUCTION arguments


You should know that Docker runs Dockerfile files sequentially from top to bottom, and this file does not have a file extension, so just write Dockerfile. To make things easier, it is best to place this Dockerfile in the same location as the files needed to create a Docker image, so that it is easier to create. That way, to create a Docker image, just run the command:

docker build -t image_name .


B. Instructions

The following are the standard Dockerfile instructions: 

1. FROM instruction

This instruction is the first command to perform a build stage in the Dockerfile with the example below:

FROM alpine:3

Using the FROM instruction


2. LABEL instruction

To add metadata to the Docker image you create, where the metadata is additional information, such as the name of the application, creator, website, and so on.

FROM alpine:3

LABEL author="sysadmin"
LABEL company="sysadminpedia" website="https://www.sysadminpedia.com"

Using the LABEL instruction


3. WORKING DIRECTORY instruction

This instruction specifies directories/folders to execute instructions in the container. By default, if there is no working directory, then the container will go to the / folder automatically. If the workdir does not exist, the directory will automatically be created, and then, after we determine the location of the workdir, the directory will be used as a place to execute the next instruction. If the workdir’s location is a relative path, then it will automatically enter the directory of the previous workdir. Workdir can also be used as a path for the first location when it enters the container.

FROM alpine:3

LABEL author="sysadmin"
LABEL company="sysadminpedia" website="https://www.sysadminpedia.com"

WORKDIR /app

Using the WORKDIR instruction


4. RUN instruction

This instruction is a command in the image during the build stage, where the results of the RUN command will be committed to changes to the image, so that the RUN command will only be executed during the Docker build process, and this command will not be executed again and when you run the docker container from the image the RUN command will not be executed. 

FROM alpine:3

LABEL author="sysadmin"
LABEL company="sysadminpedia" website="https://www.sysadminpedia.com"

WORKDIR /app

RUN mkdir hello
RUN echo "Hello World" > "hello/world.txt"

Using the RUN instruction


5. USER instruction

To change the user or user group when Docker images are run, because by default, Docker will use the root user, and we can change it by using the user instruction, with the note that the user must be created first.

FROM alpine:3

LABEL author="sysadmin"
LABEL company="sysadminpedia" website="https://www.sysadminpedia.com"

WORKDIR /app

RUN mkdir hello
RUN echo "Hello World" > "hello/world.txt"

RUN addgroup -S app_group
RUN adduser -S -D -h /app app_user app_group
RUN chown -R app_user:app_group /app
USER app_user

Using the USER instruction


6. ENTRYPOINT instruction

An instruction in the Dockerfile specifies the main command that is executed when the container is started, and this is the main process of the container.

FROM alpine:3

LABEL author="sysadmin"
LABEL company="sysadminpedia" website="https://www.sysadminpedia.com"


WORKDIR /app

RUN mkdir hello
RUN echo "Hello World" > "hello/world.txt"

RUN addgroup -S app_group
RUN adduser -S -D -h /app app_user app_group
RUN chown -R app_user:app_group /app
USER app_user

ENTRYPOINT ["cat", "hello/world.txt"]

Using the ENTRYPOINT instruction


7. COMMAND instruction

An instruction that is used when the Docker container is running and will not be executed during the build image process. You cannot add more than one CMD instruction in an image, and if there is more than one instruction in an image, then the last CMD instruction will be executed. If there is an ENTRYPOINT instruction, then the CMD instruction becomes an argument from the ENTRYPOINT instruction. Examples of its use are as below:

FROM alpine:3

LABEL author="sysadmin"
LABEL company="sysadminpedia" website="https://www.sysadminpedia.com"

WORKDIR /app

RUN mkdir hello
RUN echo "Hello World" > hello/world.txt

RUN addgroup -S app_group
RUN adduser -S -D -h /app app_user app_group
RUN chown -R app_user:app_group /app
USER app_user

ENTRYPOINT ["cat"]

CMD ["hello/world.txt"]


The Dockerfile file above seems to be the command cat hello/world.txt, as in the picture below:

Using the CMD instruction


If there is no ENTRYPOINT, the CMD itself can be executed directly as a container command, as in the Dockerfile file below:

FROM alpine:3

LABEL author="sysadmin"
LABEL company="sysadminpedia" website="https://www.sysadminpedia.com"

WORKDIR /app

RUN mkdir hello
RUN echo "Hello World" > hello/world.txt

RUN addgroup -S app_group
RUN adduser -S -D -h /app app_user app_group
RUN chown -R app_user:app_group /app
USER app_user

CMD ["cat", "hello/world.txt"]


8. COPY instruction

To add files from the source to the destination folder in a Docker image folder. For example, if you want to copy all files with the extension .txt from a folder on the server, put them in the hello folder in the Docker image.

FROM alpine:3

LABEL author="sysadmin"
LABEL company="sysadminpedia" website="https://www.sysadminpedia.com"

WORKDIR /app

RUN mkdir hello
RUN echo "Hello World" > "hello/world.txt"

RUN addgroup -S app_group
RUN adduser -S -D -h /app app_user app_group
RUN chown -R app_user:app_group /app
USER app_user

COPY *.txt hello

CMD ["cat", "hello/world.txt"]

Using the COPY instruction


You can see in the image that in the folder on the server, there is an nginx.conf file and a tar.gz file,  but the files that are copied are only files with the extension .txt, such as the COPY command in the Dockerfile file.

9. ADD instruction

To add files from the source to the destination folder in the Docker image, and this command can detect if a source file is a compressed file, such as gzip, and will automatically extract it in the destination folder, and can also support adding multiple files at once. The difference with COPY is that COPY can only copy files, while ADD, in addition to copying, can also download the source from the URL and automatically extract compressed files. The best way to practice is to use COPY as much as possible, but if you really need to extract compressed files, then use the ADD command.

FROM alpine:3

LABEL author="sysadmin"
LABEL company="sysadminpedia" website="https://www.sysadminpedia.com"

WORKDIR /app

RUN mkdir hello
RUN echo "Hello World" > "hello/world.txt"

RUN addgroup -S app_group
RUN adduser -S -D -h /app app_user app_group
RUN chown -R app_user:app_group /app
USER app_user

COPY *.txt hello

ADD *.gz hello

CMD ["cat", "hello/world.txt"]

Using the ADD instruction

The crontab and hosts files are extracted from the etc.tar.gz file, and this explains that when you use the COPY instruction to copy a compressed file, the file will be extracted automatically in the container.

10. .dockerignore File

To specify which file(s) or folder(s) we ignore when the process of copying or adding file(s) or folder(s) to the Docker image. Because when doing the copy or add process, Docker will read the file named .dockerignore first. Create a .dockerignore file and then fill it with example.txt and qwerty.txt. Then, create the files example.txt and qwerty.txt in that folder, and they should not be copied to the folder in the Docker image.

Using the .dockerignore file


11. EXPOSE instruction

To tell the container which port to listen port on a specific number and protocol. Actually, EXPOSE will not publish any ports, but is only for documentation to inform the creator of the Docker container that this Docker image will use a specific port when run in a Docker container. For example, as below:

FROM alpine:3

LABEL author="sysadmin"
LABEL company="sysadminpedia" website="https://www.sysadminpedia.com"

WORKDIR /app

RUN mkdir hello
RUN echo "Hello World" > "hello/world.txt"

RUN addgroup -S app_group
RUN adduser -S -D -h /app app_user app_group
RUN chown -R app_user:app_group /app
USER app_user

ADD *.txt hello

COPY *.gz hello

EXPOSE 8080

CMD ["cat", "hello/world.txt"]


To see the open ports on this Docker image, use the command as shown in the image below:

Using the EXPOSE instruction


To create a container using this Docker image and see the open ports on this container, use the command as shown in the image below:

Display the EXPOSE instruction in the container


12. ENVIRONMENT VARIABLE instruction

To change the environment variables either during the build stage or when running in a Docker Container. The ENV defined in the Dockerfile can be reused using the ${ENV_NAME} syntax.

FROM alpine:3

LABEL author="sysadmin"
LABEL company="sysadminpedia" website="https://www.sysadminpedia.com"

WORKDIR /app

RUN mkdir hello
RUN echo "Hello World" > "hello/world.txt"

RUN addgroup -S app_group
RUN adduser -S -D -h /app app_user app_group
RUN chown -R app_user:app_group /app
USER app_user

COPY *.txt hello

ADD *.gz hello

EXPOSE 8080

ENV APP_PORT=8080
EXPOSE ${APP_PORT}

CMD ["cat", "hello/world.txt"]


The Environment Variable created using the ENV instruction is stored in the Docker image and can be viewed using the docker image inspect command.

Using the ENV instruction


Environment variables can be changed in value when creating a Docker container with the docker command using the –env-key=value option. So if you use the Dockerfile above, which uses APP_PORT=8080, but you want to use APP_PORT=9090, then you can use the command:

docker container create --name env_ins --env APP_PORT=9090 -p 9090:80 env_ins

Using the ENV instruction when creating a container


13. VOLUME instruction

To create the volume automatically when creating the container, and all the files contained in the volume are automatically copied to the Docker Volume, even though we didn’t create the Docker Volume when creating the Docker Container. It is suitable for cases when the application stores data in a file, so that the data can be automatically and safely stored in the Docker Volume.

FROM alpine:3

LABEL author="sysadmin"
LABEL company="sysadminpedia" website="https://www.sysadminpedia.com"

WORKDIR /app

RUN mkdir hello
RUN echo "Hello World" > "hello/world.txt"

RUN addgroup -S app_group
RUN adduser -S -D -h /app app_user app_group
RUN chown -R app_user:app_group /app
USER app_user

COPY *.txt hello

ADD *.gz hello

ENV APP_PORT=8080
EXPOSE ${APP_PORT}

ENV APP_DATA=/logs
VOLUME ${APP_DATA}

CMD ["cat", "hello/world.txt"]

Using the VOL instruction


Then, create a container from the Docker image and inspect it with the keyword Mounts. List the volume on the server, and it should be the same as in the image below:

Display the volume


14. ARGUMENT instruction

To define variables that can be used by the user to send when performing a Docker build process, use the –build-arg key=value command. This instruction is only used during the build time process, which means that when running in a Docker container, this instruction will not be used any differently from the ENV used. Accessing variables from ARG is the same as accessing variables from ENV using ${variable_name}.

FROM alpine:3

LABEL author="sysadmin"
LABEL company="sysadminpedia" website="https://www.sysadminpedia.com"

WORKDIR /app

RUN mkdir hello
RUN echo "Hello World" > "hello/world.txt"

RUN addgroup -S app_group
RUN adduser -S -D -h /app app_user app_group
RUN chown -R app_user:app_group /app
USER app_user

COPY *.txt hello

ADD *.gz hello

ENV APP_PORT=8080
EXPOSE ${APP_PORT}

ARG app=qwerty
RUN mv hello/world.txt hello/${app}.txt

CMD ["cat", "hello/${app}.txt"]

Using the ARG instruction


As you can see in the image above, the file name changes to qwerty.txt, which corresponds to the arguments you wrote in Docker. If you want to change the argument when creating a Docker image, then you can change it by adding the –build-arg app=pass option so that the file becomes pass.txt, as shown in the image below:

Using the ARG when creating a Docker image


Based on the image above, you can see that the file name has changed to pass.txt. However, you have to know that when you run the container and run the log command, it will display as shown in the picture below:

Error when opening the log


You can see in the image above that there is an error in the container log. This is because ARGs can only be accessed at build time, while CMDs are executed at runtime, so if you want to use ARG at runtime, then you need to insert the ARG into ENV, and your Dockerfile will be as below:

FROM alpine:3

LABEL author="sysadmin"
LABEL company="sysadminpedia" website="https://www.sysadminpedia.com"

WORKDIR /app

RUN mkdir hello
RUN echo "Hello World" > "hello/world.txt"

RUN addgroup -S app_group
RUN adduser -S -D -h /app app_user app_group
RUN chown -R app_user:app_group /app
USER app_user

COPY *.txt hello

ADD *.gz hello

ENV APP_PORT=8080
EXPOSE ${APP_PORT}

ARG app=qwerty
RUN mv hello/world.txt hello/${app}.txt

CMD ["cat", "hello/${app}.txt"]


15. Health CHECK instruction

To tell Docker if the container is still running properly or not. If there is a HEALTHCHECK, the container will automatically have a health status from the beginning with a starting value. If successful, it has a healthy value, and if it fails, it has an unhealthy value.

FROM nginx:alpine

RUN addgroup -S app_group \
    && adduser -S -G app_group -h /app app_user

RUN mkdir -p /app /var/cache/nginx /var/log/nginx /run \
    && chown -R app_user:app_group /app /var/cache/nginx /var/log/nginx /run

RUN echo "OK" > /app/healthz.html

RUN cat <<'EOF' > /etc/nginx/conf.d/default.conf
server {
    listen 80;

    location /healthz {
        root /app;
        try_files /healthz.html =404;
    }

    location / {
        return 200 "Hello from Nginx! Everything works fine.\n";
    }
}
EOF

USER app_user

# Healthcheck
HEALTHCHECK --interval=30s --timeout=5s --start-period=5s --retries=3 \
  CMD wget --no-verbose --tries=1 --spider http://127.0.0.1/healthz || exit 1

CMD ["nginx", "-g", "daemon off;"]

Using the HEALTHCHECK instruction


Note

Actually, it was the developers who created the Dockerfile as an image for their applications to run on Docker. However, as a sysadmin, you should also understand the instructions in the Dockerfile so that you can help developers if there is an error in their Docker, or maybe also to create a Docker image for sysadmin purposes.


References

youtube.dimas-maryanto.com
youtube.com
stackify.com
devopscube.com
geeksforgeeks.org


How to Configure Crontab in Linux?

As a sysadmin, Crontab is an important tool for running scripts that you want to run at a certain time.


Problem

How to configure crontab in Linux?


Solution

Cron is a command you can use in the shell to set up a task, like a command or a script, to run automatically at certain times, dates, or intervals. It was made by AT&T Bell Laboratories and first came out in May 1975.

A. Format crontab

Cron works based on a crontab file, which tells it what tasks to run and when. Crontab has 2 sections: a time section that has 5 items, where each item has a different parameter, and the command section to be executed. For more details, see the image below:

The syntax of the crontab file (Credit to blog.marcotorres.pe)


B. Crontab commands

To display the contents of the crontab, use the command below:

crontab -l


To display the crontab for a user, for example, john, use the command below:

crontab -u john -l


To create or modify a crontab file, use the command below:

crontab -e


To delete the crontab file, use the command below:

crontab -r


C. Crontab examples

Here are examples of Crontab to run time.sh file that contains as below, and don’t forget to permit (chmod +x) so that the file can be run:

#!/bin/bash
#
time=`date +"%Y%m%d-%H:%M:%S"`
echo $time >> time.txt


1. Once a week

If you want to run a file once a week, you can use the crontab configuration as below:

@weekly         cd /home/sysadmin;./time.sh


2. Every time you reboot

Use the crontab configuration below if you want to run a file every time the server reboot is completed:

@reboot         cd /home/sysadmin;./time.sh


3. Every 5 minutes from 1 to 7

Use the crontab configuration below if you want to run a file every 5 minutes from 1 to 7 (i.e., 01:00, 01:05, 01:10, up until 07:55):

*/5 * * * *     cd /home/sysadmin;./time.sh


4. Every 10:30 on 1,10,20,30

If you run a file every 10:30 on 1,10,20,30, use the crontab configuration as below:

30 10 1,10,20,30 * *    cd /home/sysadmin;./time.sh


5. Every first Monday of every month, at 7 a.m.

Use the crontab configuration below if you want to run a file every first Monday of every month, at 7 a.m:

0 7 1-7 * 1     cd /home/sysadmin;./time.sh


6. Every 15 minutes after rebooting

If you run a file every 15 minutes after rebooting, use the crontab configuration as below:

@reboot sleep 900 &&    cd /home/sysadmin;./waktu.sh


7. Every last Saturday of every month

If you want to run a file every last Saturday of every month, then you have to create a script file first example, last_saturday.sh, as below:

cat sabtu.sh
#!/bin/bash


TODAY=$(date +%Y-%m-%d)
NEXT_SATURDAY_MONTH=$(date -d "next Saturday" +%m)
CURRENT_MONTH=$(date +%m)

# If the next Saturday is in the next month,
# it means that this Saturday is the last Saturday of the month
if [ "$NEXT_SATURDAY_MONTH" != "$CURRENT_MONTH" ]; then
    echo "$(date '+%Y-%m-%d %H:%M:%S') - Running last Saturday of month job" >> /home/sysadmin/last_saturday.log
    /home/sysadmin/time.sh
else
    echo "$(date '+%Y-%m-%d %H:%M:%S') - Skipped (not last Saturday)" >> /home/sysadmin/last_saturday.log
fi


And in the crontab, config like below:

0 0 * * 6       cd /home/sysadmin;./last_saturday.sh


This script will only work on Saturdays in each month, and if there is a Saturday in the following month, then this script will not run. To see the log for this script, go to /home/sysadmin/last_saturday.log, and here is a sample of the log:

configure crontab in Linux
last_saturday.log


Note

For crontab to run properly, use absolute paths for files and commands. And don’t forget to make sure the script can be executed and preferably in the script file, to include logs so that it can be traced if there are errors. To see the log in Linux whether crontab is running or not on Ubuntu/Debian, you can use the command below:

sudo grep CRON /var/log/syslog


Use the command below if you are using RHEL/RockyLinux/AlmaLinux:

sudo grep CRON /var/log/cron


If you can’t find the cron log in the file, then open the file /etc/rsyslog.d/50-default.conf and search for the word cron. After that, remove the comment mark # behind the cron word. Then restart the service using the command:

sudo systemctl restart rsyslog


References

en.wikipedia.org
crontab.guru
codepolitan.com
askubuntu.com
medium.com


How to Display the Results of a Script in Zabbix?

I want to create a monitoring to check if a site is in an error state or not using a script, and the results of this script will be sent to Zabbix for monitoring.


Problem

How to display the results of a script in Zabbix?


Solution

For example, I have a sysadminpedia.com site and want to monitor the site. The way I do monitoring is to look for wordpress writing on the site, and if the wordpress writing is not on the site, it means that the site has an error. I use a bash script to monitor the word on sysadminpedia.com. For the site to be monitored by Zabbix based on the results of the script I created, follow the steps below:

1. Create a script

Log in to the Zabbix server, and you can use any folder to create your script, but I created a special folder for scripts in Zabbix using the command:

sudo mkdir -p /etc/zabbix/scripts


Then create a bash script in a folder with the file name check-sysadminpedia-site.sh and copy the script below:

#!/bin/bash

# Fetch the website content
content=$(curl -s https://sysadminpedia.com)

# Check if the word "wordpress" exists (case-insensitive)
if echo "$content" | grep -iq "wordpress"; then
  echo 1
else
  echo 0
fi


2. Change the user, group, and permission

Change the user and group on the file using the command below:

chown -R zabbix:zabbix /etc/zabbix/scripts/check-sysadminpedia-site.sh


After that, type the following command to make the script run:

chmod +x /etc/zabbix/scripts/check-sysadminpedia-site.sh


3. Configure in the zabbix_agent file

Add the below script in the file /etc/zabbix/zabbix_agentd.conf:

UserParameter=check-sysadminpedia-site,/etc/zabbix/scripts/check-sysadminpedia-site.sh


4. Restart zabbix_agent

Restart the Zabbix agent using the following commands:

systemctl daemon-reload
systemctl restart zabbix-agent


5. Configure Zabbix

Go to your Zabbix application, select the Host you want to enter to display the results of this monitoring in Zabbix. I choose to use the Zabbix server host: Monitoring > Hosts > Zabbix server > Items in the CONFIGURATION like in the image below:

Click Items in the CONFIGURATION section


And there will be a display like the following: 

Click the Create item button


Click the Create item button, and then there will be a display as shown below:

Click the Test button


I fill in the fields as in the image above, click the Test button, and then there will be a display as in the image below:

Click the Get value and test button


Click the Get value and test button, and in the Value section, there will be a value generated, either it is 1 or 0, according to the value in the bash script, as in the image below:

Click the Cancel button


You see from the image above, the Value is 1. Click the Cancel button, then it will return to the previous view, like the image below:

Click the Add button


After you press the Add button, there will be the text Item added as in the image below:

Succeed in adding an Item


6. Create a graph

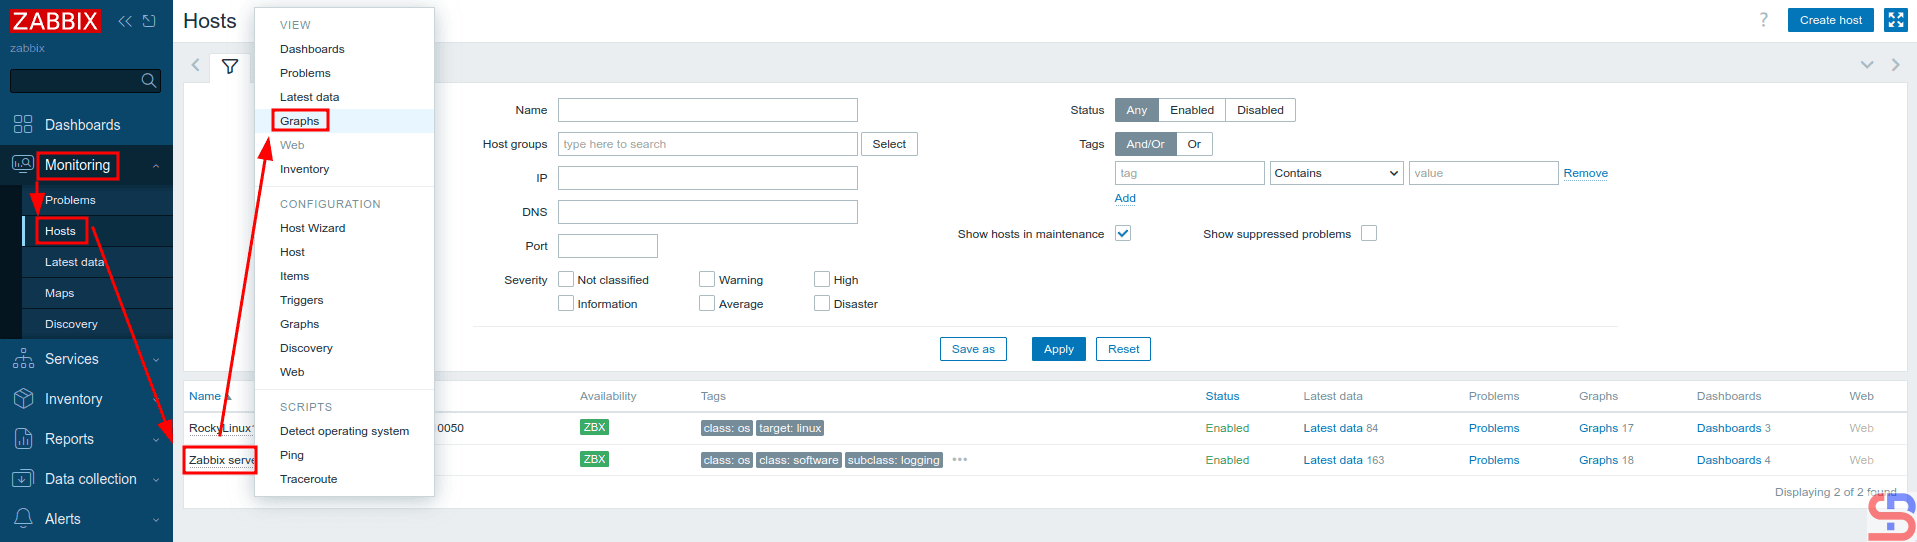
Then, create a graph for the result of the script by selecting the host that will display the result of the bash script. I choose to use the Zabbix server host: Monitoring > Hosts > Zabbix server > Graphs in the CONFIGURATION section, like the image below:

Click the Graphs in the CONFIGURATION section


And there will be a display as shown in the image below:

Click the Create Graph button


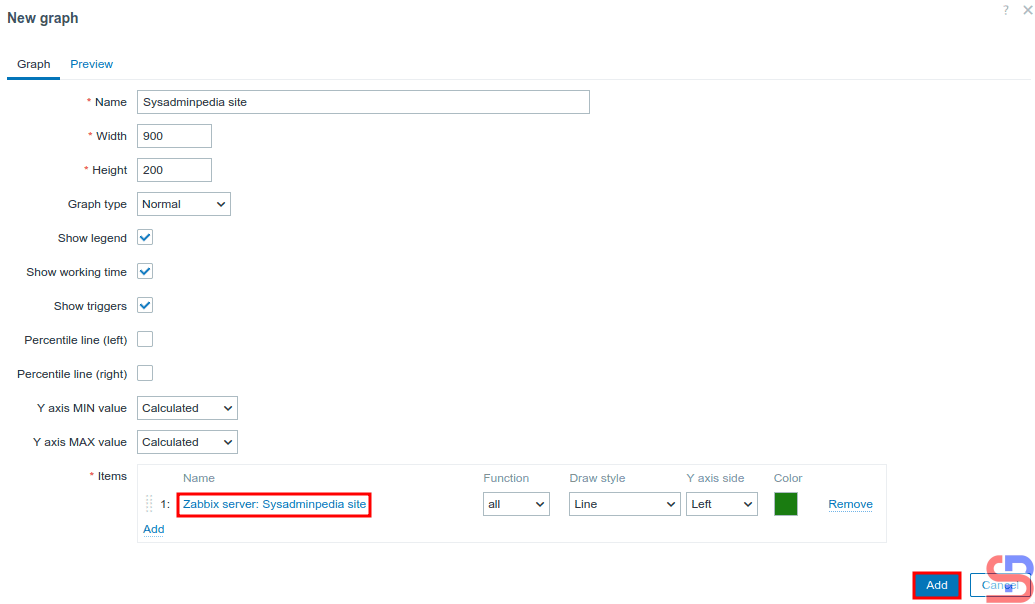
Click Create Graph, then there will be a display as below:

Click the Add button


After that, click the Add button then there will be the text Graph Added as in the image below:

Succeed in adding a Graph


7. Display the graph

Wait a while, and to see the graph, you can go to Monitoring > Hosts > Zabbix server > Graphs in the View section, as shown in the image below:

Click the Graphs in the VIEW section


Click the Filter button as shown in the image below:

Click the Filter button


Then there will be a display as shown in the image below:

Type the name of the graph and click the Apply button


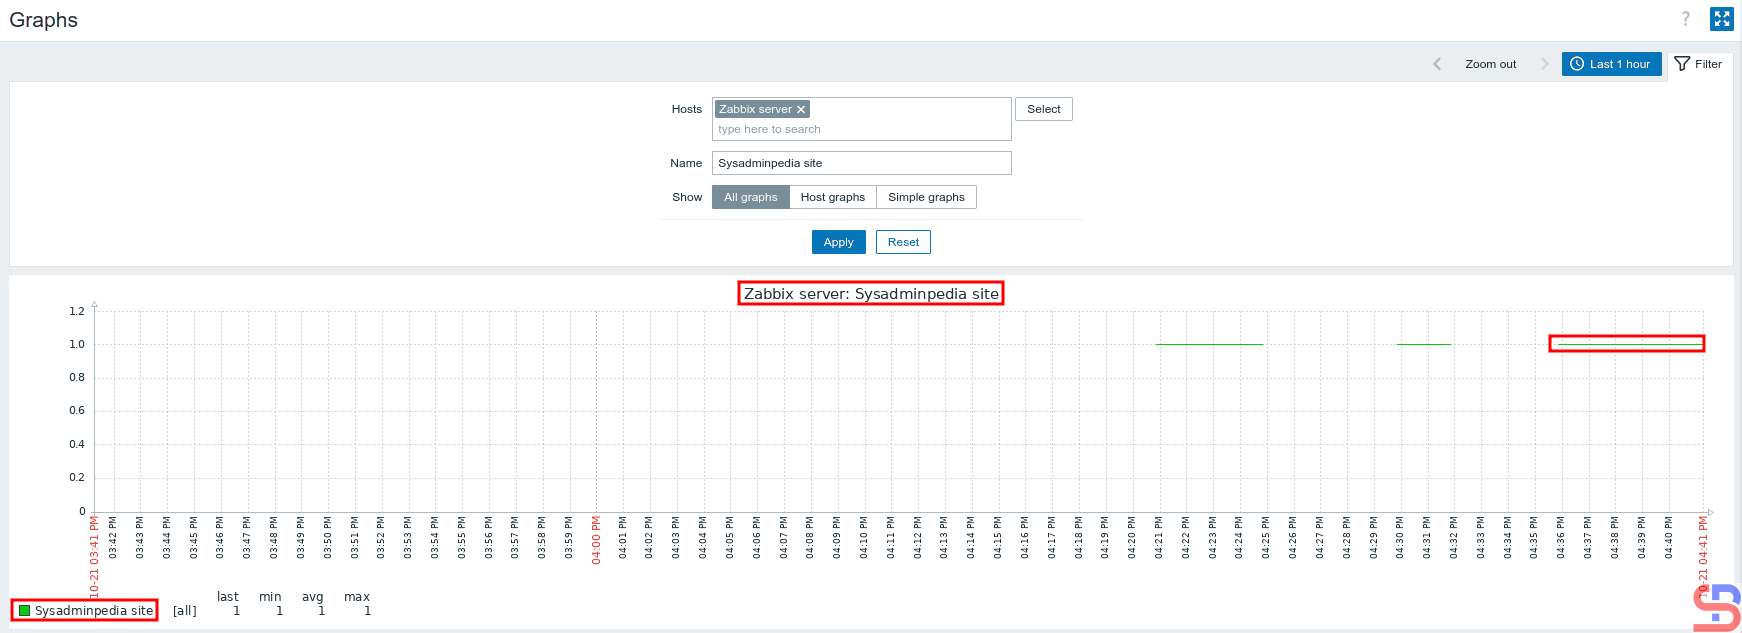
Type the name of the graph in the Name field, then click Apply, and  then there should be a display below:

The graph from your script


If the site has an error, as known as there is no word wordpress, the graph will look as below:

When your script produces the error


And you successfully created a graph in Zabbix from the result of a script you made yourself.


Note

In this article, I used the Zabbix server to insert a script that monitors the server. However, you can use another host for your script, so you can do points 1 to 4 in the explanation above on another host.


References

blog.zabbix.com
youtube.com
sbcode.net


How to Add a Linux Host to be Monitored by Zabbix?

The previous article explained how to install the Zabbix application on Ubuntu. This article will explain how to add a Linux host to be monitored by Zabbix.


Problem

How to add a Linux host to be monitored by Zabbix?


Solution

This article will add a RockyLinux10 host, which will be monitored by Zabbix with IP 192.168.56.104, while the Zabbix server IP is 192.168.56.101. So that the host can be monitored by Zabbix, you must install the Zabbix-Agent on the host. Here are the steps:

A. On Remote Host

Check whether on your RockyLinux server, you have the file /etc/yum.repos.d/epel.repo. Don’t worry if your server does not have the epel.repo file, but if the file exists on your server, you can add the script below:

excludepkgs=zabbix*


After that, run the commands below:

rpm -Uvh https://repo.zabbix.com/zabbix/7.4/release/rocky/10/noarch/zabbix-release-latest-7.4.el10.noarch.rpm
dnf clean all 
dnf install zabbix-agent -y


After you install the zabbix agent, go to copy the file /etc/zabbix/zabbix_agentd.conf as a backup:

cp /etc/zabbix/zabbix_agentd.conf /etc/zabbix/zabbix_agentd.conf.ori


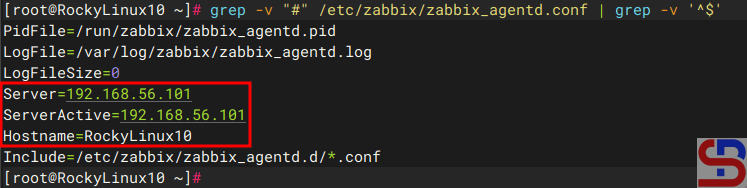
Then go into the file and change the Server section to your Zabbix server IP (which in this article is IP 192.168.56.101), and in the Hostname section, you are free to fill in, and I changed it to RockyLinux10, so the file looks like the one below:

The zabbix_agentd.conf file


If your RockyLinux server has a firewall, open port 10050 using the command:

firewall-cmd --permanent --zone=public --add-port=10050/tcp
firewall-cmd --reload


Then run the two commands below:

systemctl restart zabbix-agent
systemctl enable zabbix-agent


To view the log on zabbix-agent, open the file /var/log/zabbix/zabbix_agentd.log on your server.


B. On the Zabbix server

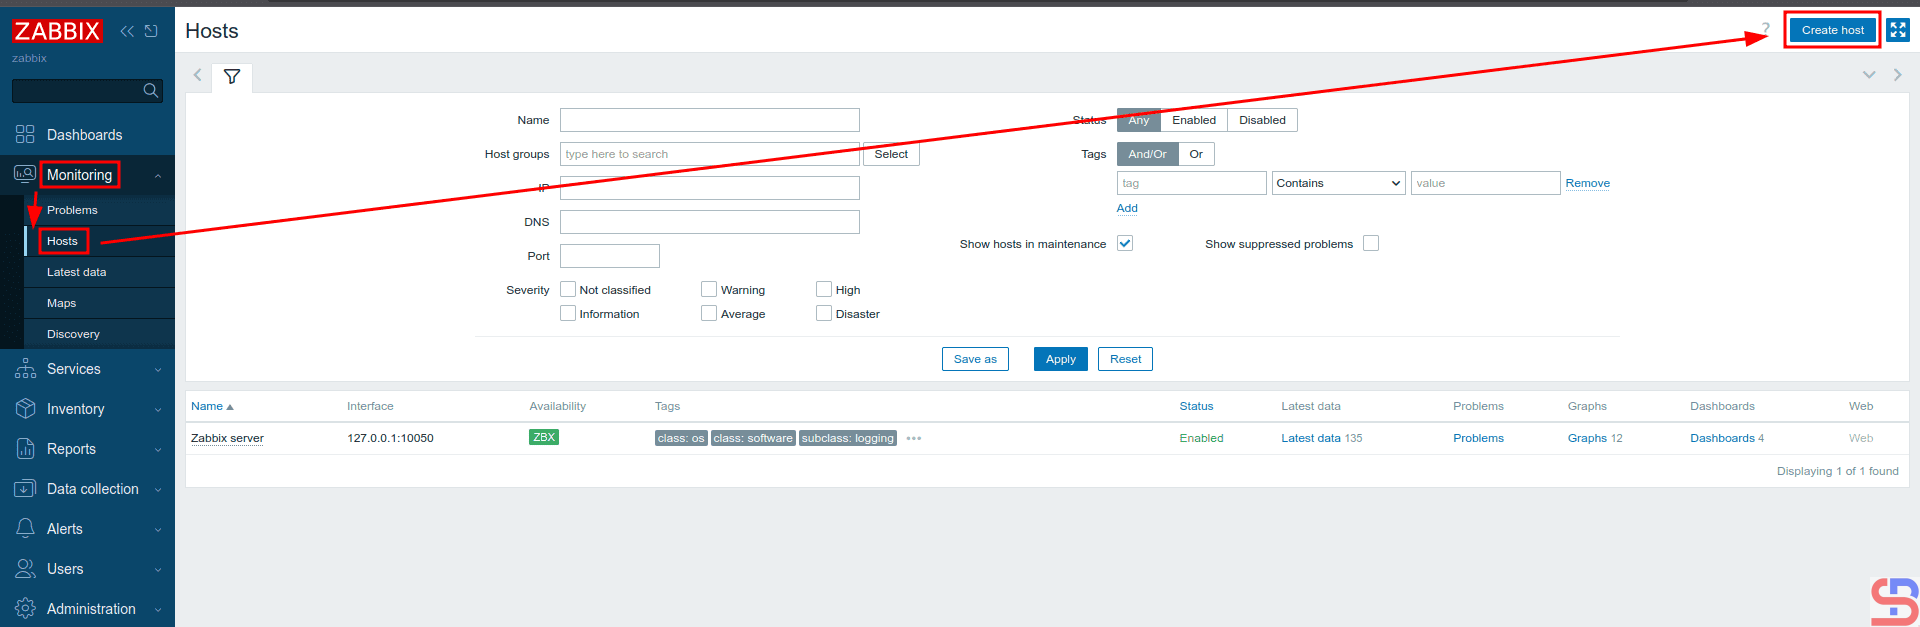
On the Zabbix server, enter the Zabbix application via your browser, then select Monitoring > Hosts > Create Host as in the image below:

Add the host to Zabbix


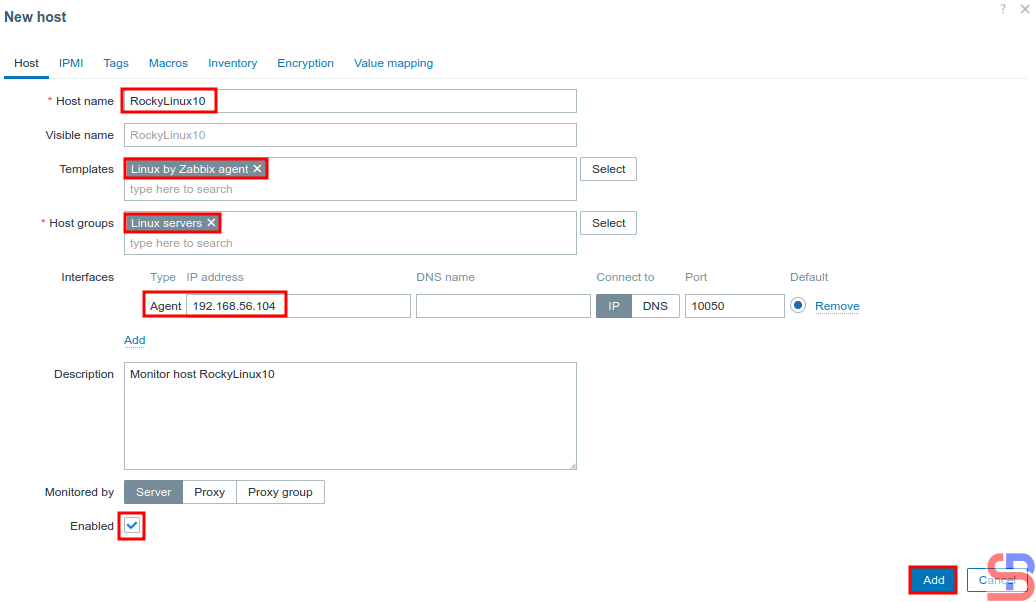
After that, there will be a display like below. You have to fill in the columns according to the host you will monitor. I filled them in as shown in the image below:

Configure a new host in Zabbix


When finished, click the Add button, and you will see a display like the one below:

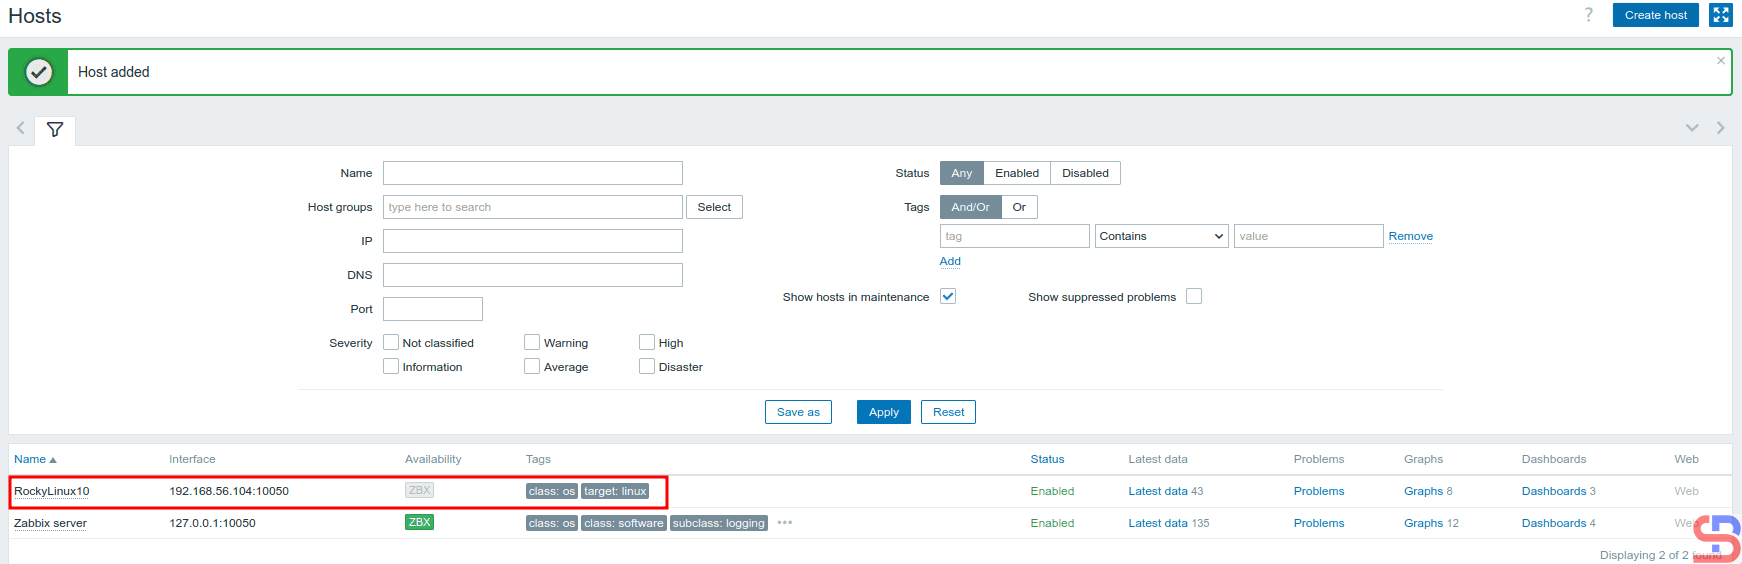
add a Linux host to be monitored by Zabbix
After the Host added


Wait a few moments, and the Zabbix application should be able to monitor your host, which is marked with the word ZBX in green, as in the image below:

Zabbix monitors the host


To see the graph of the host, click on the words Graphs, so there will be a display like the one below:

add a Linux host to be monitored by Zabbix
The graphs of the host


And you have successfully added a host to the Zabbix application.


Note

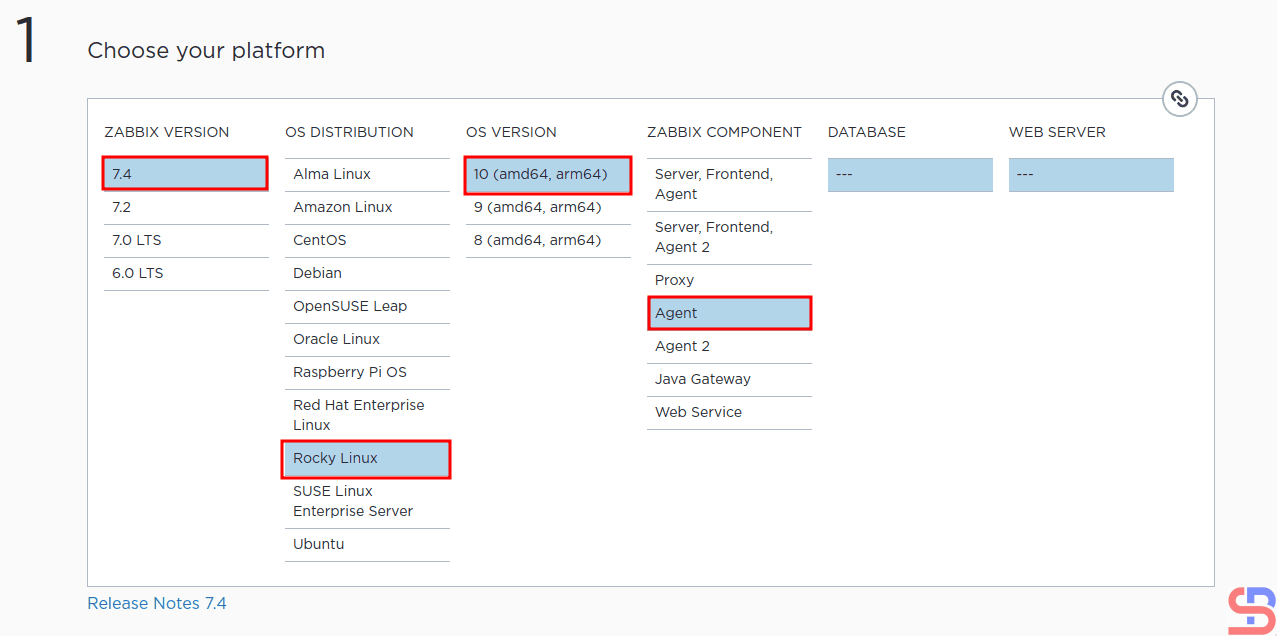
If you want to add a host that Zabbix wants to monitor, you can go to this address to see the steps to install the Zabbix agent on your server. Make sure the Zabbix version selected is the same as the Zabbix version running on the server. The following is an example image for installing the Zabbix agent on the RockyLinux10 host, which is used as an example in this article:

add a Linux host to be monitored by Zabbix
Choose the OS host to install Zabbix Agent


And don’t forget to open Port 10050 on the host you want to monitor so that the Zabbix application can access that host.


References

tecadmin.net
zabbix.com
bestmonitoringtools.com


How to Install Zabbix On Ubuntu?

Zabbix is an open-source software tool to monitor IT infrastructure such as networks, servers, virtual machines, and cloud services.


Problem

How to install Zabbix in Ubuntu?


Solution

Zabbix was first released in 2001, and as of this writing in October 2025, Zabbix has version 7.4. This article will explain how to install Zabbix on an Ubuntu server by using MariaDB and Apache databases.

A. Install Zabbix

Run the commands below to install Zabbix on Ubuntu:

wget https://repo.zabbix.com/zabbix/7.4/release/ubuntu/pool/main/z/zabbix-release/zabbix-release_latest_7.4+ubuntu24.04_all.deb
sudo dpkg -i zabbix-release_latest_7.4+ubuntu24.04_all.deb
sudo apt update
sudo apt install zabbix-server-mysql zabbix-frontend-php zabbix-apache-conf zabbix-sql-scripts zabbix-agent


B. Database Configuration

If your Ubuntu doesn’t have a database, then you can use the MariaDB database by using the command:

sudo apt install mariadb-server


Then, create a password for root in MariaDB using the command:

sudo mariadb-secure-installation 


After that, enter MariaDB using the command:

sudo mariadb -uroot -p


Run the commands below (change the password to what you want):

create database zabbix character set utf8mb4 collate utf8mb4_bin;
create user zabbix@localhost identified by 'password';
grant all privileges on zabbix.* to zabbix@localhost;
set global log_bin_trust_function_creators = 1;
quit; 


Run the command below to import the initial schema and data, and enter the password you created when you created the Zabbix database in MariaDB:

zcat /usr/share/zabbix/sql-scripts/mysql/server.sql.gz | mysql --default-character-set=utf8mb4 -uzabbix -p zabbix 


Then log in to MariaDB again using the command:

sudo mariadb -uroot -p


Run the command below to disable the log_bin_trust_function_creators option after importing the database schema.

set global log_bin_trust_function_creators = 0;
quit; 


C. Configure the Zabbix file

After that, you will configure the zabbix file located in /etc/zabbix/zabbix_server.conf. It’s better if you copy the original file as a backup by running the command below:

sudo cp /etc/zabbix/zabbix_server.conf /etc/zabbix/zabbix_server.conf.ori


Fill in the DBPassword section of the file with the password you created for the Zabbix user, so that it is as follows:

Configuration on zabbix_server.conf file


Then run the two commands below:

systemctl restart zabbix-server zabbix-agent apache2
systemctl enable zabbix-server zabbix-agent apache2


D. Configure Zabbix

Open your browser and type in the URL below:

http://your_ip_server/zabbix


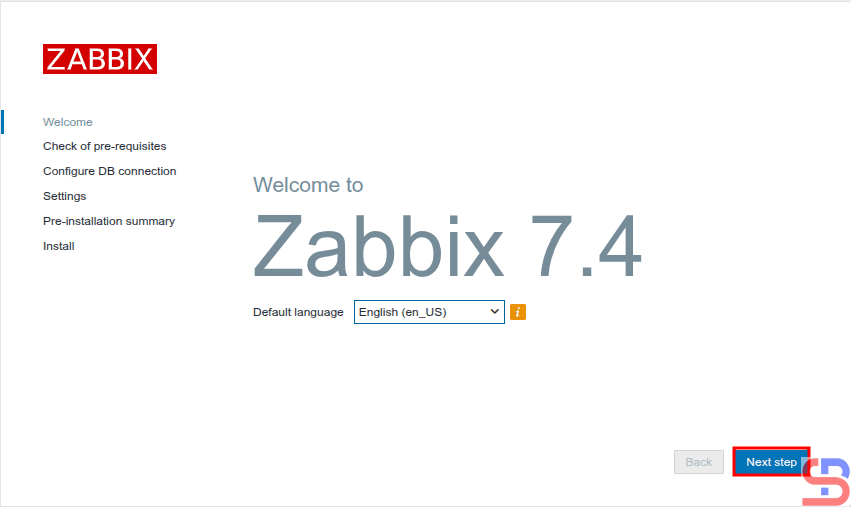
Then there will be a display like the image below:

Configure Zabbix using your browser


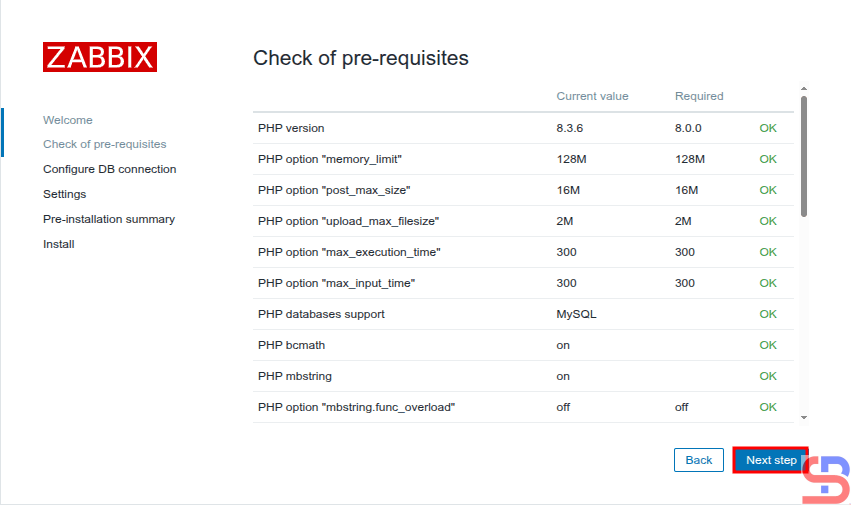
Click the Next step button, and a display similar to the picture below will be present:

Checking of pre-requisites


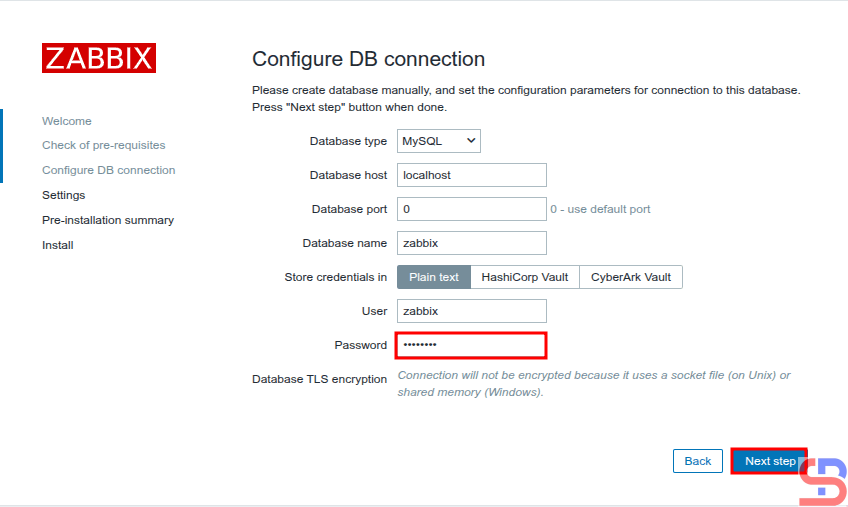
Make sure there is no error like in the image above. After that, click the Next step button, and there will be a screen similar to the one below:

Enter the password of MariaDB


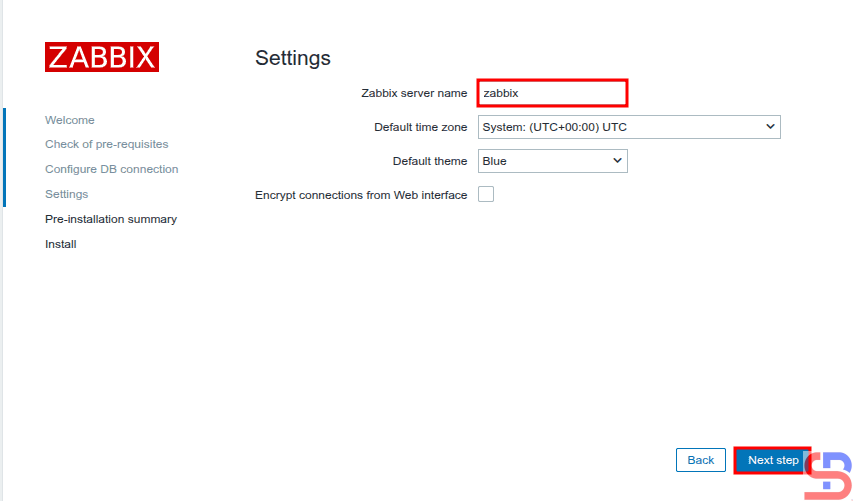
Enter your database password using the Zabbix user, click the Next step button, and a screen similar to the one below will be presented:

Enter the server name of Zabbix


Enter the name of the Zabbix server you want, click the Next step button, and there will be a display like the image below:

install Zabbix in Ubuntu
Pre-installation summary


Click the Next step button, and there will be a display similar to the image shown below.

install Zabbix in Ubuntu
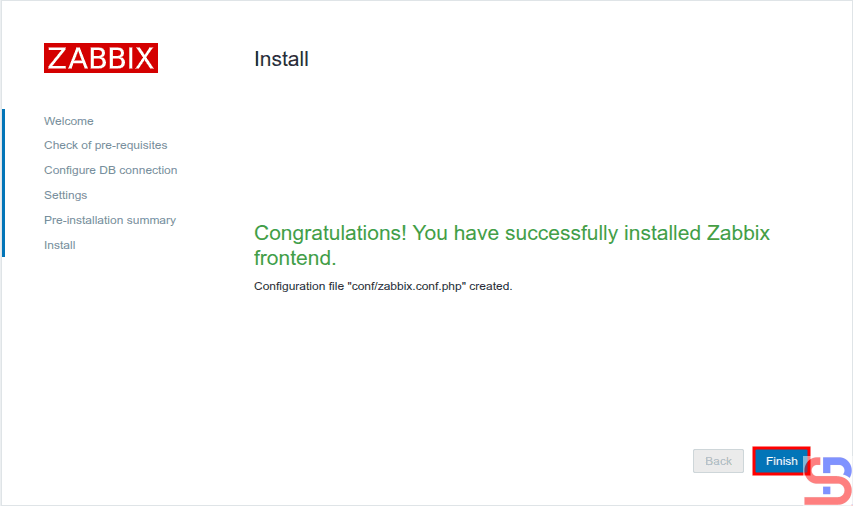
Finish installation


Click the Finish button, and a screen like the one shown below will appear.

install Zabbix in Ubuntu
Enter the username and password of Zabbix


For your information, the initial username for Zabbix is Admin and the initial password is zabbix. After you enter the username and password, click the Sign in button, and there will be a display like the image below:

install Zabbix in Ubuntu
The initial display of Zabbix


You have successfully installed the Zabbix application on your Ubuntu server.


Note

To install Zabbix on a different operating system, you can go to this page to see how to install Zabbix on your server.


References

en.wikipedia.org
zabbix.com
medium.com


How to Stop Linux From Erasing the File(s) or Folder(s)?

I want to prevent a specific file or folder from being deleted, even with the root user.


Problem

How to stop Linux from erasing the file(s) or folder(s)?


Solution

In Linux, there are two commands you can use to prevent unauthorized changes, protect the critical file(s) or folder(s), and ensure the integrity of the system: the lsattr and chattr commands.

A. The lsattr command

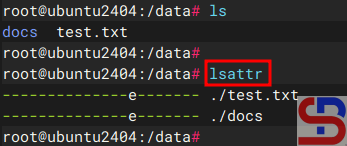
To see the properties of files or directories on a file system that supports extended attributes, use the lsattr command. So, lsattr command displays special attributes that are not visible with the ls -l command. Run the command below to see the list of attributes:

lsattr

List the attribute(s)


By default, if your server uses the ext4 format, a file or folder on that Linux server will have the e attribute, or extent format, which is a more efficient file storage method than the traditional block method. Below is a brief explanation of the various attributes:

File/Folder Attributes

Attribute Explanation
- Attribute not set
a Append-only — file can only be opened for appending without modifying existing data on a File, not overwritten or truncated
A No atime updates — access time is not updated when the file is read
c Compressed — file is stored compressed on disk (kernel support required).
C No Copy-on-Write (CoW) — disables CoW for Btrfs files.
d No dump — file is ignored by the dump backup program.
D Synchronous directory updates — directory changes are written immediately to disk.
e Extents — file uses extents to map blocks (default on ext4).
i Immutable — file cannot be modified, deleted, renamed, or linked (even by root).
j Data journaling — file data is journaled as well as metadata.
s Secure deletion — blocks are zeroed when file is deleted (if supported).
S Synchronous updates — file changes are written immediately to disk.
t No tail-merging — prevents tail-packing (used in ReiserFS).
T Top of directory hierarchy — marks directory as top-level for block allocator.
u Undelete — when deleted, file content can be recovered (if supported).


B. The chattr command

With Linux, users can modify the properties of files and directories with the ‘chattr’ (change attribute) command. Using this command, you can protect a file or directory from deletion or addition, which is very useful for protecting critical files or folders. To use this command, you can follow the format below:

chattr [operator][attribute] file(s)/folder(s)


You can see the attributes in the table above, while the table below shows the operators you can use:

The Operators in attribute file(s)/folder(s)

Operator Explanation
+ Add the specified attribute(s) to the file/directory (keep existing ones).
- Remove the specified attribute(s) from the file/directory.
= Set the attribute(s) exactly as specified (replace all existing ones).


1. Making a file undeletable

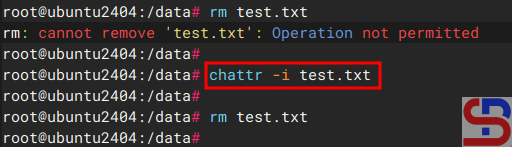
Use the command below to make a file undeletable in a file, for example, test.txt:

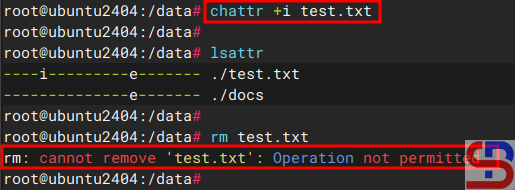
chattr +i test.txt


Then, try deleting the file. It should be undeletable even with the root user, as shown in the image below:

Making a file undeletable


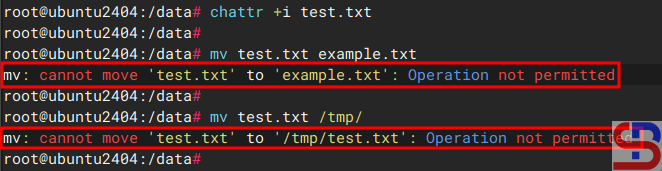
You cannot even rename the file or move it to another folder, as shown in the image below:

Can not rename or move a file


If you want to really delete a file, you have to run the command below, and you can delete the file like in the image below:

The file can be deleted


2. Append data without modifying existing data on a File

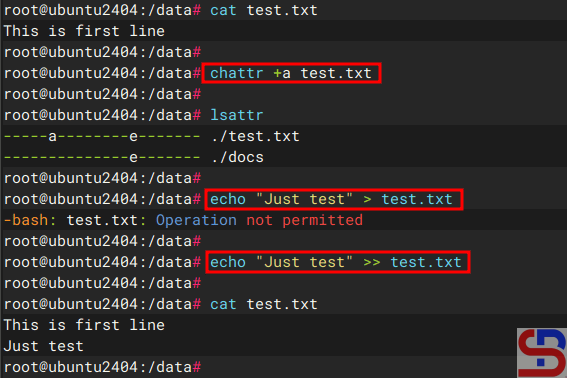
If you want the file to be able to add content without deleting the content that is already in the test.txt file, use the command below

chattr +a test.txt


Then try running the two commands below:

echo "Add test" > test.txt
echo "Just test" >> test.txt


And only the second command should be able to be executed, as shown in the image below:

Append a file


To get the file back to “normal”, use the command below:

chattr -a test.txt


3. Making a folder secure

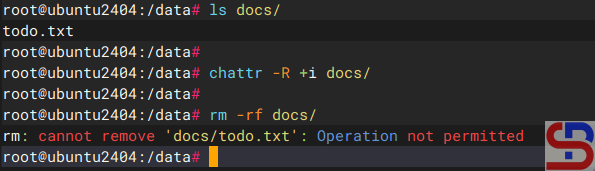
Use the command below if you want your folder to be undeleted, for example, the docs folder:

chattr -R +i docs/


Now, try to delete the folder, and it should not be deletable as shown in the image below:

Can not delete the folder


Even you can’t delete the files in the folder, as shown in the image below:

Cannot delete the file in the folder


For the folder to be deleted, use the command below:

chattr -R +i docs/


Note

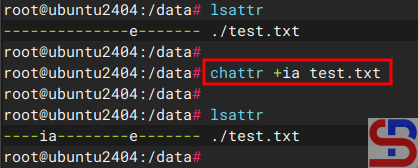
You can run more than one option to change the attributes of a file in a command. For example, you want the file to be undeletable and appended without deleting the content that was previously present in the test.txt file, then use the command below:

chattr +ia test.txt

Give more than one attribute for one file


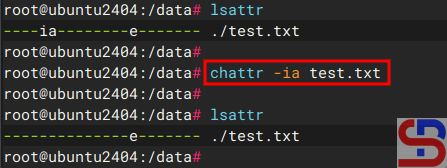
Likewise, you can delete more than one attribute for the test.txt file, then use the command below:

chattr -ia test.txt

Delete more than one attribute in one file


You can also run and change the attribute in more than one file or folder. For example, you want to change the attributes for test.txt and ok.txt, use the following command:

chattr +ia test.txt ok.txt 


References

geeksforgeeks.org
tecmint.com
howtoforge.com


How to Reset the Password in Ubuntu?

I want to access the user on the Ubuntu server that has the privilege of root using the sudo command, but I forgot my user password.
 

Problem

How to reset the password in Ubuntu?


Solution

Here are the steps to reset the password in Ubuntu:

1. Reboot the server

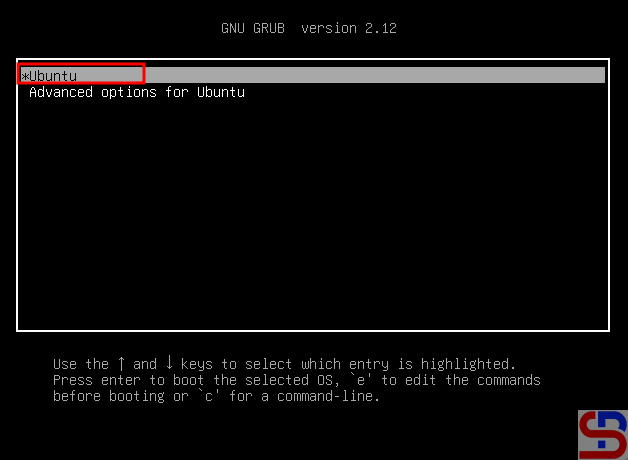
Reboot the server and press the Esc key or Shift key, and there should be a display like below:

Choose the Ubuntu


2. Click the first option

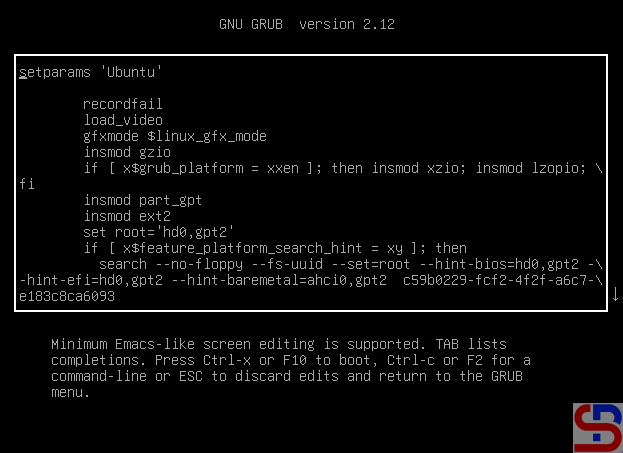
To enter recovery mode, select the top part of the image above and push the e button, so that there will be a display like the image below:

The GRUB options


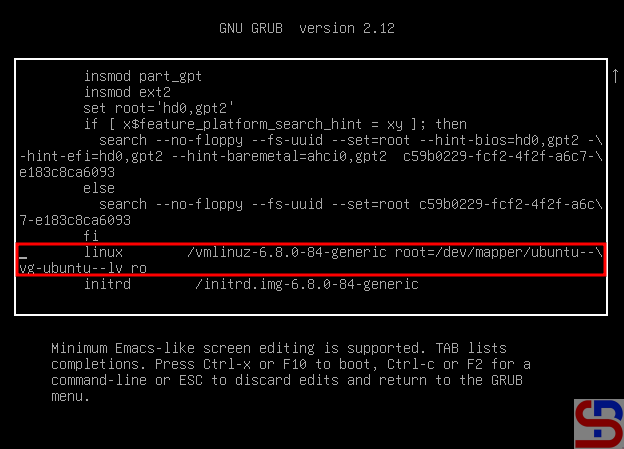
Find the line starting with linux, similar to the picture below:

Find the line starting with linux


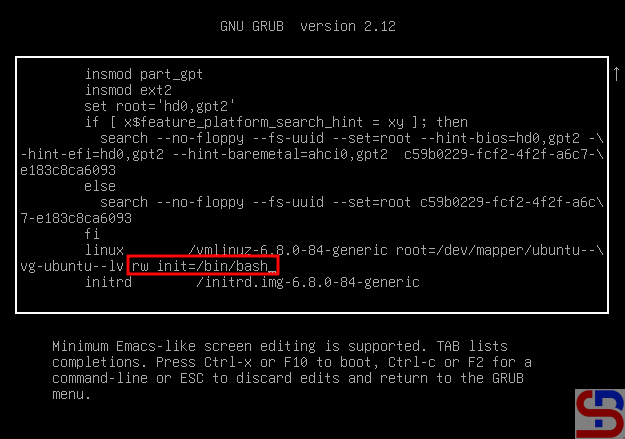
Remove everything from ro and append rw init=/bin/bash to the end of this line, like the picture below:

Change the script


After you change the script, press F10 or Ctrl+x to boot these parameters.

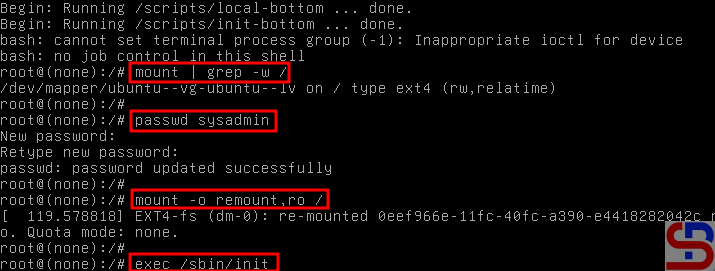
3. Run the commands

In the recovery mode, run the command below:

mount | grep -w /


After that, execute the command below to change the password:

passwd 


After you change the password, run the commands below:

mount -o remount,ro /
exec /sbin/init

Run the commands


The Linux server will reboot, and after that, try to log in with the new password that you set before.


Note

By default, you cannot log in directly as root on Ubuntu, so you can’t change your password to root because to be root on Ubuntu, you only need to use your sudo command and enter your user password.


References

tecmint.com
askubuntu.com
infotechys.com