If you are a user of the MariaDB database, you should know about the term storage engine.
Problem
How to display the storage engine in MariaDB?
Solution
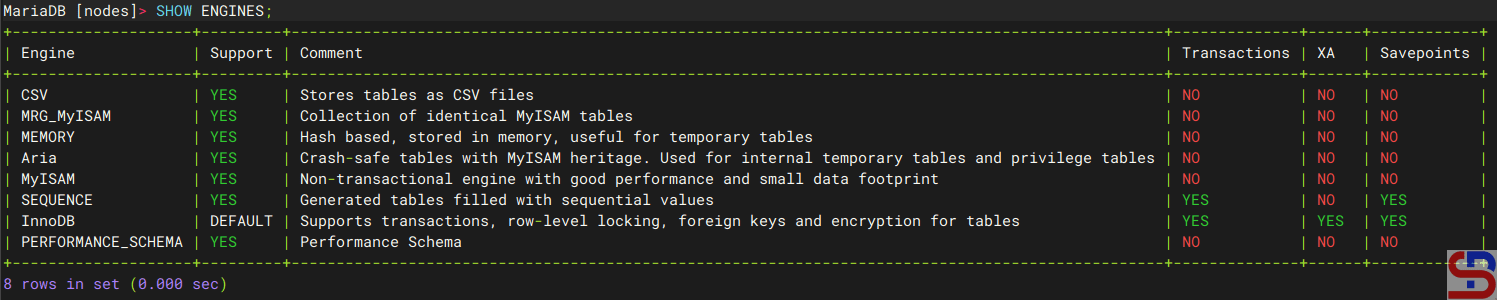
A database engine (or storage engine) is the underlying software component that a database management system (DBMS) uses to create, read, update, and delete (CRUD) data from a database. To see a list of all available storage engines on the server, use the command below in the MariaDB prompt:
SHOW ENGINES;
and it will appear as shown in the image below:
Display all the storage engines in MariaDB
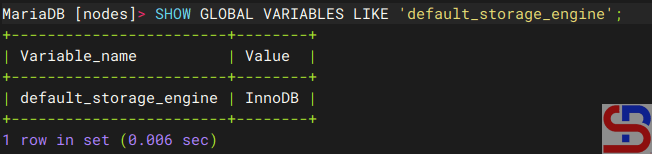
From the image above, you can see that InnoDB is the default storage engine in MariaDB. You can also use the command below to see the default storage engine in MariaDB:
SHOW GLOBAL VARIABLES LIKE 'default_storage_engine';
Display the default storage engine in MariaDB
You can change the default storage engine by using the command below, which changes the default storage engine to MyISAM:
SET GLOBAL default_storage_engine='MyISAM';
Or you can use the below command if the session default storage engine supersedes the global default during this session:
SET SESSION default_storage_engine='MyISAM';
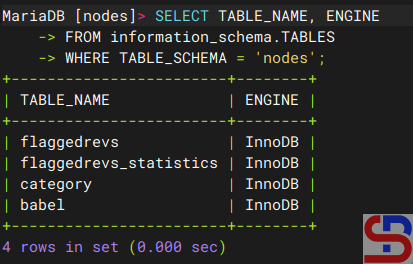
You should know that the storage engine is used per table and not per database, and to see it, you can use the command below:
SELECT TABLE_NAME, ENGINE
FROM information_schema.TABLES
WHERE TABLE_SCHEMA = 'nodes';
and the result will look like below:
Display the storage engine used in the table
From the image above, it can be seen that all tables in the nodes database use InnoDB, so it can be said that the nodes database uses InnoDB. However, one database (schema) can have a table with a different engine, and the query below is the sample to create 2 tables that use different storage engines:
CREATE TABLE product (
    id INT PRIMARY KEY,
    name VARCHAR(100)
) ENGINE=InnoDB;

CREATE TABLE access_log (
    id INT PRIMARY KEY AUTO_INCREMENT,
    time DATETIME,
    user VARCHAR(50)
) ENGINE=MyISAM;
where the product table uses InnoDB and the table access_log uses MyISAM. If a database uses various storage engines and you want to know how many storage engines are used, you can use the query below:
SELECT ENGINE, COUNT(*) AS Number_of_tables
FROM information_schema.TABLES
WHERE TABLE_SCHEMA = 'db_name'
GROUP BY ENGINE;
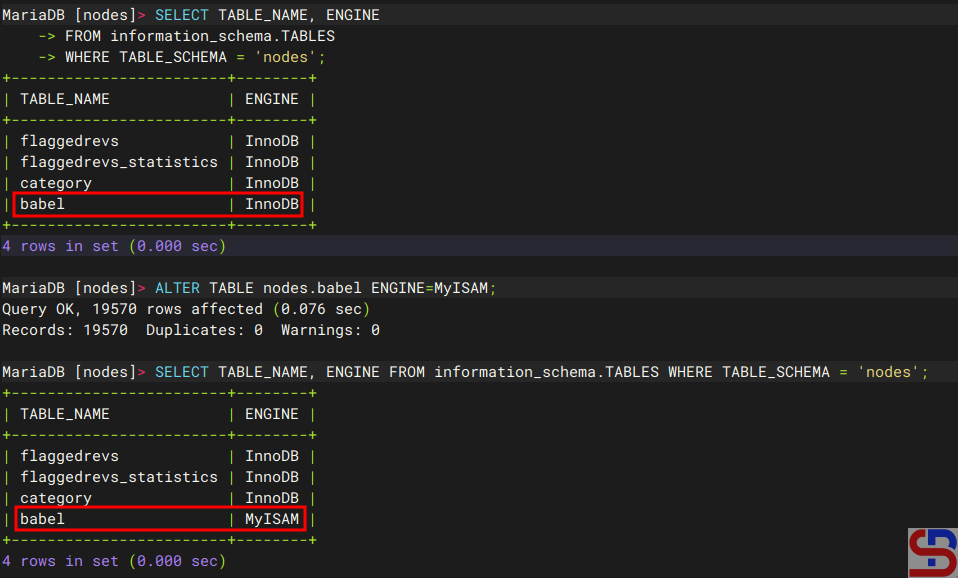
You can change the storage engine of a table by using the query below, for example, change it to MyISAM:
ALTER TABLE database_name.table_name ENGINE=MyISAM;
Change the storage engine in the table
Note
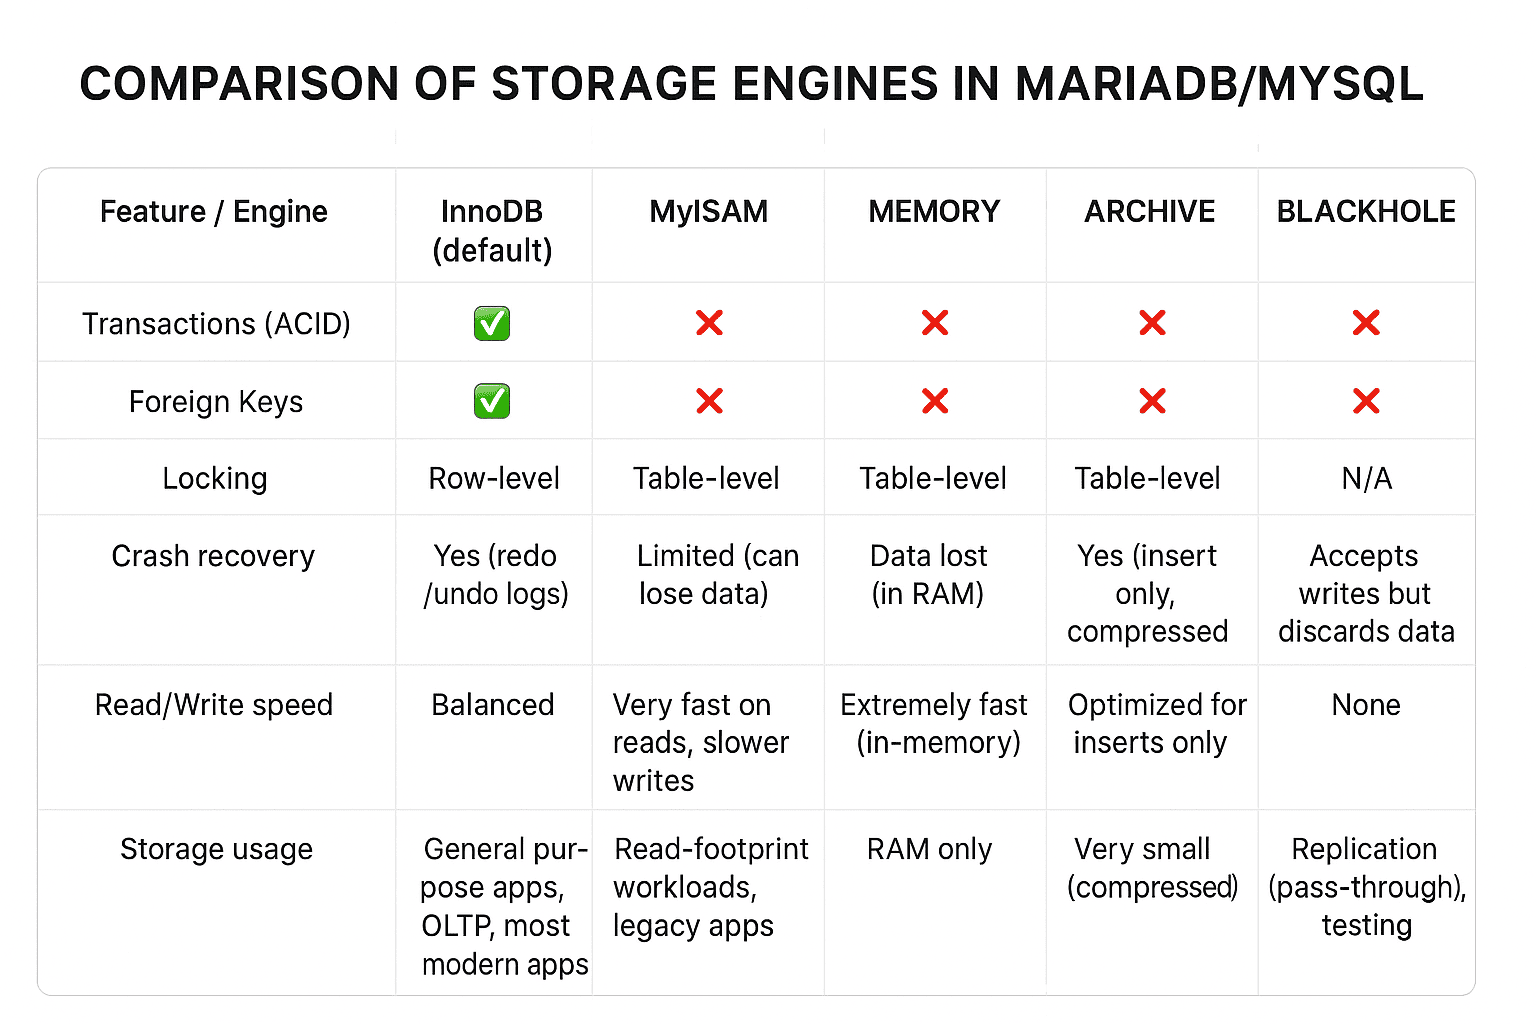
As explained above, there are many storage engines that you can use. But before you decide to use a storage engine, you should first find out the advantages and disadvantages of each storage engine, and to briefly see the differences between storage engines in the image below:
Comparison between the storage engines
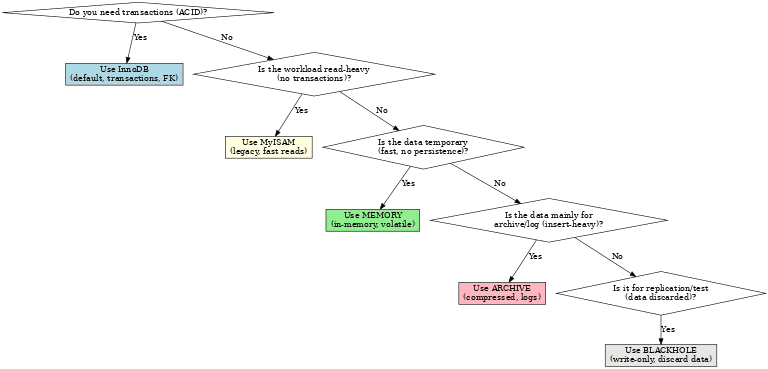
And below is a flowchart to determine the storage engines you will use:
Flowchart to choose the storage engine
However, as far as I know, among the many choices of storage engines, generally people use 2 types of storage engines, namely InnoDB and MyISAM. Maybe you can see the difference between the two through this site.
How to Display All Databases Created by the User in MariaDB?
written by sysadmin | 17 September 2025
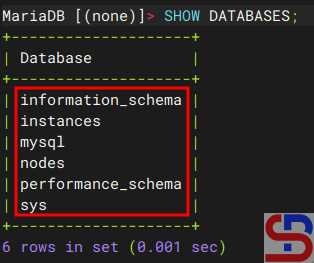
By default, in MariaDB, 4 databases are automatically created by the database system, namely information_schema, mysql, performance_schema, and sys. But I just want to display a database created by the user and not the default system databases.
Problem
How to display all databases created by the user in MariaDB?
Solution
If you use the show databases command after you access successfully accessing MariaDB, it will display all databases created by the user and default system databases, as shown below:
Display all databases
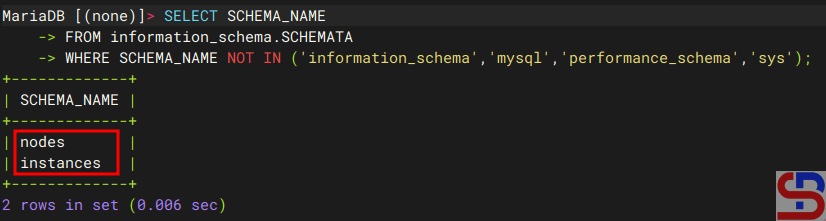
If you want to list only User-Created Databases, you can use a query as below:
SELECT SCHEMA_NAME
FROM information_schema.SCHEMATA
WHERE SCHEMA_NAME NOT IN ('information_schema','mysql','performance_schema','sys');
and it will display like the image below:
Display only User-Created Databases
Note
If you want to run the Linux command to display all databases created by the user only, use the command below:
mysql -u root -p -e "SELECT SCHEMA_NAME FROM information_schema.SCHEMATA WHERE SCHEMA_NAME NOT IN ('information_schema','mysql','performance_schema','sys');"
And you will see the result like the image below:
Display only User-Created Databases using the Linux command
How to Display the Total Size of the Entire MariaDB Database in the CLI?
written by sysadmin | 17 September 2025
I want to know the total size of the entire MariaDB database.
Problem
How to display the total size of the entire MariaDB database in the CLI?
Solution
There are two methods for displaying the total size of the entire MariaDB database in the CLI:
1. Using a query
If you have entered the MariaDB database, you can use the command below to display the total size of a MariaDB database:
SELECT table_schema AS "Database",
ROUND(SUM(data_length + index_length) / 1024 / 1024, 2) AS "Size (MB)"
FROM information_schema.TABLES
GROUP BY table_schema;
The above query will display the total size of the entire MariaDB database in MegaBytes (MB) as shown in the image below:
Display the total size of the databases using the query in Megabytes
If you want to display in Gigabytes (GB), use the command below:
SELECT table_schema AS "Database",
ROUND(SUM(data_length + index_length) / 1024 / 1024 / 1024, 2) AS "Size (GB)"
FROM information_schema.TABLES
GROUP BY table_schema;
so that it will display as shown in the image below:
Display the total size of the databases using the query in GigaBytes
2. Using Linux Command
If you want to display the total size of the entire MariaDB database using Linux commands, use the command below:
mariadb -u root -p -e "
SELECT table_schema AS 'Database',
ROUND(SUM(data_length + index_length) / 1024 / 1024, 2) AS 'Size (MB)'
FROM information_schema.TABLES
GROUP BY table_schema;"
If you run the above command, it will display like the image below:
Display the total size of the databases using the Linux command in Megabytes
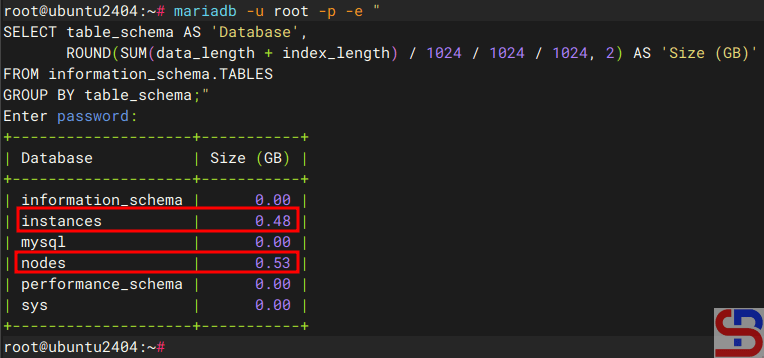
If you want to display it in GigaBytes, use the command below:
mariadb -u root -p -e "
SELECT table_schema AS 'Database',
ROUND(SUM(data_length + index_length) / 1024 / 1024 / 1024, 2) AS 'Size (GB)'
FROM information_schema.TABLES
GROUP BY table_schema;"
and it will display like the image below:
Display the total size of the databases using the Linux command in Gigabytes
Or in a short time, you can use the Linux command below to see the total size of the entire database in MariaDB:
cd /var/lib/mysql/
du -sh *
Display the total size of the databases using the Linux command
Note
If you want to display the total size of the entire MariaDB database in KiloBytes, then in the ROUND(SUM(data_length + index_length) section, simply divide it by 1024 so that it becomes as follows:
mariadb -u root -p -e "
SELECT table_schema AS "Database",
ROUND(SUM(data_length + index_length) / 1024 , 2) AS "Size (KB)"
FROM information_schema. TABLES
GROUP BY table_schema;"
And if you want to display in TeraBytes size, then in the ROUND(SUM(data_length + index_length) section, divide by 1024 4 times, so that the command is as follows:
mariadb -u root -p -e "
SELECT table_schema AS 'Database',
ROUND(SUM(data_length + index_length) / 1024 / 1024 / 1024 / 1024 , 2) AS 'Size (KB)'
FROM information_schema.TABLES
GROUP BY table_schema;"
The previous article already explained how to create a database and a table in MariaDB. This article will explain how to manage the user(s) in MariaDB.
Problem
How to manage the user(s) in MariaDB?
Solution
Here are the commands to manage user(s) in MariaDB:
INFO
The use of capital letters in this article is only to distinguish between original commands from MariaDB and data from the user. You don’t have to use the capital letters when running these commands, but you can use all lowercase letters.
1. Display all users
Type the command below to display all the users in MariaDB:
SELECT User,Host FROM mysql.user;
Display all users in MariaDB
You can see in the picture above that by default, there are only 3 users in MariaDB.
2. Create a user with a password
Use the format below to create a user with a password:
CREATE USER 'username'@'ip_address' IDENTIFIED BY 'password_user';
For example, If you want to create a user with the name james and its password 123456, then type the command below:
CREATE USER 'james'@'localhost' IDENTIFIED BY '123456';
If you want to create a John user with a qwerty password but the user can only access the database via the IP with subnet 192.168.56.0/24, type the command below:
CREATE USER 'john'@'192.168.56.%' IDENTIFIED BY 'qwerty';
But if you also want to create a judith user with a password 1q2w3e4r and the user can access the database from any network, then type the command below:
CREATE USER 'judith'@'%' IDENTIFIED BY '1q2w3e4r';
Create the users
To see the options for this command, you can go to this page.
4. Rename user
Use the format below to change the user name:
RENAME USER 'username1'@'ip_address' TO 'username2'@'ip_address'
For example, you want to change the name of james to bob by typing the command below:
RENAME USER 'james'@'localhost' TO 'bob'@'localhost';
Rename the user
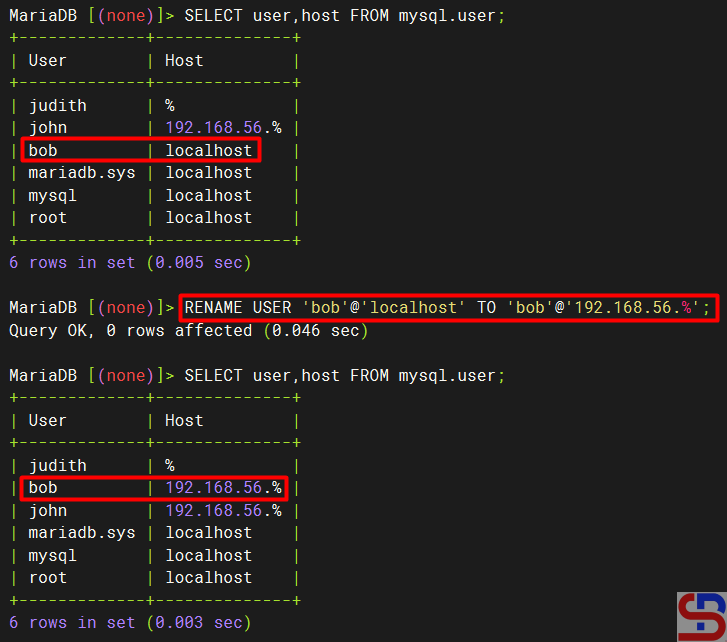
You can also change the IP address using the command:
RENAME USER 'bob'@'localhost' TO 'bob'@'192.168.56.%';
Rename the IP address
To see the options for this command, you can go to this page.
5. Alter user
Use the format below to change the user in MariaDB:
ALTER USER 'username'option1 option2 ... optionN;
For example, if you want to change the user james’ password, then use the command below:
ALTER USER 'james'@'localhost' IDENTIFIED BY 'qwerty';
Change the password using the alter command
To see the options for this command, you can go to this page.
6. Grant a user
If you only make a user in Mariadb without giving access to the user, then the user will not be able to enter the existing database in Mariadb. By default, only the root user gets access to all databases in Mariadb. To add a user to have access, use the format below:
GRANToption1 ONoption2 TO 'username'@'ip_address;
Option1 is for privileges options at a database or a table level, and option2 is for which database or table the user can access by the user. To see the options for this command, you can go to this page. For example, the user bob can only access the db_office database and then use the command below:
GRANT ALL ON db_office.* TO 'bob'@'192.168.56.%';
If you want to provide access to the user john to only be able to do the select command for the employee table in the db_office database, then use the command below:
GRANT SELECT ON db_office.employees TO 'john'@'192.168.56.%';
and provide a judith user to access the entire database, use the command below:
GRANT ALL ON *.* TO 'judith'@'%';
You can also combine the grant command by giving a password to a user by typing the command below:
GRANT ALL ON db_office.* TO 'richard'@'192.168.56.%' IDENTIFIED BY 'qwerty';
To see the grant of a user, for example, a judith user, type the command below:
SHOW GRANTS for 'judith';
Display grant for a user
Warning
If you want to see the grant of a user but you do not enter the IP address of the user’s host, as in the picture above, then by default, MariaDB will assume ‘%’ as the host. Therefore, it is recommended that you type the IP address of the user to display the grant status of the user.
If you want to see what grant access is given to a user but forget each IP host address from the user-user in MariaDB, then use this command:
select distinct concat('SHOW GRANTS FOR ', QUOTE(user), '@', QUOTE(host), ';') as query from mysql.user;
Display all grants for each user
7. Make a role
By default, if you have many users and sometimes these users have the same access, it is recommended to create a role. A role bundles many privileges together. Use the format below to create a role:
CREATE ROLErole_name;
To see the options in this command, please go to this page. For example, if you want to make a qa and a dev role in MariaDB, then use the command below to make the role:
CREATE ROLE qa;
CREATE ROLE dev;
To see all the roles in MariaDB, use the command below:
SELECT User FROM mysql.user WHERE is_role='Y';
Create the role
After that, use the grant command to access the db_office database based on the roles as the command below:
GRANT SELECT ON db_office.* TO qa;
GRANT ALL ON db_office.* TO dev;
Then enter the user bob into the qa role and judith into the dev role with the command below:
GRANT qa TO 'bob'@'192.168.56.%';
GRANT dev to 'judith'@'%';
To see users who have entered into the roles in Mariadb, use the command below:
SELECT * FROM mysql.roles_mapping;
Grant role to the user
8. Delete access
If you want to delete access to a user, whether it’s a role or a grant. Use the format below if you want to delete a user’s role:
REVOKErole_name FROM 'user'@'ip_address';
For example, if you want to delete the qa role from the user bob, use the command below:
REVOKE qa FROM 'bob'@'192.168.56.%';
Revoke a user’s role
Use the format below if you want to delete a grant:
REVOKE option1ON option2FROM'user'@'ip_address';
Option1 is for privileges options at a database or a table level, and option2 is for which database or table. If you want to see a deeper explanation of this command, go to this page. For example, if you want to delete richard’s grant in the db_office database, then use the command below:
REVOKE ALL PRIVILEGES ON db_office.* FROM 'richard'@'192.168.56.%';
Revoke the user’s grant
9. Delete a user
To delete a user, use the format below:
DROP USERusername;
If you want to see a deeper explanation of this command, please go to this page. For example, if you want to delete the judith user in MariaDB, then use the command below:
DROP USER judith;
Delete the user
But if you find a user who has 2 names that are the same, but the IP host address is different, then you must use the format below:
DROP USER 'username'@'ip_address';
For example, you want to delete one of the user bobs that has an IP 192.168.56.%, Then use the command below:
DROP USER 'bob'@'192.168.56.%';
Delete the user with a certain IP
Note
To provide grant access to one of the users, it must first be asked what his needs are for accessing a database so that the MariaDB database can be more secure.
How to manage a database and its table(s) in MariaDB?
Solution
Below are the basic commands of MariaDB to manage a database and its table(s):
1. Access to the MariaDB database
Use the format below to access MariaDB:
mariadb -hip_address -uusername -p
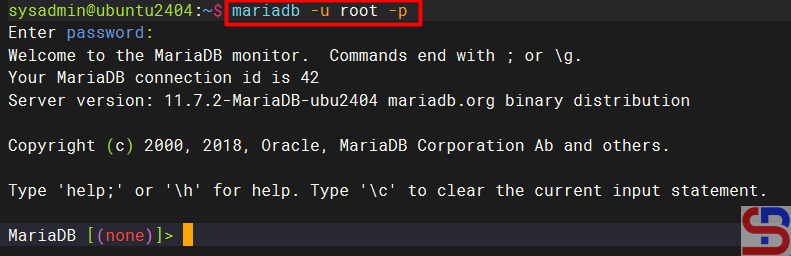
If you access MariaDB from the server using the root user directly, type the command below:
mariadb -u root -p
Enter the password for the root in MariaDB, and if the password is appropriate then you can access MariaDB as in the image below:
Access to MariaDB
INFO
The use of capital letters in this article is only to distinguish between original commands from MariaDB and data from the user. You don’t have to use the capital letters when running these commands, but you can use all lowercase letters.
2. Creating a new database
Use the format below to create a new database:
CREATE DATABASEdatabase_name;
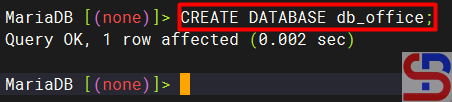
You can see the options for this command on this page. For example, if you want to create a new database called db_office, use the command below;
CREATE DATABASE db_office;
Create a new database
3. See the entire database
Type the command below to see all the databases stored in MariaDB:
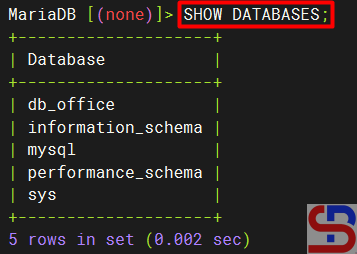
SHOW DATABASES;
Display all databases
4. Select a database
Use the format below to select the database you want to access:
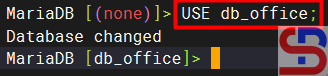
USEdb_name;
For example, if you want to access the db_office database, then type the command below:
You can see the options for this command on this page. Type the command below to create an employee table:
CREATE TABLE employee (name varchar (100), age int (3));
Create a new table
You can see data types that can be used on this page.
6. Display the entire table(s)
Use the command below to display the entire table in a database:
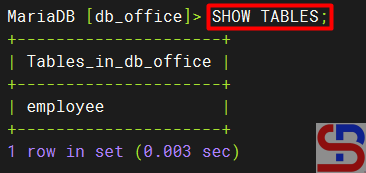
SHOW TABLES;
Show all tables
7. Display the table structure
Use the command below to display the table structure:
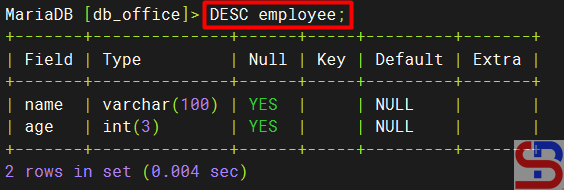
DESCtable_name;
For example, if you want to see the employee table structure, then use the command below:
DESC employee;
Display a table structure
8. Add a column
Use the format below to make a column in table:
ALTER TABLE db_name ADD COLUMN column_nametype (nnn);
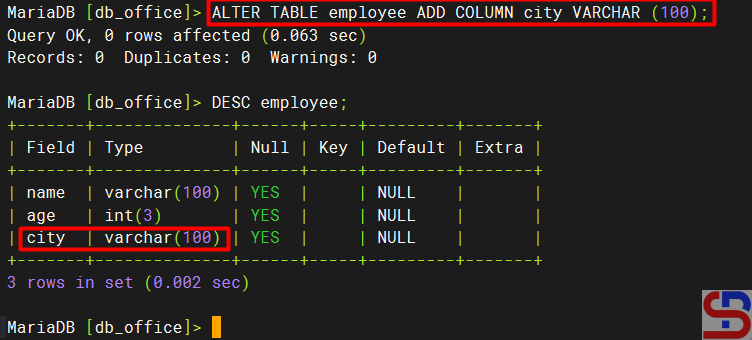
You can see the options for this command on this page. For example, if you want to add to the city column in the employee table, use the command below:
ALTER TABLE employee ADD COLUMN city VARCHAR (100);
You can see the options for this command on this page. Type the command below if you want to insert 2 data to the employee table:
INSERT INTO employee (name,age,city) VALUES ('bob',21,'New York'), ('John',22,'Chicago');
Insert data into the table
INFO
If you want to insert a value in the form of a number, the number does not have to be flanked with an apostrof (‘…’) sign, whereas if it is a character or a combination of characters and numbers, it must be flanked with an apostrof (‘…’).
10. Displays data in a table
Use the format below to display all data in a table:
SELECT option1FROM table_name option2;
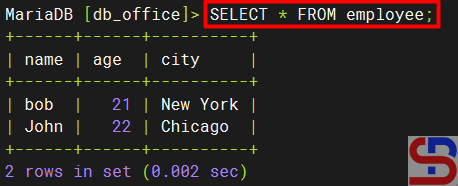
You can see the options for this command on this page. For example, use the command below to display all data in the employee table:
SELECT * FROM employee;
Display all the data
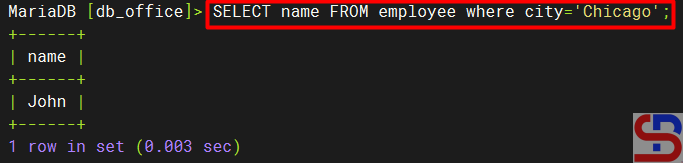
Or, if you want to display the name of the user who lives in the city of Chicago then use the command below:
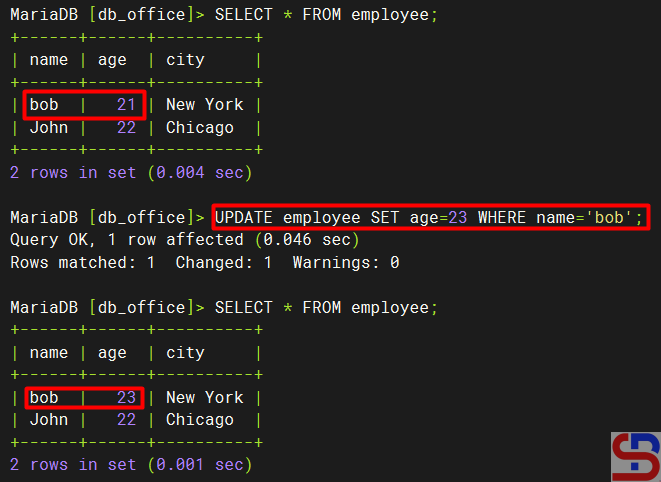
You can see the options for this command on this page. For example, if you want to update the age of the employee named Bob, use the command below:
UPDATE employee SET age=23 WHERE name='bob';
Update data
12. Delete Data
Use the format below to delete one or more rows of a table:
DELETE FROMtable_nameWHERE column=value;
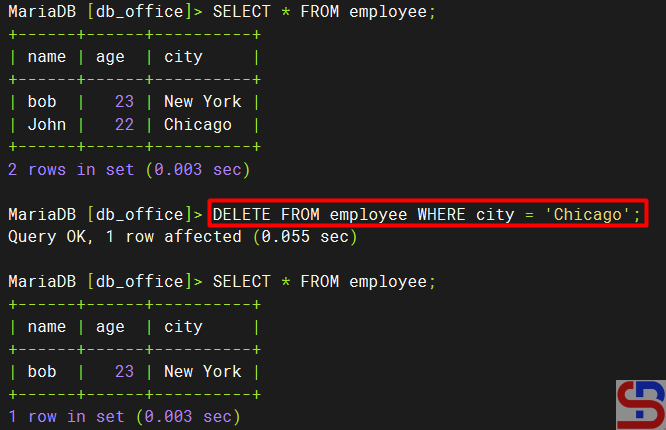
You can see the options for this command on this page. For example, if you want to delete the data where the user is in Chicago, then use the command below:
DELETE FROM employee WHERE city='Chicago';
Delete the data
13. Delete the column
Use the format below to make changes in the table:
ALTER TABLEdb_nameDROP COLUMNcolumn_name;
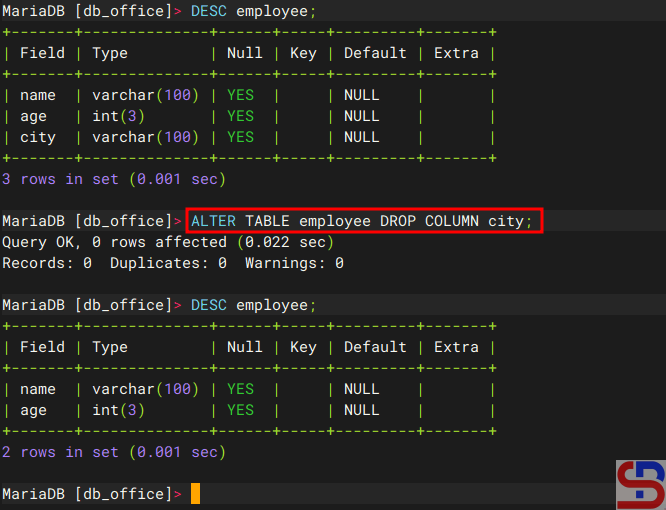
If you want to delete the column, for example, city, you can use the following command:
ALTER TABLE employee DROP COLUMN city;
Delete the column
14. Empty the table
You can delete all data in a table with the format as below:
TRUNCATEtable_name;
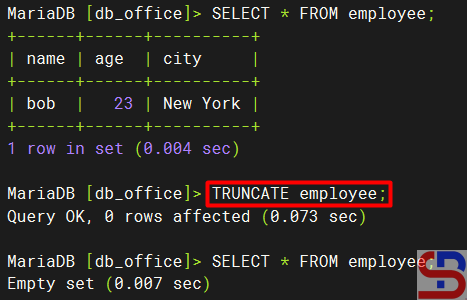
You can see the options for this command on this page. For example, if you want to delete all the data in the employee table, then type the command below:
TRUNCATE employee;
Truncate the table
15. Change a table name
You can change the name of the table using the format below:
RENAME TABLEold_table_nameTO new_table_name;
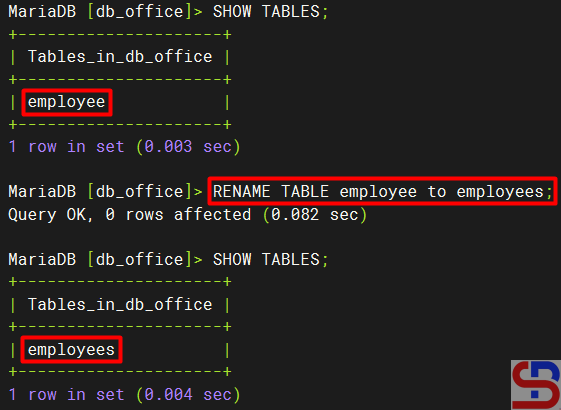
You can see the options for this command on this page. Use the command below if, for example, you want to change the name of the employee table to employees:
RENAME TABLE employee to employees;
Rename the table
16. Delete a table
Use the format below to delete a table:
DROP TABLEtable_name;
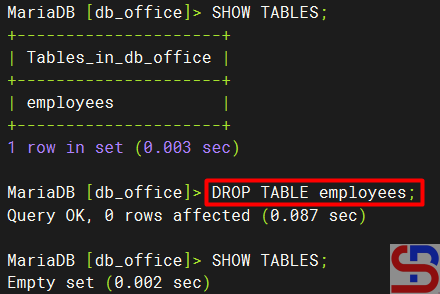
You can see the options for this command on this page. For example, if you want to delete the employee table, then use the command below:
DROP TABLE employees;
Delete the table
17. Delete a database
To delete a database, use the format below:
DROP DATABASEdatabase_name;
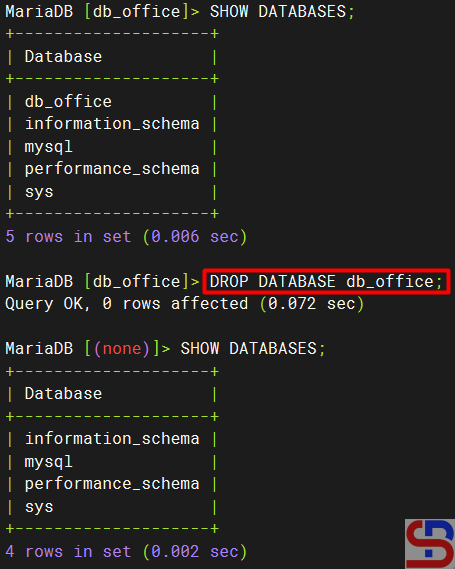
You can see the options for this command on this page. For example, if you want to delete the db_office database, then type the command below:
DROP DATABASE db_office;
Delete the database
18. Quit from the database
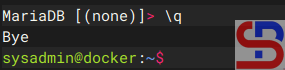
To quit from the database, run the command below:
\q
Quit from the database
Note
The next article will explain how to access a database using a user.
How to Install the Latest Version of MariaDB on the Linux Server?
written by sysadmin | 17 September 2025
MariaDB is one of the widely used open-source database applications that was first released in 2009. This database was named MySQL, but in 2008, Sun Microsystems acquired MySQL, so the MySQL database maker made MariaDB as a free version. But sometimes when you install MariaDB on your Linux server, your MariaDB version is not the latest version.
Problem
How to install the latest version of MariaDB on the Linux server?
Solution
As of this writing, the latest MariaDB version is 11.7.2. Use the command below to create a MariaDB repository on your Linux server:
After MariaDB has been installed on your Linux server, use the command below to see the MariaDB version that you have installed:
mysql -V
Checking the MariaDB version
After that, use the command below to see the status of MariaDB:
systemctl status mariadb
Display the status of service
You can see the image above that MariaDB’s service is on. However, if MariaDB’s service is still not on, use the command below to turn on the MariaDB service:
systemctl start mariadb
To run MariaDB after turning on the server, use the command below:
systemctl enable mariadb
Enable MariaDB
After that, to MariaDB becomes safe, use one of the commands below:
sudo mariadb_secure_installation
OR
sudo mariadb-secure-installation
Then there will be a display as in the image below:
Running the command
By default, there is no password when accessing MariaDB so press the Enter button to continue the process. After that, you must answer the questions displayed, including creating a new password as shown below:
Write the password
Then, continue until the process is finished. The next article will explain how to manage a database and its table(s) in MariaDB.
Note
Use the command below if you want to see the option when you run the command to make a repo: