How to Create a Virtual Machine in GCP?

Many people use cloud technology provided by cloud providers such as AWS, GCP, and Azure to support their business operations. One of the features of this technology is the use of a virtual machine, or VM.


Problem

How to create a virtual machine in GCP?


Solution

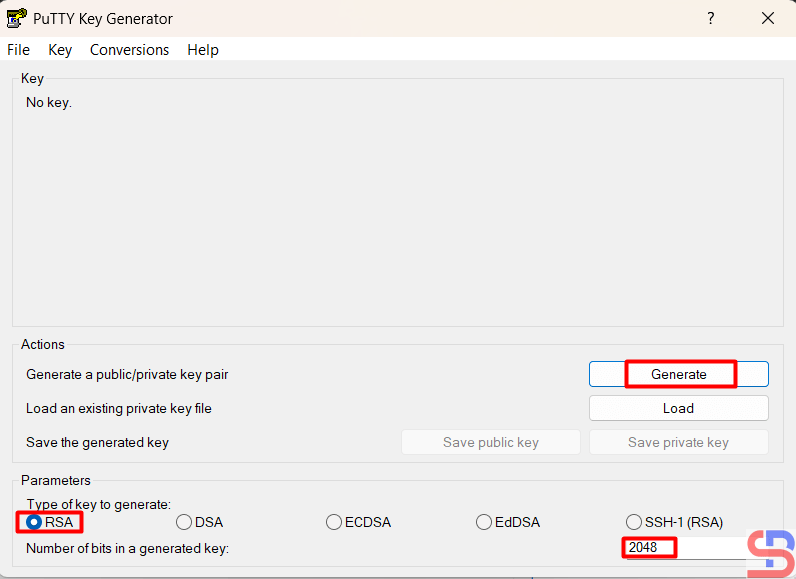
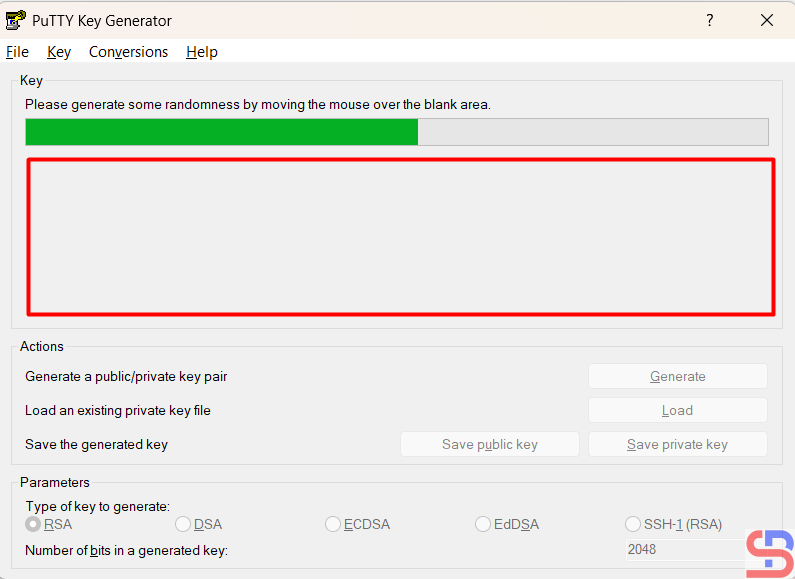
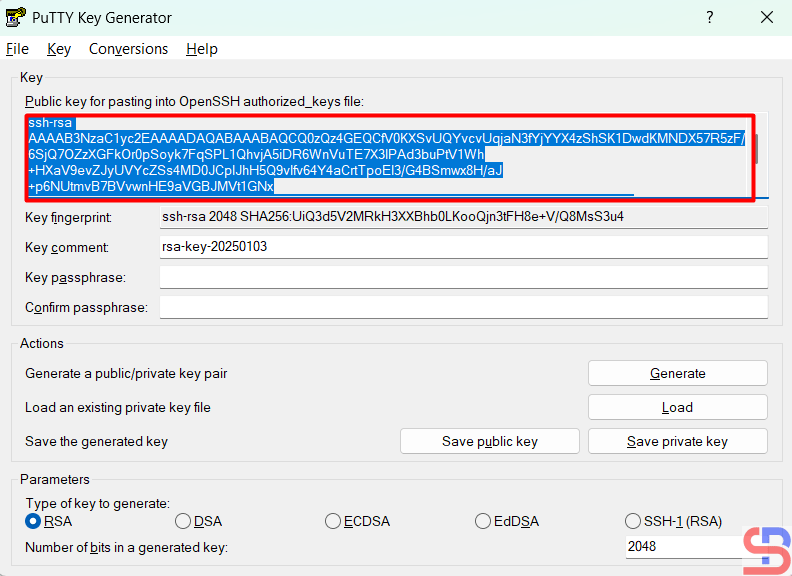
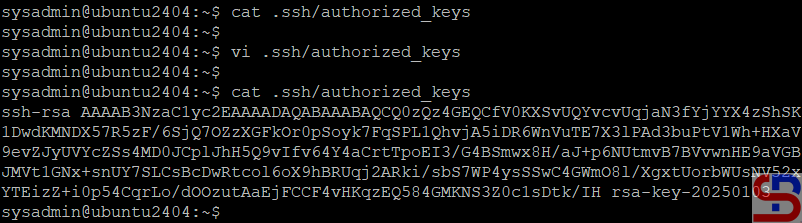
There are several ways to create a virtual machine or a VM in GCP, but this article will explain how to create a virtual machine in the GCP console. In the GCP Console, at the top left corner, click the Navigation menu, which is symbolized by three lines as in the image below:

Click the icon


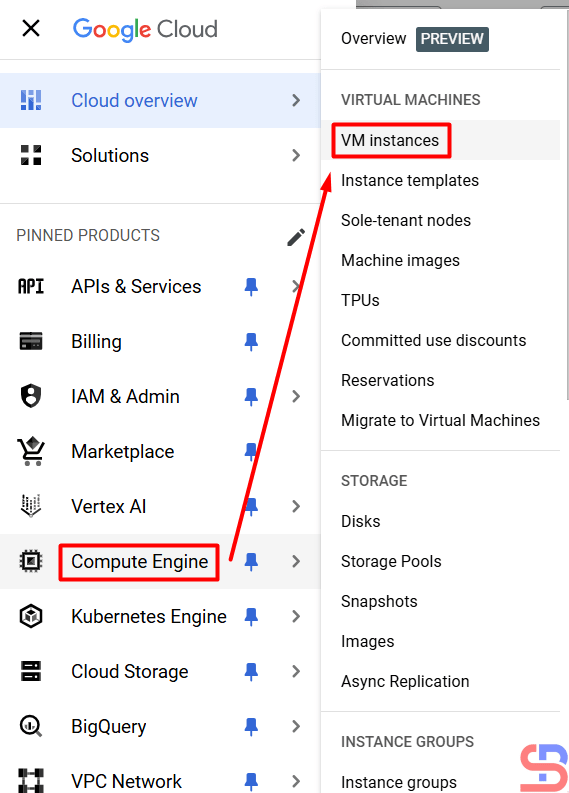
Then click Compute Engine > VM Instances as in the image below:

Click the VM instance


After that, click the CREATE INSTANCE button, then a display will appear as below:

Click the button


You will see a display like the image below:

Fill in the columns in the machine configuration section


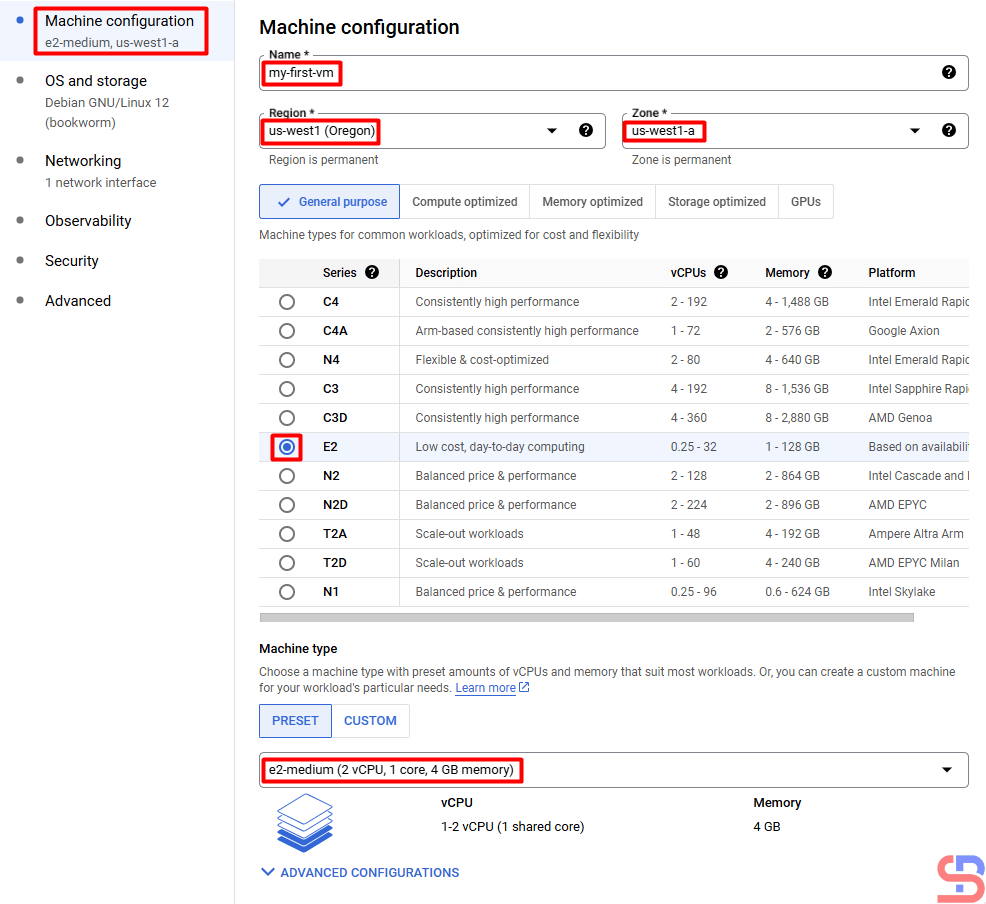
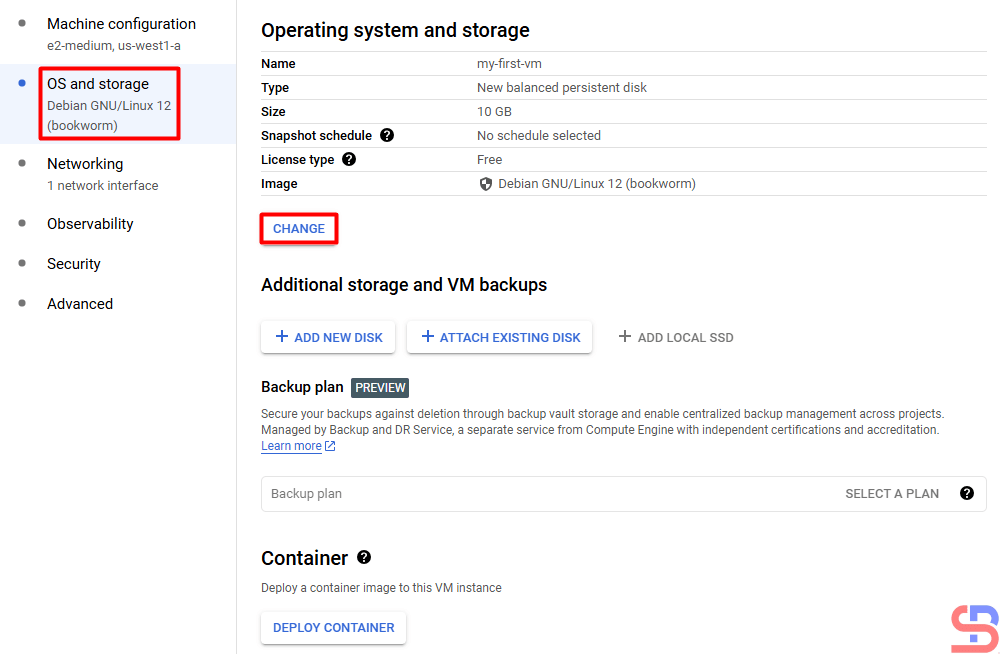
In the Machine Configuration section, you have to write the name of the VM, the location of the VM, the CPU, the RAM, and the type of machine that will be used in your VM. I wrote down my VM requirements as in the picture above. After filling in this section, click the OS and storage section. Here you can choose the OS you use and how many hard disk sizes you want in the VM using the CHANGE button:

Fill in the OS and storage section


After that, in the Networking section, you have to fill in the network requirements for the VM. I filled it in as shown in the image below. I don’t fill in the Observability, Security, and Advanced sections because I don’t need them for my virtual machine.

Fill in the Networking section


After that, I press the CREATE button and wait until the virtual machine creation process completes:

The new VM has been created


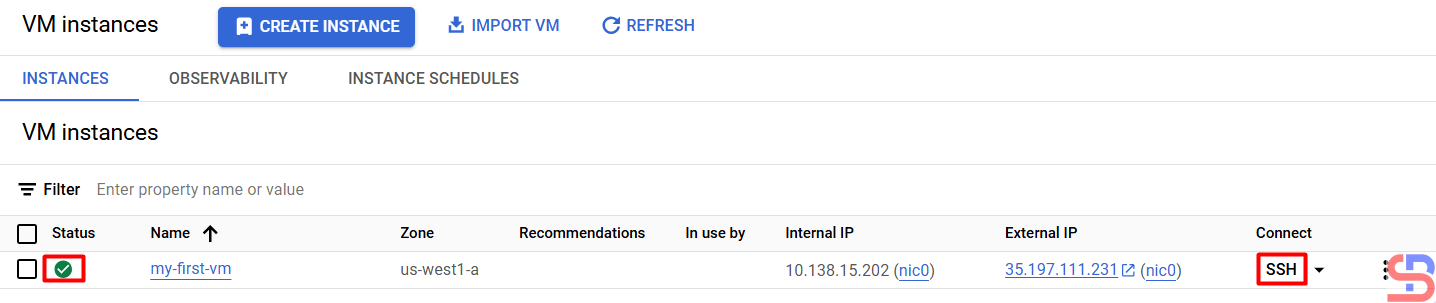
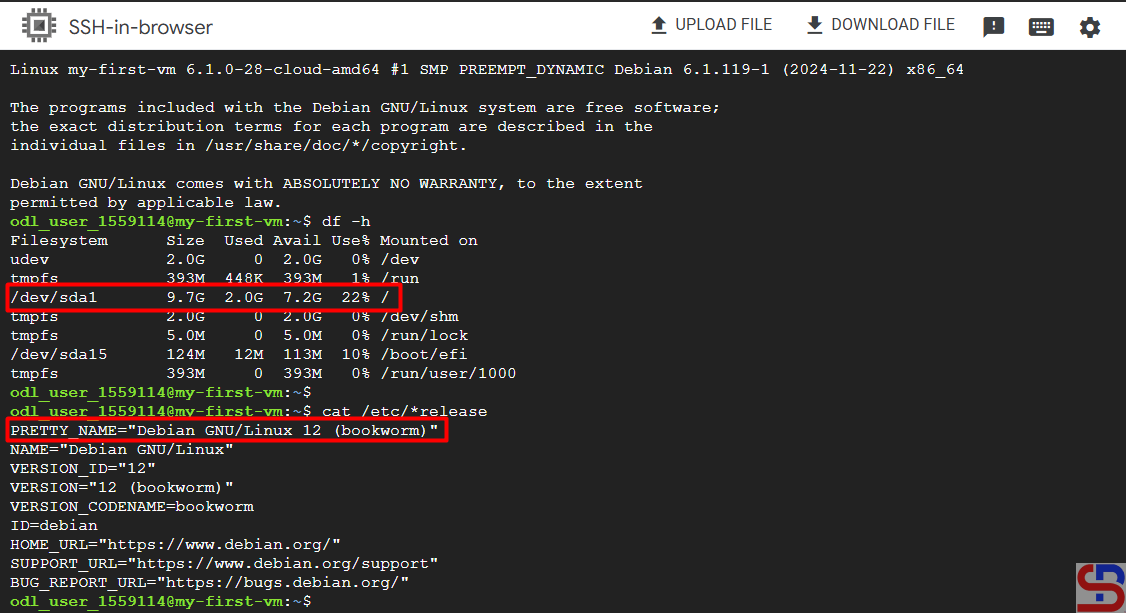
If you want to access your VM, then press the SSH button, and you can see the OS and HDD size on your VM in the image below:

Access to the VM using the SSH button

Note

At first glance, it seems easy to create a virtual machine in GCP. However, if you work in real conditions, there will be many options that must be filled in when creating your virtual machine.


References

diana-moraa.medium.com
techrepublic.com


How to Set Up Passwordless SSH in Putty?

The previous article explained how to create a passwordless SSH login.  However, the article is useful if a sysadmin accesses a Linux server through another Linux server. In general, many sysadmins use PuTTY to access their Linux servers.


Problem

How to set up passwordless SSH in Putty?


Solution

Putty is a tool created by Simon Tatham to access a device using SSH, Telnet, rlogin, and serial protocols. As of January 2025, the stable version of PuTTY is 0.82. You can visit this page to see the latest version and download PuTTY.  Just like accessing a Linux server via SSH from another server, if you access a Linux server using PuTTY, you will be asked to enter a username and password, as in the image below:

Access to the Linux server using PuTTY


To set up passwordless SSH in Putty, download the Puttygen application here to create your private/public keypair. After that, run the Puttygen application and you can choose the key according to your wishes, but in this article, we use an RSA key with 2048 bits.

Choose the RSA key and click the Generate button


Press the Generate button and move your mouse randomly in the blank area of ​​this application until the key is generated. Please see the image below for more details:

Move your mouse randomly on the blank area


After that, press the save public key and save private key buttons to save the two keys on your computer. Press the Yes button if you are asked a question when you click the Save Private Key button. On your computer, there should be 2 keys as in the image below:

Two key files from puttygen


Then copy the public key by opening the public key file or copying it directly from Puttygen, as in the image below:

Copy the public key


After that, go to the remote server, open the .ssh/authorized_keys file, and enter the public key from Puttygen into that file:

Put the public key into the remote server


After that, try the remote server to test the SSH Passwordless login. Open Putty, then go to the Session and enter the IP of the remote server in the HostName section. After that, go to the Connection > Auth > Credentials > Browse section in the Private key file for the authentication section as in the image below:

Configure PuTTY to access the Linux server without a password


Press the Enter or Open button, and you should be able to access the server without having to enter a password as in the image below:

Steps to access the Linux server without a password using PuTTY

Note

To speed up access to the Linux server, you can also not write your username to Putty by configuring it in Connection > Data > Enter your username in the Auto-login username column, as in the image below:

Steps to not write your username in Putty


Press the Enter or Open button, and you should be able to access the server without having to enter the username and password, as in the image below:

Steps to access the Linux server without a username and password using Putty


References

en.wikipedia.org
portal.nutanix.com
help.dreamhost.com
tecmint.com
filecloud.com


How to Allow Access to the Linux Server Only Using SSH Key Authentication?

By default, the Linux server will ask to enter a username and a password if someone accesses the server via SSH. However, the previous article explained that you can access the Linux server using the passwordless SSH login method. Now I want my Linux servers to only allow access via SSH key authentication or SSH passwordless login.


Problem

How to allow access to the Linux server only using SSH key authentication?


Solution

You can make the security of your Linux server stronger by restricting access to the Linux server using SSH key authentication. It means the remote server can only being able to accessed the server for those who already use SSH passwordless login, so that if another user wants to access the server, it will be rejected. To allow access to the Linux server only using SSH key authentication, change the configuration in the /etc/ssh/sshd_config file by looking for the line containing PasswordAuthentication and setting it to no, as in the script below:

PasswordAuthentication no


After that, restart the SSH service using the command below:

Ubuntu/Debian

systemctl restart ssh


RockyLinux/AlmaLinux/CentOS

systemctl restart sshd


You should not be able to access the server when you try to connect to it using SSH. This means your SSH configuration is correct. Below is an example of an error that occurs when accessing via Putty:

allow access to the Linux server only using SSH key authentication
Can not access the server from Putty


For example, in the previous article, the sysadmin user on the Ubuntu server could access the RockyLinux server because he had used SSH Passwordless Login as in the image below:

Can access the server from the Ubuntu server


I can not access the RockyLinux server if I access it via the OpenSUSE server, as in the image:

Can not access the server from the OpenSUSE server


If you want to add another user to be able to access the server, you have to copy the .ssh/id_rsa.pub file and put it into the remote server in the .ssh/authorized_keys file. You can use the help of a user who can access the server to put the file. Look at the image below, where I have included the id_rsa.pub file for the sysadmin user on the OpenSUSE server on the RockyLinux server:

allow access to the Linux server only using SSH key authentication
Put the id_rsa.pub into the remote server


I tried to connect again to the RockyLinux server using the sysadmin user on the OpenSUSE server. I can access the server as shown in the image below:

allow access to the Linux server only using SSH key authentication
Can access the server from the OpenSUSE server

Note

Make sure the remote server already contains authorized_keys files from other servers so that it doesn’t make things difficult for you in the future.


References

strongdm.com
tecmint.com
linuxize.com


How to Set Up Passwordless SSH Login?

As a sysadmin, remote to a Linux server is a daily job to perform various checks on a Linux server. By default, if a sysadmin accesses a server, the sysadmin must enter a username and password. However, when the sysadmin has many servers, it is sometimes difficult for the sysadmin to enter the password for each server, especially if each server has a different password. Therefore, it needs to be made so that SSH does not need to enter a password when accessing a Linux server via SSH.


Problem

How to set up passwordless SSH Login?


Solution

There are 3 steps to setting up passwordless SSH:

1. Generate a key pair

Use ssh-keygen to generate a key pair consisting of a public key and a private key on the client computer:

ssh-keygen -t rsa


The -t rsa option specifies that the type of the key should be the RSA algorithm. Hit Enter to accept the default.

Running the ssh-keygen command

2. Upload the public key to the remote server

Use ssh-copy-id to propagate the public key to the server:

ssh-copy-id remote_username@remote_server_ip_address

For example, if you want to upload it to the server 192.168.56.2 with the username sysadmin, then use the command below:

ssh-copy-id sysadmin@192.168.56.2


Type yes when prompted and type the password for the remote server.

set up passwordless SSH
Running the ssh-copy-id command


For your information, the id_rsa.pub file will be saved in the .ssh/authorized_keys file on the remote server, like in the image below:

set up passwordless SSH
The authorized_keys file


3. Test login via SSH

Try to connect to the server using SSH, you should be able to directly access the server without entering the password first. For example, I have 2 Linux servers, each of which uses Ubuntu OS with IP 192.168.56.100 and RockyLinux OS with IP 192.168.56.2. I want to access the RockyLinux server from the Ubuntu server without entering a password. I ran the three steps above to set up passwordless SSH on an Ubuntu server, and the results are as in the image below:

set up passwordless SSH
Access the server without entering a username and password

From the image above, you can see that I can directly access the server without entering the server password.


Note

By default, the system will generate a 2048-bit key in the first step when you run the ssh-keygen command. However, if you want to be more secure, you can use 4096-bit encryption by using the command below:

ssh-keygen -t rsa -b 4096


Besides RSA, you can also use several other public key algorithms, such as ECDSA or ED25519. Elliptic Curve Digital Signature Algorithm, or ECDSA, is one of the more complex public key cryptography encryption algorithms that supports three key sizes: 256, 384, and 521 bits. You can use the command below when using ECDSA:

ssh-keygen -t ecdsa -b 521


Ed25519 is an elliptic curve signing algorithm using EdDSA and Curve25519, and this is a new algorithm added in OpenSSH. You can use the command below when using ed25519:

ssh-keygen -t ed25519

Unfortunately, support for this among clients is not yet universal. Therefore, its use in general-purpose applications may not be advisable.


References

strongdm.com
phoenixnap.com
ssh.com
encryptionconsulting.com
cryptography.io