I want to see the metric values of my MariaDB database.
Problem
How to display MariaDB database metric values?
Solution
As far as I know, there are 2 tools that you can use to display the values of metrics on your MariaDB database.
1. mariadb-report
This tool is built into MariaDB, so when you install the MariaDB database or mariadb-client on your server, this tool will automatically be installed on your server. In general, use the format below to run this command:
Enter the password, and the results will be entered into the /tmp/metric.txt file.
2. mysqlmonitor
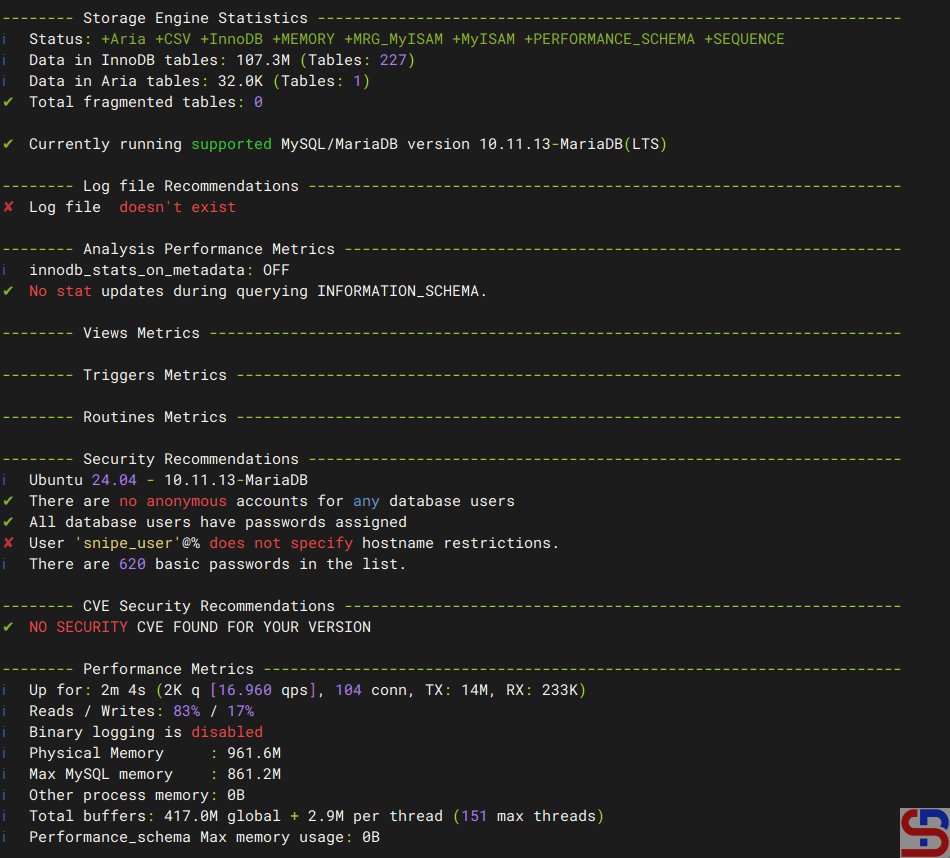
This is a simple bash script created to give system administrators and database administrators a fast summary of MySQL metrics. It presents essential metrics such as InnoDB buffer utilization, query efficiency, and system memory, accompanied by concise descriptions of each parameter. To run this script, you must create MariaDB credentials in the my.cnf file, because if not, there will be an error like the one below:
Error when running mysqlmonitor
Copy the script below and insert it into the my.cnf file:
[client]
user=username
password=your_password
To download and run the script, run the commands below:
From the image above, you can see that the results from the mysqlmonitor tool are more concise than the mariadb-report tool. To exit this tool, press the q key.
Note
If you want detailed metric results, then you can use the mariadb-report tool. However, if you want more concise metrics, you can use the mysqlmonitor tool.
The previous article explained the mysqltuner script to provide recommendations to increase MariaDB performance. This article will explain the primary-tuning script, which is an alternative or may also be an addition to providing recommendations for MariaDB.
Problem
How to install and run tuning-primer?
Solution
The primary-tuning script was created by Matthew Montgomery using a bash script to provide recommendations against a MySQL/MariaDB database. This script takes information from “SHOW STATUS LIKE…” and “SHOW VARIABLES LIKE…” to produce recommendations for tuning server variables. To download this script, use the command below:
Go to the primary-tuning folder and permit so that the script can be run:
chmod +x tuning-primary.sh
Then, run the command below to run the primary-tuning script:
./tuning-primer.sh
There will be a display like the image below:
Run tuning-primer script
Press Enter, then you have to enter your username and password so that this script can access your MariaDB database, as in the image below:
Enter username and password
Warning
This script writes the password clearly, so you have to be careful when using this script.
After that, the script will display recommendations as in the image below:
tuning-primer script result display
Note
Because this script was created in 2018 and there has been no update, there are several errors that occur where on lines 1482 and 1483 (see first image) in the netstat command where at this time (November 2025), the netstat command has been changed to ss and also the password is written as plain text which is very dangerous if known by the unauthorized user.
If you have a MariaDB database, then you definitely want the performance of the database to improve. Therefore, you should have done several configurations to achieve your goals. There is a script called mysqltuner that you can use to improve the performance of your MariaDB database by providing recommendations.
Problem
How to install and run mysqltuner?
Solution
mysqltuner is a Perl script designed to quickly assess a MySQL setup and implement changes to enhance performance and stability. It supports ~300 indicators for MySQL/MariaDB/Percona Server in this latest version and is actively maintained, supporting many configurations such as Galera Cluster, TokuDB, Performance schema, Linux OS metrics, InnoDB, MyISAM, Aria, and so on. To download it, you can run the command:
To run this script, you must have Perl installed on your server. So, to run this script, you can use the command (if you download mysqltuner using git, you have to go to the MySQLTuner-perl folder):
perl mysqltuner.pl
Or you permit this script to be executed by using the command:
chmod +x mysqltuner.pl
./mysqltuner.pl
After you run the command, there will be a display as below:
Enetr username and password
Enter the username and password, and if there is no error, mysqltuner displays your MariaDB state as shown in the image below:
mysqltuner view
And at the end, mysqltuner will recommend that your MariaDB improve its performance:
Recommendations on mysqltuner
Note
If you want to run mysqltuner with the verbose option, use the command below:
perl mysqltuner.pl --verbose
If you want to display Maximum Output Information around MySQL, like display database(s) and table(s) on mysqltuner, use the command below:
By default, MariaDB uses port 3306. I want to change the default port to another port for security reasons.
Problem
How to change MariaDB port?
Solution
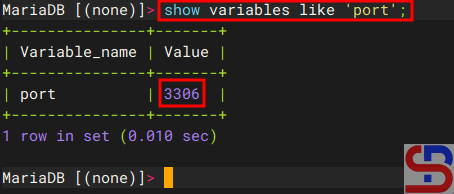
To see the default MariaDB port, you can use the command below:
sudo ss -ptuln | grep mariadb
Display the MariaDB port via netstat
Or you run the query below:
show variables like 'port';
Display the MariaDB port via query
From the images above, you can see MariaDB is using port 3306. If you want to change the port from 3306 to 4306, for example, then in the file /etc/mysql/mariadb.conf.d/50-server.cnf if you are using Ubuntu, add the item below:
port = 4306
Warning
If you’re using a distro other than Ubuntu/Debian, you can search for the file by using the command:
sudo find / -type f -name "*server.cnf"
Then restart mariadb using the command:
sudo systemctl restart mariadb
After that, you can check the MariaDB port by using one of the commands above, and the MariaDB port should have changed according to the port you want, as shown in the image below:
Display the MariaDB port via netstat after changing the port
Note
If you have changed the default port of MariaDB from 3306 to 4306, for example, then you don’t need to write the port in the Linux command to access MariaDB if you access from localhost:
Access to MariaDB after changing the port from localhost
But, if you access MariaDB from another host, you have to write the option for the port, like in the picture below:
Access to MariaDB after changing the port on another host
How to Access a MariaDB Database From Another Host?
written by sysadmin | 24 December 2025
The previous article already explained how to access a MariaDB database from localhost. This article will explain how to access the MariaDB database from another host.
Problem
How to access a MariaDB database from another host?
Solution
To access the MariaDB database, you can follow the format below:
mariadb -hyour_server_ip-uusername-Pport_number-p
By default, the MariaDB database uses port 3306, so if your MariaDB database uses port 3306, then there is no need to write the port when executing the command to access the MariaDB database. I have a MariaDB database server with an IP of 192.168.56.101 and an Ubuntu server with an IP of 192.168.56.11. I want to access the MariaDB database via the Ubuntu server using the user john and run the command:
mariadb -h 192.168.56.101 -u john -p
But I got an error like below:
ERROR 2002 (HY000): Can’t connect to server on ‘192.168.56.101’ (115)
Error when accessing the MariaDB from another host
Below are the steps to access the MariaDB database:
1. Open the port
Open port 3306 on both servers. If you use RockyLinux/AlmaLinux/RHEL for your servers, use the command below:
But if you use Ubuntu/Debian for your server, type the command below:
sudo ufw allow 3306
2. Check the MariaDB version
You should know that to access the MariaDB database, you need a mariadb-client package whose version is the same as the MariaDB database version. If the mariadb-client version is different from the mariadb database version, then there will usually be an error. To install the mariadb-client package, you can go to this page.
3. Grant access
On the database server, run a query with the format below:
For example, if user john wants to access the entire MariaDB database from the host with IP 192.168.56.11, then use the query below:
GRANT ALL ON *.* TO john@"192.168.56.11" IDENTIFIED BY "123456";
Grant access for user john
Warning
If you want user john to be able to access only the Zabbix database, use the query below:
GRANT ALL ON zabbix.* TO john@"192.168.56.101" IDENTIFIED BY "qwerty";
And use the query below if you want user john to be able to view only the Zabbix database:
GRANT SELECT ON zabbix.* TO john@"192.168.56.101" IDENTIFIED BY "qwerty";
4. Configure the file
Go to the file /etc/mysql/mariadb.conf.d/50-server.cnf and change the bind-address item to be as below:
bind-address = 0.0.0.0
Warning
You can also change the bind-address item in the /etc/mysql/my.cnf file by adding the following script to the file:
[mysqld]
bind-address = 0.0.0.0
5. Restart MariaDB
After that, restart the MariaDB service using the command below:
sudo systemctl restart mariadb
Then, try to access it again, and you should be able to access the database like in the picture below:
Succeed to access MariaDB from another host
Note
If you want your MariaDB database to only be accessed from a certain IP, for example, IP 192.168.56.11, then use the command below if your distro uses Ubuntu/Debian:
sudo ufw allow from 192.168.56.11 to any port 3306
But, if you use RockyLinux/AlmaLinux/RHEL, type the below command to open port 3306 only from IP 192.168.56.11
If you want to access MariaDB databases from other hosts, then your device must have a mariadb-client package.
Problem
How to install the mariadb-client in Linux?
Solution
Below is the command to install mariadb-client on some Linux distros:
Ubuntu/Debian
sudo apt update
sudo apt install mariadb-client
RockyLinux/AlmaLinux/RHEL
sudo yum install mariadb-client-*
Use the command below to see the version of mariadb-client after you installed the package:
mariadb --version
Checking MariaDB version
As you can see in the image above, the version of mariadb-client that you installed is version 10.11.3. But you should know that, usually by default, the package provided by the distro is a stable old version and not the latest stable version. Therefore, if you want the mariadb-client package to use the latest stable version, use the command below:
After that, reinstall the package using the command above (sudo apt install mariadb-client or sudo yum install mariadb-client-*), and your MariaDB version should be the latest.
Note
If you want to know how to access the MariaDB database from another host, you can go to this article.
As a sysadmin, you need a tool to monitor the MariaDB database, and one of the tools you can use is mytop.
Problem
How to install mytop?
Solution
Mytop is an open-source utilitydeveloped by Jeremy Zawodny with Perl for real-time monitoring of MySQL/MariaDB databases. To install this tool, use the commands below:
wget https://jeremy.zawodny.com/mysql/mytop/mytop-1.6.tar.gz
tar -zxvf mytop-1.6.tar.gz
cd mytop-1.6/
perl Makefile.PL
make
make test
sudo make install
To run this tool, use the format below:
mytop --prompt -ddb_name
For example, if you want to monitor the Zabbix database, then use the command below:
mytop --prompt -d zabbix
Warning
But, if you want to use another user, you have to use the command below:
mytop --prompt -u zabbix_user -d zabbix
By default, Mytop uses the root user to enter the database, then enter the password from the root user, and you should see a display like the one below:
View of mytop application
You see from the image above, it looks like the top command in Linux. The following is a brief explanation of what the image above looks like:
The first line shows the version of the MariaDB Database and the uptime of the server.
The second line shows the number of queries that have been processed on the server (Queries), the average number of queries per second (qps), the number of slow queries (Slow), and the percentage of Select, Insert, Update, and Delete queries (Se/In/Up/De(%)).
The third lineshows the current value since the last mytop refresh, which defaults to 5 seconds. The first field is the number of queries per second. The second value is the number of slow queries per second. The threads segment indicates there are a total of 32 connected threads, 1 is active (the others are sleeping), and there are 0 threads in the thread cache. The last field in the third line shows the query percentages, like in the previous line, but since last mytop refresh.
The fourth line shows crucial buffer efficiency (the frequency of key reads from the buffer instead of the disk) and the total number of bytes that MySQL has both sent and received, including data from the last mytop cycle. Key Efficiency: 100.0% indicates that all keys are read from the buffer, not from the disk. Bps in/out: 0.1/5.4 shows that since startup, MySQL has averaged 0.1kbps of inbound traffic and 5.4kbps for outbound traffic. Now in/out shows the traffic again, but since last mytop refresh.
The next line up to the last line shows a list of current MySQL threads, sorted according to their idle time (least idle first).
If you want to see more details about a query, then you can press the f button, and you will see a display like the one below:
Type the f button to get more details
Select the ID number for which you want to display the query in detail, for example, number 65, then type number 65 and press the Enter button, and then there will be a display like the one below:
Display the query in more detail
If you want to see an explanation of a query, then type the e button as in the image below, then there will be a display like the one below:
Type the ID number to explain the query
Type the ID number you want to explain, and after that, press the Enter key. If you want to see the command view, press the c button, then there will be a display like below:
Display the command view
The Command column displays the type of command or query that was executed, and the following is a brief explanation:
– The Total column represents the overall count of that type of command executed since the server began.
– The Last column indicates how many of that command type were executed since the last mytop refresh
– The Pct column indicates the equivalent percentage.
If you want to exit the mytop application, press the q button. If you want to enter the mytop application without having to type a password, you can create a .mytop file. Type the command:
vi ~/.mytop
After that, copy the script below, assuming the Zabbix database that you want to monitor uses the mytop application:
After that, type the mytop command, and the mytop application should immediately display the mytop application without you having to write arguments and passwords, as in the image below:
Run the mytop tool without arguments and a password
You should only make a user a viewer if you are afraid that others will see your database password.
Note
Regrettably, this application is no longer under development, and the final version available is 1.6 from 2007. Nonetheless, after I use this tool in November 2025, it remains effective for monitoring MySQL/MariaDB databases.