How to Print All columns From the nth to the Last?
written by sysadmin | 4 August 2025
I often see a log where I want to print sequential columns in the log for a purpose.
Problem
How to print all columns from the nth to the last?
Solution
For example, you have a test.txt file that contains the following:
No  Name        Address
1   Richard     Apt. 344 86094 Swaniawski Drive, East Suzetteshire, MT 51323-2013
2   Alex        4522 Rosenbaum Island, Lake Suzan, IL 68193
3   Bryan       Apt. 907 703 Douglas Run, West Brainburgh, MT 70080-8990
Display the log
Usually, to display the complete Address column, I will run the command below:
However, I think this method is less effective because if the address is more than 12 columns, then I have to write more than 12 items, and it is very tiring. After searching on the internet, there are 2 methods you can use:
1. Using the awk command
From the test.txt file, you just want to print the entire column except columns 1 and 2, then you can use the command below:
awk '{$1=$2=""; print $0}' test.txt
The result will be as shown in the image below:
Using the awk command
2. Using the cut command
In addition to using awk, you can also use the cut command to display the same by using the command below:
cut -d' ' -f3- test.txt
And the result will be as shown in the image below when you run the command above:
Using the cut command
Warning
Replace the variable -f3- with what column you will start printing. If you start printing from column 7, then change the command above to the following:
cut -d" " -f7- test.txt
Note
There are still several methods to print columns that run from the nth to the last column, but I think those two methods will suffice.
How to Display Linux Applications Using the Most CPU and Memory With a Bash Script?
written by sysadmin | 4 August 2025
I have some Linux servers used to run some of the necessary applications in the office. But occasionally, I can’t reach certain servers due to issues, and I saw in the monitoring tool that the CPU or RAM on the server had increased significantly, resulting in the server having to be forcibly shut down and restarted. I tried to find out what applications caused the CPU or RAM to go up, but unfortunately, the monitoring application I used only showed the value of the CPU or RAM, but did not feature applications that used the CPU or RAM the most.
Problem
How to display Linux applications using the most CPU and memory with a bash script?
Solution
The ps command displays information about a selection of the active processes, so that by using the command, you can see which applications are using the most CPU and memory. Let’s say you want to display the 50 most CPU-intensive applications on Linux, then use the command below:
ps -eo pid,%cpu,args --sort=-%cpu | head -n 10
And use the command below to display the 10 applications that use the most memory on Linux:
ps -eo pid,%mem,args --sort=-%mem | head -n 10
Based on the two commands above, you can create a bash script to see which applications are using the most CPU and RAM on Linux servers. Create a mon_cpu_ram.sh file and copy the bash script below into the file:
#!/bin/bash

# Get 50 application that take biggest cpu
ps -eo pid,%cpu,args --sort=-%cpu | head -n 50 > get_50_app_cpu.txt

# total cpu
awk 'NR > 1 {mem[$3" "$4" "$5" "$6" "$7" "$8" "$9" "$10" "$11" "$12" "$13" "$14" "$15" "$16" "$17] += $2} END {for (cmd in mem) printf "%.1f\t%s\n", mem[cmd], cmd}' get_50_app_cpu.txt | sort -nr | head -n 5 > total_cpu.txt

# Display date and uptime
date +"%Y-%m-%d %H:%M:%S" >> cpu_history.txt
uptime=`uptime -p`
echo "Uptime: $uptime" >> app_cpu_mem.txt

# get 3 apps that takeing biggest CPU
head -n3 total_cpu.txt >> cpu_history.txt
echo >> cpu_history.txt

# send the output of biggest CPU
date +"%Y-%m-%d %H:%M:%S" >> app_cpu_mem.txt
echo "Big CPU" >> app_cpu_mem.txt
head -n3 total_cpu.txt >> app_cpu_mem.txt


# Get 50 application that take biggest memory
ps -eo pid,%mem,args --sort=-%mem | head -n 50 > get_50_app_mem.txt

# total memory
awk 'NR > 1 {mem[$3" "$4" "$5" "$6" "$7" "$8" "$9" "$10" "$11" "$12" "$13" "$14" "$15" "$16" "$17] += $2} END {for (cmd in mem) printf "%.1f\t%s\n", mem[cmd], cmd}' get_50_app_mem.txt | sort -nr | head -n 5 > total_mem.txt

# get 3 apps that taking biggest memory
date +"%Y-%m-%d %H:%M:%S" >> mem_history.txt
head -n3 total_mem.txt >> mem_history.txt
echo >> mem_history.txt

# send the output of biggest Memory
echo "Big Memory" >> app_cpu_mem.txt
head -n3 total_mem.txt >> app_cpu_mem.txt

echo >> app_cpu_mem.txt
After that, permit the file and run it using the command below:
chmod +x mon_cpu_ram.sh
./mon_cpu_ram.sh
If you run the bash script, it will produce 3 files:
cpu_history.txt => Display the history of the CPU only
mem_history.txt => Display the histoy of the memory history
app_cpu_mem.txt => Displays the CPU and Memory history simultaneously
Run the bash script
If you want the file to run every 5 minutes, enter the file in the crontab by copying the script below into the crontab:
*/5 * * * * cd /home/sysadmin/;. /mon_cpu_ram.sh
Note
I think this script is useful for sysadmins, especially me, to identify any applications that use the most CPU and RAM in Linux, so you can limit CPU or RAM to these applications.
I have a file containing many IPs that I want to ping the rest of the IPs.
Problem
How to read a file line by line on Linux?
Solution
I have an ip.txt file that contains IP addresses, and in this article, I will only limit it to 3 IP addresses:
192.168.56.2 192.168.56.12 192.168.56.100
To read a file line by line on Linux, you can use the format below:
catyour_file | while read linedothe-commands-that-you-want-to-run ....... .......done
In this case, the format above has changed as below to ping each IP in the file:
cat ip.txt | while read line
do
	ping -c 3 $line
	echo
done
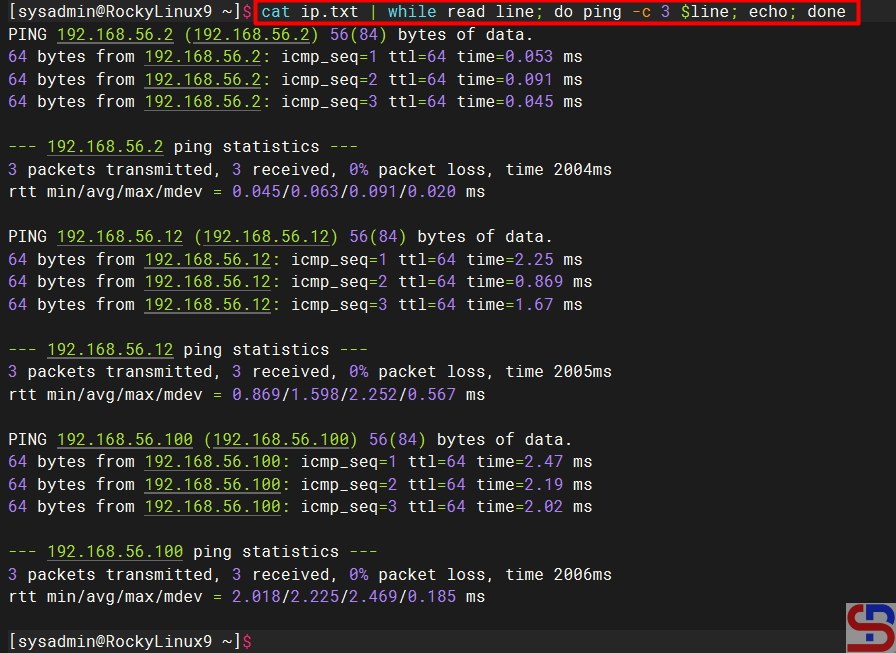
The command above means to run the ping command 3x on each IP in the ip.txt file by separating one line for each IP. If we run the command, it will look like the image below:
Ping the IPs from the file
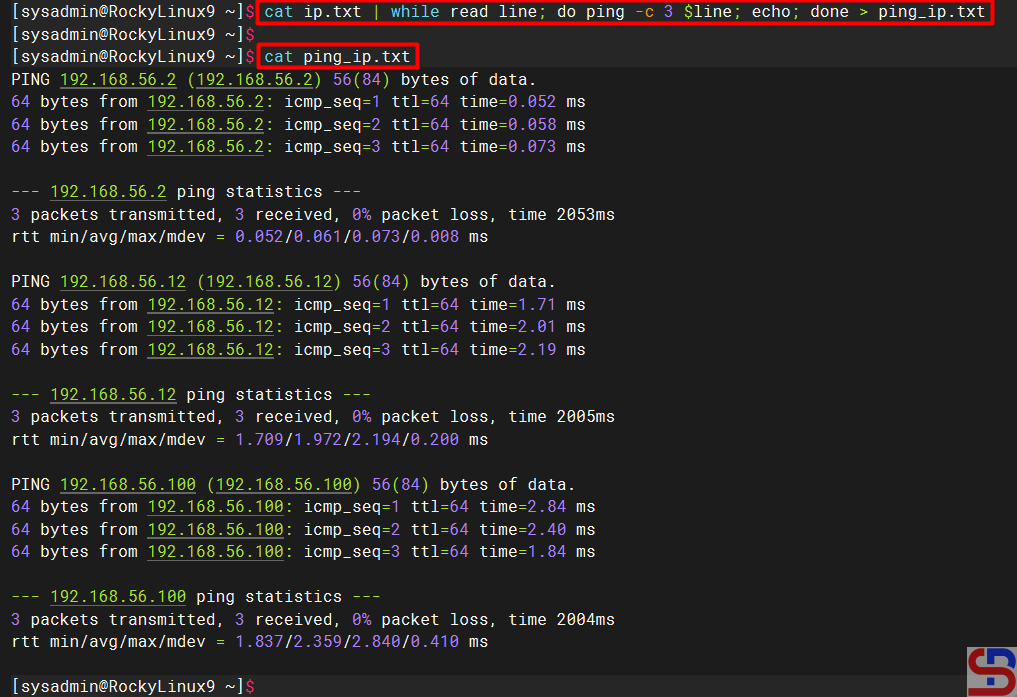
Change the script above to be as below if you want to enter the results of each ping IP into one file:
cat ip.txt | while read line
do
    ping -c 3 $line
    echo
done > ping_ip.txt
Look at the picture below:
Ping IP results are saved in one file
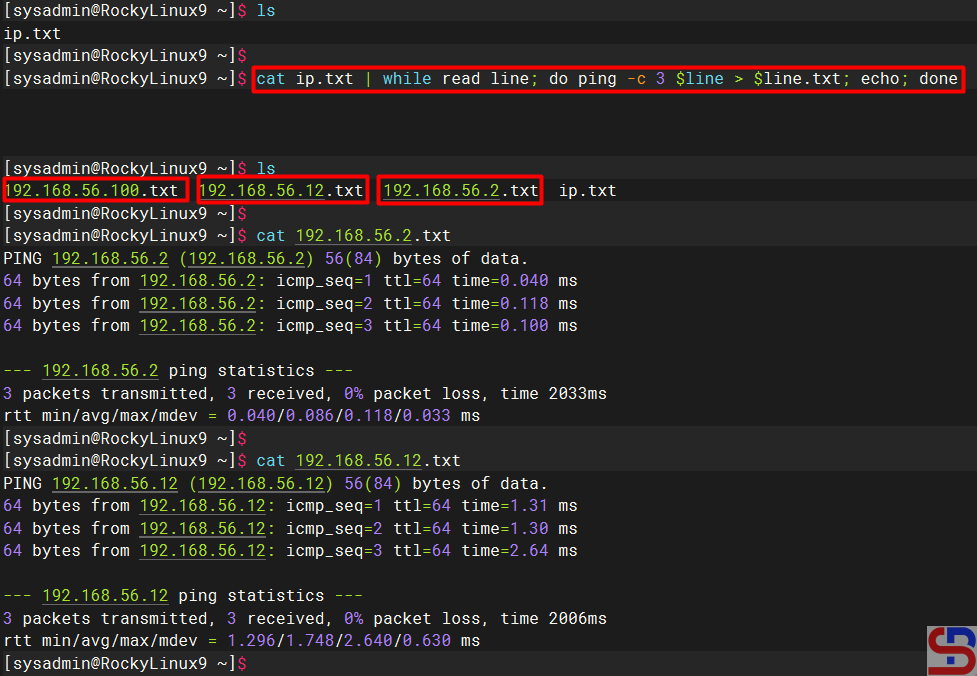
But if you want to enter the results of each ping IP into several files based on the IP, change the script above to be as below:
cat ip.txt | while read line
do
    ping -c 3 $line
    echo
done > ping_ip.txt
There should be new files after you run the script above, and each file will contain the results of the ping IP as in the image below:
Ping IP results are saved in each file
Note
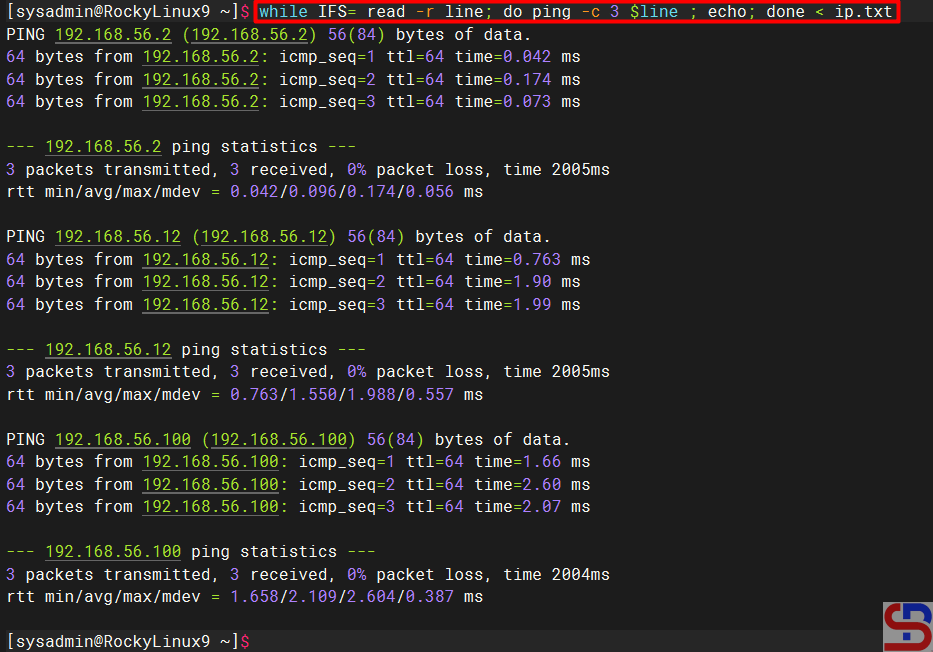
In addition to using the script above, you can use the script below to read line by line in a Linux file:
while IFS= read -r line; do ping -c 3 $line ; echo; done < ip.txt
How to Get The Value Between Two Special Characters on Linux?
written by sysadmin | 4 August 2025
I need to get a value between 2 special characters I use for my other purposes in the log file on the Linux server.
Problem
How to get the value between two special characters on Linux?
Solution
Special characters are the punctuation characters on your keyboard, such as !, @, #, and so on. After I searched on the internet, there were 2 solutions to get the value between these two special characters: using the grep command or using the cut command.
1. Using the grep command
To get the value between two special characters using the grep command, use the following format:
For example, if the special character is pound or #, then the format above changes to:
cut -d "#" -f2 | cut -d "#" -f1
Type the command below to get the value between the pounds:
echo "#test#" | cut -d "#" -f2 | cut -d "#" -f1
Look at the example in the image below:
Using the cut command
Note
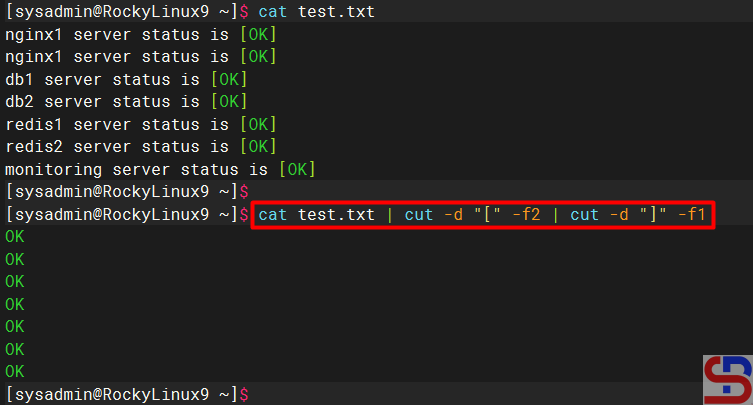
If you have a log file in Linux, for example, the content of the file is as image below:
nginx1 server status is [OK] nginx1 server status is [OK] db1 server status is [OK] db2 server status is [OK] redis1 server status is [OK] redis2 server status is [OK] monitoring server status is [OK]
You can use one of the commands above to get the value between 2 special characters, and I use the cut command as in the command below:
How to Make a Tool Like Molly-Guard Using a Bash Script?
written by sysadmin | 4 August 2025
The previous article explained how the Molly-Guard tool can protect Linux servers from accidental reboot or shutdown commands. Unfortunately, this tool is only available on Debian/Ubuntu distros and their derivatives, while sysadmins generally have many Linux servers from various distros.
Problem
How to make a tool like Molly-Guard using a bash script?
Solution
To create a tool like Molly-Guard, you can use a bash script, and this script has been tested on Ubuntu Server 24.04, RockyLinux9, and OpenSUSE 15 distros. And this script should be applied throughout the Linux distro to replace the Molly Guard tool. Here are the steps:
1. Check the paths
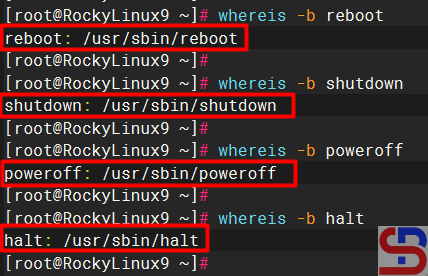
First, check where the reboot, shutdown, poweroff, and halt commands are located on the Linux server by running the command below:
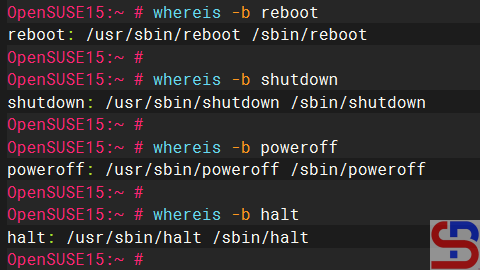
As far as I know, Linux distributions such as RockyLinux and Ubuntu only provide one binary file for each command for the reboot, shutdown, poweroff, or halt command, usually in the folder /usr /sbin. However, on certain distros, for example, the OpenSUSE distro, when you run the command above, the result will be as shown in the image below:
Check the paths in OpenSUSE
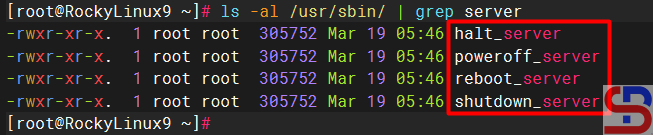
From the image above, you can see that 2 files represent each of these commands. Because this article uses the commands in the /usr/sbin folder, you can rename the commands in the /sbin folder using the commands below:
Copy the bash script below into the /usr/local/bin/ folder and give it a molly-guard-costume.sh name:
#!/usr/bin/env bash

# molly-guard-custome.sh: Prevent accidental reboot or shutdown like molly-guard tool

##########################################################################################
# The functions

check_hostname_reboot() {
# Compare the user input with the actual hostname
if [ "$USER_INPUT" == "$ACTUAL_HOSTNAME" ]; then
        echo "Hostname confirmed."
        echo
        sleep 1
        echo "Proceeding with the command..."
        echo
        sleep 1
        echo "The system will reboot now!"
        echo
        sleep 1
        /usr/sbin/reboot_server
else
        echo "Hostname mismatch. Aborting the reboot operation."
        exit 1
fi
}

check_hostname_halt() {
# Compare the user input with the actual hostname
if [ "$USER_INPUT" == "$ACTUAL_HOSTNAME" ]; then
        echo "Hostname confirmed."
        echo
        sleep 1
        echo "Proceeding with the command..."
        echo
        sleep 1
        /usr/sbin/halt_server
else
        echo "Hostname mismatch. Aborting the halt operation."
        exit 1
fi
}

check_hostname_poweroff() {
# Compare the user input with the actual hostname
if [ "$USER_INPUT" == "$ACTUAL_HOSTNAME" ]; then
        echo "Hostname confirmed."
        echo
        sleep 1
        echo "Proceeding with the command..."
        echo
        sleep 1
        echo "The system will reboot now!"
        echo
        sleep 1
        /usr/sbin/poweroff_server
else
        echo "Hostname mismatch. Aborting the poweroff operation."
        exit 1
fi
}

check_hostname_shutdown() {
# Compare the user input with the actual hostname
if [ "$USER_INPUT" == "$ACTUAL_HOSTNAME" ]; then
        echo "Hostname confirmed."
        echo
        sleep 1
        echo "Proceeding with the command..."
        echo
        sleep 1
        echo "The system will reboot now!"
        echo
        sleep 1
        /usr/sbin/shutdown_server
else
        echo "Hostname mismatch. Aborting the shutdown operation."
        exit 1
fi
}

##########################################################################################

# Get the actual system hostname
ACTUAL_HOSTNAME=$(hostname)

# Ask the user to input the hostname
echo "Please confirm the hostname to proceed it."
read -p "Enter the hostname: " USER_INPUT

# Check the command
ps aux | grep reboot > /tmp/reboot.txt
ps aux | grep halt > /tmp/halt.txt
ps aux | grep poweroff > /tmp/poweroff.txt
ps aux | grep shutdown > /tmp/shutdown.txt

reboot_size=`ls -al /tmp/reboot.txt | awk '{print $5}'`
halt_size=`ls -al /tmp/halt.txt | awk '{print $5}'`
poweroff_size=`ls -al /tmp/poweroff.txt | awk '{print $5}'`
shutdown_size=`ls -al /tmp/shutdown.txt | awk '{print $5}'`

# Compare the command

if [ $reboot_size -gt 90 ];
then
        rm -f /tmp/reboot.txt /tmp/halt.txt /tmp/poweroff.txt /tmp/shutdown.txt
        check_hostname_reboot
elif [ $shutdown_size -gt 90 ];
then
        rm -f /tmp/reboot.txt /tmp/halt.txt /tmp/poweroff.txt /tmp/shutdown.txt
        check_hostname_shutdown
elif [ $poweroff_size -gt 90 ];
then
        rm -f /tmp/reboot.txt /tmp/halt.txt /tmp/poweroff.txt /tmp/shutdown.txt
        check_hostname_poweroff
elif [ $halt_size -gt 90 ];
then
        rm -f /tmp/reboot.txt /tmp/halt.txt /tmp/poweroff.txt /tmp/shutdown.txt
        check_hostname_halt
fi
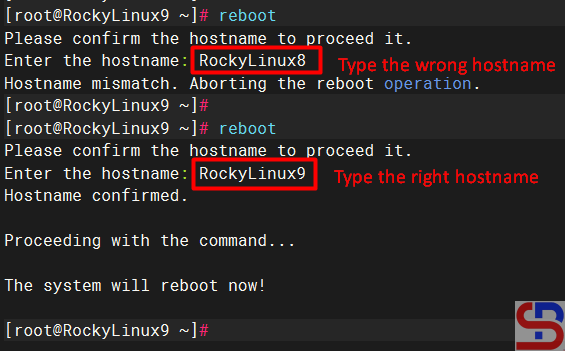
Now, try to do the reboot command and write the wrong hostname, and your Linux server shouldn’t reboot. However, try to write the correct hostname, then your Linux server should be rebooted, like in the image below:
Test the results
You should get the same results when running other commands such as poweroff, shutdown, and halt.
Note
Unlike the Molly-Guard tool, this script will continue to work even though you run the reboot or shutdown command without an SSH connection or directly connect the keyboard to the Linux server.
How to Check a Public IP in the Spam List Using a Bash Script?
written by sysadmin | 4 August 2025
The previous article explained how to see the status of a public IP, whether it is indicated as spam or not, using a PHP script. This article will explain the status of a public IP that is indicated as spam or does not use bash scripts.
Problem
How to check a public IP in the spam list using a bash script?
Solution
To run the bash script to check whether a public IP address in the spam list is spam or not, you must install the required packages below:
Ubuntu/Debian
apt-get install -y dnsutils
RHEL/CentOS/RockyLinux/AlmaLinux
yum install bind-utils -y
Then copy the bash script below and give the name check_ip_spam.sh:
#!/usr/bin/env bash
# -- $Id: blcheck,v 1.4 2007/06/16 01:08:10 j65nko Exp $ --
# Check if an IP address is listed on one of the following blacklists
# The format is chosen to make it easy to add or delete
# The shell will strip multiple whitespace
BLISTS="
bl.spamcop.net
cbl.abuseat.org
dnsbl.justspam.org
dnsbl.sorbs.net
relays.mail-abuse.org
spam.dnsbl.sorbs.net
spamguard.leadmon.net
zen.spamhaus.org
"

# simple shell function to show an error message and exit
# $0 : the name of shell script, $1 is the string passed as argument
# >&2 : redirect/send the message to stderr
ERROR() {
echo $0 ERROR: $1 >&2
exit 2
}

# -- Sanity check on parameters
[ $# -ne 1 ] && ERROR 'Please specify a single IP address'

# -- if the address consists of 4 groups of minimal 1, maximal digits, separated by '.'
# -- reverse the order
# -- if the address does not match these criteria the variable 'reverse will be empty'
reverse=$(echo $1 |sed -ne "s~^\([0-9]\{1,3\}\)\.\([0-9]\{1,3\}\)\.\([0-9]\{1,3\}\)\.\([0-9]\{1,3\}\)$~\4.\3.\2.\1~p")
if [ "x${reverse}" = "x" ] ; then
ERROR "IMHO '$1' doesn't look like a valid IP address"
exit 1
fi

# Assuming an IP address of 11.22.33.44 as parameter or argument
# If the IP address in $0 passes our crude regular expression check,
# the variable ${reverse} will contain 44.33.22.11
# In this case the test will be:
# [ "x44.33.22.11" = "x" ]
# This test will fail and the program will continue
# An empty '${reverse}' means that shell argument $1 doesn't pass our simple IP address check
# In that case the test will be:
# [ "x" = "x" ]
# This evaluates to true, so the script will call the ERROR function and quit
# -- do a reverse ( address -> name) DNS lookup
REVERSE_DNS=$(dig +short -x $1)
echo IP $1 NAME ${REVERSE_DNS:----}
EXITCODE=0

# -- cycle through all the blacklists
for BL in ${BLISTS} ; do

# print the UTC date (withour linefeed)
printf $(env TZ=UTC date "+%Y-%m-%d_%H:%M:%S_%Z")

# show the reversed IP and append the name of the blacklist
printf "%-40s" " ${reverse}.${BL}."

# use dig to lookup the name in the blacklist
#echo "$(dig +short -t a ${reverse}.${BL}. | tr '\n' ' ')"
LISTED="$(dig +short -t a ${reverse}.${BL}.)"
echo [${LISTED:-OK}]
echo $LISTED | grep '127\.' >/dev/null && EXITCODE=4
done
exit $EXITCODE
# --- EOT ------
Type the command below so that the bash script can run:
chmod +x check_ip_spam.sh
To run this bash script, use the format below:
./check_ip.shpublic_IP_address
For example, you want to check IP 172.217.194.113, then run the script by:
./check_ip.sh 172.217.194.113
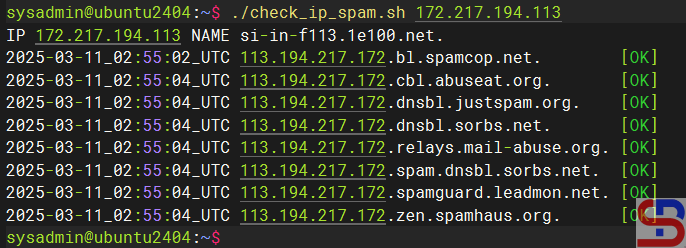
And there will be the following display:
Results of public IP checks indicated by spam
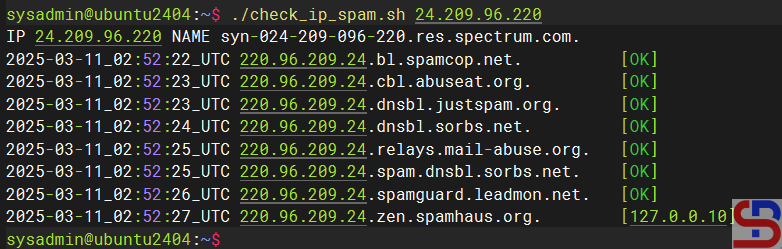
From the image above, it can be seen that the public IP does not include spam. If a public IP is included in the spam list, for example, IP 24.209.96.220, it will come out [127.0.0.x] as in the image below:
Public IP check results that do not indicate spam
If you want to check over one IP, then use the syntax format:
for X inpublic_ip_address_1 public_ip_address_2 ...; do echo;./check_ip $X; echo; done
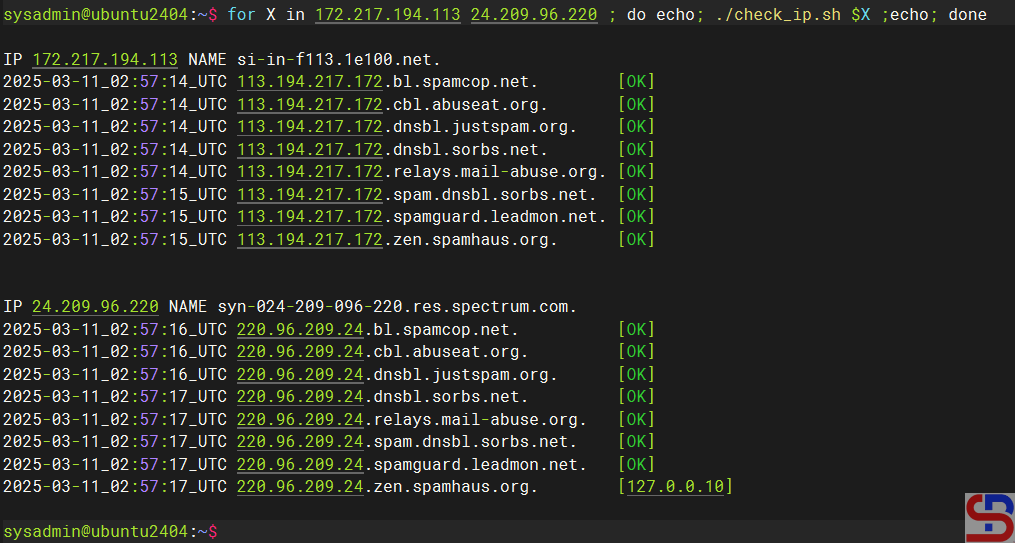
For example, if you want to check two public IP addresses, 172.217.194.113 and 24.209.96.220, you can type:
for X in 172.217.194.113 24.209.96.220 ; do echo; ./check_ip.sh $X ;echo; done
Check more than 1 public IP
Note
If you want to change the DNSBL or Domain Name System Blacklists list, then you can change it in lines 7-14 of the scrip,t and you can add the DNSBL list here. The more you enter the DNSBL list, the more valid the output will be.
How to Check a Public IP in the Spam List Using a PHP Script?
written by sysadmin | 4 August 2025
The spam list is a list of public IPs that spread spam based on the analysis made by various institutions (DNSBL or Domain Name System Blacklists) such as Spamhaus, SpamCop, and so on. This list is handy because by looking at this list, sysadmins know which public IPs are on the spam list, so they can take analysis and actions regarding their mail servers. So, I want to see if a public IP is in the spam list on the internet or not in my Linux serve,r so that I no longer need to search the internet for its status.
Problem
How to check a public IP in the spam list using a PHP script?
Solution
There are 2 solutions if you want to see if a public IP in the spam list on the internet or not in your Linux server, using a PHP script or a bash script. In this article, I use a PHP script to detect if a public IP is in the spam list on the internet or not, and I created a simple site to make it easier to check a public IP. I use the PHP application and Apache web server, and I use Ubuntu (but you can use any Linux OS you like). Install the applications needed to create the site:
sudo apt-get install apache2 php
After that, copy the script below and name the file check_ip_spam.php:
<html>
<head>
<title>DNSBL Lookup Tool - IP Blacklist Check Script</title>
</head>
<body>
<CENTER>
<h1>Check IP SPAM</h1>
<form action="" method="get">
<input type="text" value="" name="ip" placeholder="Insert a Public  IP ..." />
<input type="submit" value="LOOKUP" />
</form>

<?php
/***************************************************************************************
This is a simple PHP script to lookup for blacklisted IP against multiple DNSBLs at once.

You are free to use the script, modify it, and/or redistribute the files as you wish.

Homepage: http://dnsbllookup.com
****************************************************************************************/
function dnsbllookup($ip){
        $dnsbl_lookup=array(
        "bl.spamcop.net",
        "cbl.abuseat.org",
        "dnsbl.justspam.org",
        "dnsbl.sorbs.net",
        "relays.mail-abuse.org",
        "spam.dnsbl.sorbs.net",
        "spamguard.leadmon.net",
        "zen.spamhaus.org"); // Add your preferred list of DNSBL's

if($ip){
        $reverse_ip=implode(".",array_reverse(explode(".",$ip)));
foreach($dnsbl_lookup as $host){
        if(checkdnsrr($reverse_ip.".".$host.".","A")){
                $listed.=$reverse_ip.'.'.$host.' <font color=red>Listed</font><br />';
                }
        }
}

if($listed){
        echo $listed;
}else{
        echo "<font size=4>IP $ip <b>not listed</b> in SPAM list</font>";
        }
}

$ip=$_GET['ip'];

if(isset($_GET['ip']) && $_GET['ip']!=null){
        if(filter_var($ip,FILTER_VALIDATE_IP)){
                echo dnsbllookup($ip);
}else{
        echo "<font color=red><font size=4>Please enter a valid IP</font></font>";
        }
}

?>

<br>
<br>

<table border="0">
        <tr><td><b>This website use multiple DNSBLs:</b></td></tr>
        <tr><td>bl.spamcop.net</td></tr>
        <tr><td>cbl.abuseat.org</td></tr>
        <tr><td>dnsbl.justspam.org</td></tr>
        <tr><td>dnsbl.sorbs.net</td></tr>
        <tr><td>relays.mail-abuse.org</td></tr>
        <tr><td>spam.dnsbl.sorbs.net</td></tr>
        <tr><td>spamguard.leadmon.net</td></tr>
        <tr><td>zen.spamhaus.org</td></tr>
</table>

</CENTER>
</body>
</html>
After that, open your browser and type the URL below:
http://ip_server_address/check_ip_spam.php
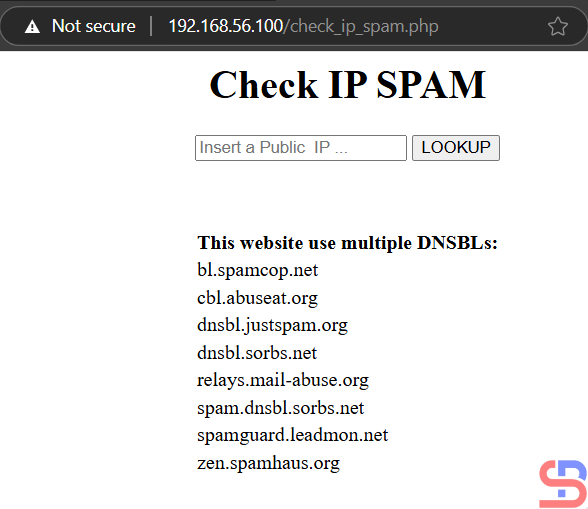
Then there should be a display like below:
The PHP Application
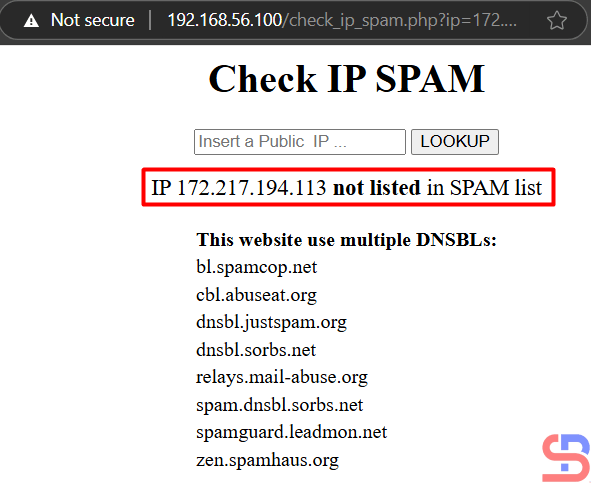
Enter the IP you want to check in the public IP field, such as IP 172.217.194.113, then press the LOOKUP button, then there will be results like the picture below:
Display when a public IP is not on the spam list
If the public IP that you put in the spam list, e.g., IP 24.209.96.220, then the result is like in the image below:
Display when a public IP is on the spam list
If you are wrong to enter a public IP, there is an error like the image below:
Display when mistyping a public IP
Note
If you want to change the DNSBL or Domain Name System Blacklists list, then you can change it in lines 23-30 of the script and you can add the DNSBL list here. The more you enter the DNSBL list, the more valid the output will be.