Cache memory is a type of data storage used to store frequently accessed information for faster response time, and it’s used to improve system performance. In Linux, the kernel uses the buff/cache memory to improve system performance by caching frequently accessed data (disk blocks, inodes, etc.) and buffering I/O operations. So if you have an application that is often used and accessible to many people, you will see that the memory cache on the server will often be used. But sometimes, because of necessity, you have to clean the cache memory.
Problem
How to clear cache memory on Linux?
Solution
Before you delete the cache memory on Linux, you must know some of the terms related to the cache memory:
Buffer: stores disk blocks that have been recently accessed or modified.
PageCache: It improves file I/O performance by storing often-used file data in RAM.
Dentries: help speed up file name searches by storing cached directory entries.
Inodes: store important metadata about files and directories, they are also separate from the content or names.
So if you want to delete cache memory, use the format below:
sync; echo1-3> /proc/sys/vm/drop_caches
The sync command to clear the buffer and the drop_caches file controls which type of cached data should be cleared and the values are as follows:
1 – Clears only the page cache.
2 – Clears dentries and inodes.
3 – Clears page cache, dentries, and inodes.
So if you want to delete cache memory, use the format below:
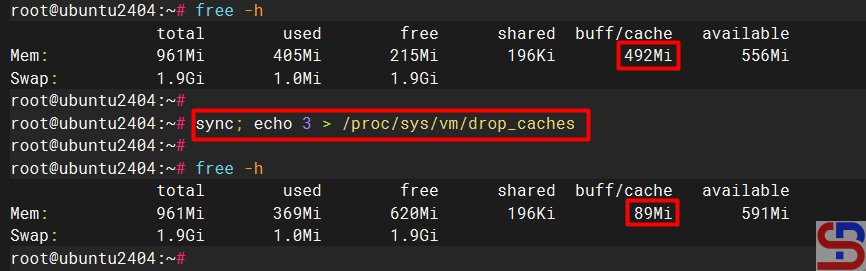
sync; echo 3 > /proc/sys/vm/drop_caches
And the cache memory on your Linux server will be deleted as shown below:
Clear the cache memory
WARNING
You have to be root if you want to run commands to delete cache memory. If you want to use an ordinary user and want to run the command, then use the command below:
sudo sync; sudo sh -c ‘echo 3 >/proc/sys/vm/drop_caches’
Note
It is not dangerous if you run the command to delete the memory cache on Linux but this will cause an increase in I/O disk because of the request that is usually handled by the memory cache because the memory cache is cleaned so that the request will immediately proceed to the hard disk, causing an increase I/O disk. Also on the application side will cause a decrease in performance because the application does not receive a response from the memory cache, but must receive a response from the hard disk, whose response time is slower than from the cache memory.
WARNING
Only clear the cache for debugging, benchmarking, or emergencies. For normal usage, let the kernel manage memory automatically. Clearing it without a good reason hurts performance.
How to Show The Progress Bar In Linux’s cp and mv Commands?
written by sysadmin | 16 April 2025
By default, if you do a copy command or move a file in Linux CLI, no progress bar shows how long the commands will take to complete. I think the users will feel bored because they do not know how long the commands will take to complete.
Problem
How to show the progress bar in Linux’s cp and mv commands?
Solution
The image below shows no progress bar when you copy a file in Linux CLI:
Copy the file in Linux CLI
To display progress bars on cp and mv commands on Linux, you need a tool made by a GitHub user named jarun, who modified the source code of Florian Zwicke. But before you can install this tool, you must install the required packages:
RockyLinux/AlmaLinux/CentOS
yum install -y tar curl patch make coreutils gcc libattr* libpcap* perl libacl*
Debian/Ubuntu
apt-get install -y tar curl patch make coreutils gcc libattr* libpcap* perl libacl*
OpenSUSE
zypper install -y tar curl patch make coreutils gcc libattr* libpcap* perl libacl*
After that, install the tool, and it is recommended to use a normal user to install the tool, but if you want to use the root user to install this tool, run the command below:
export FORCE_UNSAFE_CONFIGURE=1
Error when using the root user
Install the tool on your server by running the command below:
After installation completes, it created two new commands under the advcpmv folder. You need to replace your original cp and mv commands with these two new commands to get the progress bar while copying files:
Try to copy a file in your Linux CLI, and there should be a progress bar when you copy the file:
The progress bar appears when you copy the file
Likewise, if you are going to move a file on Linux CLI, there will be a notification as below:
The notification appears when you move the file
Note
You should know that if you want to use this tool on a different user from the user where this tool is installed on the server (for example, you installed this tool using another user but you want to use the tool using another user), you need to use the command below using your user so that this tool can be used on that user:
How to Protect the Linux Server From an Accidental Reboot?
written by sysadmin | 16 April 2025
As a Sysadmin, accessing a Linux server is a normal daily activity. But sometimes we accidentally make mistakes rebooting or shutting down the production server, causing the server to be inaccessible. Therefore, we need a tool to confirm if someone reboots or shuts down a Linux server.
Problem
How to protect the Linux server from an accidental reboot or shutdown?
Solution
In the Debian/Ubuntu distribution, the molly-guard tool can be used to protect the Linux server from an accidental reboot or shutdown. Use the two commands below to install molly-guard:
sudo apt update
sudo apt-get install molly-guard
After that, try to reboot the server, and there should be a notification like the image below:
A notification appears when trying to reboot the server
Someone who wants to reboot the server must write the server’s hostname. If the nameserver does not match the hostname on the server, the reboot process will not be continued, but if it matches the hostname on the server, the reboot process will be continued.
Try to reboot the server
This is very useful if the sysadmin accidentally types the reboot command on the server. However, this tool not only protects the server from the reboot command, but also other commands such as the poweroff, shutdown, coldreboot, pm-hibernate, pm-suspend, and pm-suspend-hybrid commands.
Try to turn off the server
Note
Keep in mind that this molly-guard tool can only work in the Debian/Ubuntu distribution and its derivatives, and this tool only works on SSH connections. If you access the Linux server without an SSH connection, for example, by directly connecting the keyboard to the Linux server, this tool will not work, so if you run the reboot command, the Linux server will immediately reboot.
How to Change the Color of Comments in the vi Application?
written by sysadmin | 16 April 2025
By default, if you open the vi application on Linux (especially using PuTTY), the color for comments is blue. However, sometimes this makes it very difficult for me to read the comments, especially if the background color of the terminal is black.
Problem
How to change the color of comments in the vi application?
Solution
Below is an image of a /etc/crontab file opened using Putty:
Comment color in the vi application
For me, it’s very difficult to read the comments in the Linux file if they’re blue like in the image above. So, if you want to change the color of comments in the vi application, for example, if you want to change the color of comments to yellow, then open the .vimrc file by:
vi ~/.vimrc
Type the script below into the file:
highlight Comment ctermfg=yellow
After that, open the file using the vi application, and the comments on the file should change to yellow as in the image below:
Comment color after configuration in the vi application
You can see that the comment color is changed to yellow after you configure the .vimrc file.
Info
Please note that the steps above only change per user. If you want all users to change the comment color to yellow then place the above command in the /etc/vim/vimrc.local file.
Note
Currently, the vi application can support up to 256 colors that can be used in the vi application. So if you want to use more colors supported by the vi application, in the .vimrc file type the script below:
set t_Co=256
Then you can choose the colors on this page, for example, you want to use purple for comments, then enter the script below in the .vimrc file:
set t_Co=256
highlight Comment ctermfg=93
Then the comments in the vi/vim application should be purple as in the image below:
Crontab, which stands for cron table, is used to run one or more scripts in Linux based on a specific time. Usually, if you want to change something in the crontab, you use the crontab -e command and then change the crontab. But I want to change crontab using a shell script.
Problem
How to change crontab using a bash script?
Solution
I create a bash script to execute something on my Linux server, and in my script, I want to change the crontab so the script will add, change, or remove the script in the crontab. Here are ways to change crontab using a script:
1. Add a script in crontab
For example, if you want to add a random.sh script which is in the /root/scripts folder in crontab and will run every 5 minutes, then use the command below:
If you want to change the file in crontab to once every 10 minutes (previously every 5 minutes) for the random.sh script in the /root/scripts folder, then use the command below:
You have to pay attention to whether the script in the crontab uses spaces or tabs because it greatly affects whether the script that you run can change something in the crontab or not. You have to put a backslash(\) if you want to change or delete your script in crontab that uses symbols like an asterisk(*), forward slash(/), hash(#), space, and so on.
How to Move the Partition to a New Partition in the Linux Server?
written by sysadmin | 16 April 2025
If you install a Linux server, you will usually install it with only one partition and not separate the other partitions. Problems will arise if one of these partitions uses a large enough hard disk, resulting in you running out of HDD space on your Linux server.
Problem
How to move the partition to a new partition in the Linux server?
Solution
In this article, I use the Ubuntu Server OS, and this article should be applied to any Linux distribution. Currently, the condition of the hard disk on my Ubuntu server is like the image below:
Condition of the hard disk in my Ubuntu server
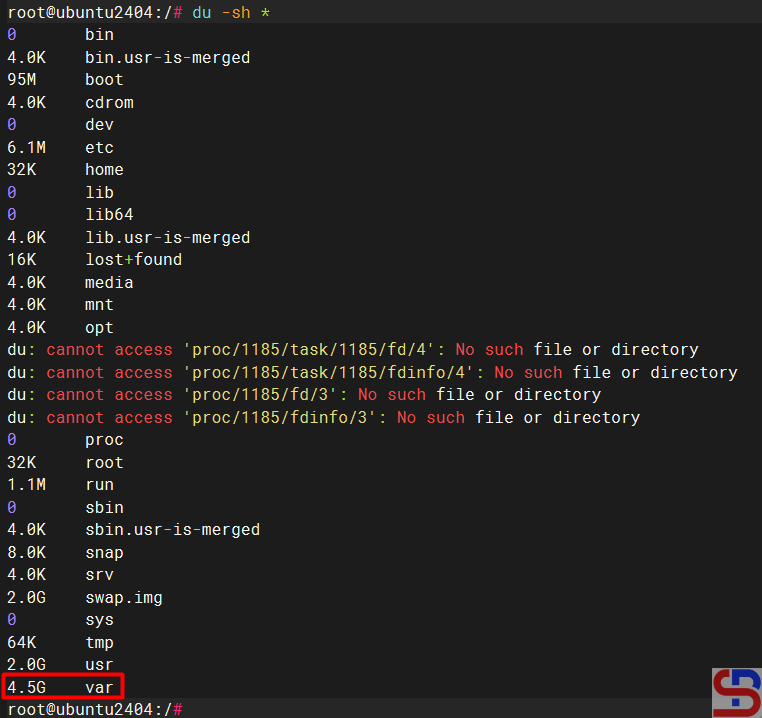
From the image above, the root partition only has a free HDD of 9 percent. After I checked, it turned out that the cause was the /var partition, which took up a lot of hard disk so I want to move the /var partition to the new partition.
Check the largest partition size
Here are the steps to move the partition to a new partition in the Linux Server:
Info
The steps in this article will make your Linux server enter maintenance mode which means that the Linux server cannot be accessed from anywhere results in the application or database that may be in the Linux server also inaccessible. So discuss first with your boss if you want to do the steps in this article
1. Add a new hard drive
I insert a new 10 GB HDD into my Linux server. After that, I check if the new HDD is detected by Linux using the command:
fdisk -l
Check the new HDD in the Linux server
From the image above, it can be seen that the new HDD was detected by Linux with a partition in sdb.
2. Create a new partition
Run the command below to create a new partition in Linux (Adjust to the hard disk partition detected on your Linux server after typing the fdisk -l command):
fdisk /dev/sdb
Press the n and p keys, then the number ,1 and enter 2x, then press the w button as seen in the image below:
Create a new partition in the new HDD
Then create a filesystem from the new HDD, and I want to use ext4 for the filesystem of the new HDD using the command:
mkfs.ext4 /dev/sdb1
Create a filesystem in the partition of the new HDD
3. Create and mount a new folder
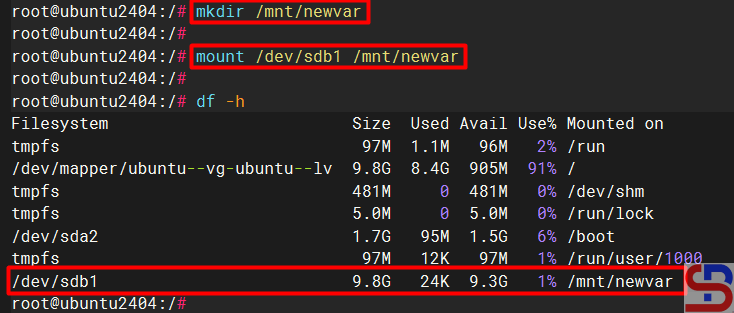
After that, create a new folder using the command:
mkdir /mnt/newvar
Then, mount the new partition to the new folder using the command:
mount /dev/sdb1 /mnt/newvar
Create and mount a new folder
4. Enter maintenance mode
Type the command below:
init 1
to enter the rescue mode:
Enter the maintenance mode
After that, press the Enter button to enter maintenance mode.
5. Copy the folder
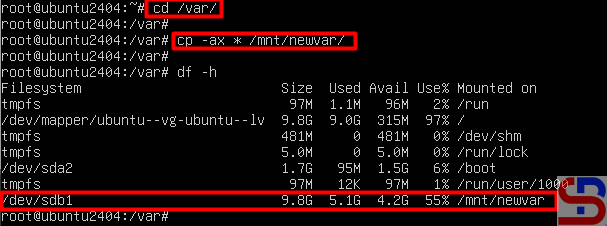
Go to the /var folder and copy all the files and folders in the folder into a new folder by typing the following commands:
cd /var
cp -ax * /mnt/newvar
Copy the folder
6. Rename the folder
Once the copy process is complete, change the /var folder to the var.old folder and then create a new /var folder using the command:
cd /
mv var var.old
mkdir /var
Rename the folder
7. Mount the new folder
Next, do umount on the /sdb1 partition by using the command:
umount /dev/sdb1
And mount the /sdb1 partition to the new /var folder using the command:
mount /dev/sdb1 /var
Mount the new folder
8. Change the fstab file
Change the /etc/fstab file by adding the following script to the file:
/dev/sdb1 /var ext4 defaults 0 0
Script additions in fstab file
9. Restart the server
After that, restart the Linux server and make sure there is no problem when the Linux server reboots.
10. Delete the folder
If the Linux server has finished restarting, then you can delete the var.old folder so that the size of the hard disk of the root partition increases by using the command:
cd /
rm -rf var.old
Before and after moving the partition
Note
Reboot the server again to make sure there are no problems after you delete the var.old folder. You can use the steps above when you want to move another folder to a new partition in the Linux server.
The previous article explained how to install Docker on Linux. This article will explain how to manage a container in Docker.
Problem
How to manage a container in Docker?
Solution
To manage a container in Docker, you have to remember basic Docker commands. And here are the basic Docker commands:
1. Search for container images
To run containers in Docker, we need a Docker image. A Docker image is an immutable (unchangeable) file that contains the source code, libraries, dependencies, tools, and other files needed for an application to run. The place to store Docker images is known as the Docker registry, which by default uses the Docker Hub located at hub.docker.com. If you are looking for a container image in Docker, use the format below:
docker search container_name
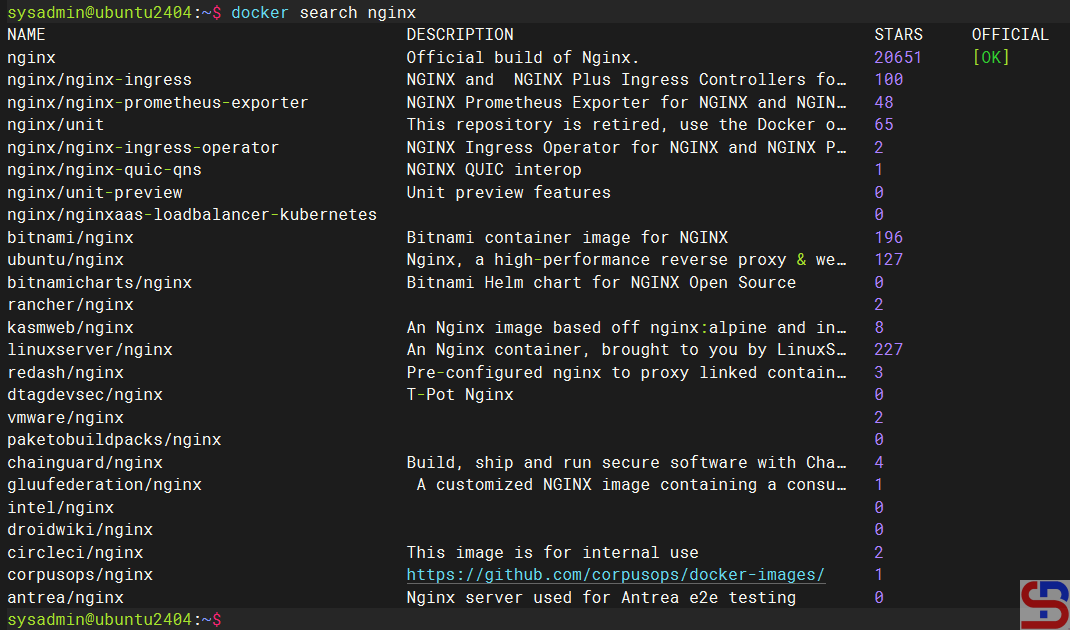
For example, if you want to find an nginx image, then use the command below:
docker search nginx
Searching the nginx image
2. Download the Docker image
To download the Docker image, use the following format:
docker image pullimage_name:tag_version
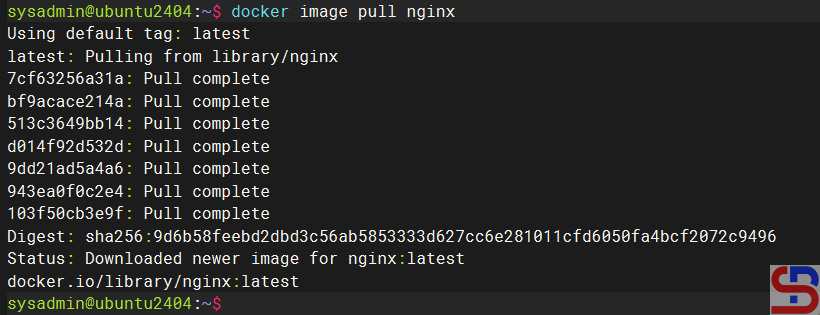
where the tag_version is the version of the image, and if you don’t write the tag, it is considered that you want to install the latest version of the image. For example, if you want to download the newest version of the nginx image, use the command:
docker image pull nginx
Download the nginx image
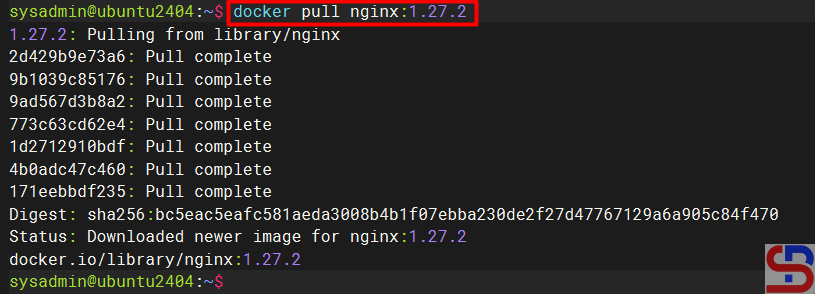
But if you want to download nginx with a certain version, for example, version 1.27.2, then use the command:
docker image pull nginx:1.27.2
Download the nginx with a certain version
3. List the Docker image(s)
To display the Docker image that you have downloaded, use the command below:
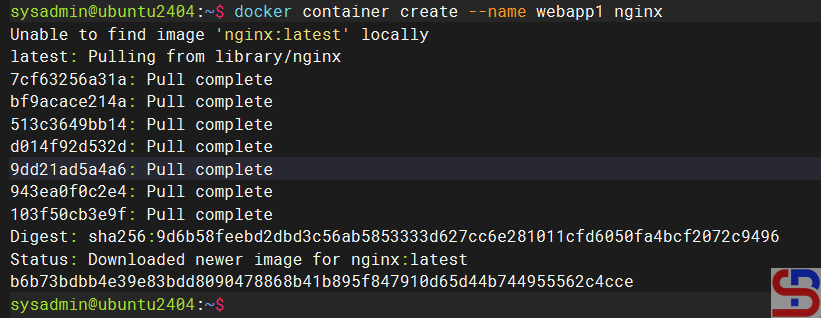
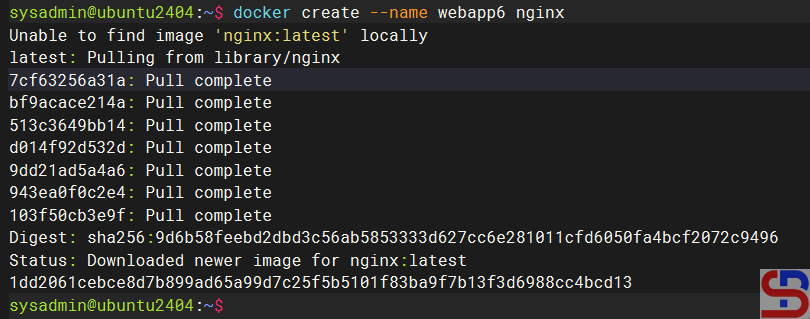
For example, if you want to create a container with the name webapp1, which contains the nginx application, then use the command below:
docker container create --name webapp1 nginx
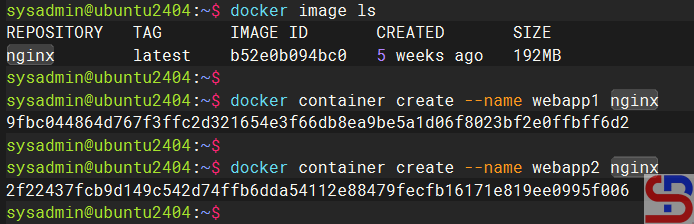
When you use this command, Docker will first check whether the nginx image is on the server. If the image is not on the server, then Docker will download the nginx image, and after that, it will create an nginx container, and the image will remain on your server, as shown in the image below:
Create the container
You can use an image to create multiple containers as long as the container names are different, as in the image below:
Create the containers with 1 image
5. List the status of the container(s)
To display the container status, you can use the command:
docker ps
List the status of running Docker
Maybe you are confused about why there is no container status displayed, even though you have made 2 containers before. Remember that the docker ps command only displays the ongoing container status. While the 2 containers you made had not been running, you just made a container. If you want to display all container statuses, use the command below:
You can use the command below to resume the container:
docker container unpause webapp1
Resume the container
8. Run a container with a single command
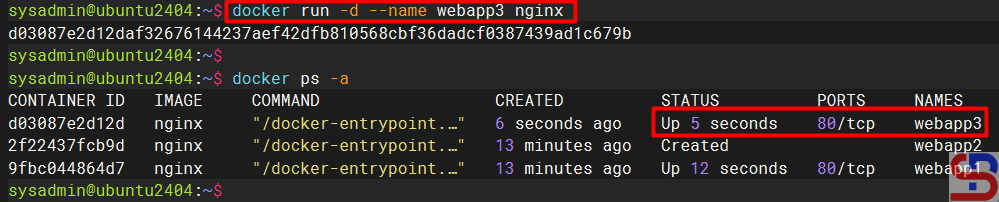
As explained above, if you want to run a container, you have to download the image first, create a container, and turn on the container (see numbers 2, 4, and 6). There is a command that can summarize the three commands above, using the format below:
docker run -d --namecontainer_id/container_name image_name:tag
where the -d option is to run the container in the background. So if you want to run a container with the name webapp2, which contains the nginx application, then use the command below:
docker run -d --name webapp3 nginx
Run the container
9. Display the size of Docker
To display how large Docker is installed on your server, use the command below:
docker system df
Display the size of Docker
To display a Docker size in detail, use the command below:
docker system df -v
Display the size of the Docker
10. Display logs
To display logs of the running container to check something, follow the format below:
docker container logscontainer_id/container_name
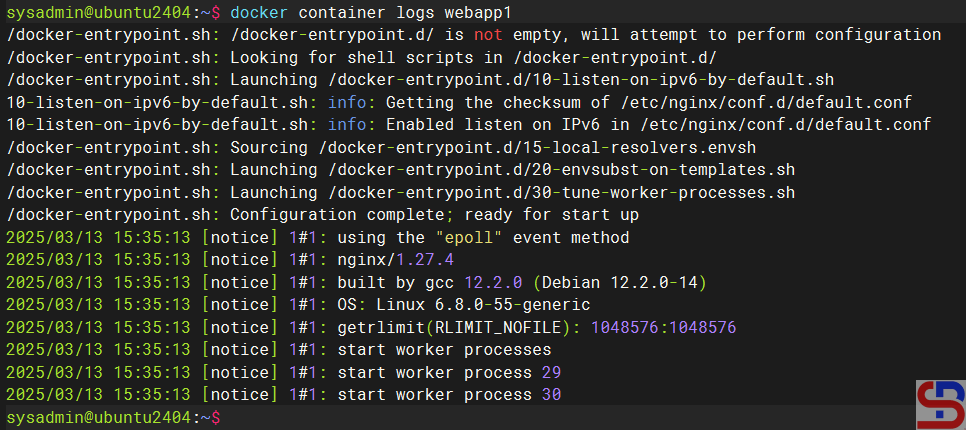
So, run the command below to check the logs of your container:
docker container logs webapp1
Display logs in the container
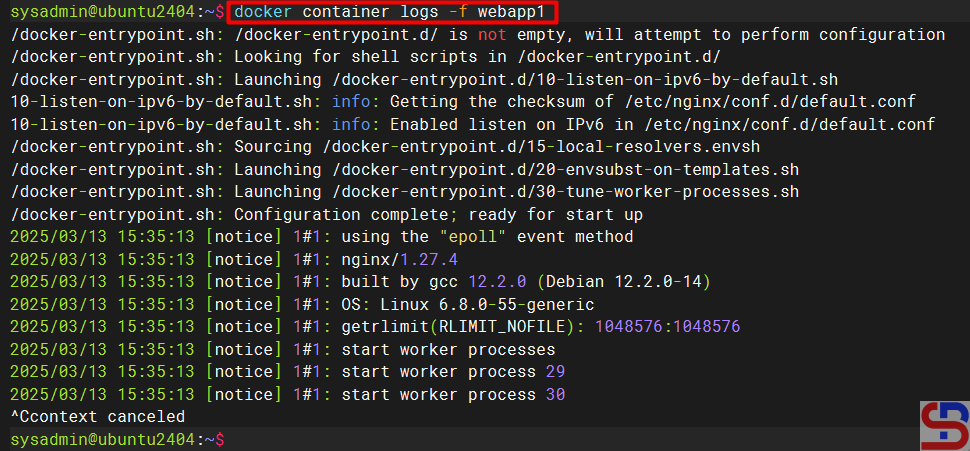
If you want to display real-time logs of the container, give an option -f like in the below command:
docker container logs -f webapp1
Press Ctrl-C to exit the log.
Display real-time logs in the container
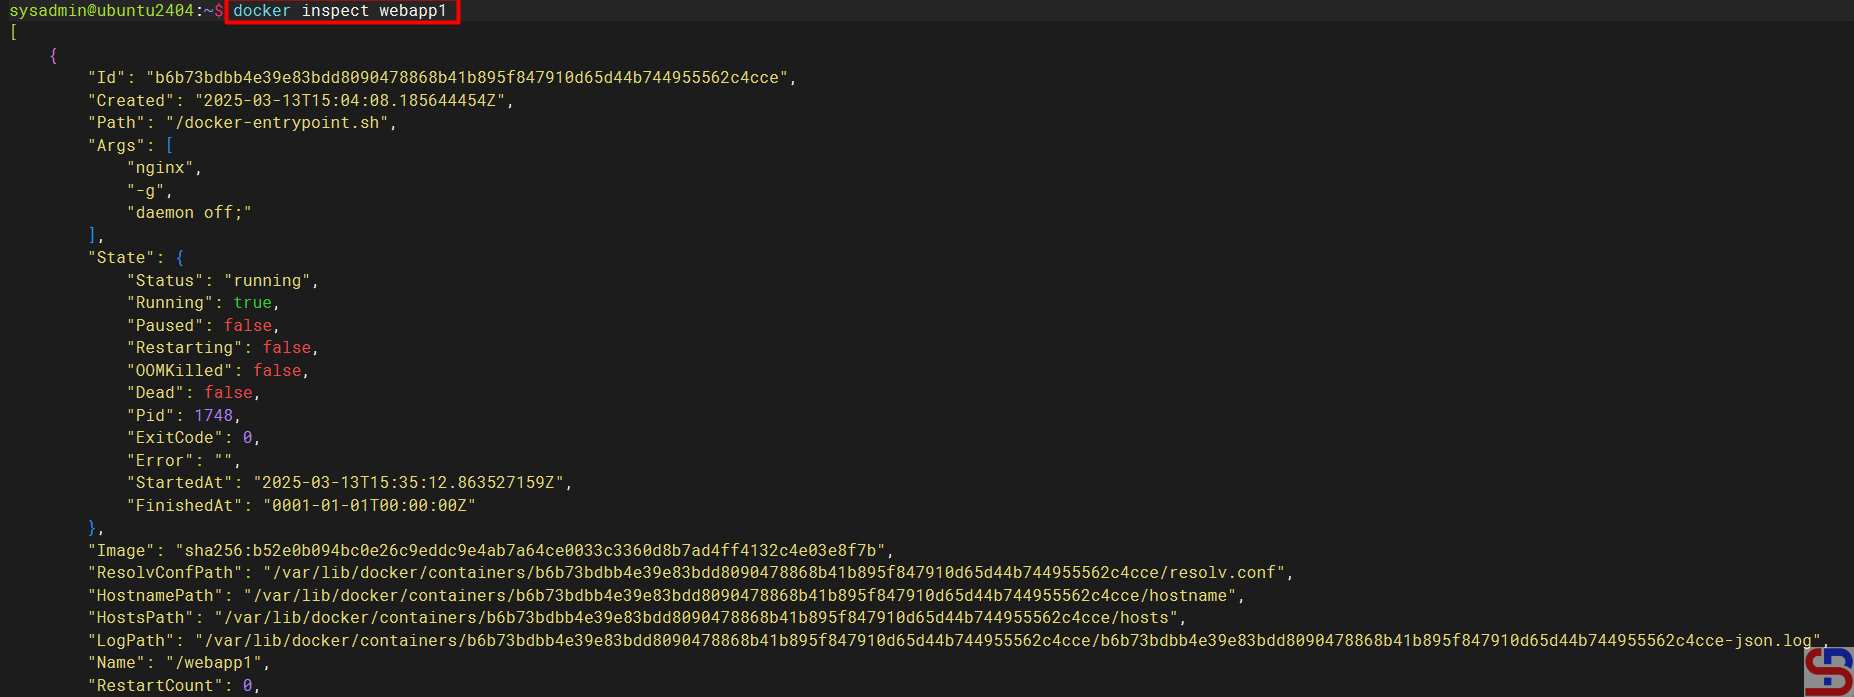
11. Inspect the container
To display detailed information about a container, use the following format:
docker inspectcontainer_name/container_id
So, if you want to see the detailed information about the container that you created before, use the command below:
docker inspect webapp1
Inspect the container
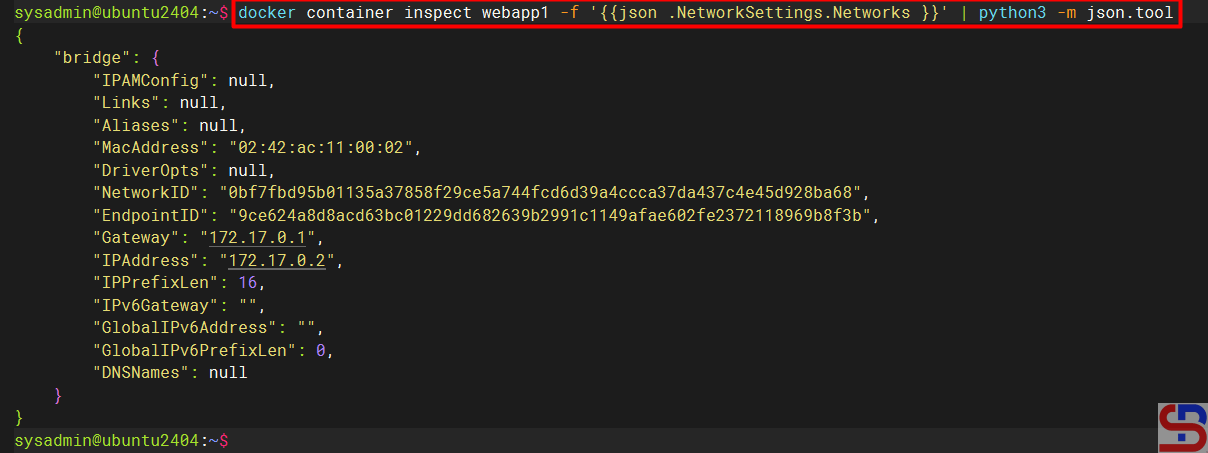
If you only want to display specific items when running the inspect command, use the following format:
For example, if I want to stop my container, then use the command below:
docker container stop webapp1
Stop the container
You can stop all the containers running with the below command:
docker stop webapp1 webapp2
Stop more than one container
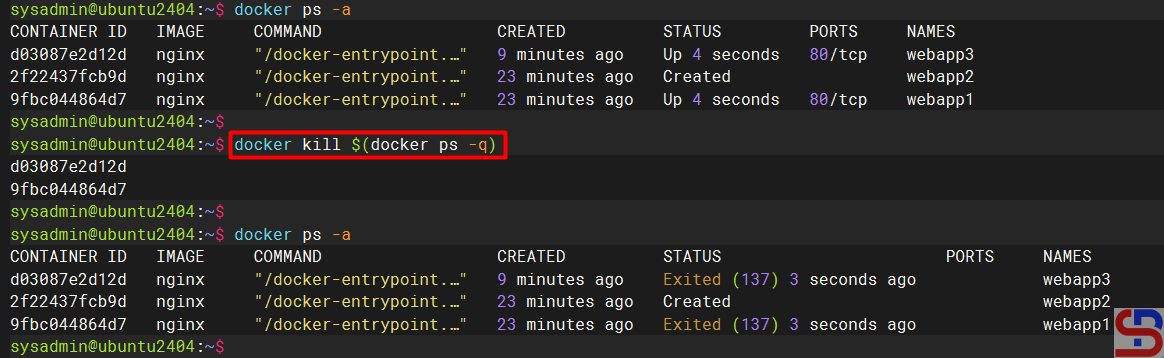
Or use the below command to stop all the running containers:
docker kill $(docker ps -q)
Stop all running containers
13. Remove the container(s)
Before you remove the container, you have to stop the container first. To delete a container that’s already turned off, use the format below:
docker container rmcontainer_id/container_name
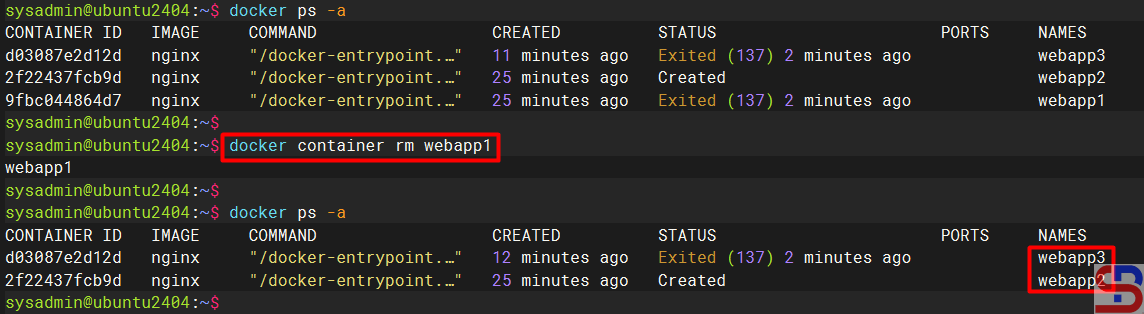
Run the command below to remove the container:
docker container rm webapp1
Delete the container
By default, you can’t remove a container if the container is still running. You can use the command below to delete the container even if the container is still running, but it is not recommended:
docker container rm -f webapp2
Force delete the running container
If you have a lot of containers that are no longer used and you don’t want to delete them one by one, you can use the command below to delete all the unused containers:
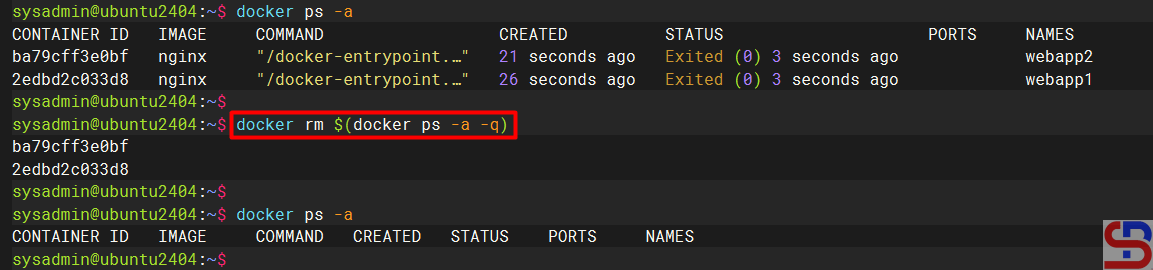
docker rm $(docker ps -a -q)
Delete all the stop containers
You can also use the command below to delete all the stop containers:
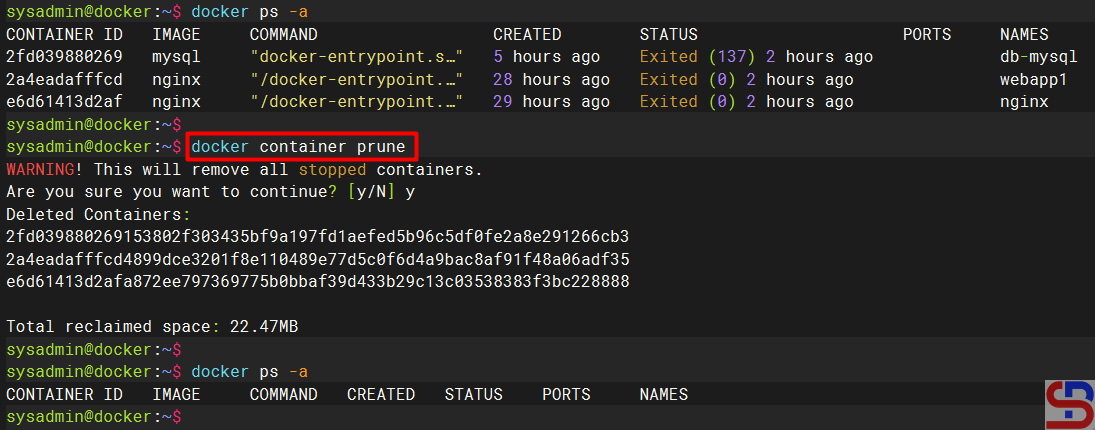
docker container prune
Delete the stop containers using the prune command
14. Delete the image(s)
To delete the Docker image that you have already downloaded, use the format below:
docker image rmimage_name
Run the image below if you want to delete the nginx image:
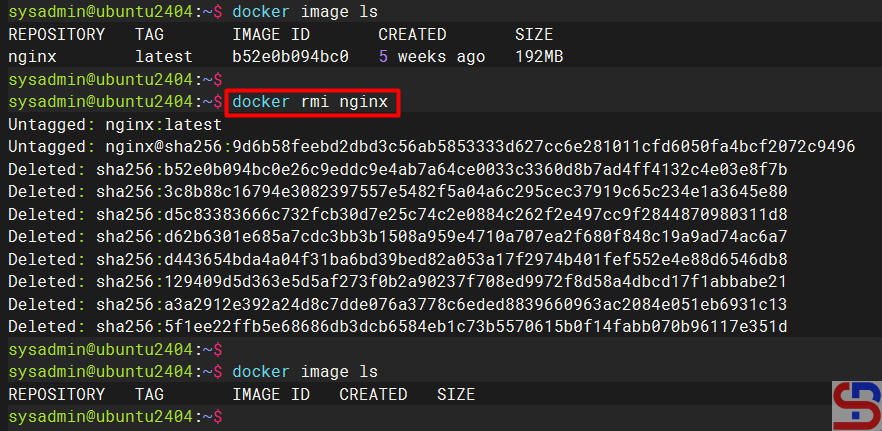
docker image rm nginx
Delete the image
However, you must know that you can’t delete the Docker image if the image is still running in the container. So you must remove the container first before you delete the image. If you want to delete multiple Docker images, use the following format:
docker image rmimage_name1 image_name2 ...
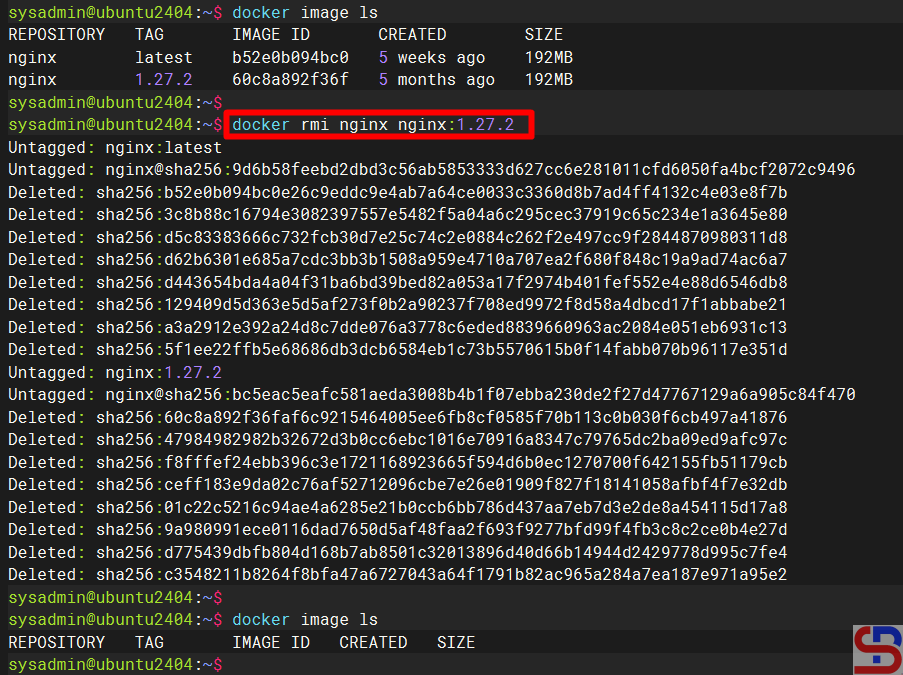
So if you want to delete the nginx image and nginx:1.27.2 at once, then use the command below:
docker image rm nginx nginx:1.27.2
Delete more than one image
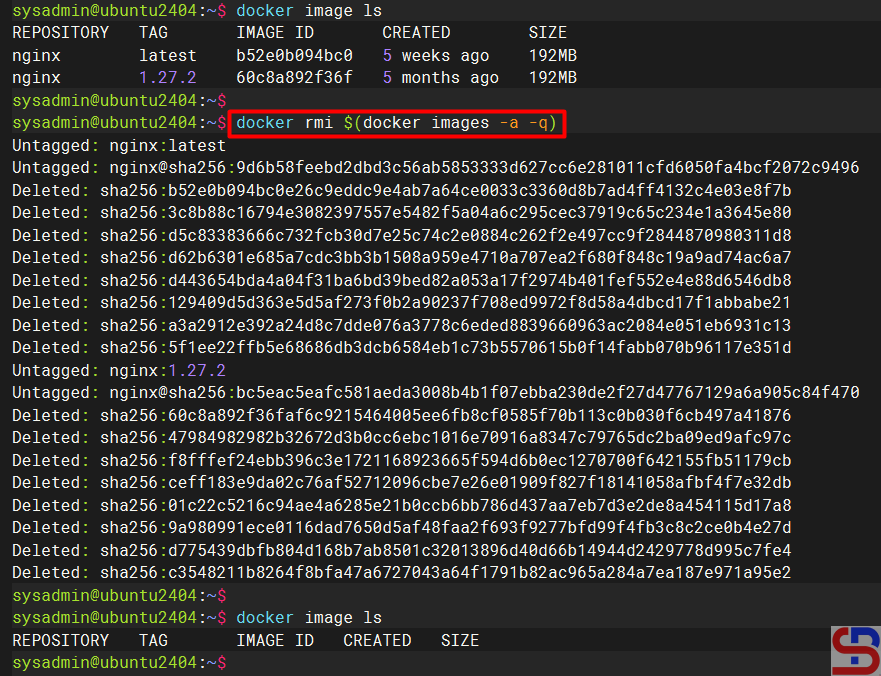
And if you want to delete all the images, you can use the command below:
docker rmi $(docker images -a -q)
Delete all the images
Or, you can use the command below to remove the unused images:
docker image prune -a
Delete all the unused images using the prune command
Note
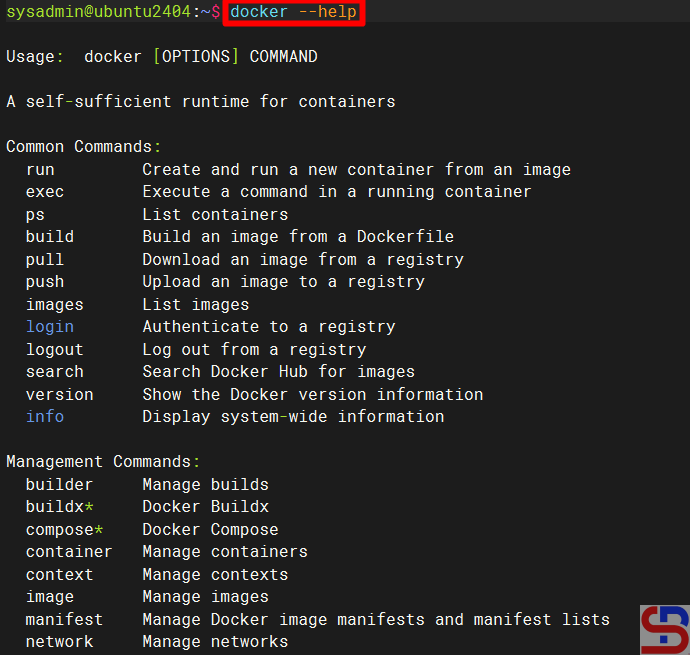
If you forget or don’t know what command to use in Docker, use the following command:
docker --help
Using the docker help command
After that, if you want to know the options in the Docker command, then use the following format:
dockercommand --help
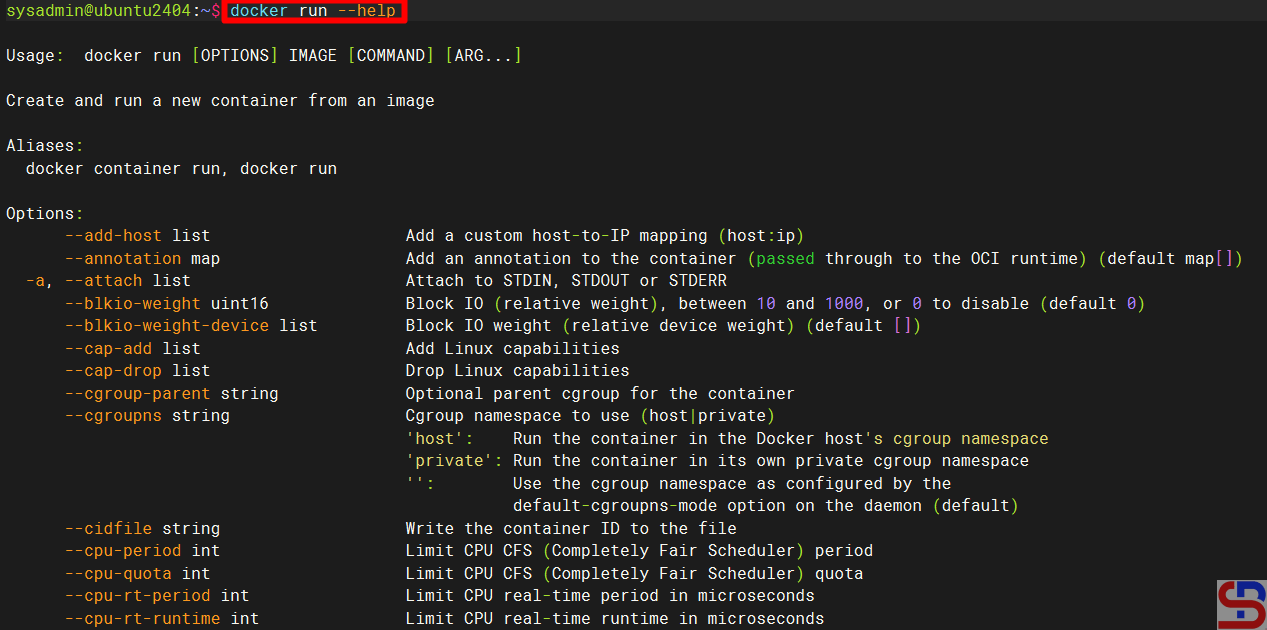
For example, if you want to know the options of the run command in Docker, then type the command below:
docker run --help
Using the docker run help command
You can shorten all the Docker container commands to just the docker command to shorten the typing time. For example, if you want to create a container, you can use the command: