By default, when you connect to an Ubuntu server using SSH, Ubuntu will display a welcome message. But sometimes, the welcome message is not needed or even annoying, so you want to disable the welcome message.
Problem
How to disable a welcome message in Ubuntu?
Solution
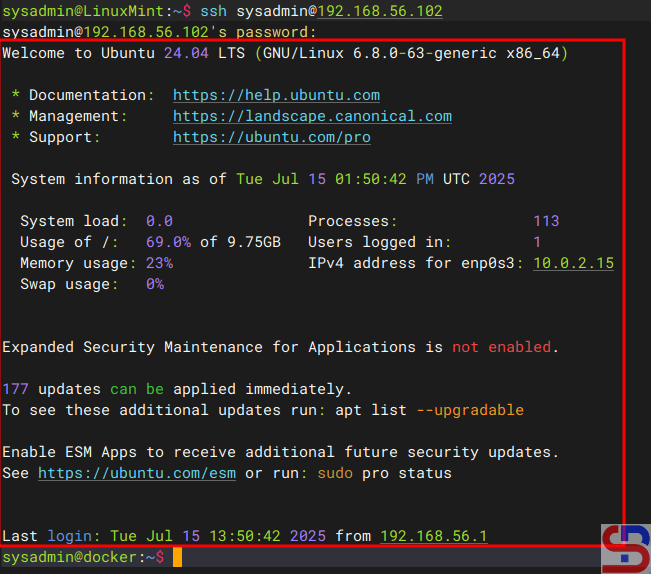
Usually, the welcome message looks like Ubuntu displays information about the Ubuntu server, as shown in the image below:
The welcome message in Ubuntu
There are 2 methods to disable the welcome message:
1. Remove the execute
You have to know that the welcome messages are generated by the files residing in /etc/update-motd.d/. So, use the command below to disable the welcome message in Ubuntu:
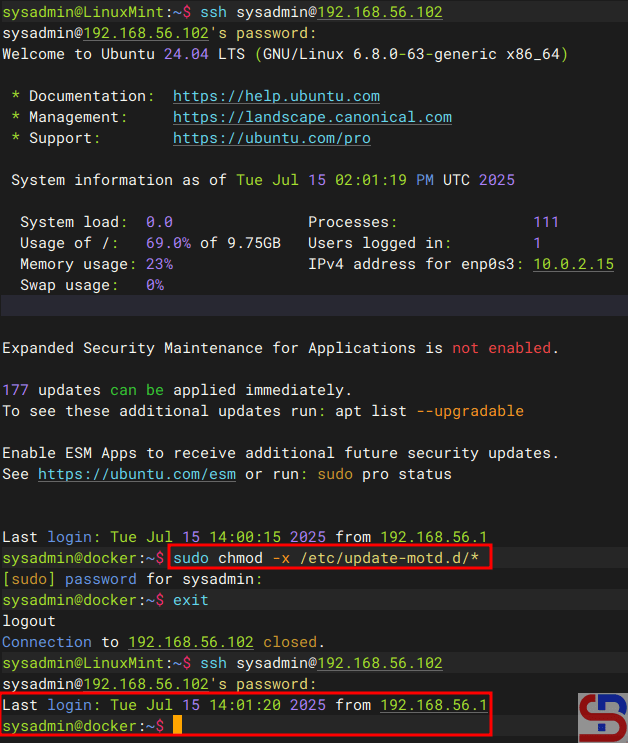
sudo chmod -x /etc/update-motd.d/*
After you run the above command, every time you access the Ubuntu server, the Ubuntu server does not display a welcome message anymore, but only displays the last login on this server as shown in the image below:
Disable the welcome message by removing the execute
2. Create a file
The second method is to create an empty file known as .hushlogin in your $HOME directory by using the command below:
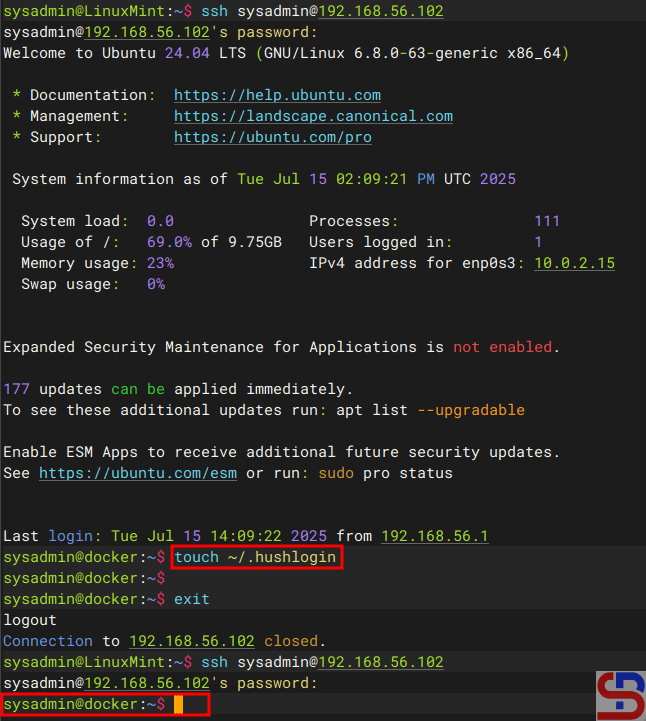
touch ~/.hushlogin
It should be after you do the above command, every time you access the server, the Ubuntu server does not display a welcome message or last login at all, as shown in the image below:
Disable the welcome message by creating a file
Note
If you want to return the default welcome message after you run one of the 2 methods above, then use the command below if you are using the first method:
sudo chmod +x /etc/update-motd.d/*
And use the command below if you are using the second method:
rm ~/.hushlogin
The default welcome message in Ubuntu should appear every time you access the Ubuntu server.
How to Run a Container Automatically After the Server Reboots?
written by sysadmin | 26 July 2025
By default, if a server containing Docker reboots, all Docker containers on that server will shut down. If the server has a lot of containers, you will have to manually turn them on, which is highly exhausting.
Problem
How to run a container automatically after the server reboots?
Solution
In Docker, the restart policy specifies when and how the Docker container will be automatically restarted in the event of a system failure, shutdown, or reboot. There are 4 types of restart policies that you can use:
Restart Policy in Docker
Option
Description
no
Never restarts automatically and this is a default policy
on-failure
Restart only if the exit code ≠ 0 (fail). Can be added to the maximum restart (on-failingure: 5).
always
Always restart the container, unless it is stopped manually (docker stop), including when rebooting the server.
unless-stopped
Similar to the always option, but it won't restart if the container is stopped manually, even after a reboot.
By default, Docker uses the no option for the restart policy so that the container won’t turn on when the server boots. There are several methods to automatically turn on containers after the server reboots:
Warning
Make sure that Docker on your server is enabled because all containers on that server won’t run automatically after restarting the server if you haven’t enabled Docker.
1. If your container is still not running
Use the format below if you run a container and you want it to turn on automatically after restarting the server:
docker run -d ‐-restartrestart_option your_docker_image
If your container name is a webserver that uses the nginx image and you want the container to run automatically after the server reboots, you can use the command below:
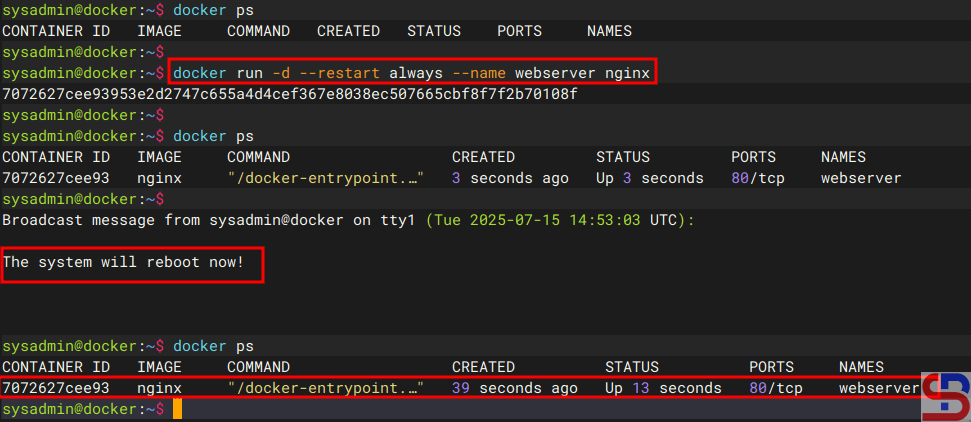
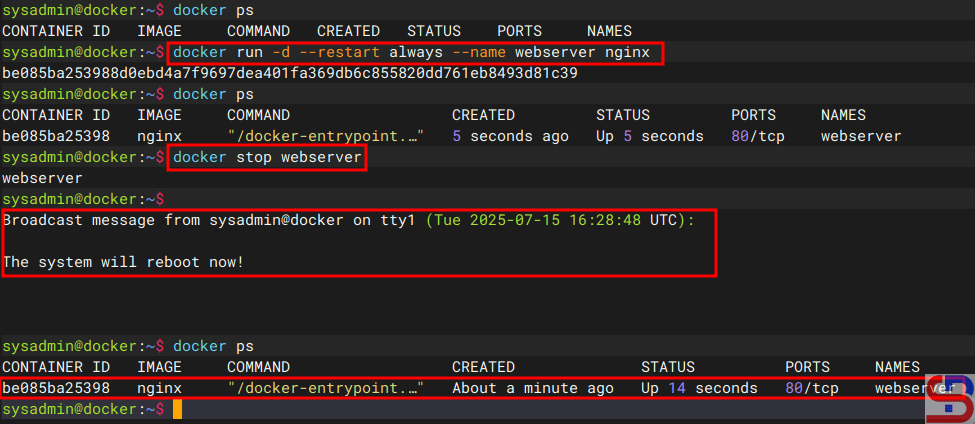
docker run -d --restart always --name webserver nginx
Once the container is running, try restarting the server, and it should continue to run automatically after the server restart, like in the image below:
The container runs automatically after the server restarts using the always option
Now, try to stop the container and restart the server, and then the container should still run automatically after the server restarts, like in the image below:
The container still runs automatically after the server restarts using the always option
2. If your container is running
If a container is running but has not used the restart option, you can use the format below so that the container can run automatically after the server restarts:
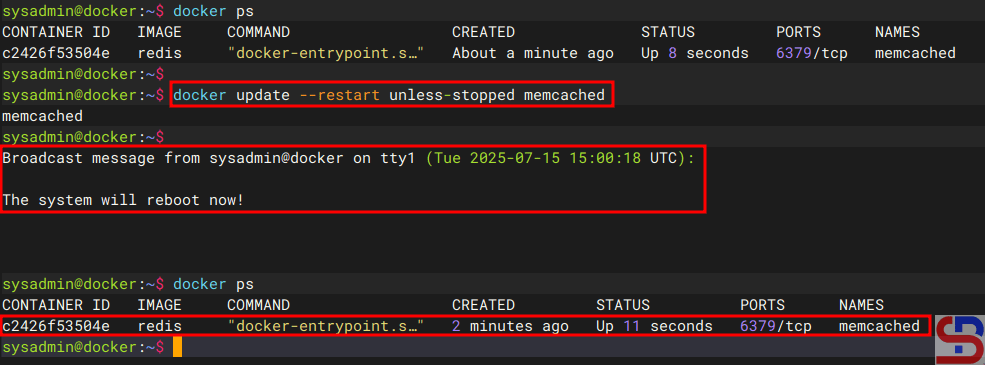
For example, you see a memcached container that uses a redis image is already running on the server, but has not used the restart option. Use the command below if you want the container to keep running after the server restarts, but if the container previously stopped, then at the time of the server restart, the container still won’t run:
docker update --restart unless-stopped memcached
Now, try restarting the server while the container is running, and then the container should still run automatically if the server reboots, like in the image below:
The container runs automatically after the server restarts using the unless-stopped option
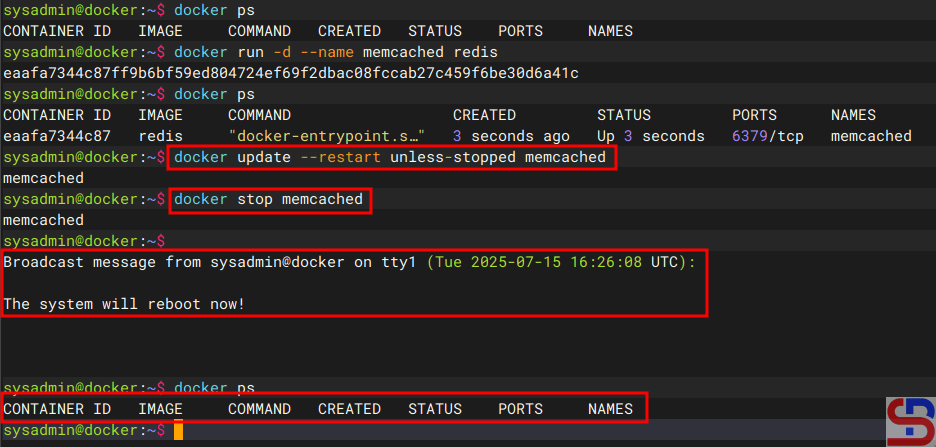
Now, try to stop the container and then restart the server; the container should still not run after the server restarts, like in the image below:
The container is still not running after the server restarts using the unless-stopped option
3. Using crontab
The third method of using crontab is to enter the following formats into crontab:
@reboot /usr/bin/docker startcontainer_name_or_id
For example, you want to run the webserver container automatically after restarting the server, so insert the script below into the crontab :
@reboot /usr/bin/docker start webserver
If a container uses a crontab to keep it running after restarting the server, it will continue to run after restarting the server, even if it uses the unless-stopped option and the container is not running before the server is restarted.
Note
If you want a container to run automatically after restarting the server, it is important to note the distinction between using the always and unless-stopped parameters. If the container is a very important application, such as a webserver or database, use the always option for the container, but use the unless-stopped option if the container is a non-essential application.
How to Run Multiple Sessions Using the Screen Tool?
written by sysadmin | 26 July 2025
Have you ever been doing a job using a terminal that runs the SSH protocol, whether it’s using a putty or a terminal in Linux, that takes a long time, for example syncing or downloading a file, but has to suddenly stop because the internet network is disconnected or your laptop suddenly shuts down? It is very disappointing because you have to repeat from the beginning of the work, or even more dangerous if you are updating the database, for example, doing an alter table in a database, but suddenly your internet connection is lost. Therefore, you need multiple sessions in one terminal so that if your internet connection or laptop goes down, the process will still run. There are several tools to run multiple sessions, but this article will explain the use of the screen tool.
Problem
How to run multiple sessions using the screen tool?
Solution
Screen or GNU Screen is a terminal application developed by the GNU project in 1987 that is used to create multiplex several virtual consoles, allowing a user to access multiple separate login sessions inside a single terminal window, or detach and reattach sessions from a terminal and keeping them running in the background even if your internet network or laptop goes down.
A. Install the screen
On some Linux distros, this tool is already installed by default, and to check it, use the command below:
screen --version
But if your Linux distro doesn’t have this tool, you can run the command below to install the screen:
RockyLinux/Almalinux/CentOS
yum install screen
Ubuntu/Debian
sudo apt update
sudo apt install screen
OpenSUSE
zypper install screen
B. Run the screen
Type the command below to run the screen:
screen
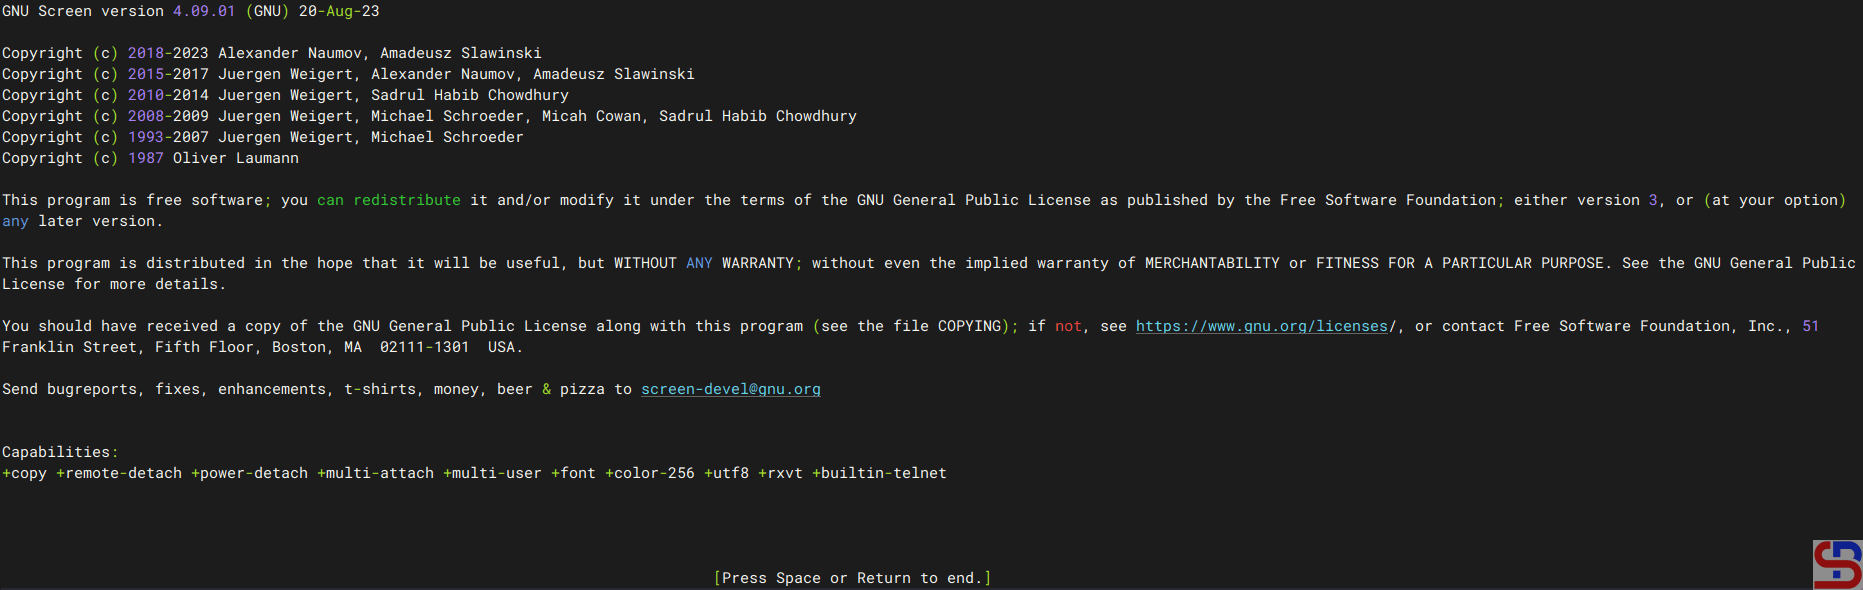
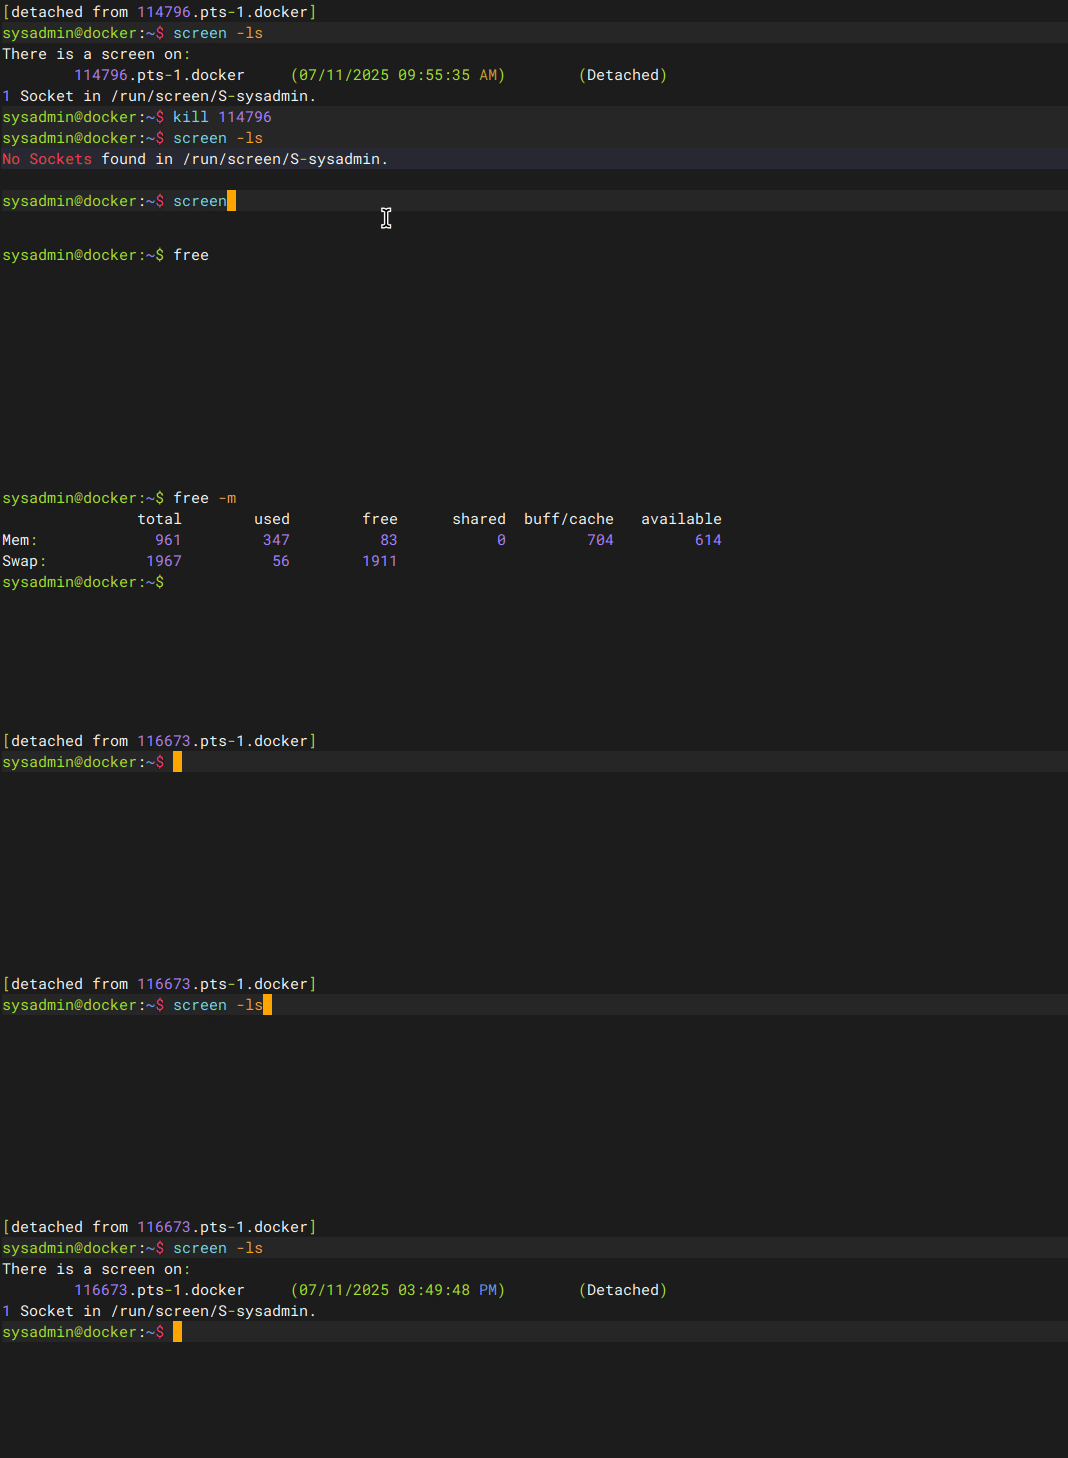
There will be a display like the image below:
The initial display of the screen
Press the Space or Enter key to continue, and after that, you are in the application screen. On the screen, you are free to use the Linux commands you want to run, for example, if you want to run the command:
free -m
The command will display the size of the memory on the server. If you want to exit the screen but want the command to continue on the screen, press the Ctrl+ad key, then you will return to your default terminal. To view the running screen session, use the command below:
screen -ls
It will look like in the image below:
Running the screen
C. Reattach to the screen session
If you want to reattach the previous screen session, use the format below:
screen -rpid_screen
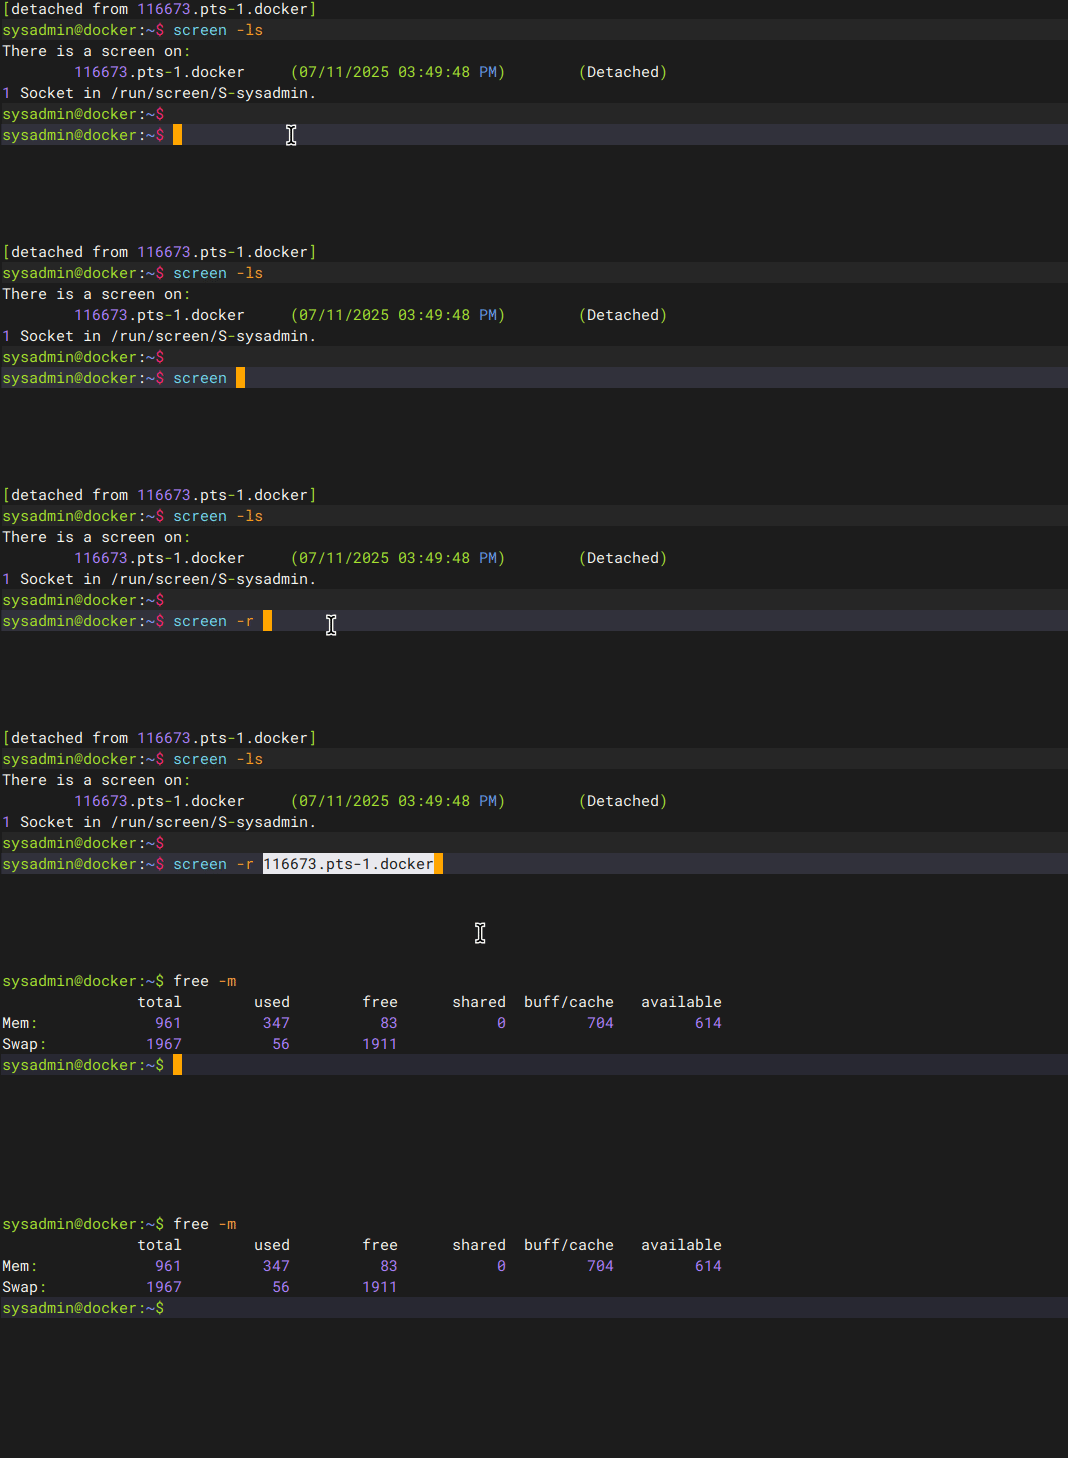
For example, my previous screen session used pid 116673.pts-1.docker, like in the image above. If I want to log in to the previous screen session, I type the command below:
screen -r 116673.pts-1.docker
And I can log into the screen session, and the size of the server memory will be displayed as I leave the screen session, like in the image below:
Reattach to the previous screen
INFO
You can write only the PID number, and there is no need to write the complete PID of a screen session. For example, you have a pid screen like this: 116673.pts-1.docker. So you can type screen -r 116673 instead of type screen -r 116673.pts-1.docker.
D. Naming a screen session
By default, the screen will give a pid in the form of a pid number followed by the terminal type and hostname, as shown in the image above (116673.pts-1.docker). However, it may be confusing to the user if the user uses more than one screen with different processes on each screen. Therefore, you can give a name to distinguish it using the format below:
screen -Sscreen_session_name
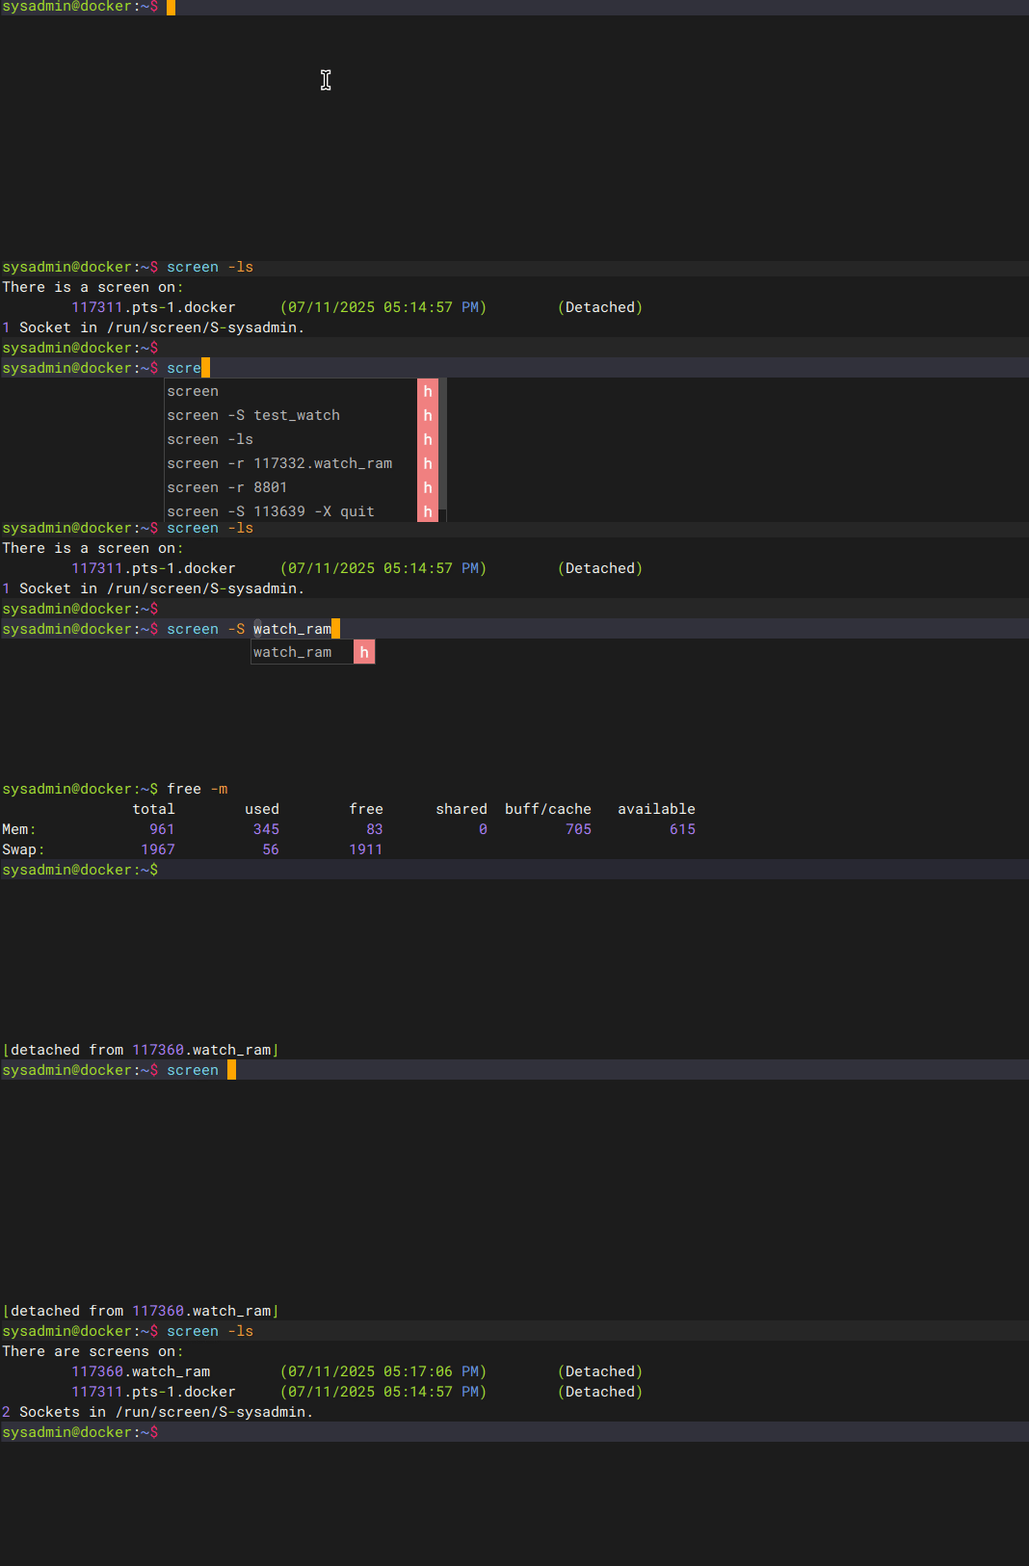
For example, if you want to use a screen to run the watch process, then you can use the command below:
screen -S watch_ram
Naming a screen session
If you display the screen session will look like the image below:
List of screen sessions
From the image above, the screen name will change according to what you wrote, and will no longer use the connection type format and hostname for naming a screen session.
E. Delete a screen session
There are 2 ways to delete a screen session: from inside the screen and from outside the screen.
1. From inside the screen
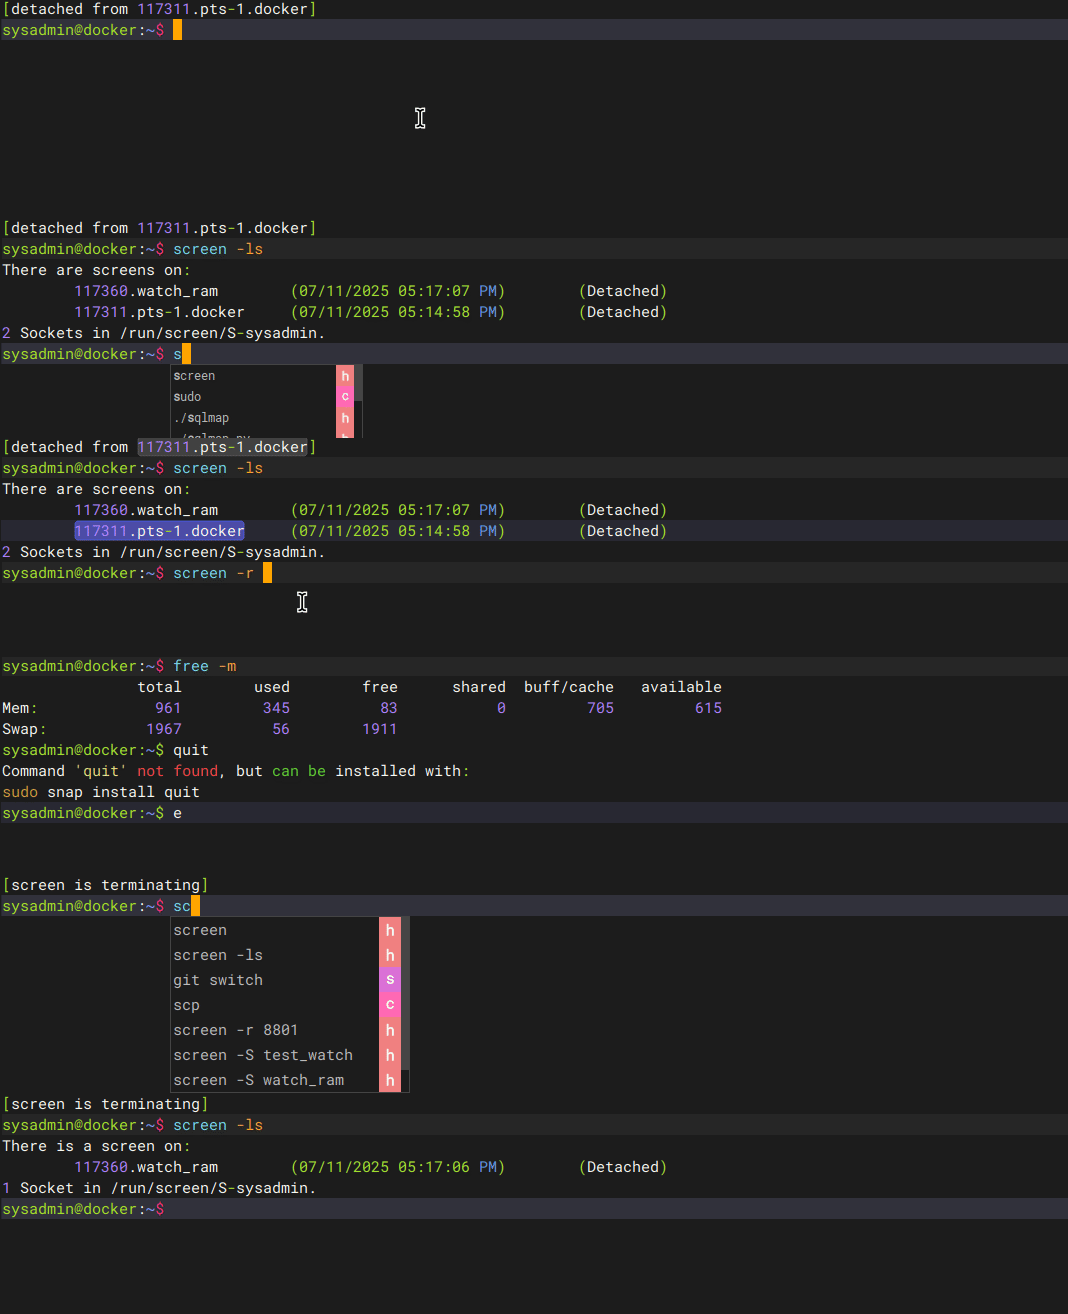
If it is from inside the screen, just type exit or press Ctrl+d for the session to end, the screen session will end, which is marked by the sentence [screen is terminating] on the screen, and the screen session will disappear as shown in the image below:
Delete a screen session from inside the screen
2. From outside the screen
If it is from outside the screen, there are 2 methods to turn off the screen session. The first method is to use the command in the format below:
screen -Sscreen_session-X quit
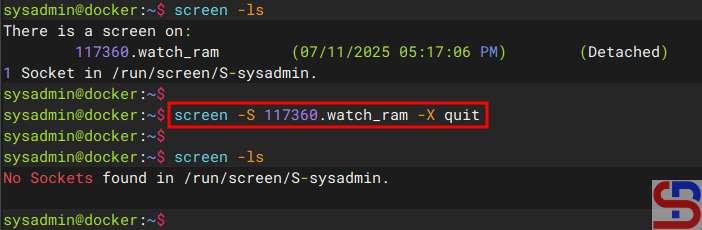
Let’s say you have a PID session 117360.watch_ram, and want to turn off the session from outside the screen. You can use the command:
screen -S 117360.watch_ram -X quit
And the screen session should be deleted, like in the image below:
Delete a screen session from outside the screen using the option -X quit
The second method is to use the kill command using the format:
killpid_screen_session
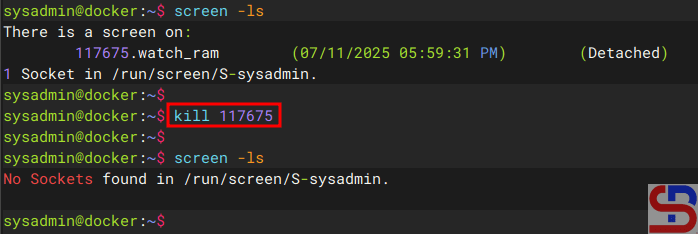
Let’s say you have a PID session 117675.watch_ram, and want to turn off the session from outside the screen. You can use the command:
kill 117675.watch_ram
And the screen session should be deleted, like in the image below:
Delete a screen session from outside the screen using kill
Note
If you open a screen session on a terminal but suddenly your internet connection is lost, you can open a new terminal and connect to the previous screen session. But after you type the command screen -r pid_screen_session, there is a statement as below:
There is no screen to be resumed matching 1195600.pts-1.linuxmint.
It means that the screen session is already attached somewhere ‐- likely in another terminal, SSH session, or even an old/abandoned connection. You can forcefully take over the session using:
screen -D -r 1195600.pts-1.linuxmint
And you should be able to reattach to the screen session.
How to Display the Total CPU Size Used by an Application on Linux?
written by sysadmin | 26 July 2025
The previous article explained how to display the total size of memory used by applications on Linux. This article will explain how to display the total CPU size used by an application on Linux.
Problem
How to display the total CPU size used by an application on Linux?
Solution
You can use the application commonly used to see processes that run on Linux, such as top and htop, because it will display the CPU usage. Still, I want to display the size of the CPU used by an application because the display of the two commands is still confusing. Here are some scripts that can be used to see the size of the CPU used by an application on Linux:
A. Displays CPU per one application
Run the command below to see the CPU size used by an application (this script will display the size of the CPU used by the Vivaldi browser):
echo "Firefox browser use $(ps -C firefox -o %cpu --no-headers 2>/dev/null \
| awk -v cores=$(nproc) '{sum+=$1} END {if (NR>0) printf "%.1f%% CPU (of %d cores)", \
sum, cores; else print "0% CPU (not running)"}')"
Then the memory used by Firefox will be displayed as shown in the picture below:
Display the size of the total CPU used by Firefox
B. Display the CPU for more than one application
If you want to display the CPU size used by more than one application, use the command below (this script will display the CPU size used by the Vivaldi and Firefox browsers):
for app in firefox-bin vivaldi-bin; do   echo -n "$app: ";   ps -C "$app" -o %cpu --no-headers 2>/dev/null |     awk -v cores=$(nproc) '{
      sum+=$1
    } END {
      if (NR>0) printf "%.1f%% CPU (of %d cores)\n", sum, cores
      else print "0% CPU (not running)"
    }'; done
Then the CPU used by Vivaldi and Firefox browsers will be displayed as shown in the picture below:
Display the size of the total CPU used by Vivaldi and Firefox
C. Displays the 5 apps that use the most CPU
Run the script below to see the 5 Linux applications that use the most CPU:
{
  echo -e "Application Name       %CPU"
  ps -eo comm,%cpu --no-headers | awk '{cpu[$1]+=$2} END {for (p in cpu) printf "%-20s %6.2f\n", p, cpu[p]}' | sort -k2 -nr | head -n 5
}
The script above will show the 5 Linux applications that use the most CPU:
Display the Linux applications that use the biggest CPU
Note
If you want to know the simple Linux command to display the memory and CPU of an application, you can use the command below (for this case, I chose the Firefox application):
How to Display the Total Memory Size Used by an Application on Linux?
written by sysadmin | 26 July 2025
I want to see the total memory size used by an application on Linux.
Problem
How to display the total memory size used by an application on Linux?
Solution
I usually use top or htop to see the process that occurs in Linux. But I want to be more specific to see how much the total size of the memory used by an application on Linux is. After searching on the internet, 2 tools can be used:
A. Using the ps_mem Tool
The ps_mem tool is used to see the use of memory for a program made by Pixelb at Github. To install this tool, make sure you have a Python package on your Linux device. Use the commands below to install ps_mem:
If your Linux device has python3 and its location at /usr/bin/python3 (to know the location of the python, use whereis python3), use the command below so that this tool can run on your device:
sudo ln -s /usr/bin/python3 /usr/bin/python
After that, type the command below whether the ps_mem tool is running or not:
ps_mem --version
To see the options used in this tool, use the command below:
ps_mem --help
In general, the format used to see the size of a memory used in a Linux application is as follows:
ps_mem -S -p $(pgrepapplication_name)
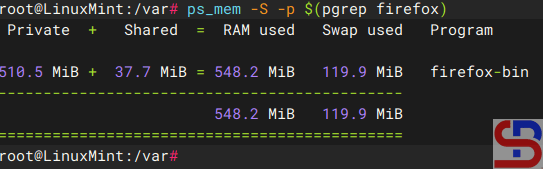
For example, if you want to see how much memory size is used in the Firefox application, then type the command below:
ps_mem -S -p $(pgrep firefox)
Display the size of total memory using ps_mem
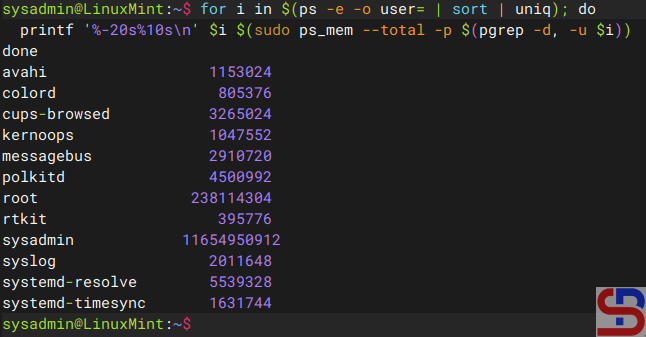
As seen in the picture above, the Firefox application uses memory of 548.2 MB. To see the total memory used per Linux user, you can use the command below:
for i in $(ps -e -o user= | sort | uniq); do
  printf '%-20s%10s\n' $i $(sudo ps_mem --total -p $(pgrep -d, -u $i))
done
Display used memory by user on Linux
INFO
If you want to change the result to Megabytes, use the below command:
for i in $(ps -e -o user= | sort | uniq); do bytes=$(sudo ps_mem –total -p $(pgrep -d, -u “$i”) 2>/dev/null) bytes=${bytes:-0} mb=$(( bytes / 1048576 )) printf ‘%-20s%10s MB\n’ “$i” “$mb”
B. Using the smem Tool
This tool provides detailed reports on memory usage per process and per user, as well as providing additional information such as USS (Unique Set Size) that is not available in traditional tools such as top or htop. Below is how to install the smem tool:
Ubuntu/Debian
sudo apt update
sudo apt install smem
RockyLinux/AlmaLinux/CentOS
sudo yum install smem
OpenSUSE
sudo zypper install smem
Type the command below to run a smem command:
smem
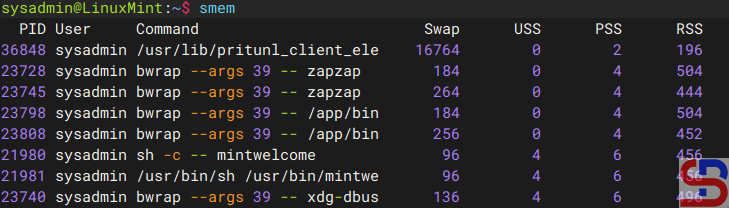
Then the display will appear as shown below:
the smem command
The terms USS, PSS, and RSS can be briefly explained below:
USS (Unique Set Size) = Memory used exclusively by the process.
PSS (Proportional Set Size) = Shared memory divided among processes.
RSS (Resident Set Size) = Total RAM used (including shared).
After that, to display the size of memory used by a Linux application, such as the Vivaldi browser application, you can use the following script:
echo "Vivaldi using memory of $(smem -c "name pss" | grep -i vivaldi | awk -v avail_mem_kb=$(grep MemAvailable /proc/meminfo | awk '{print $2}') -v total_mem_kb=$(grep MemTotal /proc/meminfo | awk '{print $2}') '{sum+=$2} END {if(sum>0) {printf "%.2f MB (%.1f%% of total RAM, %.1f%% of available RAM)", sum/1024, (sum/total_mem_kb)*100, (sum/avail_mem_kb)*100} else {print "0 MB (0% of total RAM, 0% of available RAM)"}}')"
Display the size of the total memory that is used for Vivaldi using smem
If you want to display the memory size used by more than one application, such as Vivaldi and Brave browser applications, copy the script below:
for app in vivaldi brave; do avail_mem_kb=$(grep MemAvailable /proc/meminfo | awk '{print $2}'); total_mem_kb=$(grep MemTotal /proc/meminfo | awk '{print $2}'); sum=$(smem -c "name pss" | grep -i "$app" | awk '{s+=$2} END {print s+0}'); LC_NUMERIC=C printf "%s using memory of %.2f MB (%.1f%% of total RAM, %.1f%% of available RAM)\n" "$app" "$(echo "$sum/1024" | bc -l)" "$(echo "($sum/$total_mem_kb)*100" | bc -l)" "$(echo "($sum/$avail_mem_kb)*100" | bc -l)"; done
Display the size of the total memory of two Linux applications using smem
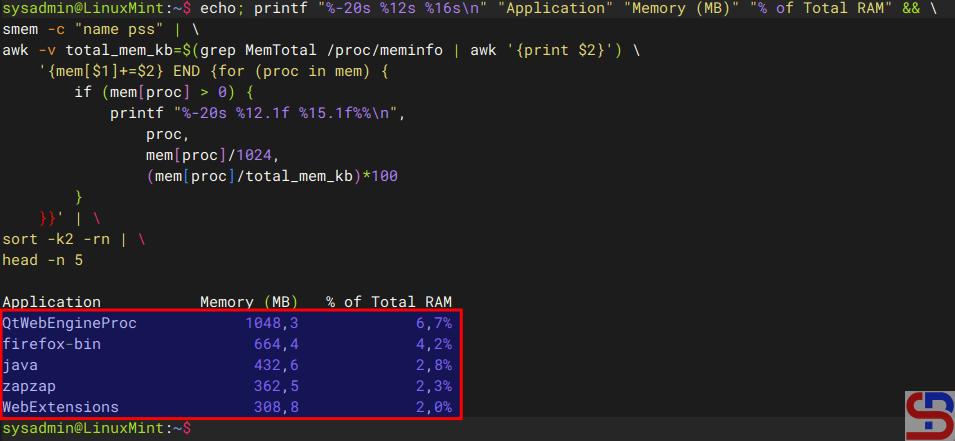
If you want to see the applications on your Linux device that use the most memory, copy the script below where the script will display the 5 Linux applications that use the most memory:
List of 5 top application that use the biggest memory in Linux
Note
If you compare the results of the two tools, you can see the results obtained are almost the same as in the picture below:
Comparison result of ps_mem and smem tools
If you want to see the total size of memory used by an application on Linux easily then you can use the ps_mem tool. However, if you want to see a list of Linux applications that use the most memory, you can use the smem application.
How to Display Hidden Files and Folder Sizes on Linux?
written by sysadmin | 26 July 2025
To see the total size of a folder in Linux usually sysadmin uses the command du -sh*. However, this command has a drawback because it only displays the size of all files and folders visible in the Linux folder but cannot display the size of the files and folders hidden in a Linux folder.
Problem
How to display hidden files and folder sizes on Linux?
Solution
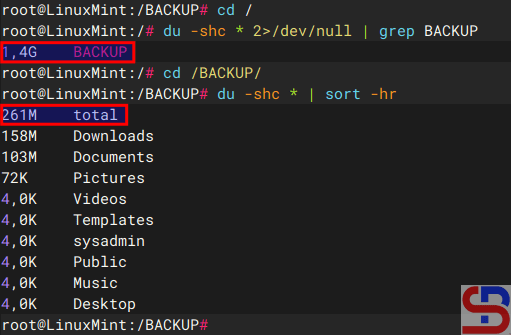
I have a BACKUP folder with a total folder size of 1.4GB, but, when I go to the folder and run the command du -sh *, it turns out that the size of all the files and folders in the folder is only 261 MB as shown in the image below:
Total size of the folder
So there is a difference of 1.1 GB from the total size of the BACKUP folder. The difference is that the du -sh* command does not count the hidden files and folders in a Linux folder. To display hidden files and folder sizes on Linux, use the command below:
du -shc .[^.]* 2>/dev/null | sort -hr
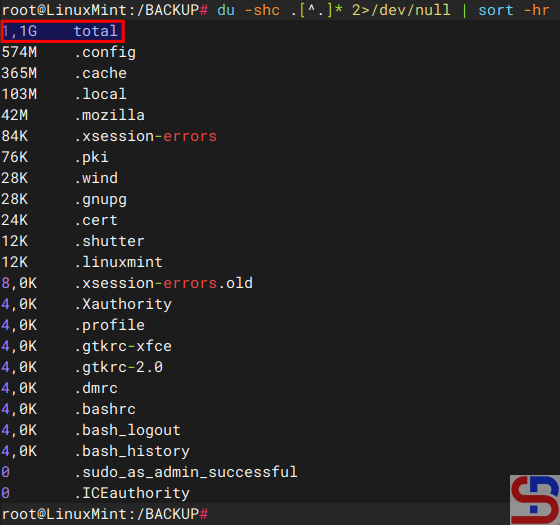
and it will look like in the image below:
Total size of the hidden files/folders
As seen in the image above, the command only displays hidden files and directories and shows a total of 1.1 GB of hidden files and folders. If you want to display the size of the entire file or folder, both hidden and visible, use the command below:
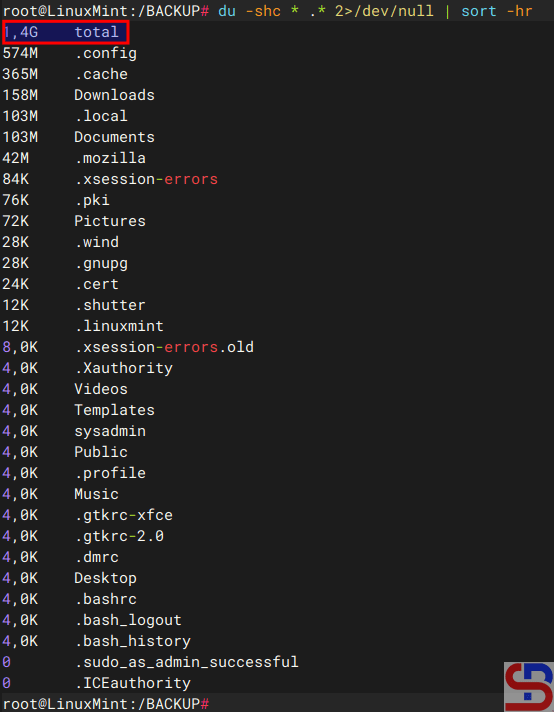
du -shc * .* 2>/dev/null | sort -hr
there will be a display like the image below:
Total size of all the files/folders
You can see the total size of a file and folder, both visible and hidden, like the image above.
Note
You can view file sizes and directories on Linux by using an application named ncdu. To install it, enter the following command:
Next, choose the folder you wish to view to see the overall size of the files and folders included within. If you want to see the total of all folders in Linux, log in as a root user and type the command below:
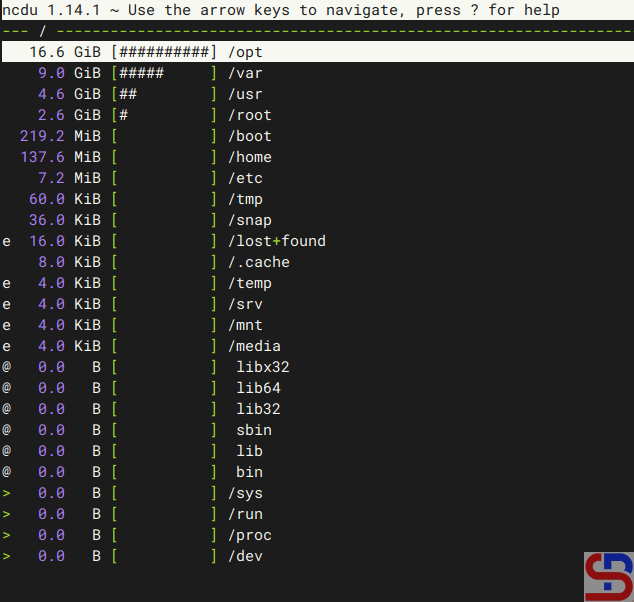
ncdu -x /
then the application will scan and after the scanning process is complete it will display the total size of all folders in Linux as shown in the image below:
Total size of all folders in Linux
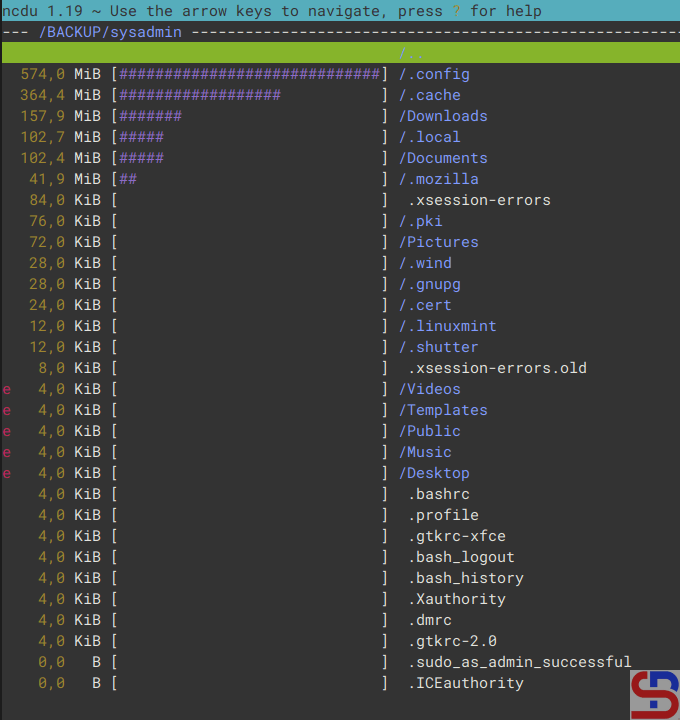
Please select the folder you want to enter and press the Enter key to enter the folder. I choose the BACKUP folder and push the Enter button, it will display like the image below:
Enter into the BACKUP folder
The -x option in the above command means that he will ignore other mounted filesystems outside where the root filesystem is hosted. If you want to use more options in this application, please read the description using the command below:
How to Display a Partition That is Not Visible in Linux?
written by sysadmin | 26 July 2025
I installed dual-boot Windows 11 with Linux Mint on my laptop and allocated almost 110 GB of hard disk size for Linux Mint. However, after Linux Mint is installed, only 49 GB of hard disk size is displayed.
Problem
How to display a partition that is not visible in Linux?
Solution
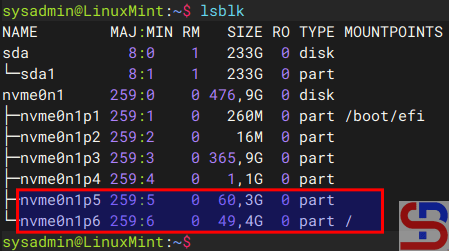
I have a hard disk of almost 500GB and I installed dual-boot Linux Mint alongside Windows Boot Manager where the last two partitions are used as Linux partitions like in the image below:
Display the partitions
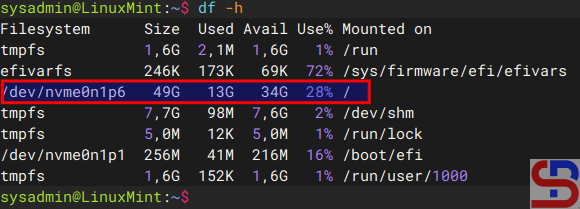
From the image above you can see that 2 partitions in Linux have a hard disk size of 60 GB and 49 GB respectively. But when I display the hard disk size using df -h command, I just see only one partition like in the image below:
Only one partition appears
After I searched on the internet, the root cause of the invisible partition was not mounted. Here are the steps to display an invisible Linux partition and I want to mount it to my /home folder:
1. Backup the folder
Backup first the folder you want and in this case the /home folder I will backup first:
sudo cp -a /home /home_backup
2. Check the filesystem
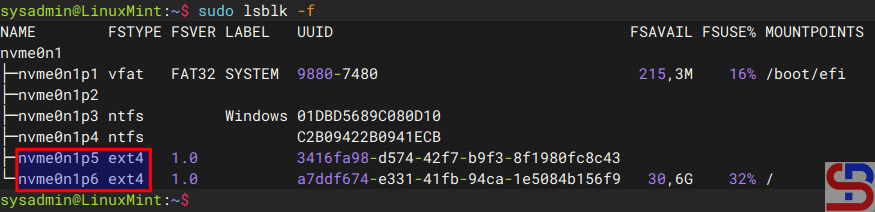
Check the filesystem of the partition using the command below:
sudo lsblk -f
Check the filesystem
From the image above, the “invisible” partition has an ext4 format type. If the partition is not formatted, format it using the command below if you want an ext4 format for the partition and adjust it to the name of your Linux partition:
sudo mkfs.ext4 /dev/nvme0n1p5
3. Create a temporary mount
Now, create a temporary mount and move existing home data using the commands below:
sudo mkdir /mnt/new_home
sudo mount /dev/nvme0n1p5 /mnt/new_home
sudo cp -a /home/. /mnt/new_home/
4. Unmount the temporary mount
Use the command below to unmount the temporary mount:
sudo umount /mnt/new_home
5. Update the fstab file
Now, update the /etc/fstab file to it at /home on boot so the folder remains after the device restarts. Copy the script below and paste to the file:
/dev/nvme0n1p5 /home ext4 defaults 0 2
6. Mount the folder
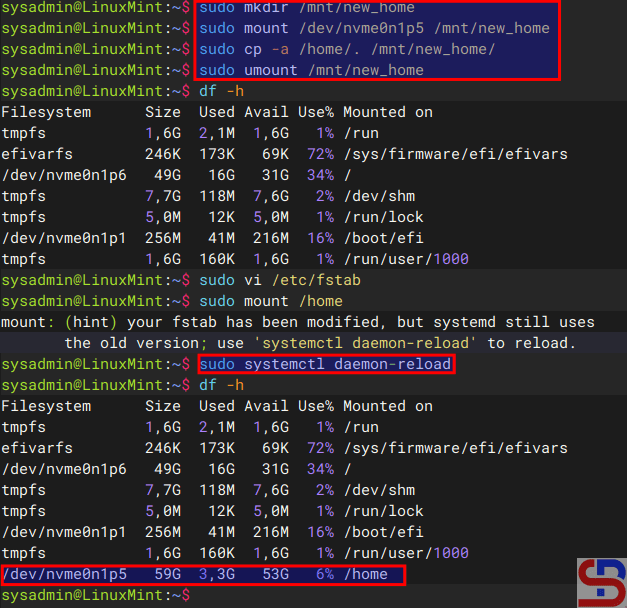
Now, mount the /home folder using the commands below:
sudo mount /home
sudo systemctl daemon-reload
df -h
For more details see the image below:
The commands to mount /home
From the image above, you see that the invisible partition is already mounted to the /home folder.
Note
Try to reboot the device to make sure the folder remains after the device reboots and the /home folder should be mounted from /dev/nvme0n1p5. If something goes wrong, you can restore the old home with the command below:
sudo mv /home_backup /home
And then remove the fstab entry to boot normally. Once you have restarted the appliance and you see that there is no error so that you can access the folder you just created (in this case the /home folder), you can delete the /home_backup folder by using the command below: