How to Install Docker on the Linux Server?

A Docker is a platform for developing, shipping, and running container applications. Docker is like installing a virtual machine application on your laptop or server, whether itโ€™s VirtualBox, VMWare, or Xen, so you can test various operating systems or applications on it without putting your laptop or server in danger.


Problem

How to install Docker on the Linux server?


Solution

A. Docker summary

The key differentiator between containers and virtual machines is that virtual machines virtualize an entire machine down to the hardware layers, and containers only virtualize software layers above the operating system level. Take a look at the image below to make the difference between virtual machines and Docker clearer:

Comparison of Docker and Virtual Machine Architecture (image credit from atlassian.com)


The table below shows the comparison between virtual machines and Docker:

Comparison between Docker and virtual machine (Image credit from huawei.com)


Below is a brief explanation of the terms in Docker:

  • ๐——๐—ผ๐—ฐ๐—ธ๐—ฒ๐—ฟ ๐—ฃ๐˜‚๐—น๐—น: Downloads images from Docker Hub if not locally available
  • ๐——๐—ผ๐—ฐ๐—ธ๐—ฒ๐—ฟ ๐—•๐˜‚๐—ถ๐—น๐—ฑ: Creates a local image using a Dockerfile, enabling custom images
  • ๐——๐—ผ๐—ฐ๐—ธ๐—ฒ๐—ฟ ๐—ฃ๐˜‚๐˜€๐—ต:Uploads images to Docker Hub, allowing sharing
  • ๐——๐—ผ๐—ฐ๐—ธ๐—ฒ๐—ฟ ๐—ฅ๐˜‚๐—ป: Takes an image to run a container, useful for starting web servers or other applications
  • ๐——๐—ผ๐—ฐ๐—ธ๐—ฒ๐—ฟ ๐—œ๐—บ๐—ฎ๐—ด๐—ฒ: Read-only templates forming the base of containers, including all application dependencies
  • ๐——๐—ผ๐—ฐ๐—ธ๐—ฒ๐—ฟ ๐—–๐—น๐—ถ๐—ฒ๐—ป๐˜: Interacts with Docker, sending instructions to the Docker daemon to execute tasks
  • ๐——๐—ผ๐—ฐ๐—ธ๐—ฒ๐—ฟ Daemon: Handles all requests, including building, running, and distributing containers
  • ๐——๐—ผ๐—ฐ๐—ธ๐—ฒ๐—ฟ ๐—–๐—ผ๐—ป๐˜๐—ฎ๐—ถ๐—ป๐—ฒ๐—ฟ๐˜€: Include everything needed to run an application, such as code, libraries, and configurations
  • ๐——๐—ผ๐—ฐ๐—ธ๐—ฒ๐—ฟ ๐—ฅ๐—ฒ๐—ด๐—ถ๐˜€๐˜๐—ฟ๐˜†: Stores Docker images, with Docker Hub as a public registry and the option to create private ones

The image below is a picture of how the Docker works:

How Docker works (Image credit from geeksforgeeks.org)


B. Install Docker

In general, use the command belowย  to install Docker on Linux:

curl -fsSL https://get.docker.com -o get-docker.sh
sh get-docker.sh


But after you execute the commands above, there is an error like this when you install it in RockyLinux:

ERROR: Unsupported distribution ‘rocky’

You have to install Docker manually using these commands:

sudo dnf config-manager --add-repo https://download.docker.com/linux/rhel/docker-ce.repo
sudo dnf -y install docker-ce docker-ce-cli containerd.io docker-buildx-plugin docker-compose-plugin


Or when you install Docker in OpenSUSE, you get an error like this:

ERROR: Unsupported distribution ‘opensuse-leap’

Use the commands below to install Docker in OpenSUSE:

sudo zypper install -y docker docker-compose docker-compose-switch


C. After installing Docker

Use the following command to run Docker:

sudo systemctl restart docker
sudo systemctl enable docker


To see the version of Docker you installed, use the command below:

docker info

Running the docker info command


D. Test the application in Docker

After that, to see whether Docker is running well on the server, use the command below to run the hello-world container on your server:

docker run hello-world


If you have got the error like the image below:

Error when running the docker run command


ERROR: permission denied while trying to connect to the Docker daemon socket at unix:///var/run/docker.sock: Get “http://%2Fvar%2Frun%2Fdocker.sock/v1.47/info”: dial unix /var/run/docker.sock: connect: permission denied

Then you have to run the following command:

sudo usermod -aG docker $USER


Log out of your server and log in again. After that, you should be able to run the Docker commands like in the image below:

Test the Docker run command


That way, your Docker application is ready to use.


Note

You donโ€™t have to use Docker to create and run containers, but you can use other applications such as podman, buildah, cri-o, etc. However, Docker is the most popular at the moment. Also, the terms and workings of various container applications are almost the same, so if you understand the terms and workings of Docker, then you will also understand the terms and workings of other container applications. To learn about basic commands in Docker, go to this page.


References



How to Display Server Memory Percentage on Linux?

In general, sysadmins will use the free -m command to see how much server memory is on the Linux server and how much is used. However, I want to display the server memory percentage on my Linux.


Problem

How to display server memory percentage on Linux?


Solution

If you run free -m on your Linux server, you will see something like this in the image below:

Display of RAM condition


a. Display the memory usedย 

Use the command below to display the memory used in percent form:

free -m | grep Mem | awk '{print $3/$2 * 100.0}' | sed 's/$/%/'

Used memory in percentage


b. Display available free memoryย 

Use the command below to display available free memory in percent form:

free -m | grep Mem | awk '{print $4/$2 * 100.0}' | sed 's/$/%/'

display server memory percentage on Linux
Free memory in percentage


c. Display the cache memory

Use the command below to display the cache memory in percent form:

free -m | grep Mem | awk '{print $6/$2 * 100.0}' | sed 's/$/%/'

display server memory percentage on Linux
Cache memory in percentage


d. Integrate with bash script

If you want the percentage of memory to be put into the bash script for comparison, then the percentage should be changed from a fraction to an integer. Take a look at an example of a bash script below:

#!/bin/bash

# Take the percentage of memory usage
mem_usage=$(free -m | grep Mem | awk '{print $3/$2 * 100.0}')
echo Usage Memory: $mem_usage

# Change to integer for comparison
mem_usage_int=${mem_usage%.*}

# Check condition
if [ $mem_usage_int -gt 80 ]; then
    echo "High Memory: ${mem_usage_int}% used"
else
    echo "Low Memory: ${mem_usage_int}% used"
fi


Note

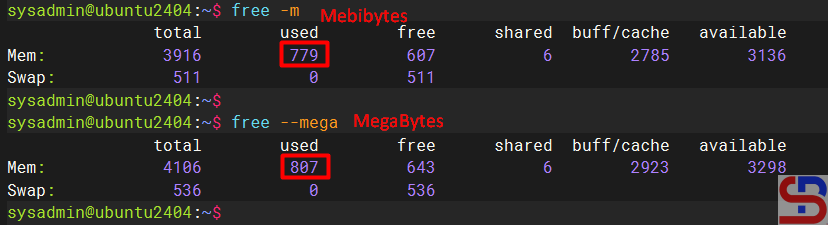
Sysadmins, including me, often think that using the free -m command will display memory in Megabytes (MB), even though the command will display memory in Mebibytes. To display memory in Megabytes, run the free –mega command, where 1 Mebibyte (MiB) is the same as 1,048 Megabytes. Look at the image below to see the difference between Mebibytes and Megabytes:

display server memory percentage on Linux
Difference between Mebibyte and Megabyte


References

stackoverflow.com
baeldung.com
mathda.com


How to Make a Linux User Have the sudo Function?

SUDO stands for “SuperUser DO” and it is a program for Unix-like computer operating systems that enables users to run programs with the security privileges of another user, by default, the superuser. With sudo, a normal user can install or delete an application, change the server network, or even reboot or shut down the server.


Problem

How to make a Linux user have the sudo function?


Solution

This article will explain how to make a Linux user have the sudo function on RockyLinux/AlmaLinux/CentOS, Ubuntu/Debian, and OpenSUSE distros. For example, you want to add the user john to these distros and want that user to be able to use the sudo function. As far as I know, there are two methods to do it:

1. Change the sudoers file

Open the /etc/sudoers file or use the command below:

visudo


Add to the file the user name as in the image below:

Add the user in the sudoers file


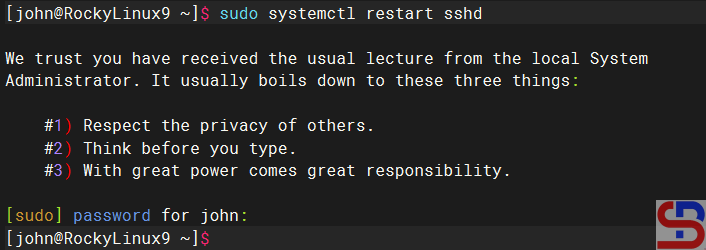
After that, save the file and then try to add a new user using the user john, if there is a display like the image below:

Choose number 1


Then select number 1, and the user should successfully add a new user as in the image above.

2. Add the user to the sudo group

Add the user to the sudo group, where the name of this sudo group can vary in each distro. To see the name of the sudo group, look in the sudoers file and look for a sentence similar to ‘Allows people in group to execute any command‘. For example, in RockyLinux and OpenSUSE, the name of the sudo group is wheel, sudo in Ubuntu, and don’t forget to make sure to uncomment the section as in the image below:

Check the sudo group in the sudoers file


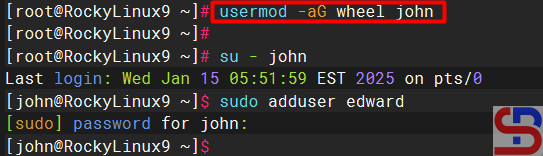
Then type the command below so that a user can use sudo:

RockyLinux & OpenSUSE

usermod -aG wheel john

make a Linux user have the sudo function
Add the user to the sudo group


Ubuntu/Debian

usermod -aG sudo john


Note

The two methods above can provide the sudo feature to a user on Linux so that the user can run commands that can only be executed by root if the user uses the sudo command by writing down the password. However, if you want the bob user not to have to enter a password when running the sudo command, then in the sudoers file, type the script below:

bob             ALL=(ALL)       NOPASSWD: ALL


Use the command below if you want the robin user to only be able to perform reboot commands using sudo, but not other commands using sudo:

robin           ALL=(ALL)     /usr/sbin/reboot

make a Linux user have the sudo function
Give the partial sudo function to the user


References

en.wikipedia.org
askubuntu.com
phoenixnap.com
hostinger.com


How to Display the Timestamp in the History Command?

Displaying the timestamp in the history command is very useful for various purposes. However, in general, Linux systems do not display a timestamp when you run the history command


Problem

How to display the timestamp in the history command?


Solution

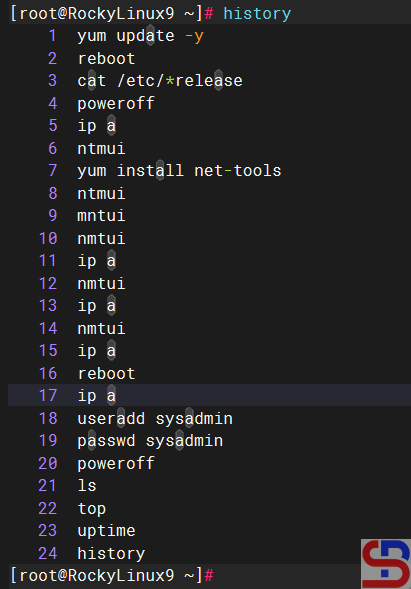
If you type the history command on your Linux server, by default, you will find that there is no timestamp, as in the image below:

display the timestamp in the history command
The history command


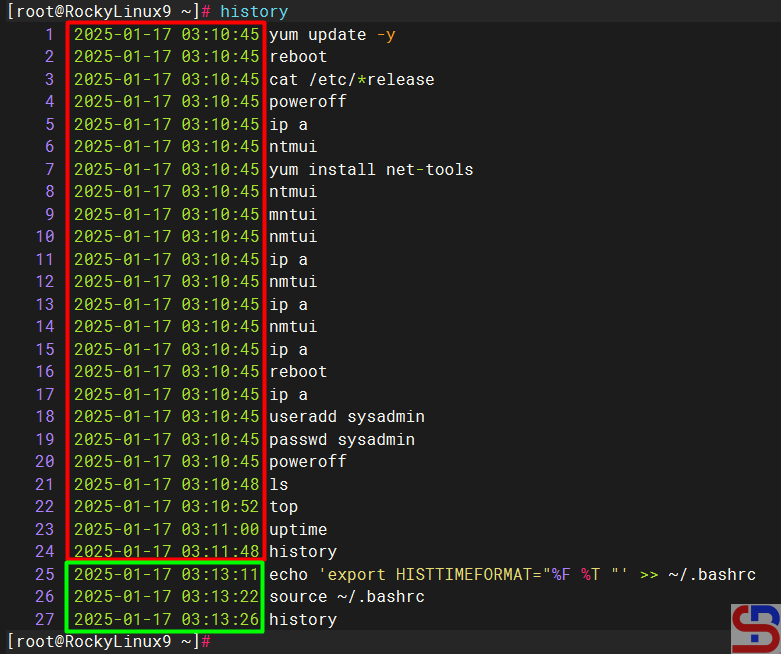
So that your Linux server can display timestamps in the history command, type the command below:

echo 'export HISTTIMEFORMAT="%F %T "' >> ~/.bashrc
source ~/.bashrc

display the timestamp in the history command
The history command with a timestamp


The image above shows that the timestamp is already visible when you type the history command. Linux commands executed for a long time will display the same timestamp (look at the image above in the red box). However, if you run another Linux command, the timestamp displayed will be the same as when you executed the Linux command (look at the image above in the green box).


Note

By default, you have to run the commands above on each user to display the timestamps in the history command. But I think it’s very tiring to do that. So, if you want to display a timestamp in the history command for each Linux user, copy the command below:

sudo vi /etc/profile.d/history-timestamp.sh


After that, copy the script below into the file:

export HISTTIMEFORMAT="%F %T "


and then run the below script:

sudo chmod 644 /etc/profile.d/history-timestamp.sh


The history command in the new user’s shell will display timestamps automatically if there is a new user on your Linux server.


References

cyberciti.biz
stackoverflow.com
tecmint.com
linuxhandbook.com


How to Install gcloud on RockyLinux?

If you use GCP in daily operations, it is recommended to use the commands in the CLI known as gcloud. This is because many commands can only be executed using gcloud rather than using the Console in the browser.


Problem

How to install gcloud on RockyLinux?


Solution

Before you access GCP and run GCP commands through your server, you must first install gcloud on your server.

A. Install gcloud

As far as I know, there are 2 methods to install gcloud on RockyLinux/AlmaLinux/CentOS, and both methods recommend using a user other than root.

1. Using the script

Before you download the script, install the packages using the command below:

yum install tar curl


Use the command below to download and install the script:

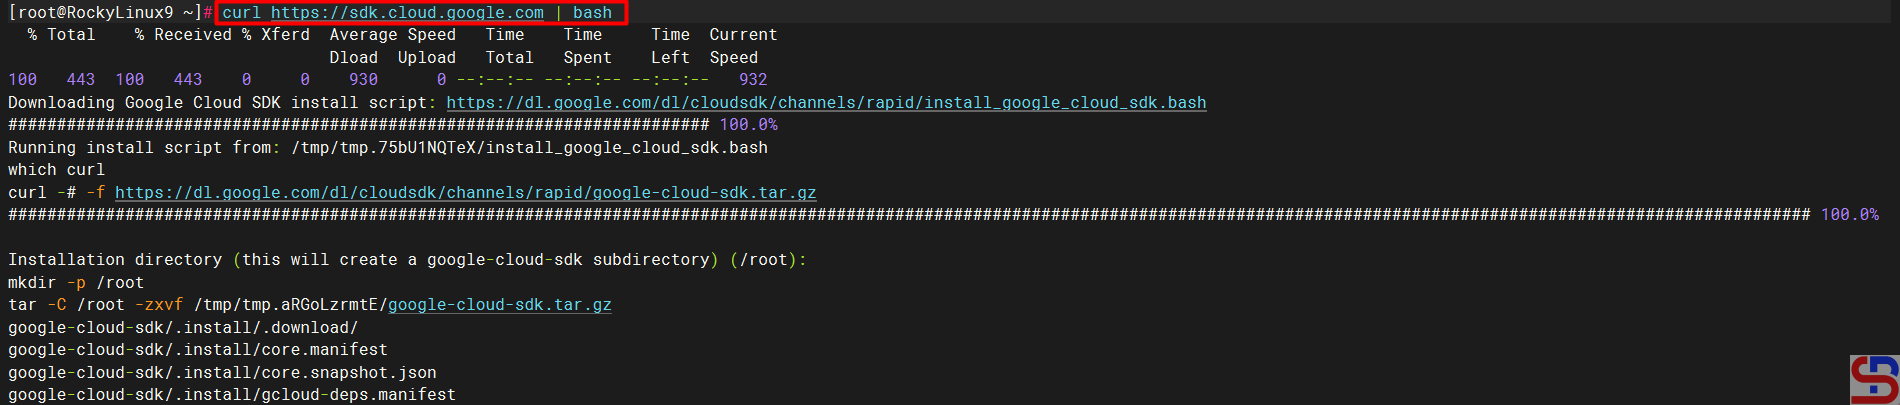
curl https://sdk.cloud.google.com | bash


Then you will see a display like the one below:

install gcloud on RockyLinux
Install gcloud using the script


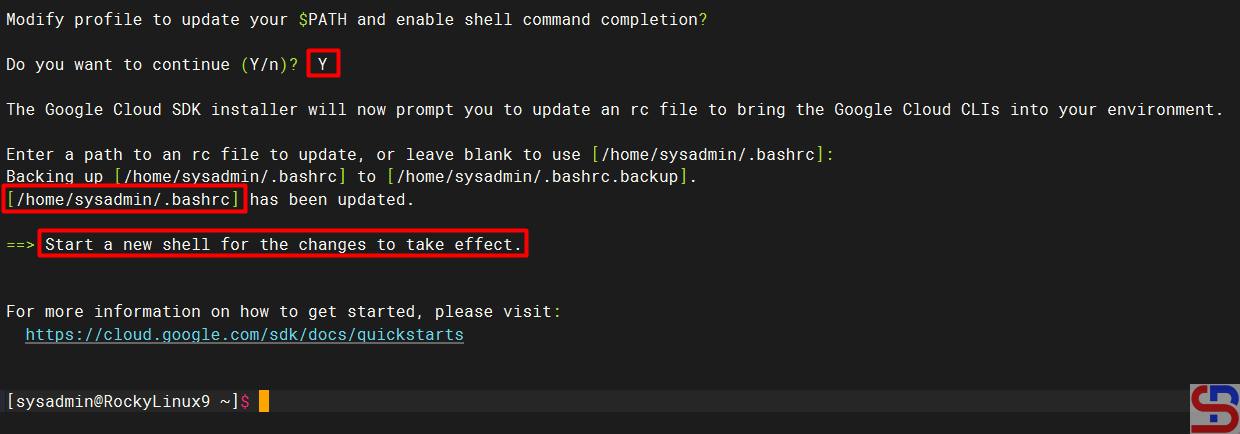
Wait until it’s finished, and you will see a display like the one below:

install gcloud on RockyLinux
Installation complete


From the image above, you are asked to create a new SSH connection so that the effect can be seen, and type the command below:

gcloud version


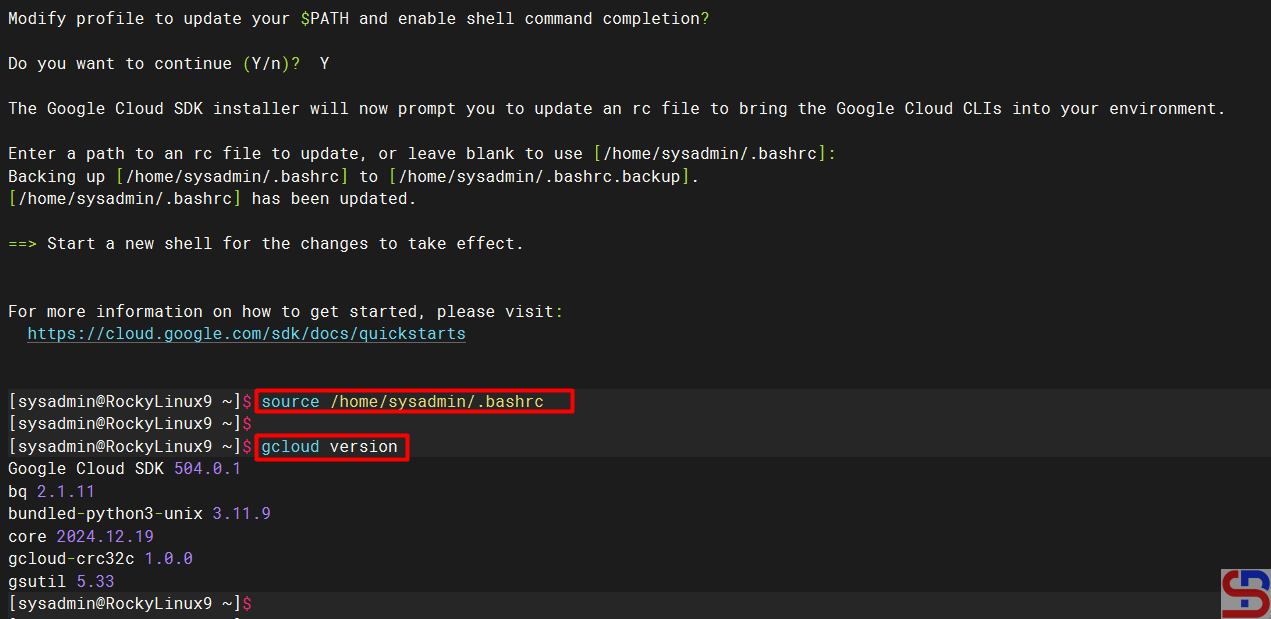
However, you can use the command below:

source /home/sysadmin/.bashrc


So you don’t need to create a new SSH connection to run the gcloud version command, which results in the image below:

install gcloud on RockyLinux
Check the result of the installation


2. Using the Repository

You have to add the Google Cloud SDK repository to your server using the following command:

sudo tee -a /etc/yum.repos.d/google-cloud-sdk.repo << EOM
[google-cloud-cli]
name=Google Cloud CLI
baseurl=https://packages.cloud.google.com/yum/repos/cloud-sdk-el9-x86_64
enabled=1
gpgcheck=1
repo_gpgcheck=0
gpgkey=https://packages.cloud.google.com/yum/doc/rpm-package-key.gpg
EOM


After that, install gcloud using the command below:

yum install google-cloud-sdk


After the installation finishes, run the following command to test the gcloud command:

gcloud version


B. Connect to GCP

After you install gcloud on your server, type the command below:

gcloud init


Then there will be a display like the image below:

Click the link


Click the Ctrl+Click button in the red box to open the link in a browser, or if you have difficulty, copy what is in the red box and place it in your browser so you will see a display like the one below:


Click the account


Click on the Google account that will access GCP, then there will be a display like the image below:

Click the Continue button


Click the Continue button, then the display below will appear:

Click the Allow button


Click the Allow button, then the display below will appear:

Click the Copy button


Click the Copy button, and paste it into the CLI on your server as in the image below:

Paste the code


Select the project and configure the zone as in the image above. After that, the gcloud configuration is complete.

C. Test gcloud

Now, try gcloud to access your GCP. I try to list my virtual machine in GCP using the below command:

gcloud compute instances list


Then the display below will appear:

install gcloud on RockyLinux
Display virtual machine in GCP using gcloud


If you get a display like the image above, you have successfully used your gcloud to access your GCP.


Note

If you have many projects on your GCP, you can choose one of these projects as the starting point for your gcloud on GCP. You can switch projects using the command:

gcloud config set project PROJECT_ID

Change PROJECT_ID to the project ID you want to switch to.


References

liquidweb.com
cloud.google.com
bacancytechnology.com


How to Set Up Passwordless SSH Login?

As a sysadmin, remote to a Linux server is a daily job to perform various checks on a Linux server. By default, if a sysadmin accesses a server, the sysadmin must enter a username and password. However, when the sysadmin has many servers, it is sometimes difficult for the sysadmin to enter the password for each server, especially if each server has a different password. Therefore, it needs to be made so that SSH does not need to enter a password when accessing a Linux server via SSH.


Problem

How to set up passwordless SSH Login?


Solution

There are 3 steps to setting up passwordless SSH:

1. Generate a key pair

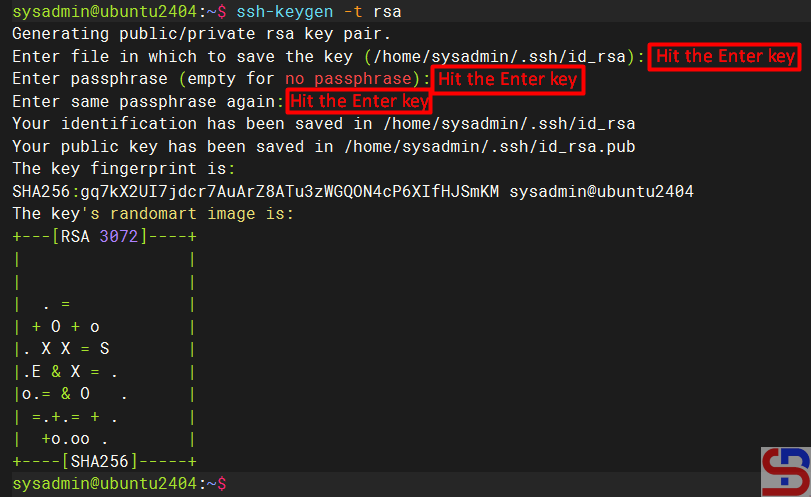
Use ssh-keygen to generate a key pair consisting of a public key and a private key on the client computer:

ssh-keygen -t rsa


The -t rsa option specifies that the type of the key should be the RSA algorithm. Hit Enter to accept the default.

Running the ssh-keygen command

2. Upload the public key to the remote server

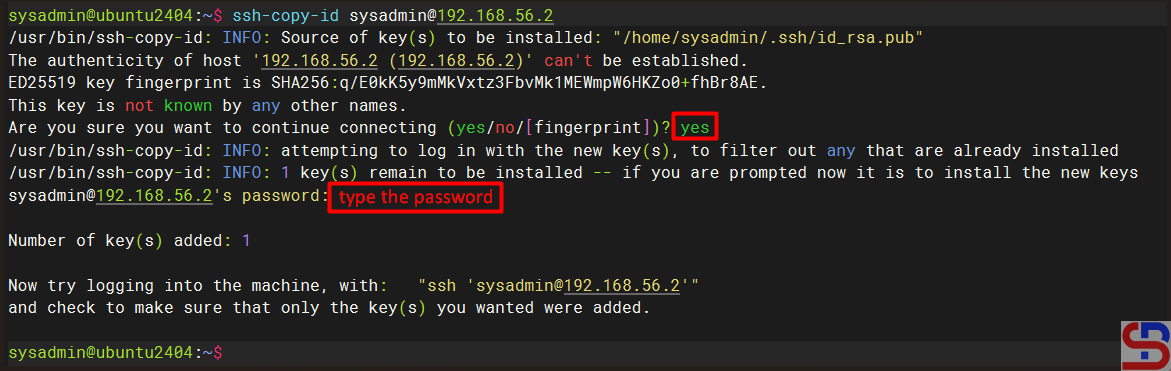
Use ssh-copy-id to propagate the public key to the server:

ssh-copy-id remote_username@remote_server_ip_address

For example, if you want to upload it to the server 192.168.56.2 with the username sysadmin, then use the command below:

ssh-copy-id sysadmin@192.168.56.2


Type yes when prompted and type the password for the remote server.

set up passwordless SSH
Running the ssh-copy-id command


For your information, the id_rsa.pub file will be saved in the .ssh/authorized_keys file on the remote server, like in the image below:

set up passwordless SSH
The authorized_keys file


3. Test login via SSH

Try to connect to the server using SSH, you should be able to directly access the server without entering the password first. For example, I have 2 Linux servers, each of which uses Ubuntu OS with IP 192.168.56.100 and RockyLinux OS with IP 192.168.56.2. I want to access the RockyLinux server from the Ubuntu server without entering a password. I ran the three steps above to set up passwordless SSH on an Ubuntu server, and the results are as in the image below:

set up passwordless SSH
Access the server without entering a username and password

From the image above, you can see that I can directly access the server without entering the server password.


Note

By default, the system will generate a 2048-bit key in the first step when you run the ssh-keygen command. However, if you want to be more secure, you can use 4096-bit encryption by using the command below:

ssh-keygen -t rsa -b 4096


Besides RSA, you can also use several other public key algorithms, such as ECDSA or ED25519. Elliptic Curve Digital Signature Algorithm, or ECDSA, is one of the more complex public key cryptography encryption algorithms that supports three key sizes: 256, 384, and 521 bits. You can use the command below when using ECDSA:

ssh-keygen -t ecdsa -b 521


Ed25519 is an elliptic curve signing algorithm using EdDSA and Curve25519, and this is a new algorithm added in OpenSSH. You can use the command below when using ed25519:

ssh-keygen -t ed25519

Unfortunately, support for this among clients is not yet universal. Therefore, its use in general-purpose applications may not be advisable.

ย 

References

strongdm.com
phoenixnap.com
ssh.com
encryptionconsulting.com
cryptography.io