If you want to access MariaDB databases from other hosts, then your device must have a mariadb-client package.
Problem
How to install the mariadb-client in Linux?
Solution
Below is the command to install mariadb-client on some Linux distros:
Ubuntu/Debian
sudo apt update
sudo apt install mariadb-client
RockyLinux/AlmaLinux/RHEL
sudo yum install mariadb-client-*
Use the command below to see the version of mariadb-client after you installed the package:
mariadb --version
Checking MariaDB version
As you can see in the image above, the version of mariadb-client that you installed is version 10.11.3. But you should know that, usually by default, the package provided by the distro is a stable old version and not the latest stable version. Therefore, if you want the mariadb-client package to use the latest stable version, use the command below:
After that, reinstall the package using the command above (sudo apt install mariadb-client or sudo yum install mariadb-client-*), and your MariaDB version should be the latest.
Note
If you want to know how to access the MariaDB database from another host, you can go to this article.
How to Access a PostgreSQL Database From Another Host?
written by sysadmin | 26 November 2025
I want to access a PostgreSQL database from another host.
Problem
How to access a PostgreSQL database from another host?
Solution
I have 2 servers, the PostgreSQL server IP is 192.168.56.101, and the Ubuntu server IP is 192.168.56.11. I want to access the PostgreSQL database from the Ubuntu server. By default, use the format below if you want to access PostgreSQL:
psql -hip_db-uusername-ddb_name-pport_number
By default, the PostgreSQL database uses port 5432, so if you access your PostgreSQL using port 5432, you don’t need to write the port. I accessed my PostgreSQL by writing the command:
psql -h 192.168.56.101 -u postgres -d mydb
But I got an error like the image below:
psql: error: connection to server at ‘192.168.56.101’, port 5432 failed: Connection refused Is the server running on that host and accepting TCP/IP connections?
Error when accessing the PostgreSQL database
The following are the steps to access a PostgreSQL database from another host:
1. Open port
Open port 5432 on each server. If you use RockyLinux/AlmaLinux/RHEL for your servers, use the command below:
Ownership of a database and the tables in it in PostgreSQL is very crucial because this has a big influence on users who want to carry out CRUD (Create, Read, Update, Delete) activities in a PostgreSQL database. If the user is not the owner of the database and the tables in it, then the user will not be able to perform CRUD.
Problem
How to change ownership in PostgreSQL?
Solution
For example, I have a mydb database and mydb_user as a user. When I access the database using the user mydb_user and perform a query:
select * from employee;
There is an error as shown below:
ERROR: permission denied for table employee
Error permission denied
After I searched on the internet, it turned out that this was caused by the user mydb_user not being the owner of the mydb database and the tables in it. To see the owner of the database, you can use the query below:
SELECT datname AS database_name,
       pg_catalog.pg_get_userbyid(datdba) AS owner
FROM pg_database;
List the owners
You can see in the picture above, the postgres user is the owner of the mydb database. This is because when creating the database uses the postgres user and not the mydb_user.
INFO
You can also use an alternative query like the one below to see the owner of your database:
SELECT d.datname AS database_name, r.rolname AS owner
FROM pg_database d
JOIN pg_roles r ON d.datdba = r.oid
WHERE d.datname = 'your_database_name';
or using the simple query:
\l
Similarly, if you want to see the owners of the tables in the database (but you must first log in to that database to run this query), use the query below:
SELECT tablename, tableowner
FROM pg_tables
WHERE schemaname = 'public';
Then there will be a display like the following:
Show the owner of the tables
You can see in the image above that the owner of the table employee in the mydb database is a postgres user. This is because when creating the tables uses user postgres and user mydb.
INFO
You can also use a query like the one below to see the ownership of all tables in PostgreSQL:
SELECT
    schemaname,
    tablename,
    tableowner
FROM pg_tables
ORDER BY schemaname, tablename;
A. Change database owner
If you want to change ownership of the mydb database from user postgres to user mydb_user, then you have to log in to PostgreSQL as an existing user, which in the case of a postgres user:
ALTER DATABASE mydb OWNER to mydb_user;
Run the query below to check ownership of the database:
\l
Change the database owner
You can see that the owner of the mydb database has changed to user mydb_user. But even so, you still can’t run CRUD on the database because the tables in the database still belong to the postgres user.
B. Change the owner of the table
Still using the postgres user, log in to the mydb database using the command:
\c mydb;
Then run the query below to change the table, sequence, and view to mydb_user:
DO $$
DECLARE
    r RECORD;
BEGIN
    -- Change the owner of all tables
    FOR r IN SELECT schemaname, tablename FROM pg_tables WHERE schemaname = 'public'
    LOOP
        EXECUTE format('ALTER TABLE %I.%I OWNER TO mydb_user;', r.schemaname, r.tablename);
    END LOOP;

    -- Change the owner of all sequences
    FOR r IN SELECT sequence_schema, sequence_name FROM information_schema.sequences WHERE sequence_schema = 'public'
    LOOP
        EXECUTE format('ALTER SEQUENCE %I.%I OWNER TO mydb_user;', r.sequence_schema, r.sequence_name);
    END LOOP;

    -- Change the owner of all views
    FOR r IN SELECT table_schema, table_name FROM information_schema.views WHERE table_schema = 'public'
    LOOP
        EXECUTE format('ALTER VIEW %I.%I OWNER TO mydb_user;', r.table_schema, r.table_name);
    END LOOP;
END $$;
Query to change the owner of the tables
After that, run the command below to view the ownership of the tables in the mydb database:
SELECT tablename, tableowner
FROM pg_tables
WHERE schemaname="public";
Change the owner of the tables
From the image above, you can see the owner of the tables in the mydb database is not a postgres user but a mydb_user. So, you should be able to do CRUD using the mydb_user user as shown in the image below:
Do CRUD on the database
Note
As a reminder, to create databases and tables in the database, you should not use postgres user but create a new user because it is very dangerous to use postgres user to carry out daily activities in the PostgreSQL database.
The previous article explained the basic commands in the PostgreSQL database. This article will explain how to set up a user in PostgreSQL.
Problem
How to manage a user in PostgreSQL?
Solution
By default, PostgreSQL runs MD5 encryption to save PostgreSQL user passwords in the pg_authid table. However, since PostgreSQL version 10 and later, PostgreSQL has added scram-sha-256 encryption, which is more secure compared to MD5 encryption. To use this encryption, you have to go to the /etc/postgresql/18/main/postgresql.conf file if you use PostgreSQL 18 and look for the word scram-sha-256 in the file, and open the fence located to the left of the word so it looks like the one below:
password_encryption = scram-sha-256
Then restart PostgresQL using the command:
sudo systemctl restart postgresql
A. List all users
To see all users in PostgreSQL, type the following command:
\du
List all users in PostgreSQL
By default, PostgreSQL uses the postgres user to access all databases in PostgreSQL.
B. Create a new user
To create a new user in PostgreSQL, use the format below on the PostgreSQL server:
For example, if you want to create a mydb_user user with the password qwerty, then use the command below:
create user mydb_user with encrypted password 'qwerty';
Create a user in PostgreSQL
C. Change user password
To change the password in PostgreSQL, use the format below:
ALTER USERusername WITH PASSWORD 'your_password';
For example, if you want to change the password for the mydb_user to q1w2e3, then use the command below:
ALTER USER mydb_user WITH PASSWORD 'q1w2e3';
Change the password in PostgreSQL
D. Create a user privilege
To give the user privileges for a database in PostgreSQL using the format below:
GRANTpermission_typeONdb_nameTOusername;
For example, in the previous article, you created a mydb database, so use the command below to grant all permission types:
grant all privileges on database mydb to mydb_user;
Grant all to the user in PostgreSQL
If you want a user to only be able to view the mydb database for the sysadmin user, use the command below:
CREATE user john with encrypted password '123456';
GRANT CONNECT ON DATABASE mydb TO john;
\c mydb
GRANT USAGE ON SCHEMA public TO john;
GRANT SELECT ON ALL TABLES IN SCHEMA public TO john;
Grant viewer only in PostgreSQL
To see the grants you have made in PostgreSQL, use the command:
\l+
List all grants in PostgreSQL
E. Remove a user privilege
If you want to remove a privilege from a user, you can use the format below:
REVOKEpermission_typeONtable_nameFROMuser_name;
For example, if you want to remove a privilege for mydb_user, use the command below:
REVOKE all privileges on database mydb FROM mydb_user;
Revoke all grants from a user
Or, use the below command if you want to revoke from user john:
REVOKE CONNECT on database mydb FROM john;
Revoke connect only from a user
F. Delete a user
Use the format below to delete a user in PostgreSQL:
DROP USERusername;
If you want to delete mydb_user, use the command below:
DROP user mydb_user;
Error when dropping a user in PostgreSQL
You can see from the image above, there is an error when you want to delete a user. So, you have to remove some objects that depend on it. Use the command below:
REVOKE all privileges on database mydb FROM mydb_user;
and then delete the user using the below command:
DROP user mydb_user;
Drop a user in PostgreSQL
Note
If you want a user to only be able to access the PostgreSQL database for a certain time, for example, until January 31, 2030, use the command below:
How to Manage a Database and its Table(s) in PostgreSQL?
written by sysadmin | 26 November 2025
The previous article explained how to install a PostgreSQL database on Linux. This article will explain the basics of commands in a PostgreSQL database.
Problem
How to manage a database and its table(s) in PostgreSQL?
Solution
Below are the basic commands of PostgreSQL to manage a database and its table(s):
1. Access to the PostgreSQL database
Use the command below to access PostgreSQL:
sudo -u postgres psql
Access to the PostgreSQL
INFO
The use of capital letters in this article is only to distinguish between original commands from PostgreSQL and data from the user. You don’t have to use the capital letters when running these commands, but you can use all lowercase letters.
2. List all databases
Use the command below to list all databases in PostgreSQL:
\l
List all databases
3. Creating a new database
Use the format below to create a new database:
CREATE DATABASEdatabase_name;
You can see the options for this command on this page. For example, if you want to create a new database called mydb, use the command below;
CREATE DATABASE mydb;
Create a new database
4. Connect to the database
Use the format below to connect to the database:
\cdb_name;
For example, if you want to connect to the mydb database, type the following command:
You can see the options for this command on this page. Type the command below to create an employee table:
CREATE TABLE employee (name varchar (100), age int);
Create a table
6. Display all tables
Use the command below to display all the tables:
\dt
Display all table
7. Display the table structure
Use the format below to display the table structure:
\dtable_name;
For example, if you want to display the employee table structure, run the command below:
\d employee;
Describe a table
If you want to display more information about the table, type the command below:
\d+ employee;
Display more information in a table
8. Add the column
Use the format below to make a column in the table:
ALTER TABLEtable_nameADD columncolumn_nametype(nnn);
You can see the options for this command on this page. For example, if you want to add to the city column in the employee table, use the command below:
ALTER TABLE employee ADD column city varchar(100);
You can see the options for this command on this page. Type the command below if you want to insert 2 data to the employee table:
INSERT INTO employee (name,age,city) VALUES ('bob',21,'New York'), ('John',22,'Chicago');
Insert data
INFO
If you want to insert a value in the form of a number, the number does not have to be flanked with an apostrof (‘…’) sign, whereas if it is a character or a combination of characters and numbers, it must be flanked with an apostrof (‘…’).
10. Displays data in a table
Use the format below to display all data in a table:
SELECToption1FROMtable_name option2;
You can see the options for this command on this page. For example, use the command below to display all data in the employee table:
You can see the options for this command on this page. For example, if you want to update the age of the employee named Bob, use the command below:
UPDATE employee SET age=23 WHERE name='bob';
Update the data
12. Delete data
Use the format below to delete one or more rows of a table:
DELETE FROMtable_nameWHEREcolumn=value;
You can see the options for this command on this page. For example, if you want to delete the data where the user is in Chicago, use the command below:
DELETE FROM employee WHERE city='Chicago';
Delete the data
13. Delete the column
Use the format below to make changes in the table:
ALTER TABLEdb_nameDROP COLUMNcolumn_name;
If you want to delete the column, for example, city, you can use the following command:
ALTER TABLE employee DROP COLUMN city;
Delete the column
14. Empty the table
You can delete all data in a table with the format as below:
TRUNCATEtable_name;
You can see the options for this command on this page. For example, if you want to delete all the data in the employee table, type the command below:
TRUNCATE employee;
Truncate the table
15. Change a table name
You can change the name of the table using the format below:
ALTER TABLE old_table_name RENAME TO new_table_name;
You can see the options for this command on this page. Use the command below if, for example, you want to change the name of the employee table to employees:
ALTER TABLE employee RENAME TO employees;
Rename the table
16. Delete a table
Use the format below to delete a table:
DROP TABLEtable_name;
You can see the options for this command on this page. For example, if you want to delete the employee table, use the command below:
DROP TABLE employees;
Delete the table
17. Delete a database
To delete a database, use the format below:
DROP DATABASEdatabase_name;
You can see the options for this command on this page. For example, if you want to delete the mydb database, type the command below:
DROP DATABASE mydb;
Delete the database
17. Quit from the database
To quit from the database, run the command below:
\q
Quit from the database
Note
Actually, the basic commands for PostgreSQL and MariaDB are almost the same, with only there is a slight difference between the two databases.
The previous articles have explained how to perform a database backup in MariaDB. This article will explain how to perform a database restore in MariaDB.
Problem
How to restore the database in MariaDB?
Solution
There are several methods to perform the database restore in MariaDB:
1. Restore the entire database
To restore the backup file of the entire database, use the format below:
mysql -uusername-p <backup_file.sql
Use the command below if your backup file name is backup_all_databases.sql:
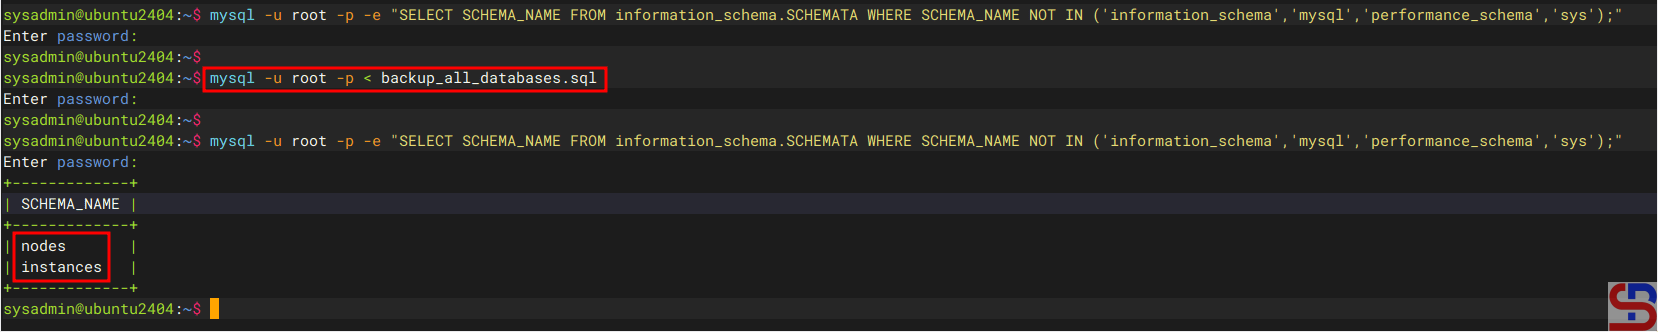
mysql -u root -p < backup_all_databases.sql
After you run the above command, the database will be restored in MariaDB as shown in the image below:
Restore all databases in MariaDB
2. Restore a database
Use the following format to restore a database’s backup file:
mysql -uusername-p -e'create database new_database;' <backup_file.sql
If you want to restore the nodes database, then you can use the command below:
mysql -uroot -p -e'create database nodes;' < backup_nodes_db.sql
After you run the command above, MariaDB will restore the database like in the image below:
Restore a database in MariaDB
3. Restore the table(s)
If you want to restore the table(s), you can follow the format below:
mysql -uusername-pdb_name<table_backup_file.sql
So, use the command below if you want to restore the tables in the nodes database:
mysql -u root -p nodes < table_backup_file.sql
4. Restore a compressed backup file
There are two methods to restore a compressed backup file:
a. Restore the .gz backup file
If you want to restore a .gz backup file, use the format below:
gunzip <database.sql.gz| mysql -uusername-p -e'create databasenew_database;'
For example, if you want to restore a database that uses .gz compression, then use the command below:
Restore a database that is compressed using .bz2 compression
Note
You can restore a database backup file that is compressed using method number 4, whether you compress when backing up the database or after backing up the database.
Before doing a backup, it is highly recommended to ensure that there are no transactions in the database. Maybe you can turn off the application that is connected to the database or turn off the connection to the database so that it will produce a good backup file. In this article, I have 3 databases to use as an example, like the image below:
Example of databases
And below are the commands to back up the MariaDB database:
1. Back up the entire database
If you want to back up all databases in MariaDB, use the format below:
When you back up a database, by default, the database will be backed up in its entirety, both the database and the database structure. But sometimes you just want to back up the database without the structure, so you can use the format below:
By default, when people perform database backups, they will usually use .sql as an extension of the database backup file. But actually, you can compress the database backup files when you do a backup. There are 2 methods of compressing database backups, namely using the tar.gz method and the .bz2 method. If you want to use the first method, use the format below:
And if you want to use bz2 compression when backing up databases, then make sure that the bz2 package is already installed on your server. If the package is not already installed, use the command below:
RockyLinux/AlmaLinux/CentOS
dnf install bzip2
Ubuntu/Debian
sudo install bzip2
OpenSUSE
zypper install bzip2
After you install the package, try to back up your database using the format below:
Below is a comparison image of the size of the backup file that does not use compression, uses .tar.gz compression, and .bz2 compression:
Comparison size file
Warning
If you use compression when backing up the database, it will take longer than if you don’t use compression. And if you use bz2 compression, then the time spent will be longer than using .tar.gz.
Note
You should know that the mariadb-dump command has many useful options, including the ‐-single-transaction and ‐-lock-tables options. If you have a database that uses the InnoDB storage engine, then you should use the ‐-single-transaction option because this option starts a transaction before dumping and reads data from a consistent snapshot without locking the tables for extended periods, allowing concurrent reads and writes. However, if you are using the MyISAM storage engine, you can use the ‐-lock-tables option when backing up the database in MariaDB. If your database has a different storage engine, it is recommended to back up the database partially; some tables that use InnoDB use the ‐-single-transaction option, and some tables that use MyISAM use the ‐-lock-tables option when backing up the database.