How to Convert a Column into a Row in a Linux File?
written by sysadmin | 18 August 2025
I want to convert a file containing a column into a row in a Linux file.
Problem
How to convert a column into a row in a Linux file?
Solution
For your information, columns are vertical, or what you arrange from top to bottom, while rows are horizontal, or what you can arrange from left to right. Consider the picture below to distinguish between columns and rows:
Columns vs rows
For example, you have a test.txt file as shown below:
If you want to enter the results in a file, for example, the result.txt file, then you can use the standard output redirection or stdout on Linux. For example, you use the awk command to change the file, so you can use the command below:
The previous article has explained how to reduce the size of a file in Linux. This article will explain how to increase the size of a file in Linux.
Problem
How to create a file of a certain size in Linux?
Solution
By default, if you want to create a file, it will use the command:
touch example.txt
And the command above will generate an example.txt file with a size of 0 bytes, as shown in the image below:
Create a file in Linux
However, sometimes there are situations where you have to create a file of a certain size for a purpose, e.g., you have to create a test.txt file with a size of 2 GB, Then there are several methods to generate such files of a certain size:
1. Using the fallocate command
Use the command below to create a test.txt file with a size of 2 GB:
fallocate -l 2048MB test.txt
Using the fallocate command
2. Using the truncate command
Create a test.txt file with a size of 2 GB using the command below:
truncate -s 2048MB test.txt
Using the truncate command
3. Using the dd command
To produce a test.txt file that is 2 GB in size, run the command below:
dd if=/dev/zero of=test.txt bs=1M count=2048MB
Using the dd command
4. Using the head command
Use the command below to generate a test.txt file of size 2 GB:
head --bytes 2048MB /dev/zero > test.txt
Using the head command
5. Using the tail command
Utilize the following command to generate a 2 GB test.txt file:
tail --bytes 2048MB /dev/zero > test.txt
Using the tail command
6. Using Perl commands
Below is the command to create a 2 GB test.txt file (the number 2147483648 comes from 2048x1024x1024):
perl -e 'print '0' x 2147483648' > test.txt
Using the Perl command
7. Using the base64 command
Create a 2 GB test.tx file, followed by (the number 2147483648 comes from 2048x1024x1024):
base64 /dev/urandom | head -c 2147483648 > test.txt
Using the base64 command
Note
To get quick results when creating a file of a certain size, you can use the truncate or fallocate command.
One that often causes the hard drive on the Linux device to decrease its size is the number of very large files that are usually logged by an application. Therefore, as a Sysadmin, you must maintain and supervise the files so that the size is not too large. This article will explain how to reduce the size of a file on Linux.
Problem
How to reduce the size of a file on Linux?
Solution
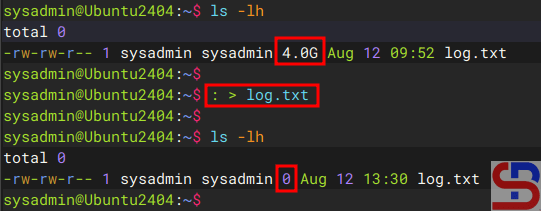
There are several methods to reduce a file in Linux, and assume that you have a log.txt file measuring 4 GB.
A. Up to 0 Bytes
There are several methods to reduce the file size to 0 bytes:
1. Using the colon command
Use the below command to reduce the file to 0 bytes:
: > log.txt
Reduce the file size up to 0 bytes using the colon command
2. Using the cat command
To decrease the file to 0 bytes, use the command below:
cat /dev/null > log.txt
Reduce the file size up to 0 bytes using the /dev/null command
3. Using the echo command
Use the command below to reduce the file size to zero bytes.:
echo -n > log.txt
Reduce the file size up to 0 bytes using the echo command
4. Using the redirection command
To get the file down to zero bytes, use the command below:
> log.txt
Reduce the file size up to 0 bytes using the redirection command
5. Using the truncate command
To shrink the file to zero bytes, use the command below:
truncate -s 0 log.txt
Reduce the file size up to 0 bytes using the truncate command
B. Up to 1 Byte
To reduce the file size to 1 byte, use the command below:
echo "" > log.txt
Reduce the file size to 1 byte
C. Reduce the file size to a certain size
To reduce the file size to a certain size (for example, make the file size 100 M), use the following command:
truncate -s 100M log.txt
Reduce the file size to a certain size
Note
By using the command above, you can reduce the size of a file, causing the size of the hard disk on the Linux device to increase. And if you experience failure in reducing the file size, then usually the problem is with the write permissions on the file. Use the command below so that the file gets write permission to reduce the file size:
sudo sh -c '> filename'
Change the filename to your real filename. After that, run one of the commands above, and the file size should be reduced.
The previous article explained how to create a recycle bin in the Linux CLI without installing an application. This article will explain how to create a recycle bin in the Linux CLI using the trash-cli application.
Problem
How to use the trash-cli as a recycle bin in Linux?
Solution
Trash-cli is an application to trash files, recording the original path, deletion date, and permissions, which can function as a recycle bin in the Linux CLI.
You can also install this application from GitHub by using the command below:
git clone https://github.com/andreafrancia/trash-cli.git
cd trash-cli
python setup.py install
To see the trash-cli version installed, you can use the command:
trash --version
Display version of trash-cli
B. Delete item(s)
If you want to delete a file, for example, the images.zip file, then use the command below:
trash images.zip
If you want to delete more than one file, you can delete them directly using, for example, the command below:
trash test.txt chatgpt.png
You can also delete folder(s) using the format above.
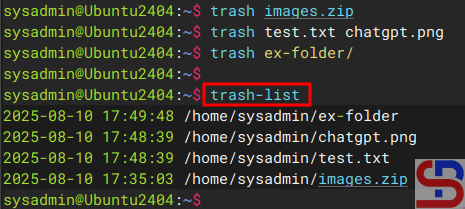
C. Displays deleted item(s)
To show deleted file(s) and folder(s), use the command below:
trash-list
Displays the contents in the trash
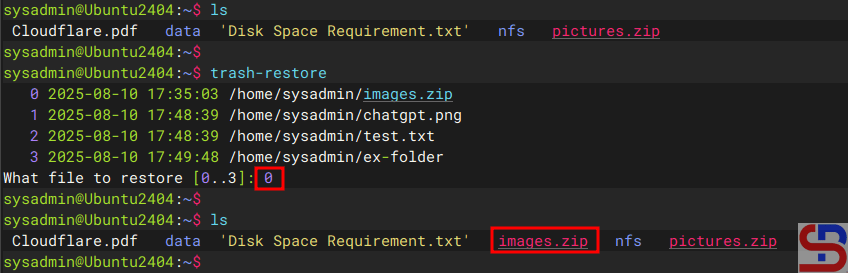
D. Restore item(s)
To restore deleted item(s), use the command below:
trash-restore
It will display all the items that have been deleted, and you will be asked to select the files to be restored. Enter the file number, and the file will be restored to its original location as in the image below:
Restoring the content from the trash
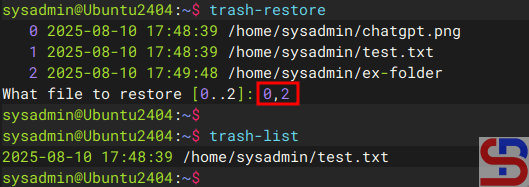
If you want to restore more than one item, you can write file numbers separated by commas.
Restoring the contents from the trash
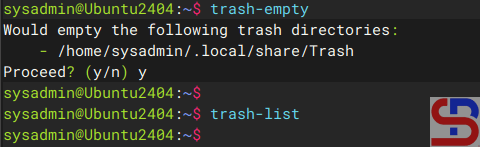
E. Empty the trash bin
If you want to empty the trash bin, use the command below:
trash-empty
All items in the trash can be deleted as shown in the image below:
Empty the trash
In addition, you can delete some items that are more than 3 days old by using the command:
trash-empty 7
You can also delete items with the .zip extension by using the command:
trash-empty *.zip
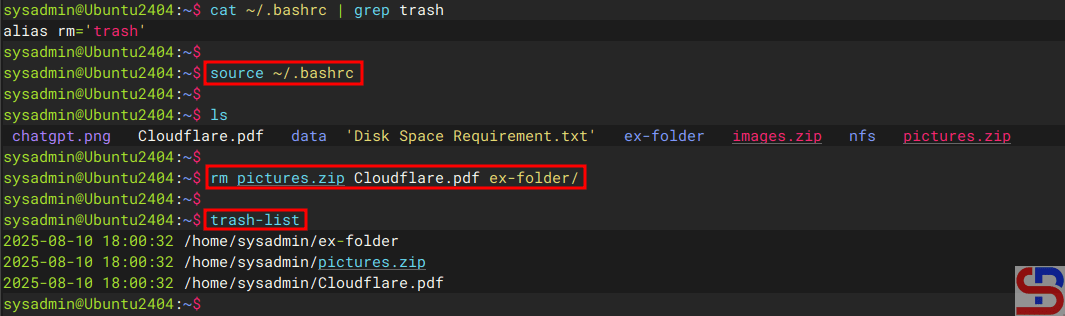
F. Combine the rm command with the trash application
By default, you have to use the trash command to delete a file or folder when using the trash-cli application. However, Linux uses the rm command to delete a file or folder. Therefore, you can combine the rm command and the trash command by adding the script below to the .bashrc file:
alias rm=`trash`
After that, run the command:
source ~/.bashrc
Then, try deleting files or folders using the rm command, then the items that have been deleted using the rm command should be in the trash can using the trash-list command, as in the image below:
Combine the rm command with trash-cli
Warning
If you combine the rm command with the trash application, you can delete the folder without using -rf option like in the image above.
Note
You have to manually change the .bashrc file for each user who wants to combine the rm command and this trash application. You can also use crontab for each user to delete items in the trash can. Just like the previous method, the weakness of this method is that if you use sudo to delete a file or folder, the file or folder will be immediately deleted from the Linux system and will not be saved in the Recycle bin that has been created. So be careful about that.
If you have important source code and are worried that someone is changing or duplicating it, you can protect it by encrypting the file so that other people cannot read the source code unless they can enter the appropriate password. There are several ways to encrypt a file, but in this article will use the vim application.
Problem
How to encrypt a file using the Vim application?
Solution
A. The Vim application
Vim or vi improved is an enhanced, improved, and extended version of the Vi text editor. To see if the application is already installed or not, use the command below:
vim --version
If your Linux device does not have a Vim application, you can install it using the following commands:
RockyLinux/AlmaLinux/CentOS
yum install vim
Ubuntu/Debian
sudo apt update
sudo apt install vim
OpenSUSE
sudo zypper install vim
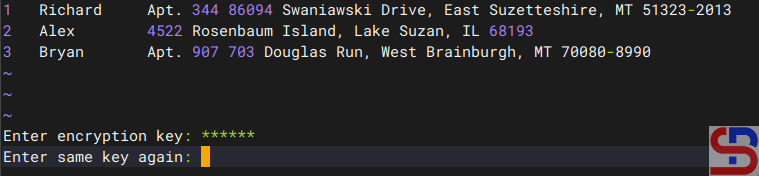
The Vim application has a feature to encrypt a file so that users who want to access the file must enter a password, and the algorithm used by the Vim application to encrypt a file is Blowfish. Suppose you have a file called test.txt, the contents of which are as below:
No  Name        Address
1   Richard     Apt. 344 86094 Swaniawski Drive, East Suzetteshire, MT 51323-2013
2   Alex        4522 Rosenbaum Island, Lake Suzan, IL 68193
3   Bryan       Apt. 907 703 Douglas Run, West Brainburgh, MT 70080-8990
B. Encrypt the file
There are 2 methods for encrypting files using the Vim application:
1. Before accessing the file
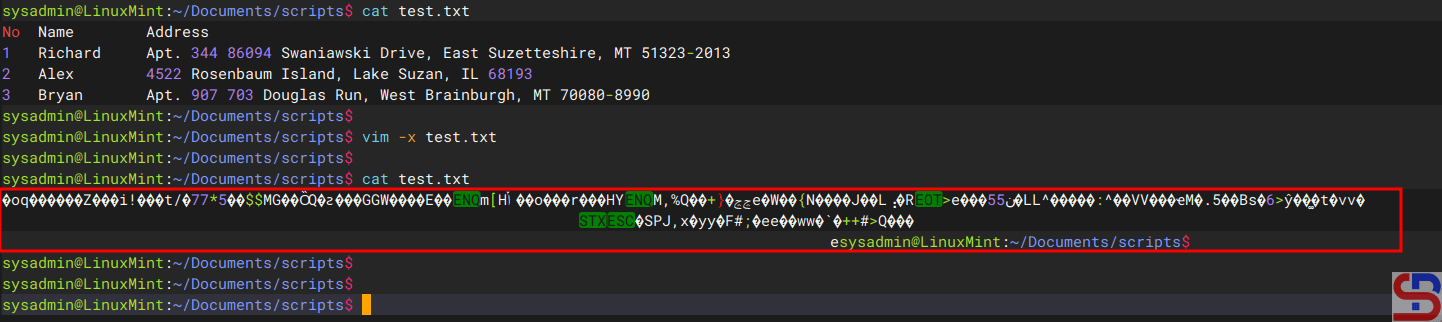
If you want to encrypt a file, then use the format below before you access the file:
vim -xfilename
For example, if your file name is test.txt, then use the command below before you access the file:
vim -x test.txt
There will be writing as below:
Enter the password
Enter the password you want, press the Enter button, then there will be writing as below:
Enter the password again
You will be able to access the test.txt file. After that, save and exit the file, and thus you have successfully encrypted the file. Now, try to display the file, and the file should be encrypted as shown below:
Encrypt the file using the first method
If you or other users want to access the file, you must enter the password as shown below:
When accessing the encrypted file using the Vim application
If your password is suitable, the file can be displayed, but if the password is not appropriate, the file remains in its the condition in the encrypt.
2. When accessing files
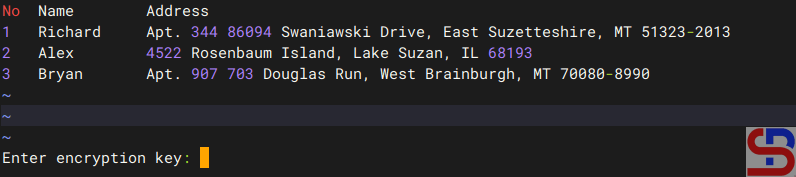
When you are accessing the file and want the file to be encrypted, then in the command mode (mode in Vim after you press the Esc button), Type :X, press the Enter button, it will be written as below:
Create the encrypt using the second method
Press the Enter key after entering the desired password, and the following text will appear:
Enter the password again
After that, save and exit the file, and thus you have successfully encrypted the file.
C. Decrypt the file
If you want the file to be decrypted or no longer need to use a password to access it, then open the file by entering the password and then write :X in the command mode, and press the Enter button 2x when you are asked to enter the password. After that, save and exit the file, and the file should be directly opened without having to enter the password again, as shown below:
Decrypt the file
Note
You must always remember the password that you use to encrypt in Vim because if you forget then as far as I know, you will not be able to decrypt the file.
How to Print All columns From the nth to the Last?
written by sysadmin | 18 August 2025
I often see a log where I want to print sequential columns in the log for a purpose.
Problem
How to print all columns from the nth to the last?
Solution
For example, you have a test.txt file that contains the following:
No  Name        Address
1   Richard     Apt. 344 86094 Swaniawski Drive, East Suzetteshire, MT 51323-2013
2   Alex        4522 Rosenbaum Island, Lake Suzan, IL 68193
3   Bryan       Apt. 907 703 Douglas Run, West Brainburgh, MT 70080-8990
Display the log
Usually, to display the complete Address column, I will run the command below:
However, I think this method is less effective because if the address is more than 12 columns, then I have to write more than 12 items, and it is very tiring. After searching on the internet, there are 2 methods you can use:
1. Using the awk command
From the test.txt file, you just want to print the entire column except columns 1 and 2, then you can use the command below:
awk '{$1=$2=""; print $0}' test.txt
The result will be as shown in the image below:
Using the awk command
2. Using the cut command
In addition to using awk, you can also use the cut command to display the same by using the command below:
cut -d' ' -f3- test.txt
And the result will be as shown in the image below when you run the command above:
Using the cut command
Warning
Replace the variable -f3- with what column you will start printing. If you start printing from column 7, then change the command above to the following:
cut -d" " -f7- test.txt
Note
There are still several methods to print columns that run from the nth to the last column, but I think those two methods will suffice.
How to Display Linux Applications Using the Most CPU and Memory With a Bash Script?
written by sysadmin | 18 August 2025
I have some Linux servers used to run some of the necessary applications in the office. But occasionally, I can’t reach certain servers due to issues, and I saw in the monitoring tool that the CPU or RAM on the server had increased significantly, resulting in the server having to be forcibly shut down and restarted. I tried to find out what applications caused the CPU or RAM to go up, but unfortunately, the monitoring application I used only showed the value of the CPU or RAM, but did not feature applications that used the CPU or RAM the most.
Problem
How to display Linux applications using the most CPU and memory with a bash script?
Solution
The ps command displays information about a selection of the active processes, so that by using the command, you can see which applications are using the most CPU and memory. Let’s say you want to display the 50 most CPU-intensive applications on Linux, then use the command below:
ps -eo pid,%cpu,args --sort=-%cpu | head -n 10
And use the command below to display the 10 applications that use the most memory on Linux:
ps -eo pid,%mem,args --sort=-%mem | head -n 10
Based on the two commands above, you can create a bash script to see which applications are using the most CPU and RAM on Linux servers. Create a mon_cpu_ram.sh file and copy the bash script below into the file:
#!/bin/bash

# Get 50 application that take biggest cpu
ps -eo pid,%cpu,args --sort=-%cpu | head -n 50 > get_50_app_cpu.txt

# total cpu
awk 'NR > 1 {mem[$3" "$4" "$5" "$6" "$7" "$8" "$9" "$10" "$11" "$12" "$13" "$14" "$15" "$16" "$17] += $2} END {for (cmd in mem) printf "%.1f\t%s\n", mem[cmd], cmd}' get_50_app_cpu.txt | sort -nr | head -n 5 > total_cpu.txt

# Display date and uptime
date +"%Y-%m-%d %H:%M:%S" >> cpu_history.txt
uptime=`uptime -p`
echo "Uptime: $uptime" >> app_cpu_mem.txt

# get 3 apps that takeing biggest CPU
head -n3 total_cpu.txt >> cpu_history.txt
echo >> cpu_history.txt

# send the output of biggest CPU
date +"%Y-%m-%d %H:%M:%S" >> app_cpu_mem.txt
echo "Big CPU" >> app_cpu_mem.txt
head -n3 total_cpu.txt >> app_cpu_mem.txt


# Get 50 application that take biggest memory
ps -eo pid,%mem,args --sort=-%mem | head -n 50 > get_50_app_mem.txt

# total memory
awk 'NR > 1 {mem[$3" "$4" "$5" "$6" "$7" "$8" "$9" "$10" "$11" "$12" "$13" "$14" "$15" "$16" "$17] += $2} END {for (cmd in mem) printf "%.1f\t%s\n", mem[cmd], cmd}' get_50_app_mem.txt | sort -nr | head -n 5 > total_mem.txt

# get 3 apps that taking biggest memory
date +"%Y-%m-%d %H:%M:%S" >> mem_history.txt
head -n3 total_mem.txt >> mem_history.txt
echo >> mem_history.txt

# send the output of biggest Memory
echo "Big Memory" >> app_cpu_mem.txt
head -n3 total_mem.txt >> app_cpu_mem.txt

echo >> app_cpu_mem.txt
After that, permit the file and run it using the command below:
chmod +x mon_cpu_ram.sh
./mon_cpu_ram.sh
If you run the bash script, it will produce 3 files:
cpu_history.txt => Display the history of the CPU only
mem_history.txt => Display the histoy of the memory history
app_cpu_mem.txt => Displays the CPU and Memory history simultaneously
Run the bash script
If you want the file to run every 5 minutes, enter the file in the crontab by copying the script below into the crontab:
*/5 * * * * cd /home/sysadmin/;. /mon_cpu_ram.sh
Note
I think this script is useful for sysadmins, especially me, to identify any applications that use the most CPU and RAM in Linux, so you can limit CPU or RAM to these applications.