How to Display the Timestamp in the History Command?
written by sysadmin | 3 February 2025
Displaying the timestamp in the history command is very useful for various purposes. However, in general, Linux systems do not display a timestamp when you run the history command
Problem
How to display the timestamp in the history command?
Solution
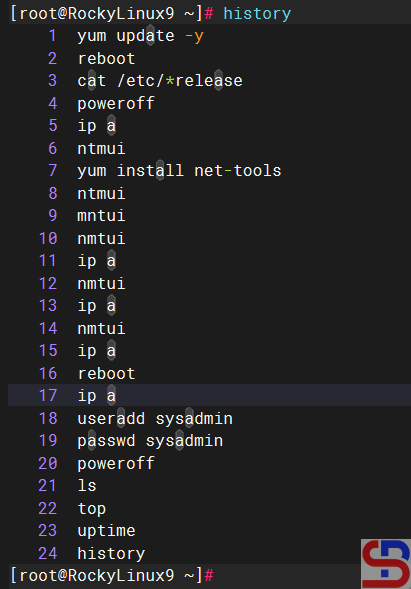
If you type the history command on your Linux server, by default, you will find that there is no timestamp, as in the image below:
The history command
So that your Linux server can display timestamps in the history command, type the command below:
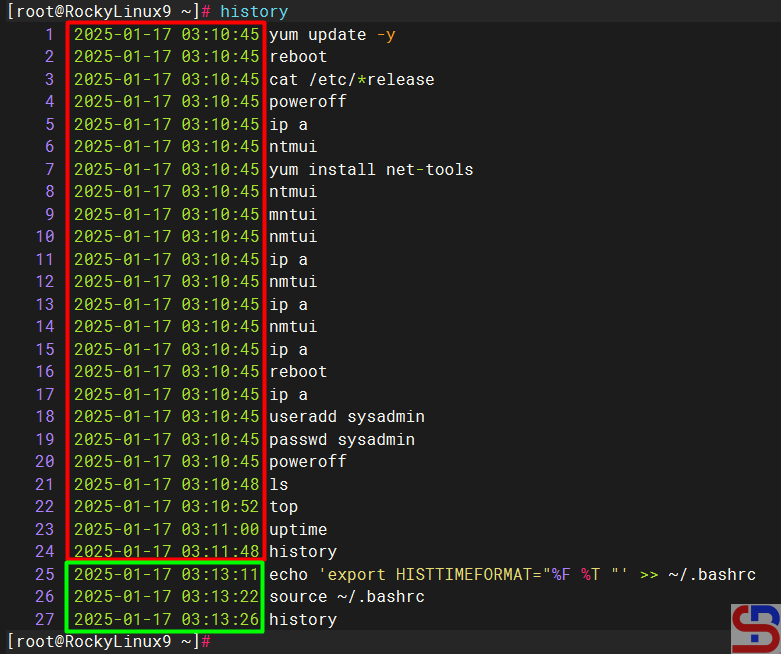
The image above shows that the timestamp is already visible when you type the history command. Linux commands executed for a long time will display the same timestamp (look at the image above in the red box). However, if you run another Linux command, the timestamp displayed will be the same as when you executed the Linux command (look at the image above in the green box).
Note
By default, you have to run the commands above on each user to display the timestamps in the history command. But I think it’s very tiring to do that. So, if you want to display a timestamp in the history command for each Linux user, copy the command below:
The previous articles explained how to install gcloud on Ubuntu/Debian distros and RockyLinux/AlmaLinux/CentOS distros. This article will explain how to install gcloud on Linux.
Problem
How to install gcloud on a Linux server?
Solution
If you use Linux other than the Ubuntu/Debian distro and the RockyLinux/AlmaLinux/CentOS distro, and you want to install gcloud on your Linux distro, then below are the steps (I use OpenSUSE 15 distro):
A. Install gcloud
As far as I know, there are 2 methods for installing on a Linux server, and both methods recommend using a user other than root.
1. Use the script
Before you install gcloud using the script, make sure there are tar and curl packages, and Python version 3.8 and up on your server. You can check it with the following command:
python3 --version
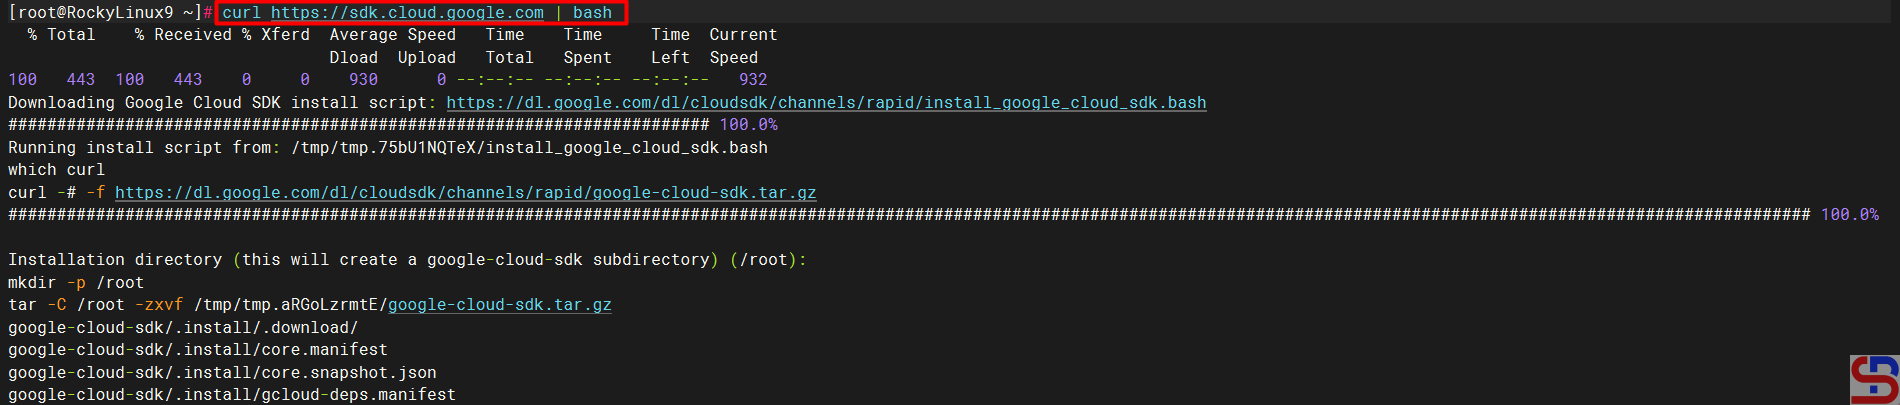
After that, use the following command to download and install the script:
curl https://sdk.cloud.google.com | bash
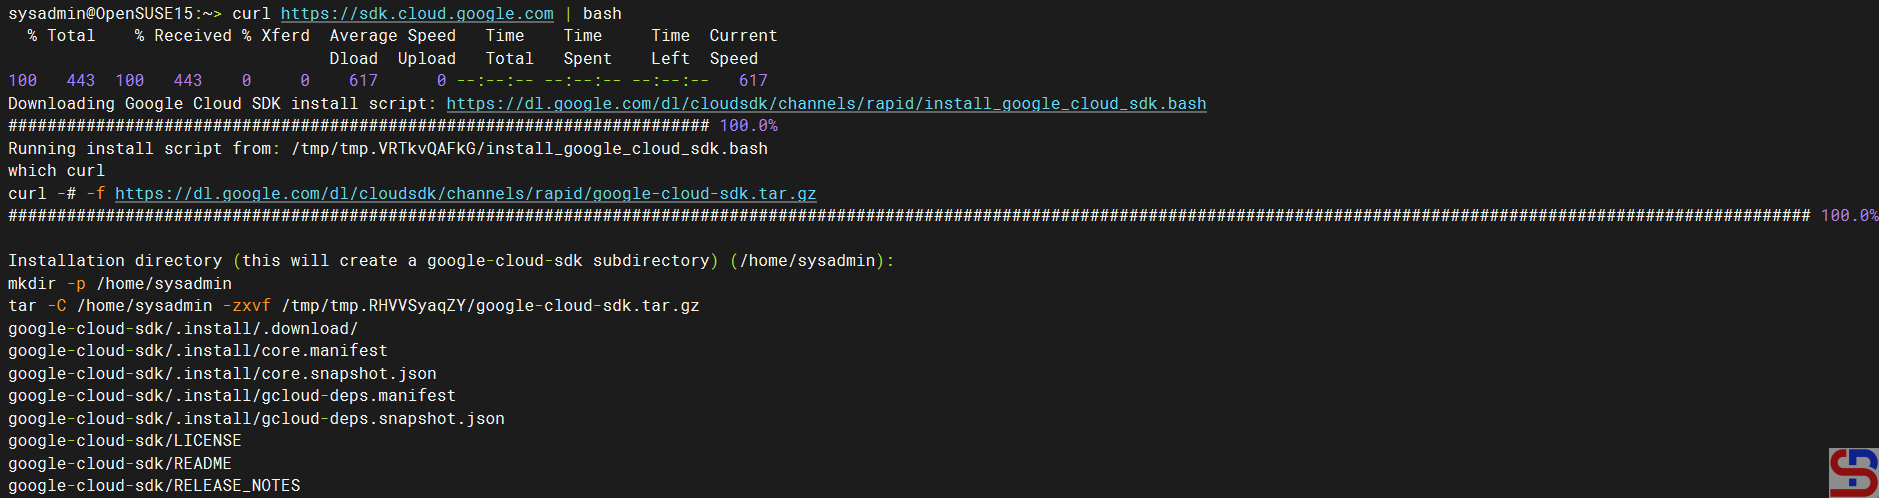
Then you will see a display like the one below:
Install gcloud using the script
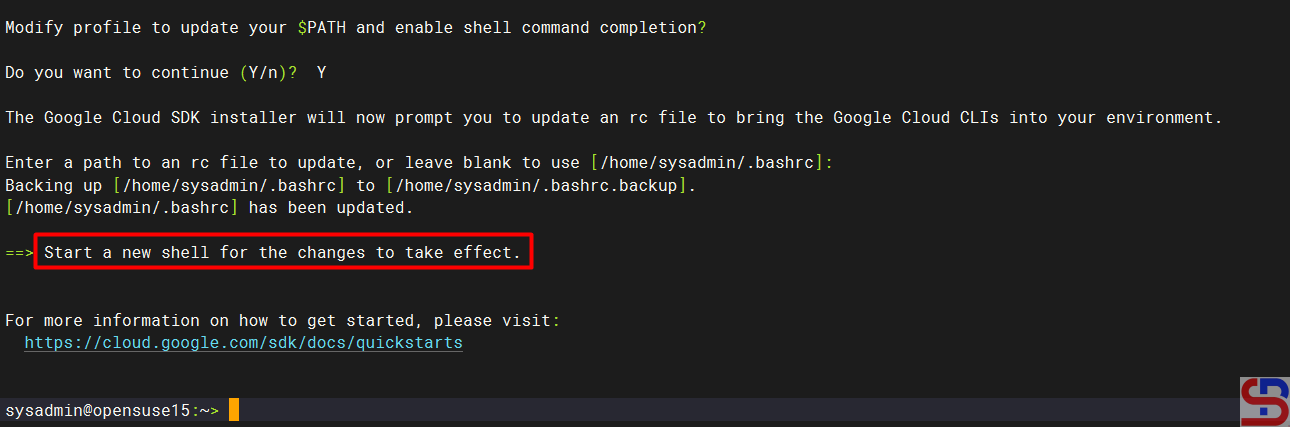
Wait until it’s finished, and you will see a display like the one below:
Installation complete
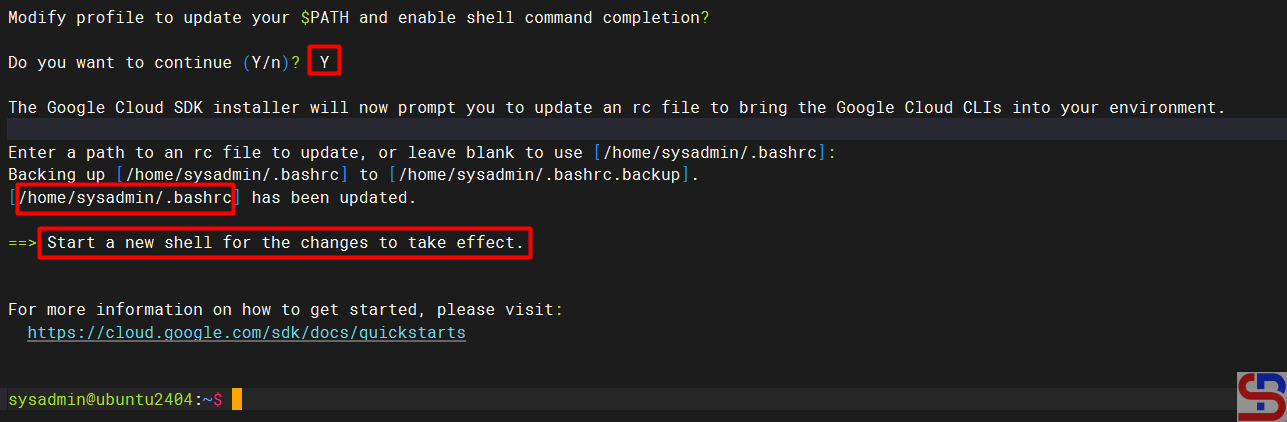
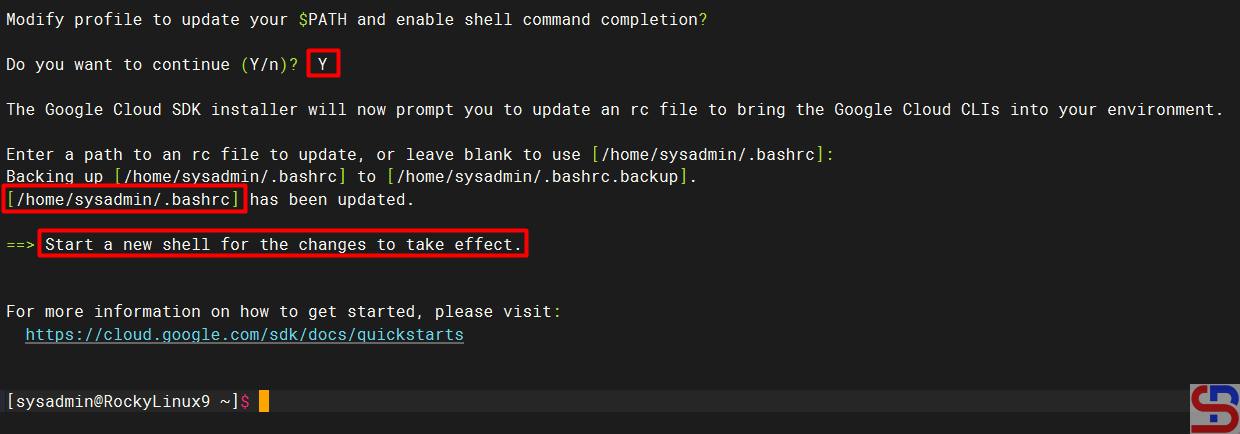
From the image above, you are asked to create a new SSH connection so that the effect can be seen, and type the command below:
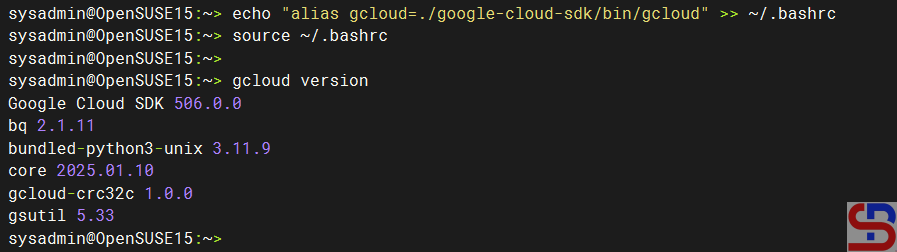
./google-cloud-sdk/bin/gcloud version
Execute the gcloud version command
If you want to type the gcloud command without having to type ./google-cloud-sdk/bin/gcloud, then run the command below:
Run the following commands to install gcloud on your Linux server:
curl -O https://dl.google.com/dl/cloudsdk/channels/rapid/downloads/google-cloud-cli-linux-x86_64.tar.gz
tar -xf google-cloud-cli-linux-x86_64.tar.gz
./google-cloud-sdk/install.sh
After installation completes, use the following command to test the gcloud command:
./google-cloud-sdk/bin/gcloud version
B. Connect to GCP
After you install gcloud on your server, type the command below:
gcloud init
Then there will be a display like the image below:
Click the link
Click the Ctrl+Click button in the red box to open the link in a browser, or if you have difficulty, copy what is in the red box and place it in your browser so you will see a display like the one below:
Click the account
Click on the Google account that will access GCP, then there will be a display like the image below:
Click the Continue button
Click the Continue button, then the display below will appear:
Click the Allow button
Click the Allow button, then the display below will appear:
Click the Copy button
Click the Copy button, and paste it into the CLI on your server as in the image below:
Paste the code
Select the project and configure the zone as in the image above. After that, the gcloud configuration is complete.
C. Test gcloud
Now, try gcloud to access your GCP. I try to list my virtual machine in GCP using the below command:
gcloud compute instances list
Then the display below will appear:
Display virtual machine in GCP using gcloud
If you get a display like the one above, you have successfully used gcloud to access your GCP.
Note
If you have many projects on your GCP, you can choose one of these projects as the starting point for your gcloud on GCP. You can switch projects using the command:
gcloud config set project PROJECT_ID
Change PROJECT_ID to the project ID you want to switch to.
If you access a device such as a server using an SSH connection, you are using port 22 by default. However, port 22 is often the target of security attacks, so it is recommended that you change the SSH port.
Problem
How to change SSH Port?
Solution
To change the SSH port on a Linux server, go to the /etc/ssh/sshd.config file, look for the line containing Port 22 and set it to the number you want to change. For example, you want to change the SSH port to port 43210, so change the line as in the script below from:
#Port 22
to
Port 43210
After that, restart the SSH service using the command below:
Ubuntu/Debian
systemctl restart ssh
RockyLinux/AlmaLinux/CentOS & OpenSUSE
systemctl restart sshd
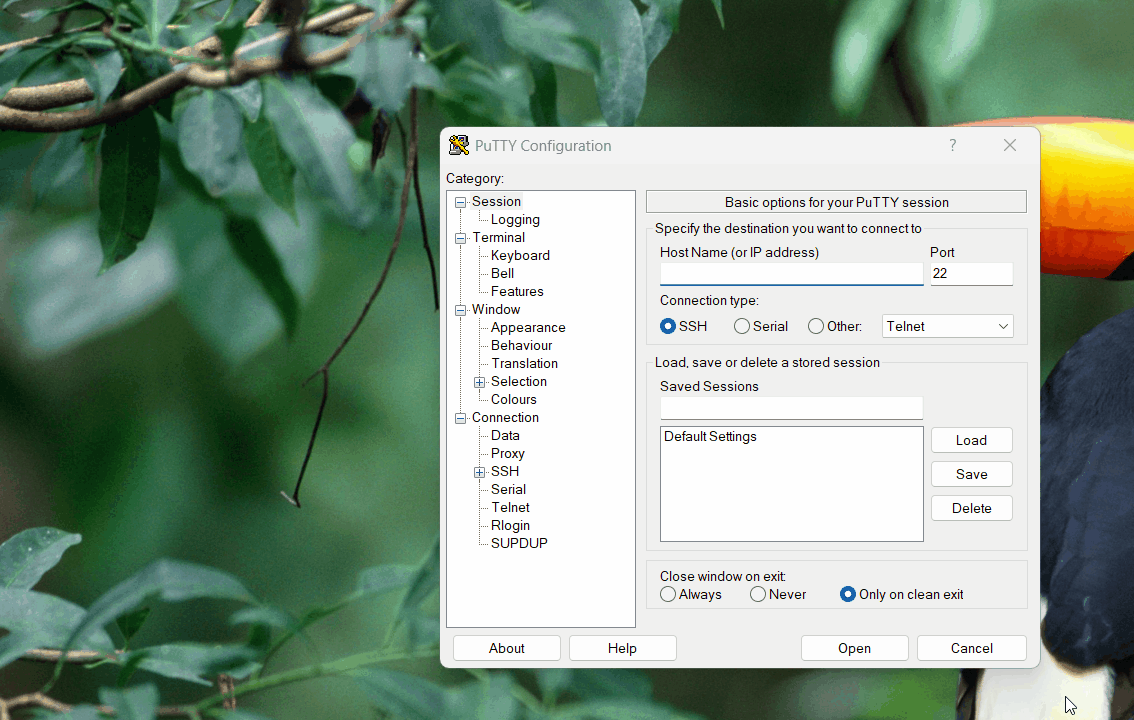
After that, test by accessing SSH using port 43210. If you use Putty, then change port 22 to 43210 as in the image below:
Change the port in Putty
If you can’t access the Linux server, make sure you have opened the firewall on the server (you can open this page if you use RockyLinux and OpenSUSE, but if you use Ubuntu, you can read it on this page). If you want to access it via a Linux server, then use the format below:
sshusername@your_server_ip-pport_number
Then the format above can be the command below:
ssh sysadmin@192.168.56.12 -p 43210
Access via SSH using a new SSH port
WARNING
If you run a firewall on your remote server, you must open the port first. If you want to get an explanation of how to open the port, go to this page if you use firewalld or go to this page if you use ufw.
Note
Please note that the port number is from 0-65536, however, these ports are divided into 3 classifications:
Port 0-1023 => Well-Known ports, you can not use these ports.
Port 1024-49151 => Registered ports, these is a registered ports assigned by IANA (Internet Assigned Numbers Authority), you can or can not use these ports.
Port 49152-65535 => Dynamic or Private ports, you can use these ports.
The previous article explained how to open and close ports in RockyLinux/AlmaLinux/CentOS. This article will explain how to open and close a port in Ubuntu.
Problem
How to open and close a port in Ubuntu?
Solution
A. Check the firewall
By default, Ubuntu and Debian use the UFW or Uncomplicated Firewall application as the default firewall, and it is installed automatically when you install Ubuntu/Debian. If the firewall is not installed on your Ubuntu/Debian distro, use the command below:
sudo apt install ufw
To see whether ufw is running or not, use the command below:
sudo ufw status
Check status ufw
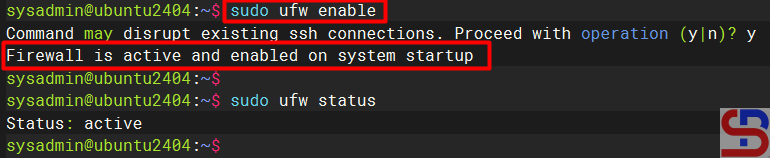
From the image above, you can see that the application is not yet active. To enable it, type the command below:
sudo ufw enable
Enable ufw
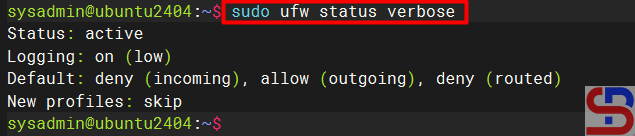
If you want to see the complete current status of the firewall, use the command below:
sudo ufw status verbose
Display the complete current status of the firewall
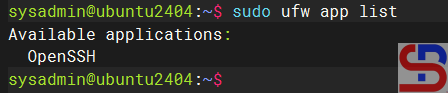
By default, the firewall only opens the OpenSSH service, which you can view by using the command below:
sudo ufw app list
Display the service that is open in the firewall
B. Open the port
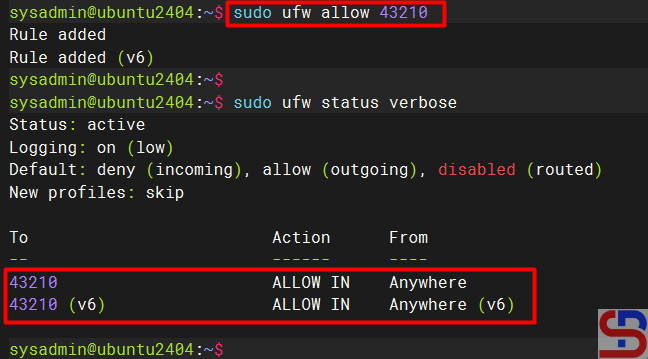
To open a port, for example, port 43210, use the command below:
sudo ufw allow 43210
Open the port
WARNING
If you open the port using the command above, it means you will open the port for both TCP and UDP.
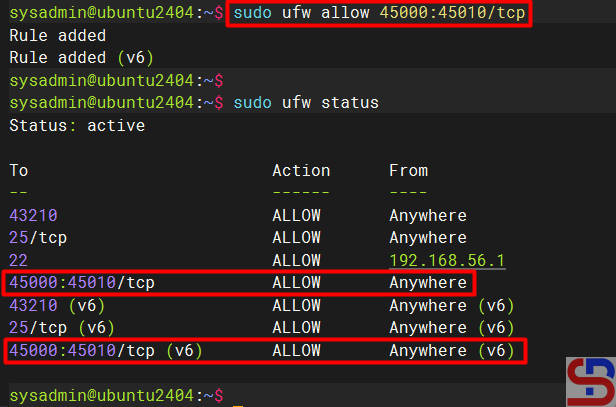
To open a port range, for example, from port numbers 45000 to 45010 with the TCP protocol, use the command below:
sudo ufw allow 45000:45010/tcp
Open the range ports
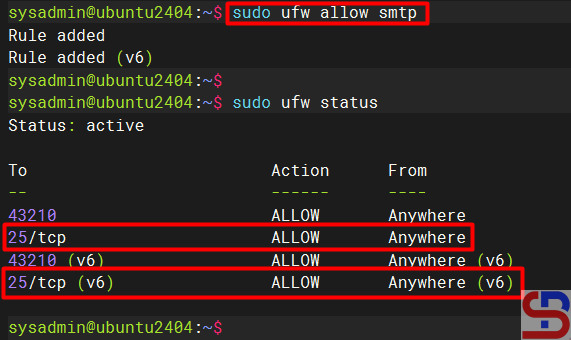
C. Open the service
You can see from the image above that port 43210 has been opened on your Ubuntu server. You can also use the service name when opening a port. For example, if you want to open the SMTP service on your Ubuntu server, then use the command below:
sudo ufw allow smtp
Open the SMTP service
D. Open the port from a certain IP
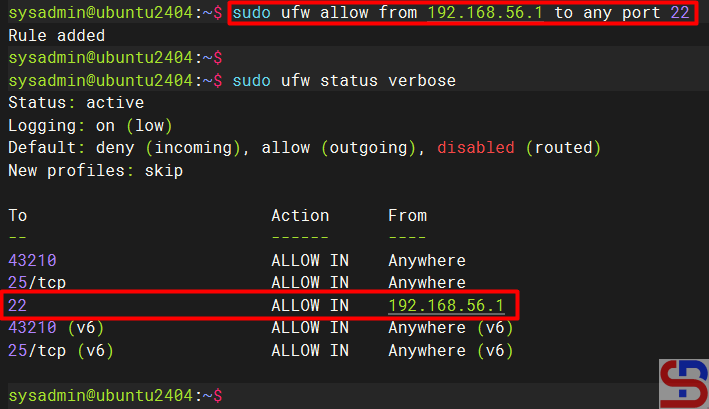
If you want to open a port from a certain IP, for example, you only allow IP 192.168.56.1 to access port 22 on this server, then use the command below:
sudo ufw allow from 192.168.56.1 to any port 22
Allow the IP to a certain port
To allow the 192.168.56.0 subnet to the SMTP service, use the command below:
sudo ufw allow from 192.168.56.0/24 to any port 25
Allow the subnet to a certain port
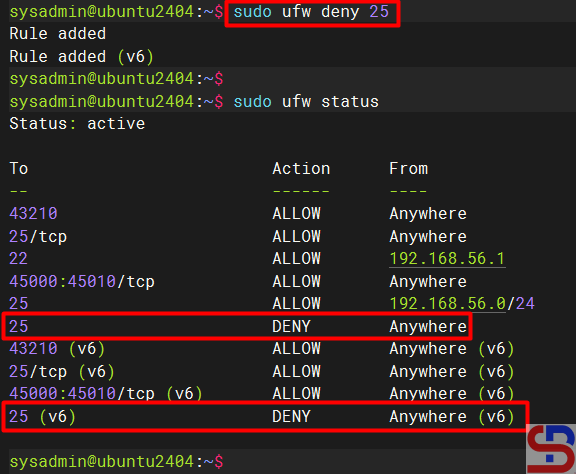
E. Close the port
To close port 25, use the command below:
sudo ufw deny 25
Close the port
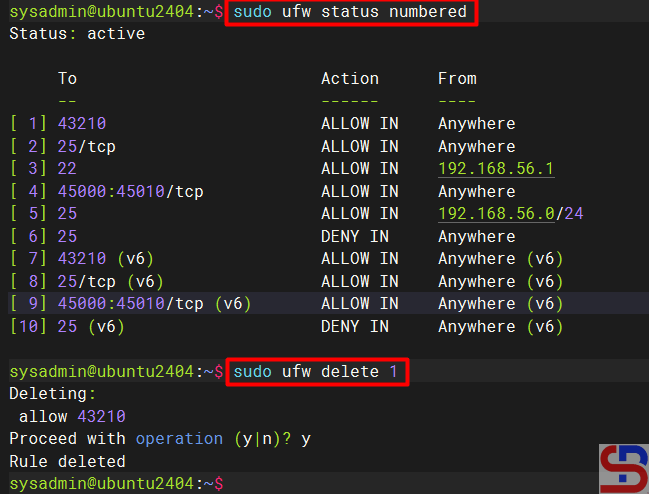
F. Delete the port
You can also close a port and delete the port that has been opened, for example, port 43210, using the syntax below:
sudo ufw deletenumber
Close and delete the port
WARNING
You don’t need to run sudo ufw reload after each rule change using ufw commands (such as ufw allow or ufw deny). However, you will need to run sudo ufw reload if you are editing the ufw configuration file manually (such as /etc/ufw/before.rules or /etc/ufw/after.rules), or if you want to make sure all the latest rules and settings are loaded.
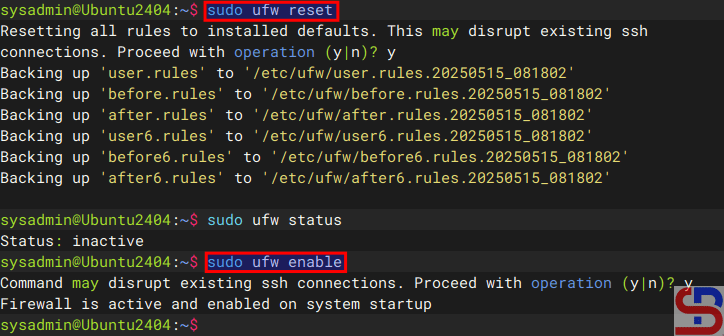
Note
You can remove all the rules in ufw by using the command below:
sudo ufw reset
After that, enable the ufw by using the command below:
sudo ufw enable
Reset ufw
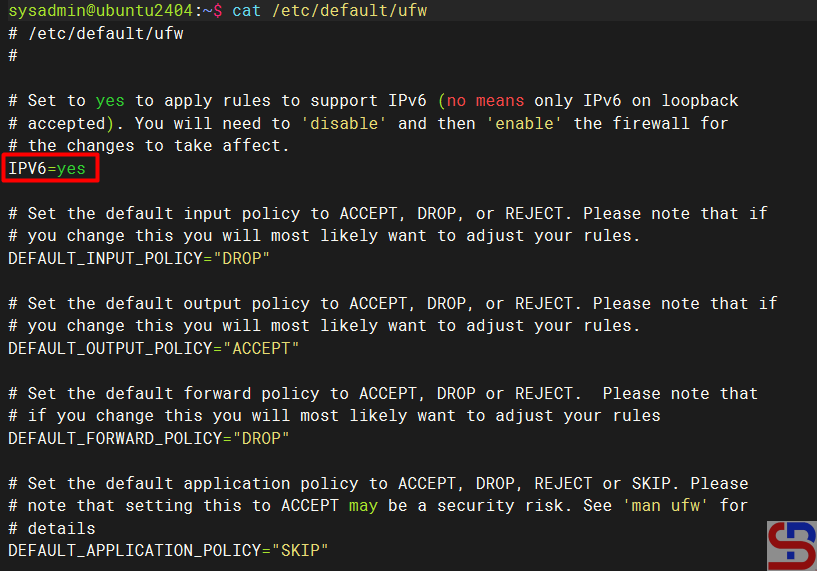
By default, if you open a port, it will automatically open in IPv4 and IPv6, and likewise, if you close the port. To see the UFW settings, open the /etc/default/ufw file.
After you install gcloud on your server, type the command below:
gcloud init
Then there will be a display like the image below:
Click the link
You can open the link in a browser by clicking the Ctrl+Click button located in the red box. If you are having trouble doing so, copy what is included in the red box and paste it into your browser. This will allow you to view a display similar to the one that is shown below:
Click the account
When you click on your Google account, that will allow you to access GCP, and a display similar to the one shown below will appear:
Click the Continue button
After you click the Continue button, the screen below will show:
Click the Allow button
When you click the Allow button, the screen below will show:
Click the Copy button
Click the Copy button, and paste it into the CLI on your server as in the image below:
Paste the code
Select the project and configure the zone as in the image above. After that, the gcloud configuration is complete, like in the image below:
Installation of GCP is complete
C. Test gcloud
Now, try gcloud to access your GCP. I try to list my virtual machine in GCP using the below command:
gcloud compute instances list
Then the display below will appear:
Display virtual machine in GCP using gcloud
If you get a display like the image above, then you have successfully used your GCloud to access your GCP.
Note
If you have many projects on your GCP, you can choose one of these projects as the starting point for your gcloud on GCP. You can switch projects using the command:
gcloud config set project PROJECT_ID
Change PROJECT_ID to the project ID you want to switch to.
How to Open And Close a Port on RockyLinux Server?
written by sysadmin | 3 February 2025
By default, the RockyLinux/AlmaLinux/CentOS distro provides two firewalls, iptables and firewalld. This article will explain how to open and close a port using Firewalld on the distro. If you have opened and closed a port using Firewalld, you don’t need to open and close a port in iptables.
Problem
How to open and close a port on the RockyLinux server?
Solution
A. Check the Firewalld status
By default, the Firewalld package is installed automatically using the command:
systemctl status firewalld
Check the status of Firewalld
From the picture above, you can see that the firewall on the server is already running. If the Firewalld is not already running, use the command below:
systemctl enable --now firewalld
But if on your server there is no firewall package, you can install it using the command below:
yum install -y firewalld
B. Check the zones
Firewalld uses zones and services, compared to iptables, which use chains and rules. Zones are a collection of rules that have been set for what network connections should be permitted based on the level of confidence in the network connected to the system. We can determine the name of the network interface and the network source into zones.To see the zones in firewalld and which zone is the default, use the command below:
Use the command below to see the ports that have been opened:
firewall-cmd --list-ports
List all opened ports
D. Open the port from a certain IP
If you want to open a port from a certain IP, for example, you only allow IP 192.168.56.100 to access port 22 on this server, then use the command below:
If you want to close a port from a certain IP, for example, you block a host with IP 192.168.56.100 from accessing port 22 on this server, then use the command below:
If you use GCP in daily operations, it is recommended to use the commands in the CLI known as gcloud. This is because many commands can only be executed using gcloud rather than using the Console in the browser.
Problem
How to install gcloud on RockyLinux?
Solution
Before you access GCP and run GCP commands through your server, you must first install gcloud on your server.
A. Install gcloud
As far as I know, there are 2 methods to install gcloud on RockyLinux/AlmaLinux/CentOS, and both methods recommend using a user other than root.
1. Using the script
Before you download the script, install the packages using the command below:
yum install tar curl
Use the command below to download and install the script:
curl https://sdk.cloud.google.com | bash
Then you will see a display like the one below:
Install gcloud using the script
Wait until it’s finished, and you will see a display like the one below:
Installation complete
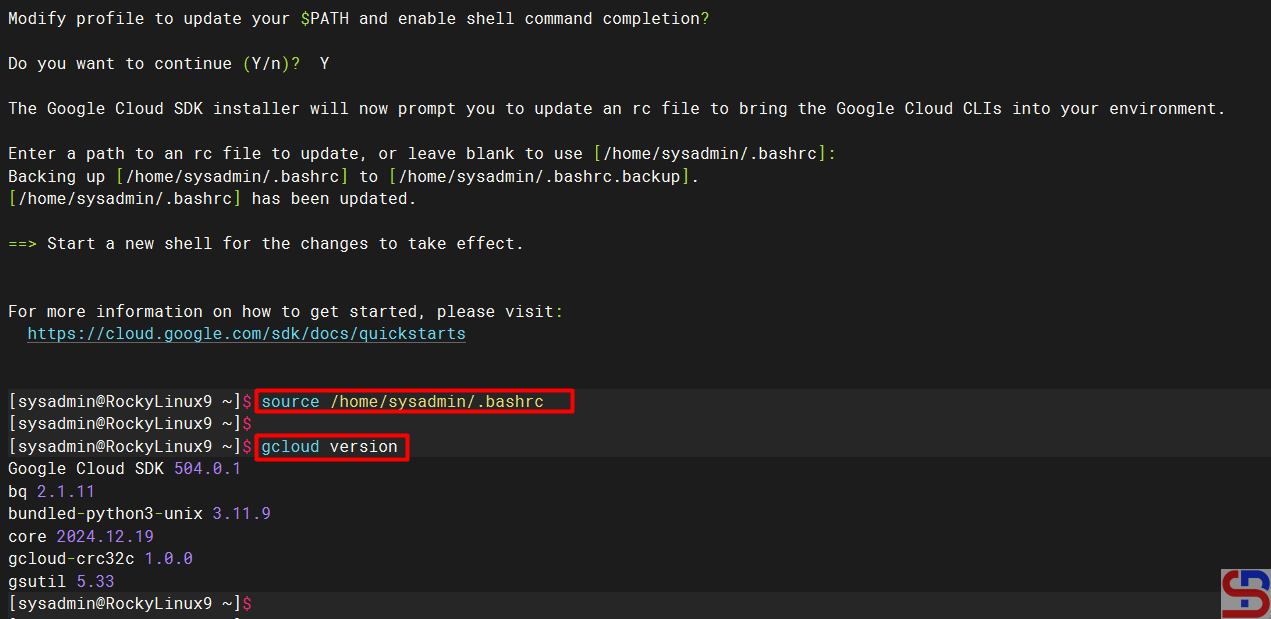
From the image above, you are asked to create a new SSH connection so that the effect can be seen, and type the command below:
gcloud version
However, you can use the command below:
source /home/sysadmin/.bashrc
So you don’t need to create a new SSH connection to run the gcloud version command, which results in the image below:
Check the result of the installation
2. Using the Repository
You have to add the Google Cloud SDK repository to your server using the following command:
sudo tee -a /etc/yum.repos.d/google-cloud-sdk.repo << EOM
[google-cloud-cli]
name=Google Cloud CLI
baseurl=https://packages.cloud.google.com/yum/repos/cloud-sdk-el9-x86_64
enabled=1
gpgcheck=1
repo_gpgcheck=0
gpgkey=https://packages.cloud.google.com/yum/doc/rpm-package-key.gpg
EOM
After that, install gcloud using the command below:
yum install google-cloud-sdk
After the installation finishes, run the following command to test the gcloud command:
gcloud version
B. Connect to GCP
After you install gcloud on your server, type the command below:
gcloud init
Then there will be a display like the image below:
Click the link
Click the Ctrl+Click button in the red box to open the link in a browser, or if you have difficulty, copy what is in the red box and place it in your browser so you will see a display like the one below:
Click the account
Click on the Google account that will access GCP, then there will be a display like the image below:
Click the Continue button
Click the Continue button, then the display below will appear:
Click the Allow button
Click the Allow button, then the display below will appear:
Click the Copy button
Click the Copy button, and paste it into the CLI on your server as in the image below:
Paste the code
Select the project and configure the zone as in the image above. After that, the gcloud configuration is complete.
C. Test gcloud
Now, try gcloud to access your GCP. I try to list my virtual machine in GCP using the below command:
gcloud compute instances list
Then the display below will appear:
Display virtual machine in GCP using gcloud
If you get a display like the image above, you have successfully used your gcloud to access your GCP.
Note
If you have many projects on your GCP, you can choose one of these projects as the starting point for your gcloud on GCP. You can switch projects using the command:
gcloud config set project PROJECT_ID
Change PROJECT_ID to the project ID you want to switch to.