How to Check a Public IP in the Spam List Using a PHP Script?

The spam list is a list of public IPs that spread spam based on the analysis made by various institutions (DNSBL or Domain Name System Blacklists) such as Spamhaus, SpamCop, and so on. This list is handy because by looking at this list, sysadmins know which public IPs are on the spam list, so they can take analysis and actions regarding their mail servers. So, I want to see if a public IP is in the spam list on the internet or not in my Linux serve,r so that I no longer need to search the internet for its status.


Problem

How to check a public IP in the spam list using a PHP script?


Solution

There are 2 solutions if you want to see if a public IP in the spam list on the internet or not in your Linux server, using a PHP script or a bash script. In this article, I use a PHP script to detect if a public IP is in the spam list on the internet or not, and I created a simple site to make it easier to check a public IP. I use the PHP application and Apache web server, and I use Ubuntu (but you can use any Linux OS you like). Install the applications needed to create the site:

sudo apt-get install apache2 php


After that, copy the script below and name the file check_ip_spam.php:

<html>
<head>
<title>DNSBL Lookup Tool - IP Blacklist Check Script</title>
</head>
<body>
<CENTER>
<h1>Check IP SPAM</h1>
<form action="" method="get">
<input type="text" value="" name="ip" placeholder="Insert a Public  IP ..." />
<input type="submit" value="LOOKUP" />
</form>

<?php
/***************************************************************************************
This is a simple PHP script to lookup for blacklisted IP against multiple DNSBLs at once.

You are free to use the script, modify it, and/or redistribute the files as you wish.

Homepage: http://dnsbllookup.com
****************************************************************************************/
function dnsbllookup($ip){
        $dnsbl_lookup=array(
        "bl.spamcop.net",
        "cbl.abuseat.org",
        "dnsbl.justspam.org",
        "dnsbl.sorbs.net",
        "relays.mail-abuse.org",
        "spam.dnsbl.sorbs.net",
        "spamguard.leadmon.net",
        "zen.spamhaus.org"); // Add your preferred list of DNSBL's

if($ip){
        $reverse_ip=implode(".",array_reverse(explode(".",$ip)));
foreach($dnsbl_lookup as $host){
        if(checkdnsrr($reverse_ip.".".$host.".","A")){
                $listed.=$reverse_ip.'.'.$host.' <font color=red>Listed</font><br />';
                }
        }
}

if($listed){
        echo $listed;
}else{
        echo "<font size=4>IP $ip <b>not listed</b> in SPAM list</font>";
        }
}

$ip=$_GET['ip'];

if(isset($_GET['ip']) && $_GET['ip']!=null){
        if(filter_var($ip,FILTER_VALIDATE_IP)){
                echo dnsbllookup($ip);
}else{
        echo "<font color=red><font size=4>Please enter a valid IP</font></font>";
        }
}

?>

<br>
<br>

<table border="0">
        <tr><td><b>This website use multiple DNSBLs:</b></td></tr>
        <tr><td>bl.spamcop.net</td></tr>
        <tr><td>cbl.abuseat.org</td></tr>
        <tr><td>dnsbl.justspam.org</td></tr>
        <tr><td>dnsbl.sorbs.net</td></tr>
        <tr><td>relays.mail-abuse.org</td></tr>
        <tr><td>spam.dnsbl.sorbs.net</td></tr>
        <tr><td>spamguard.leadmon.net</td></tr>
        <tr><td>zen.spamhaus.org</td></tr>
</table>

</CENTER>
</body>
</html>


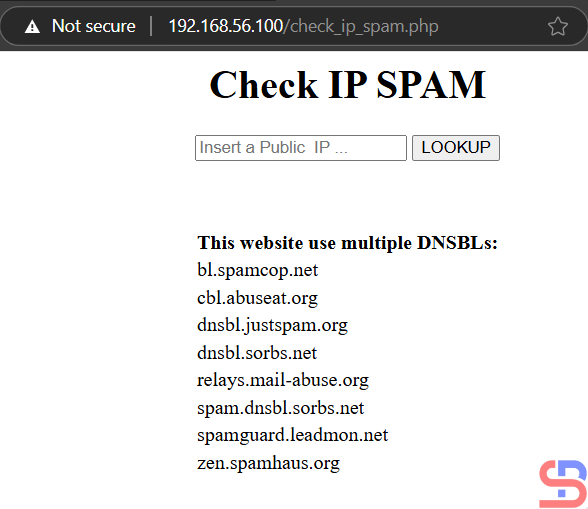
After that, open your browser and type the URL below:

http://ip_server_address/check_ip_spam.php


Then there should be a display like below:

The PHP Application


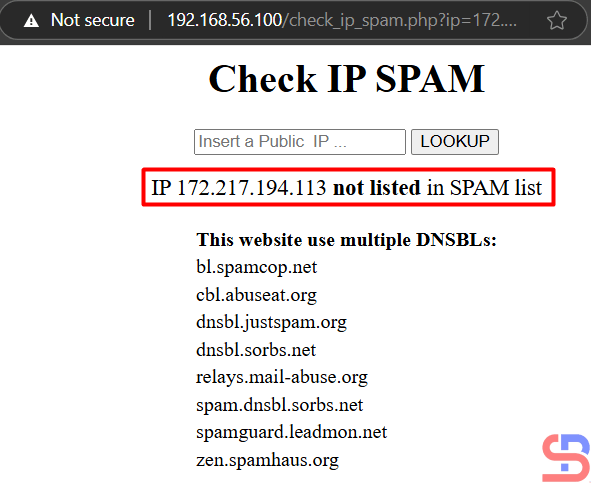
Enter the IP you want to check in the public IP field, such as IP 172.217.194.113, then press the LOOKUP button, then there will be results like the picture below:

check a public IP into the spam list
Display when a public IP is not on the spam list


If the public IP that you put in the spam list, e.g., IP 24.209.96.220, then the result is like in the image below:

check a public IP into the spam list
Display when a public IP is on the spam list


If you are wrong to enter a public IP, there is an error like the image below:

check a public IP into the spam list
Display when mistyping a public IP


Note

If you want to change the DNSBL or Domain Name System Blacklists list, then you can change it in lines 23-30 of the script and you can add the DNSBL list here. The more you enter the DNSBL list, the more valid the output will be.


References

gist.github.com
freecodecamp.org


How to Install the Latest Version of MariaDB on the Linux Server?

MariaDB is one of the widely used open-source database applications that was first released in 2009. This database was named MySQL, but in 2008, Sun Microsystems acquired MySQL, so the MySQL database maker made MariaDB as a free version. But sometimes when you install MariaDB on your Linux server, your MariaDB version is not the latest version.


Problem

How to install the latest version of MariaDB on the Linux server?


Solution

As of this writing, the latest MariaDB version is 11.7.2. Use the command below to create a MariaDB repository on your Linux server:

curl -LsS https://r.mariadb.com/downloads/mariadb_repo_setup | sudo bash


and the process will occur as shown image below:

Install the Latest Version of the MariaDB
Running the command


After that, install MariaDB based on the Linux server distribution that you use:

Redhat-Based Version (Centos, Almalinux, Rockylinux)

yum install MariaDB-server MariaDB-client MariaDB-backup


Ubuntu/Debian

sudo apt-get install mariadb-server mariadb-client mariadb-backup


OpenSUSE

sudo zypper install MariaDB-server MariaDB-client MariaDB-backup


After MariaDB has been installed on your Linux server, use the command below to see the MariaDB version that you have installed:

mysql -V

Checking the MariaDB version


After that, use the command below to see the status of MariaDB:

systemctl status mariadb

Display the status of service


You can see the image above that MariaDB’s service is on. However, if MariaDB’s service is still not on, use the command below to turn on the MariaDB service:

systemctl start mariadb

To run MariaDB after turning on the server, use the command below:

systemctl enable mariadb

Enable MariaDB

After that, to MariaDB becomes safe, use one of the commands below:

sudo mariadb_secure_installation

OR

sudo mariadb-secure-installation


Then there will be a display as in the image below:

Running the command


By default, there is no password when accessing MariaDB so press the Enter button to continue the process. After that, you must answer the questions displayed, including creating a new password as shown below:

Write the password


Then, continue until the process is finished. The next article will explain how to manage a database and its table(s) in MariaDB.


Note

Use the command below if you want to see the option when you run the command to make a repo:

curl -LsS https://r.mariadb.com/downloads/mariadb_repo_setup | sudo bash -s -- --help


If you want to install a certain version of MariaDB, for example, version 11.4, then you can use the command below:

curl -LsS https://r.mariadb.com/downloads/mariadb_repo_setup | sudo bash -s -- --mariadb-server-version="mariadb-11.4"


If you want to download a script, use the command below:

curl -LO https://r.mariadb.com/downloads/mariadb_repo_setup


References

mariadb.com
devopscube.com


How to Make a Virtual Machine’s IP Address on Hyper-V Static?

Throughout my experience using Hyper-V on Windows, if my virtual machine is using a static IP, then if my virtual machine or my laptop is restarted, my virtual machine’s IP will change automatically, even though I have created a static IP on my virtual machine. So I had to change the settings in a few places to keep up with the IP changes on my virtual machine, and it’s very tiring. However, I plan to make the virtual machine’s IP address on Hyper-V static.


Problem

How to make a virtual machine’s IP address on Hyper-V static?


Solution

When you create a virtual machine in Hyper-V, it will use the Default-Switch connection by default. This connection usually has a class B IP, like in the image below on my laptop:

The IP of the Default Switch in my laptop


If I create a virtual machine in Hyper-V, it will usually get an IP in class B as well, and it will change if there is a restart on my virtual machine or my Windows laptop. Therefore, I want to create a static IP in class C on my virtual machine in Hyper-V.

A. On Windows

First, I have to create a new Virtual Switch, which I call StaticIP, and I write the following command in PowerShell:

New-VMSwitch -SwitchName "StaticIP" -SwitchType Internal


On the new Virtual Switch, I have to enter the IP address 192.168.100.0/24, so I type in PowerShell like the command below:

New-NetIPAddress -IPAddress 192.168.100.1 -PrefixLength 24 -InterfaceAlias "vEthernet (StaticIP)"


After that, I created an IP NAT for the new Virtual Switch by typing in PowerShell:

New-NetNAT -Name NATStaticIP -InternalIPInterfaceAddressPrefix 192.168.100.0/24


Then there should be a display as in the image below:

Execute the commands


B. Check the Connections

On Hyper-V Manager, there will be a new Virtual Switch Manager named StaticIP as shown below:

New Virtual Switch


In the Network Connections section, there will be a new adapter as shown below:

New adapter in the Network Connection


And the IP of the new adapter is 192.168.100.1 as shown below:

make a virtual machine's IP address on Hyper-V static
The IP of the new adapter


Or if you want a more complete IP for all adapters can be seen in the image below:

make a virtual machine's IP address on Hyper-V static
Display all IPs of adapters


B. On a Virtual Machine

If you have previously created a virtual machine, change the virtual machine settings in the Virtual Switch section, select StaticIP as shown below, and then click the OK button:

make a virtual machine's IP address on Hyper-V static
Select the new Virtual Switch


After that, log in to the virtual machine and change the IP. Because I am using Ubuntu, I changed it in the netplan section as shown below:

Change IP in Ubuntu


After that, I restarted the network and saw the changed IP as in the picture below:

make a virtual machine's IP address on Hyper-V static
Restart the network in the VM


Based on the picture above, my virtual machine can connect to the internet, making it easier for me to install something from the internet on my virtual machine. After that, I tried to reboot the virtual machine, and the IP of the virtual machine is still the same.


Note

You don’t need the above steps if your virtual machine uses DHCP.


References

mattwalsh.dev
devpress.csdn.net
superuser.com


How to Automatically Copy a File During Linux User Creation?

If you have been a sysadmin in a company for a long time, then you will usually change the Linux server settings according to what you want, for example, you create a recycle bin in your Linux server. If there is a new sysadmin, it will take a long time to explain what you are changing. Therefore, you plan to create a readme.txt file on the Linux server that contains the changes you made on the Linux server and automatically copy a file during Linux user creation.


Problem

How to automatically copy a file during Linux user creation?


Solution

Go to the /etc/skel folder, which contains files and directories. If a new Linux user is created, all the files and directories in this folder will be copied to the Linux user’s folder. Below is an image of the contents of the skel folder in the RockyLinux distro, and the contents of the skel folder can be different in each Linux distro:

The skel folder in the RockyLinux distro


If you want to copy a file to each new Linux user, create the file in the /etc/skel folder. For example, you create a readme.txt file like the following command:

echo 'This is a readme.txt file' > /etc/skel/readme.txt

Create a readme.txt file


After that, create a new Linux user, for example, bob. Use the command below to create a user named bob on Linux:

useradd -m bob


The -m option tells useradd to create the user’s home directory. Then, check the bob folder if the readme.txt file is in the bob folder by using the command below:

ls -l /home/bob
cat /home/bob/readme.txt

Automatically copy a file during Linux user creation
Check in the user folder


From the image above, you can see that the readme.txt file is already in the bob folder automatically. To be more sure, try creating a new Linux user, and the readme.txt file should appear in your new user.


Note

Make sure to use the -m option when creating a new user in Linux so that the file(s) or folder(s) can be automatically copied from the skel folder.


References

youtube.com
linux.org


How to Create a Recycle Bin on Linux CLI?

By default, as of this writing (February 2025), there is no recycle bin function like in Windows in the Linux CLI. This is very dangerous if you accidentally delete an important file or folder on your Linux CLI; the file or folder will disappear forever. Therefore, you have to create a recycle bin on the Linux CLI.


Problem

How to create a Recycle Bin on Linux CLI?


Solution

You must first determine where the recycle bin is located, and this article uses the .trash folder as a recycle bin on the Linux server. Then type the command below to carry out the folder function as a recycle bin (you can change the .trash folder to the name of the folder you want):

echo "alias rm='mkdir -p "$HOME/.trash" && mv -b -t "$HOME/.trash"'" >> ~/.bashrc 


After that, run the command below:

source ~/.bashrc

Run the commands

Info
You have to change the .bashrc file in each of your Linux users, so that if there are 3 users on your Linux server, then you must change the three .bashrc files so that you can run the Recycle Bin function in each user.


For example, you want to delete the Linux.gif file from the folder /home/sysadmin, so I use the command below to delete it:

rm /home/sysadmin/Linux.gif

Info
If you want to delete the folder, use the rm command only, not use rm -rf command..


After that, check the .trash folder and you will see that the file you deleted is still in the folder.

Delete the file after creating a recycle bin in Linux


So, now the Recycle Bin function in the Linux server runs normally. If you want to return the file to the previous folder, then type the command below:

mv ~/.trash/linux.gif /home/sysadmin

Move the file from the .trash folder


But if you want to delete the file, you must enter the .trash folder, then type the commands below:

cd ~/.trash
alias rm='rm -i'
rm -rf Linux.gif
source ~/.bashrc

create a Recycle Bin on Linux
Delete the file in the .trash command


If you want to delete all files or folders in the .trash folder, then type the command below:

cd ~/.trash
alias rm='rm -i'
rm -rf *
source ~/.bashrc


Remember that you must always run the source ~/.bashrc command. After you delete the .trash folder, the file or folder you delete will be in the .trash folder. If not, the file or folder will disappear forever from your Linux server.


Note

You must know that if you use sudo to delete a file or folder, the file or folder will disappear forever and will not be stored in the .trash folder as shown below:

create a Recycle Bin on Linux
Delete a file using sudo


So, be careful when you delete file(s) or folder(s) using sudo.


References

unix.stackexchange.com
2daygeek.com
blog.desdelinux.net


How to Install PostgreSQL on a Linux Server?

PostgreSQL, also known as Postgres, is a free and open-source Relational Database Management System (RDBMS) emphasizing extensibility and SQL compliance.


Problem

How to install PostgreSQL on a Linux server?


Solution

In this article, I use the Linux distro RockyLinux server version 9.5, Ubuntu Server version 24.04, and OpenSUSE version 15.6. As of this writing (January 2025), the version of PostgreSQL that has been released is version 17.2.

A. Install PostgreSQL

Here is how to install PostgreSQL on some Linux distros:

RockyLinux

dnf install -y https://download.postgresql.org/pub/repos/yum/reporpms/EL-9-x86_64/pgdg-redhat-repo-latest.noarch.rpm
dnf -qy module disable postgresql
dnf install -y postgresql17-server
/usr/pgsql-17/bin/postgresql-17-setup initdb
systemctl enable postgresql-17
systemctl start postgresql-17


Ubuntu

sudo apt install curl ca-certificates
sudo install -d /usr/share/postgresql-common/pgdg
sudo curl -o /usr/share/postgresql-common/pgdg/apt.postgresql.org.asc --fail https://www.postgresql.org/media/keys/ACCC4CF8.asc
sudo sh -c 'echo "deb [signed-by=/usr/share/postgresql-common/pgdg/apt.postgresql.org.asc] https://apt.postgresql.org/pub/repos/apt $(lsb_release -cs)-pgdg main" > /etc/apt/sources.list.d/pgdg.list'
sudo apt update
sudo apt -y install postgresql
sudo systemctl enable postgresql
sudo systemctl start postgresql


Debian

sudo apt install curl ca-certificates
sudo install -d /usr/share/postgresql-common/pgdg
sudo curl -o /usr/share/postgresql-common/pgdg/apt.postgresql.org.asc --fail https://www.postgresql.org/media/keys/ACCC4CF8.asc
sudo sh -c 'echo "deb [signed-by=/usr/share/postgresql-common/pgdg/apt.postgresql.org.asc] https://apt.postgresql.org/pub/repos/apt $(lsb_release -cs)-pgdg main" > /etc/apt/sources.list.d/pgdg.list'
sudo apt update
sudo apt -y install postgresql
sudo systemctl enable postgresql
sudo systemctl start postgresql


OpenSUSE

sudo zypper install -y postgresql17-server
sudo systemctl enable postgresql
sudo systemctl start postgresql

If you want to install the latest version of PostgreSQL, go to this page and choose based on your Linux distro.


B. Connect to PostgreSQL

Now, connect to PostgreSQL using the command below:

sudo -u postgres psql

Access to the PostgreSQL


Note

By default, only Postgres users can enter the PostgreSQL server, so you run the command sudo -u postgres psql to connect to PostgreSQL. If you want to connect to PostgreSQL using other users, such as the root user, use the command below:

sudo -u root psql


There will be an error like below:

psql: error: connection to server on socket “/run/postgresql/.s.PGSQL.5432” failed: FATAL: role “root” does not exist


So, you have to define a new role for the root user. Connect to PostgreSQL, and run the command below:

CREATE ROLE root WITH SUPERUSER LOGIN;
CREATE DATABASE root;
\q


After that, try to connect to PostgreSQL using the root user; it should connect to PostgreSQL as shown in the image below:

install PostgreSQL on a Linux
Connect to PostgreSQL using the root user


References

en.wikipedia.org
postgresql.org
devart.com
neon.com
openbasesystems.com


How to Change the Timezone on the Linux Server?

When you install Linux on a server for the first time, you are asked to select the regional zone where the server is located so that Linux will create the date and the time on the server based on that zone. But sometimes you want to change the timezone on your Linux server.


Problem

How to change the timezone on the Linux server?


Solution

To see the timezone currently used on the server, you can use the command:

timedatectl

The timedatectl command


From the image above, the server’s time zone is in the American region in the New York area. To see the timezone provided by Linux, use the following command:

timedatectl list-timezones

List of timezones


If you want to change the timezone to Singapore, then you can type the command below:

timedatectl set-timezone Asia/Singapore


Then the time on the server will change to Singapore time, as in the image below:

After updating the timezone


Note

Apart from using the timedatectl command, you can also use the command below:

tzselect


There is a list of the continents. Select the number that corresponds to the zone you want. For example, I choose Singapore as the timezone on my server, then I will choose number 5 for Asia, and will choose Singapore in the country selection, as in the image below:

Alternative to change the timezones


Once finished, the script in the red box must be inserted into the .profile or .bashrc file (if there is no .bashrc file on the server, then create the file manually). After that, use the command:

source ~/.bashrc


Then the timezone on the server will change.


References

linuxize.com
wikihow.com
baeldung.com
askubuntu.com
superuser.com