How to Create a Swap File in the btrfs filesystem?
written by sysadmin | 21 April 2025
The previous article explained how to create a swap file on the Linux server. But the steps in the article can only run if you use the xfs or ext4 filesystem. If you use btrfs in your filesystem, then the article will not be able to run.
Problem
How to create a swap file in the btrfs filesystem?
Solution
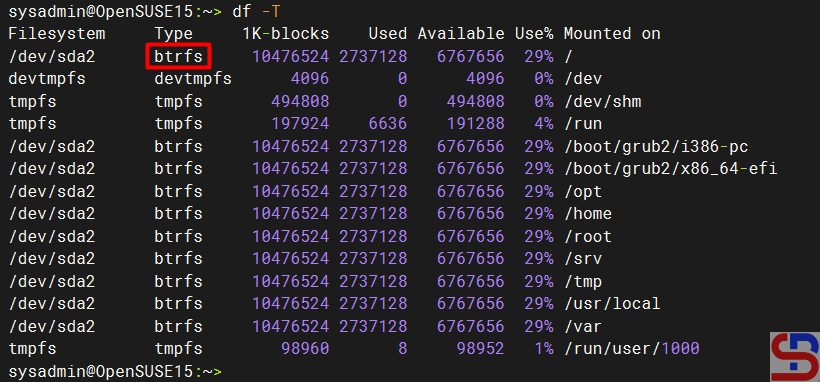
I have an openSUSE server and use the btrfs filesystem as shown in the image below:
Check the filesystem
And my server does not have a swap space:
Check the swap
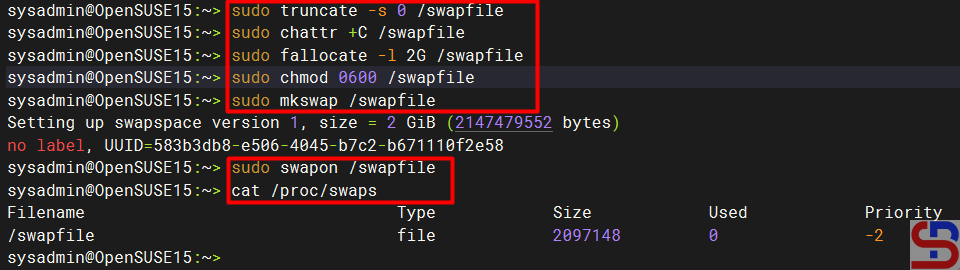
Therefore, so that my server can have a 2GB swap space, I have to create a swap file by running the commands below:
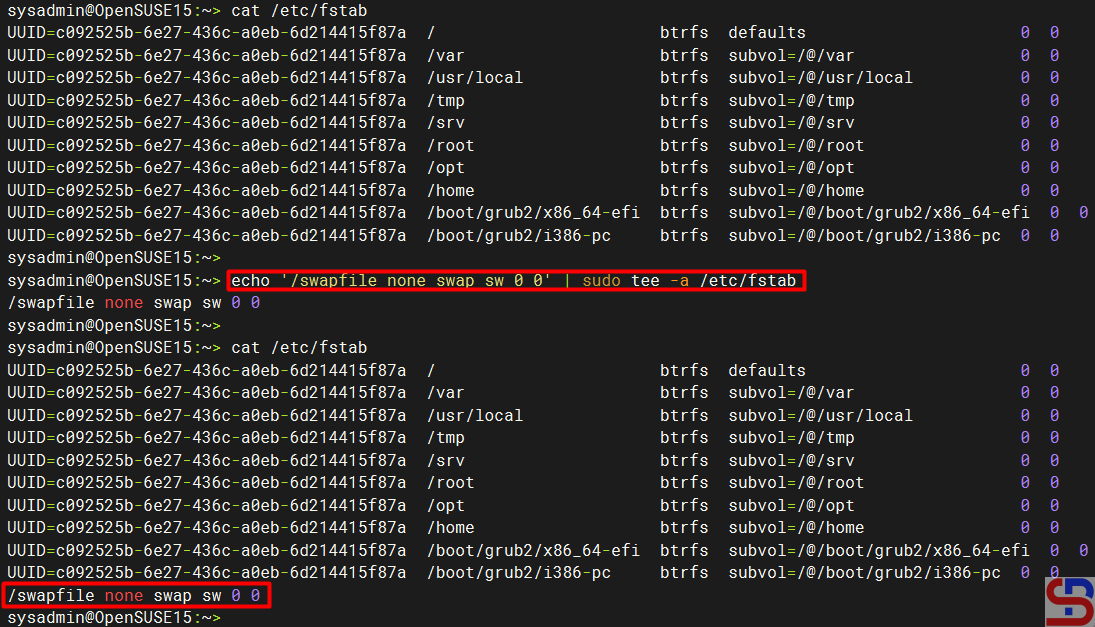
From the picture above, you can see that the server has a swap space. After that, you have to add the below script to /etc/fstab so that the swap space remains when you reboot the server by running the script below:
echo '/swapfile none swap sw 0 0' | sudo tee -a /etc/fstab
Add the swap in the fstab file
Note
Swap files in btrfs are supported with the following limitations:
A swap file can’t be on a snapshotted subvolume. Instead, we recommend that you create a subvolume on which to place the swap file.
Btrfs doesn’t support swap files on file systems that span several devices.
Swap space is a portion of hard drive storage that has been set aside for the operating system to temporarily store data that it can no longer hold in RAM. So, if the system needs more memory resources and the RAM is full, inactive pages in memory are moved to the swap space. Swap space can be a dedicated swap partition (recommended), a swap file, or a combination of swap partitions and swap files. You can use a swap file as a swap space if your server does not create a partition when installing Linux.
Problem
How to create a swap file as a swap space?
Solution
First, you have to check the type of filesystem that you use by running the command below:
df -T
Check the filesystem type
If you use the ext4 or xfs filesystem, you can use the steps below in this article. Type the command below to see whether the swap is already on your Linux server or not:
cat /proc/swaps
If the above command results are as shown below, then your server hasn’t used a swap:
Check the swap
After that, check how much hard disk size on your Linux server and determine the size of the swap file you need. You should know that the size of the swap file will reduce the size of your hard disk. Generally, the swap size is twice the size of the RAM server, so if your Linux server RAM is 1 GB, the swap size is 2 GB. In this article, we use 2GB for the swap file. Type the command below to create a 2GB swap file:
sudo fallocate -l 2G /swapfile
ls -lh /swapfile
Create the size of the swap file
Then give the command below so that the users can not read the swap file:
sudo chmod 0600 /swapfile
Set up the swap file with the command:
sudo mkswap /swapfile
Set up the swap file
Enable the new swap space for paging and swapping by typing the following:
sudo swapon /swapfile
And then run this command to verify:
sudo swapon --show
Enable the swap file
You can see if the swap space is available on your Linux server after creating a swap file:
Check the swap space after creating the swap file
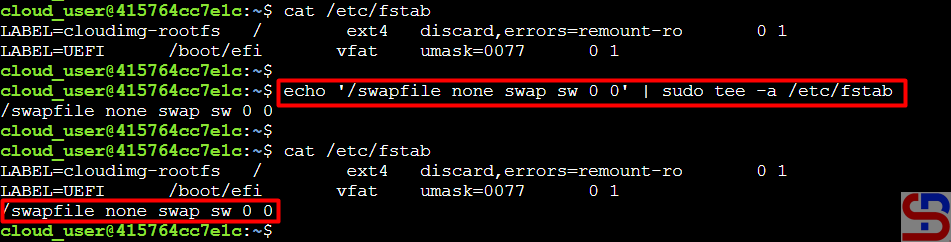
To make the swap file permanent, you have to add the swap file to the fstab file using the command below:
echo '/swapfile none swap sw 0 0' | sudo tee -a /etc/fstab
Add the swap file to the fstab file
If you want, you can reboot the server to see whether the swap is still there after you reboot the server.
Note
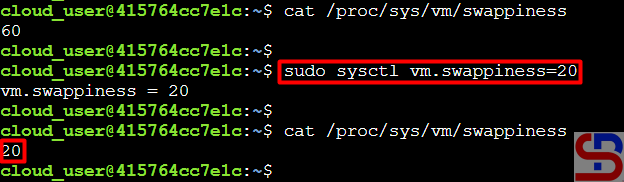
You can determine how often your Linux system exchanges data from RAM to the swap space using swappiness parameters by giving a value between 0 to 100, representing the percentage. If you give a value that is close to zero, the Linux system will not write data to the disk unless it is necessary. But if you give a value that is close to 100, the Linux system will write more data into the swap to keep more free RAM space. By default, the Linux system gives a value of 60 in the file/proc/sys/vm/swappiness, and if you want to change the value, for example, to 20, then you can change it using the command below:
sudo sysctl vm.swappiness=20
Change the swappiness parameter
But if you reboot the server, the swappiness value will return to the initial value. So if you want the swappiness value to remain, add the script below to the /etc/sysctl.conf file:
Cache memory is a type of data storage used to store frequently accessed information for faster response time, and it’s used to improve system performance. In Linux, the kernel uses the buff/cache memory to improve system performance by caching frequently accessed data (disk blocks, inodes, etc.) and buffering I/O operations. So if you have an application that is often used and accessible to many people, you will see that the memory cache on the server will often be used. But sometimes, because of necessity, you have to clean the cache memory.
Problem
How to clear cache memory on Linux?
Solution
Before you delete the cache memory on Linux, you must know some of the terms related to the cache memory:
Buffer: stores disk blocks that have been recently accessed or modified.
PageCache: It improves file I/O performance by storing often-used file data in RAM.
Dentries: help speed up file name searches by storing cached directory entries.
Inodes: store important metadata about files and directories, they are also separate from the content or names.
So if you want to delete cache memory, use the format below:
sync; echo1-3> /proc/sys/vm/drop_caches
The sync command to clear the buffer and the drop_caches file controls which type of cached data should be cleared and the values are as follows:
1 – Clears only the page cache.
2 – Clears dentries and inodes.
3 – Clears page cache, dentries, and inodes.
So if you want to delete cache memory, use the format below:
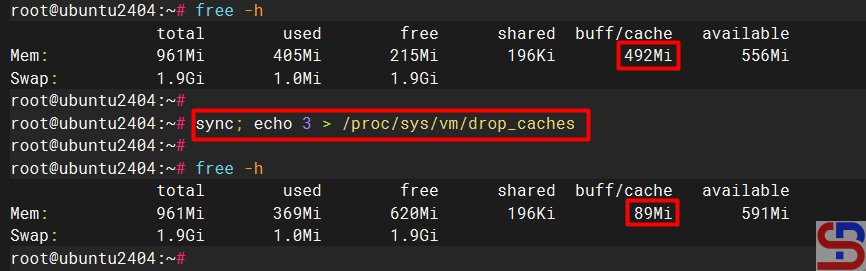
sync; echo 3 > /proc/sys/vm/drop_caches
And the cache memory on your Linux server will be deleted as shown below:
Clear the cache memory
WARNING
You have to be root if you want to run commands to delete cache memory. If you want to use an ordinary user and want to run the command, then use the command below:
sudo sync; sudo sh -c ‘echo 3 >/proc/sys/vm/drop_caches’
Note
It is not dangerous if you run the command to delete the memory cache on Linux but this will cause an increase in I/O disk because of the request that is usually handled by the memory cache because the memory cache is cleaned so that the request will immediately proceed to the hard disk, causing an increase I/O disk. Also on the application side will cause a decrease in performance because the application does not receive a response from the memory cache, but must receive a response from the hard disk, whose response time is slower than from the cache memory.
WARNING
Only clear the cache for debugging, benchmarking, or emergencies. For normal usage, let the kernel manage memory automatically. Clearing it without a good reason hurts performance.
How to Show The Progress Bar In Linux’s cp and mv Commands?
written by sysadmin | 21 April 2025
By default, if you do a copy command or move a file in Linux CLI, no progress bar shows how long the commands will take to complete. I think the users will feel bored because they do not know how long the commands will take to complete.
Problem
How to show the progress bar in Linux’s cp and mv commands?
Solution
The image below shows no progress bar when you copy a file in Linux CLI:
Copy the file in Linux CLI
To display progress bars on cp and mv commands on Linux, you need a tool made by a GitHub user named jarun, who modified the source code of Florian Zwicke. But before you can install this tool, you must install the required packages:
RockyLinux/AlmaLinux/CentOS
yum install -y tar curl patch make coreutils gcc libattr* libpcap* perl libacl*
Debian/Ubuntu
apt-get install -y tar curl patch make coreutils gcc libattr* libpcap* perl libacl*
OpenSUSE
zypper install -y tar curl patch make coreutils gcc libattr* libpcap* perl libacl*
After that, install the tool, and it is recommended to use a normal user to install the tool, but if you want to use the root user to install this tool, run the command below:
export FORCE_UNSAFE_CONFIGURE=1
Error when using the root user
Install the tool on your server by running the command below:
After installation completes, it created two new commands under the advcpmv folder. You need to replace your original cp and mv commands with these two new commands to get the progress bar while copying files:
Try to copy a file in your Linux CLI, and there should be a progress bar when you copy the file:
The progress bar appears when you copy the file
Likewise, if you are going to move a file on Linux CLI, there will be a notification as below:
The notification appears when you move the file
Note
You should know that if you want to use this tool on a different user from the user where this tool is installed on the server (for example, you installed this tool using another user but you want to use the tool using another user), you need to use the command below using your user so that this tool can be used on that user:
I have a file containing many IPs that I want to ping the rest of the IPs.
Problem
How to read a file line by line on Linux?
Solution
I have an ip.txt file that contains IP addresses, and in this article, I will only limit it to 3 IP addresses:
192.168.56.2 192.168.56.12 192.168.56.100
To read a file line by line on Linux, you can use the format below:
catyour_file | while read linedothe-commands-that-you-want-to-run ....... .......done
In this case, the format above has changed as below to ping each IP in the file:
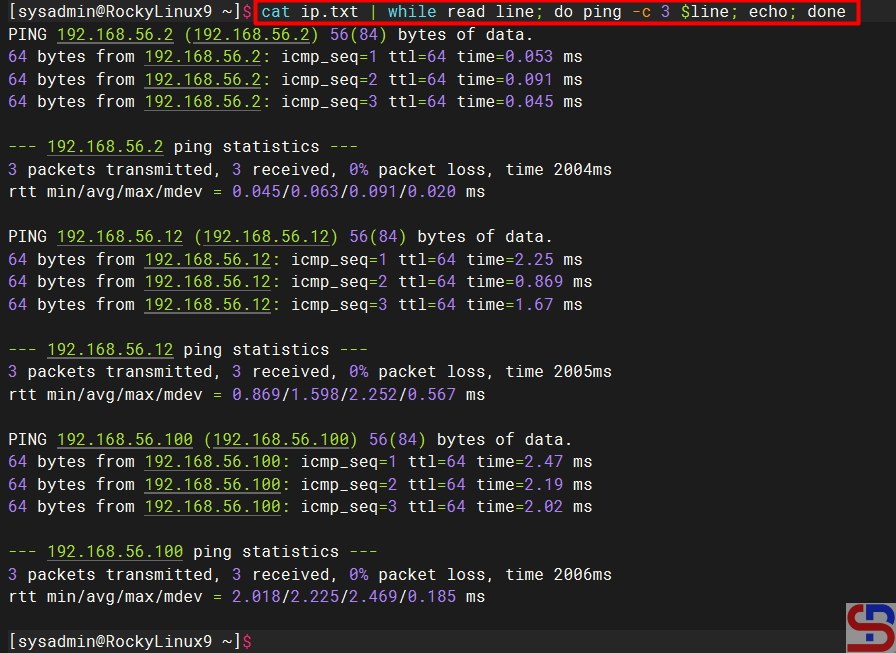
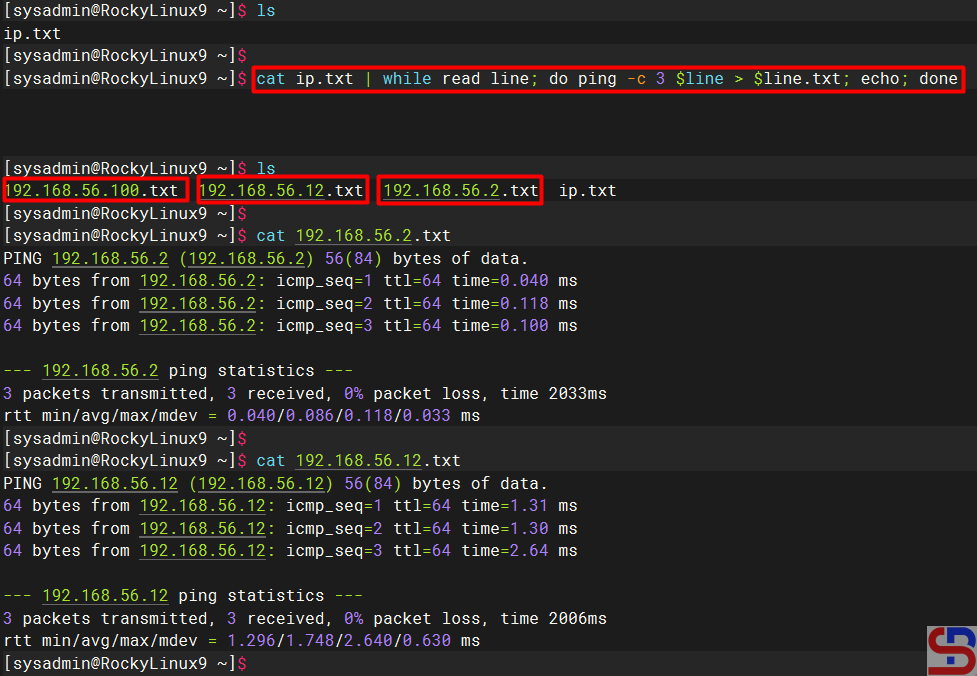
cat ip.txt | while read line
do
	ping -c 3 $line
	echo
done
The command above means to run the ping command 3x on each IP in the ip.txt file by separating one line for each IP. If we run the command, it will look like the image below:
Ping the IPs from the file
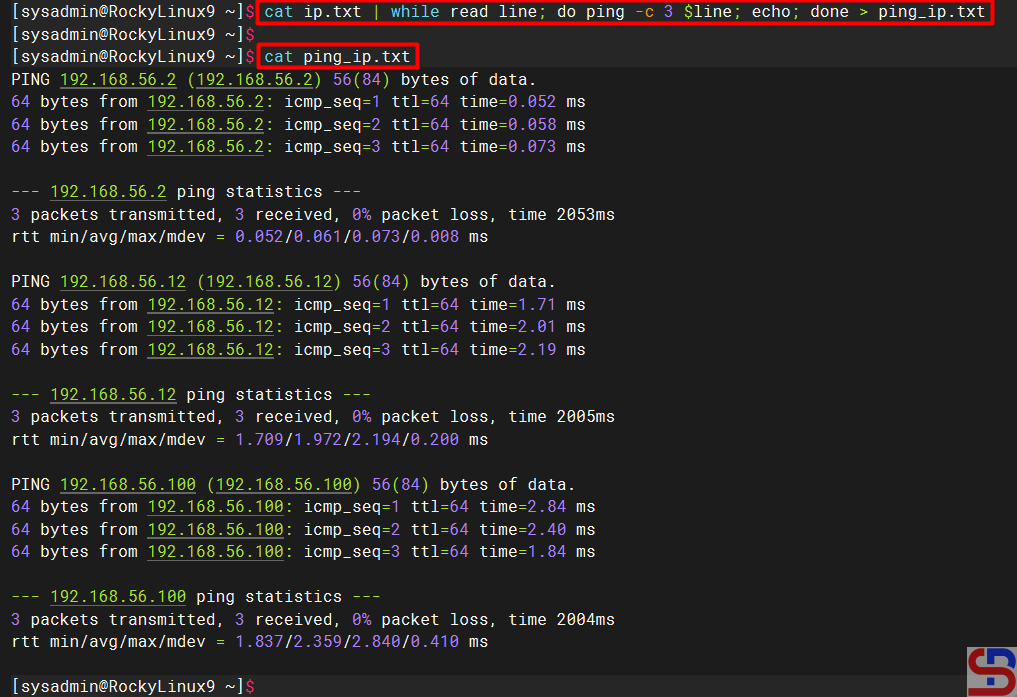
Change the script above to be as below if you want to enter the results of each ping IP into one file:
cat ip.txt | while read line
do
    ping -c 3 $line
    echo
done > ping_ip.txt
Look at the picture below:
Ping IP results are saved in one file
But if you want to enter the results of each ping IP into several files based on the IP, change the script above to be as below:
cat ip.txt | while read line
do
    ping -c 3 $line
    echo
done > ping_ip.txt
There should be new files after you run the script above, and each file will contain the results of the ping IP as in the image below:
Ping IP results are saved in each file
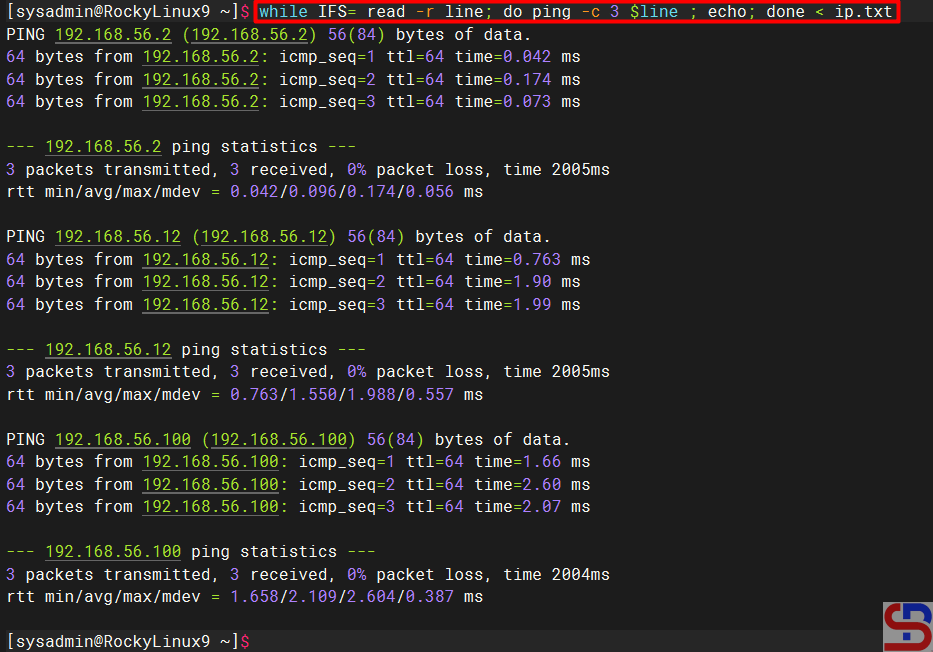
Note
In addition to using the script above, you can use the script below to read line by line in a Linux file:
while IFS= read -r line; do ping -c 3 $line ; echo; done < ip.txt
By default, if you want to turn off the Windows OS on a PC, laptop, or server, there are usually three stages to do that. You will press the Start button first, then press the Power button, and after that select the Shut down option. But you can turn off the Windows OS just by pressing one click.
Problem
How to turn off windows OS in one click?
Solution
The following steps to turn off the Windows OS in one click:
1. Create a shortcut
Go to the desktop, then right click and select New – Shortcut as shown below:
Click New – Shortcut in the desktop
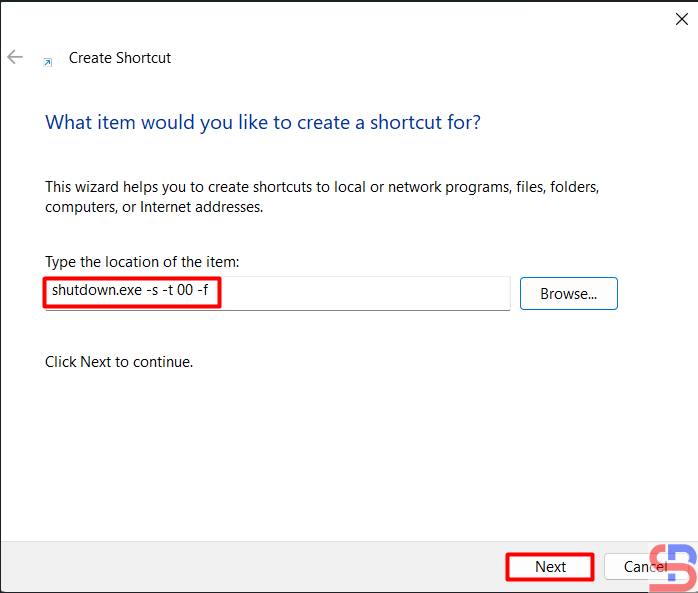
2. Write a script
Write the script below:
shutdown.exe -s -t 00 -f
In the section as shown below:
Write the script
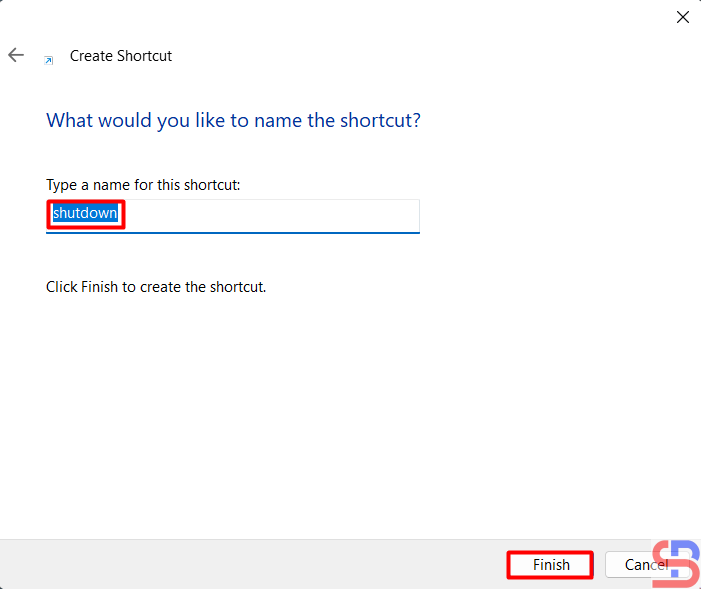
Then press the Next button, and then there will be a display as below:
Create a name for the shortcut
You can change the name for the shortcut, and after that, press the Finish button, then there will be a display as below:
Display of the shortcut icon
3. Change the icon
Right-click on the icon, select Properties as shown below:
Click the Properties of the icon
Then click Change Icon, there will be a display as below:
Click the change Icon
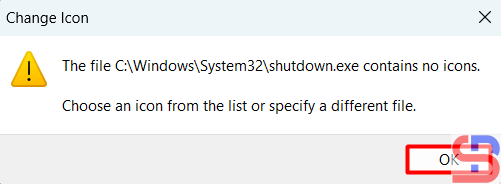
There will be a display as below:
Click the OK button
Click the OK button and after that,, you can choose the icon you like, but I chose the icon in the red box, press OK, then there will be a display as below:
Choose the icon
The shortcut icon will change to what you chose in the previous section. After that, press OK, the shortcut icon will change the image according to what you choose.
The icon is changed
4. Move the icon
Move the icon to the taskbar by dragging it as shown below:
Drag the icon
After the icon has been moved to the taskbar, you can delete the icon from the desktop.
5. Test the result
After that, try clicking the icon in the taskbar, and your Windows OS should do the shutdown process.
Note
In the second part of the script writing, the time used is 0, so there is no time lag after you click the icon with the shutdown process. You can change it to the time you want, for example, to 5 seconds, so that the script becomes like below:
shutdown.exe -s -t 5 -f
Then there will be a break of 5 seconds after you finish clicking the icon and the shutdown process.
How to Get The Value Between Two Special Characters on Linux?
written by sysadmin | 21 April 2025
I need to get a value between 2 special characters I use for my other purposes in the log file on the Linux server.
Problem
How to get the value between two special characters on Linux?
Solution
Special characters are the punctuation characters on your keyboard, such as !, @, #, and so on. After I searched on the internet, there were 2 solutions to get the value between these two special characters: using the grep command or using the cut command.
1. Using the grep command
To get the value between two special characters using the grep command, use the following format:
For example, if the special character is pound or #, then the format above changes to:
cut -d "#" -f2 | cut -d "#" -f1
Type the command below to get the value between the pounds:
echo "#test#" | cut -d "#" -f2 | cut -d "#" -f1
Look at the example in the image below:
Using the cut command
Note
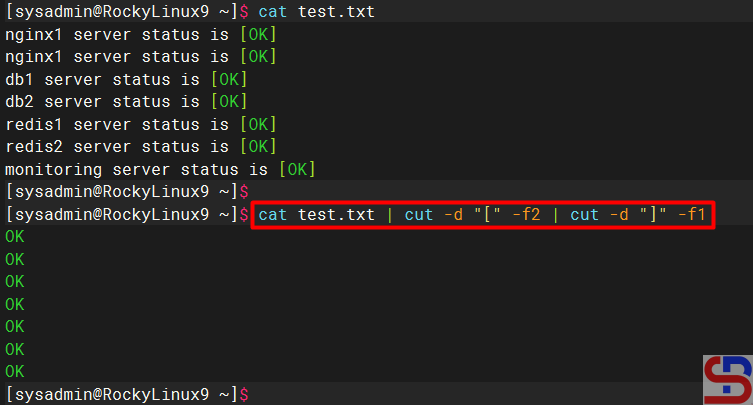
If you have a log file in Linux, for example, the content of the file is as image below:
nginx1 server status is [OK] nginx1 server status is [OK] db1 server status is [OK] db2 server status is [OK] redis1 server status is [OK] redis2 server status is [OK] monitoring server status is [OK]
You can use one of the commands above to get the value between 2 special characters, and I use the cut command as in the command below: