Zabbix is an open-source software tool to monitor IT infrastructure such as networks, servers, virtual machines, and cloud services.
Problem
How to install Zabbix in Ubuntu?
Solution
Zabbix was first released in 2001, and as of this writing in October 2025, Zabbix has version 7.4. This article will explain how to install Zabbix on an Ubuntu server by using MariaDB and Apache databases.
A. Install Zabbix
Run the commands below to install Zabbix on Ubuntu:
If your Ubuntu doesn’t have a database, then you can use the MariaDB database by using the command:
sudo apt install mariadb-server
Then, create a password for root in MariaDB using the command:
sudo mariadb-secure-installation
After that, enter MariaDB using the command:
sudo mariadb -uroot -p
Run the commands below (change the password to what you want):
create database zabbix character set utf8mb4 collate utf8mb4_bin;
create user zabbix@localhost identified by 'password';
grant all privileges on zabbix.* to zabbix@localhost;
set global log_bin_trust_function_creators = 1;
quit;
Run the command below to import the initial schema and data, and enter the password you created when you created the Zabbix database in MariaDB:
zcat /usr/share/zabbix/sql-scripts/mysql/server.sql.gz | mysql --default-character-set=utf8mb4 -uzabbix -p zabbix
Then log in to MariaDB again using the command:
sudo mariadb -uroot -p
Run the command below to disable the log_bin_trust_function_creators option after importing the database schema.
set global log_bin_trust_function_creators = 0;
quit;
C. Configure the Zabbix file
After that, you will configure the zabbix file located in /etc/zabbix/zabbix_server.conf. It’s better if you copy the original file as a backup by running the command below:
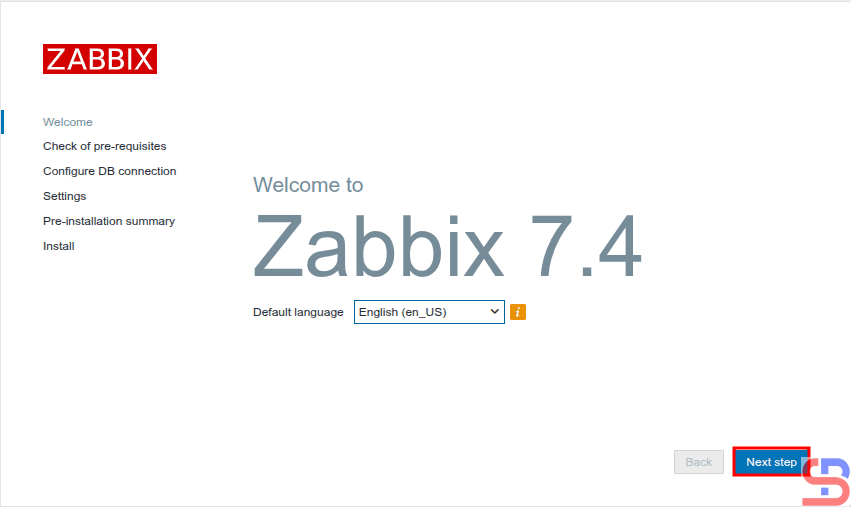
Then there will be a display like the image below:
Configure Zabbix using your browser
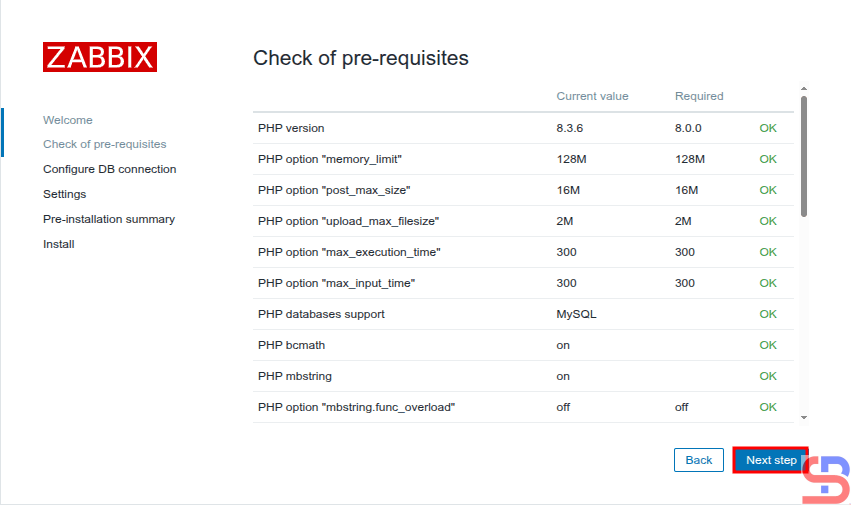
Click the Next step button, and a display similar to the picture below will be present:
Checking of pre-requisites
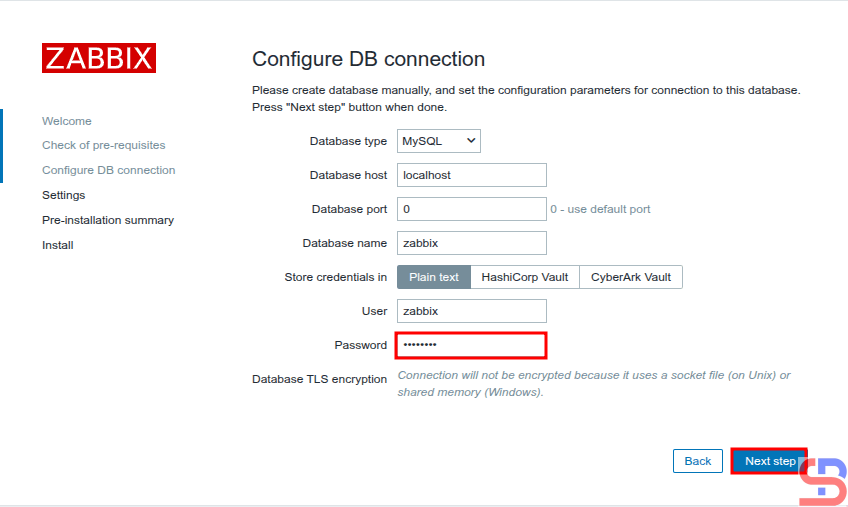
Make sure there is no error like in the image above. After that, click the Next step button, and there will be a screen similar to the one below:
Enter the password of MariaDB
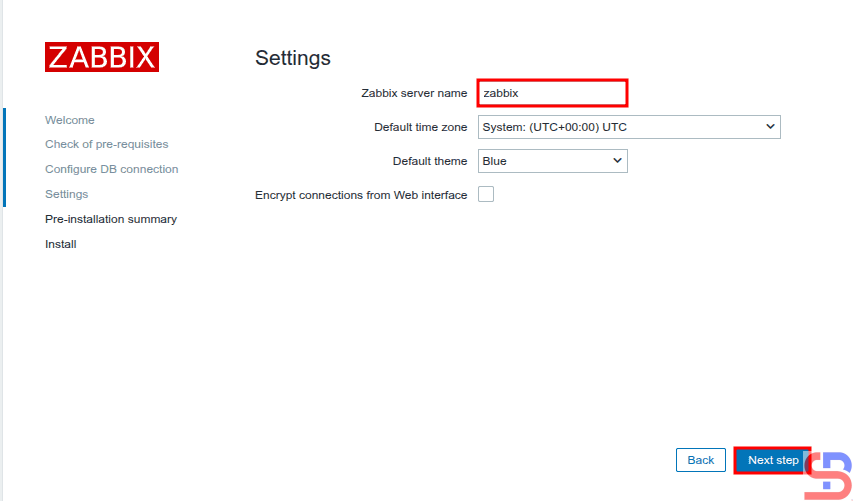
Enter your database password using the Zabbix user, click the Next step button, and a screen similar to the one below will be presented:
Enter the server name of Zabbix
Enter the name of the Zabbix server you want, click the Next step button, and there will be a display like the image below:
Pre-installation summary
Click the Next step button, and there will be a display similar to the image shown below.
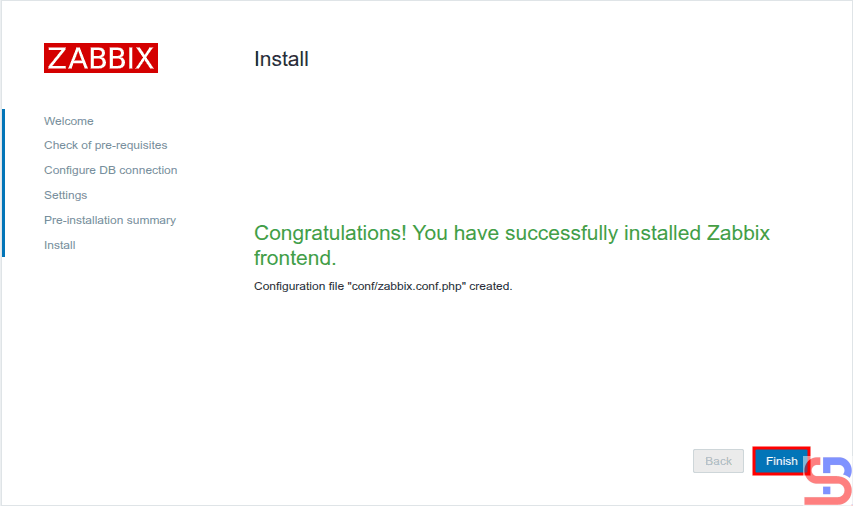
Finish installation
Click the Finish button, and ascreenliketheoneshownbelowwillappear.
Enter the username and password of Zabbix
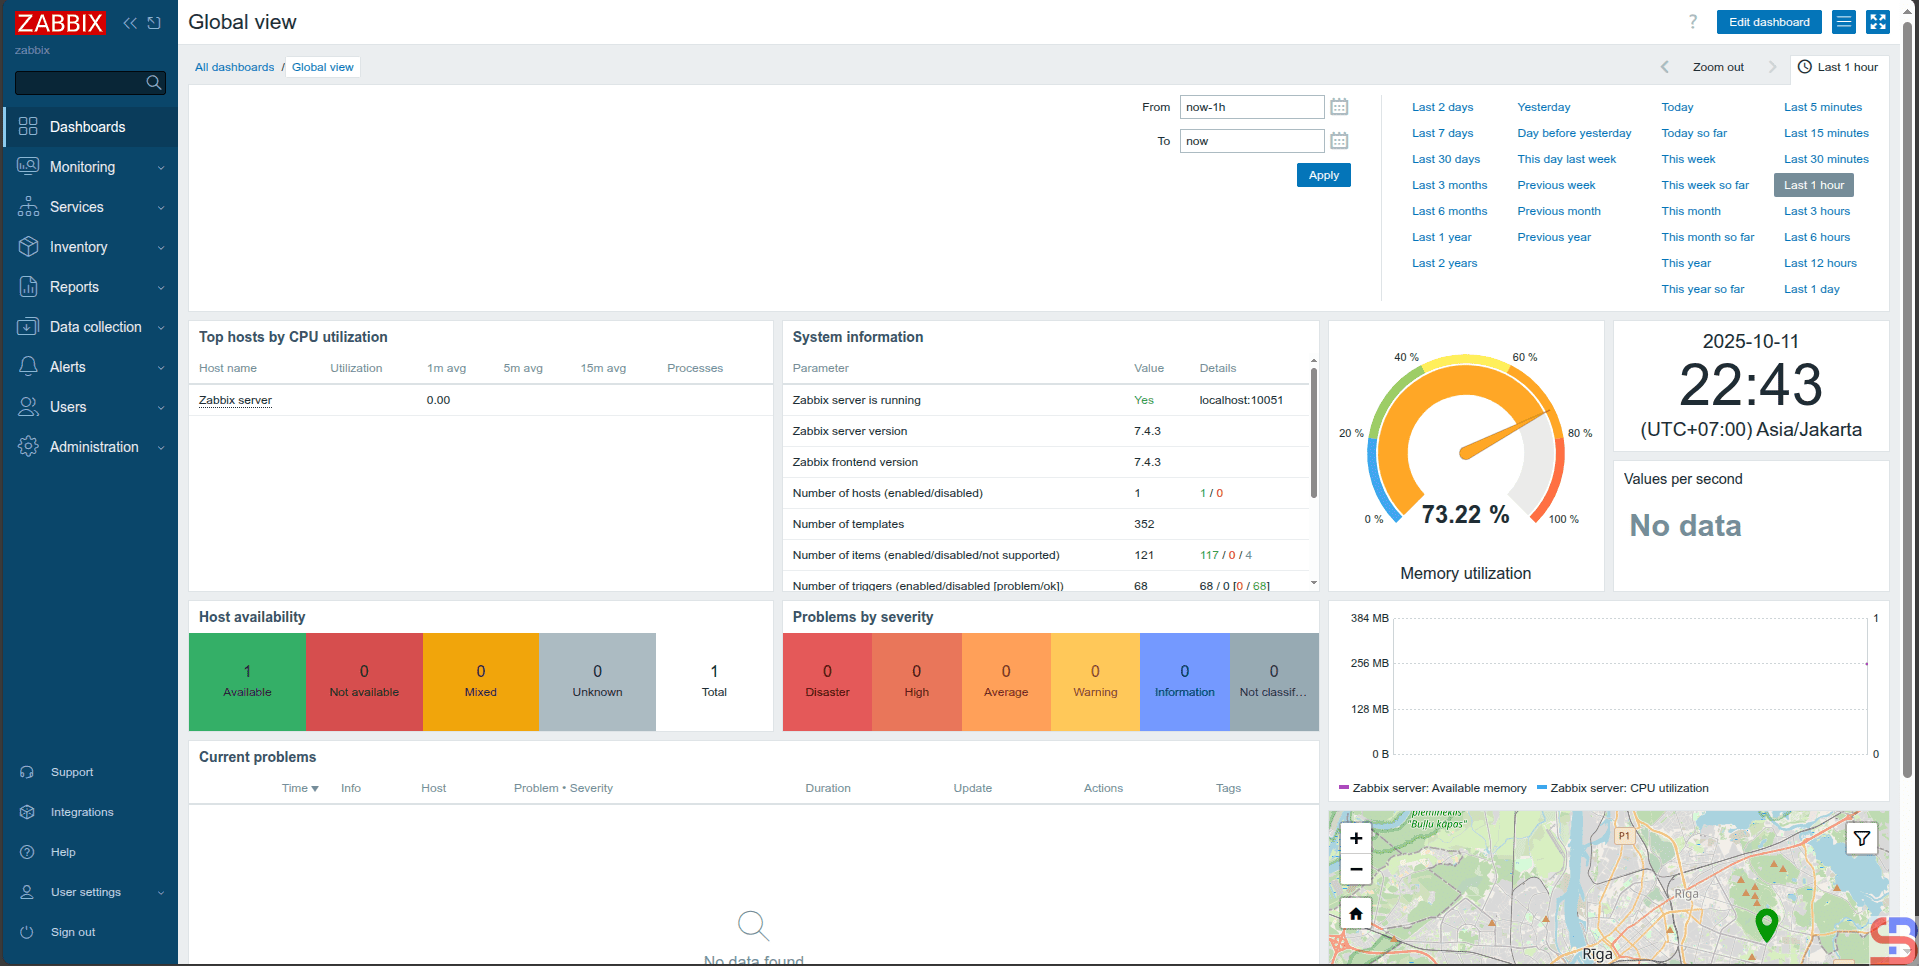
For your information, the initial username for Zabbix is Admin and the initial password is zabbix. After you enter the username and password, click the Sign in button, and there will be a display like the image below:
The initial display of Zabbix
You have successfully installed the Zabbix application on your Ubuntu server.
Note
To install Zabbix on a different operating system, you can go to this page to see how to install Zabbix on your server.
How to Stop Linux From Erasing the File(s) or Folder(s)?
written by sysadmin | 13 October 2025
I want to prevent a specific file or folder from being deleted, even with the root user.
Problem
How to stop Linux from erasing the file(s) or folder(s)?
Solution
In Linux, there are two commands you can use to prevent unauthorized changes, protect the critical file(s) or folder(s), and ensure the integrity of the system: the lsattr and chattr commands.
A. The lsattr command
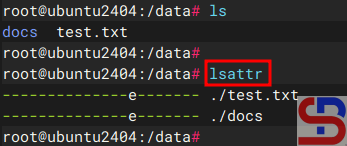
To see the properties of files or directories on a file system that supports extended attributes, use the lsattr command. So, lsattr command displays special attributes that are not visible with the ls -l command. Run the command below to see the list of attributes:
lsattr
List the attribute(s)
By default, if your server uses the ext4 format, a file or folder on that Linux server will have the e attribute, or extent format, which is a more efficient file storage method than the traditional block method. Below is a brief explanation of the various attributes:
File/Folder Attributes
Attribute
Explanation
-
Attribute not set
a
Append-only — file can only be opened for appending without modifying existing data on a File, not overwritten or truncated
A
No atime updates — access time is not updated when the file is read
c
Compressed — file is stored compressed on disk (kernel support required).
C
No Copy-on-Write (CoW) — disables CoW for Btrfs files.
d
No dump — file is ignored by the dump backup program.
D
Synchronous directory updates — directory changes are written immediately to disk.
e
Extents — file uses extents to map blocks (default on ext4).
i
Immutable — file cannot be modified, deleted, renamed, or linked (even by root).
j
Data journaling — file data is journaled as well as metadata.
s
Secure deletion — blocks are zeroed when file is deleted (if supported).
S
Synchronous updates — file changes are written immediately to disk.
t
No tail-merging — prevents tail-packing (used in ReiserFS).
T
Top of directory hierarchy — marks directory as top-level for block allocator.
u
Undelete — when deleted, file content can be recovered (if supported).
B. The chattr command
With Linux, users can modify the properties of files and directories with the ‘chattr’ (change attribute) command. Using this command, you can protect a file or directory from deletion or addition, which is very useful for protecting critical files or folders. To use this command, you can follow the format below:
chattr[operator][attribute] file(s)/folder(s)
You can see the attributes in the table above, while the table below shows the operators you can use:
The Operators in attribute file(s)/folder(s)
Operator
Explanation
+
Add the specified attribute(s) to the file/directory (keep existing ones).
-
Remove the specified attribute(s) from the file/directory.
=
Set the attribute(s) exactly as specified (replace all existing ones).
1. Making a file undeletable
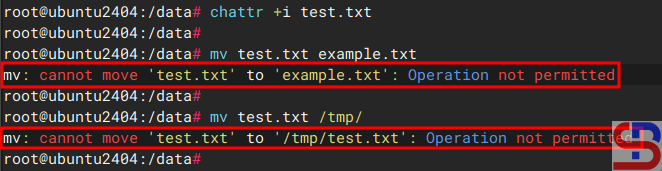
Use the command below to make a file undeletable in a file, for example, test.txt:
chattr +i test.txt
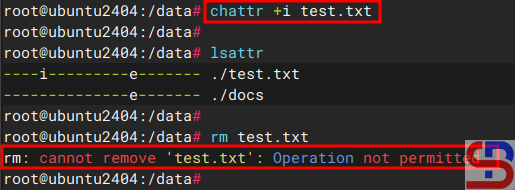
Then, try deleting the file. It should be undeletable even with the root user, as shown in the image below:
Making a file undeletable
You cannot even rename the file or move it to another folder, as shown in the image below:
Can not rename or move a file
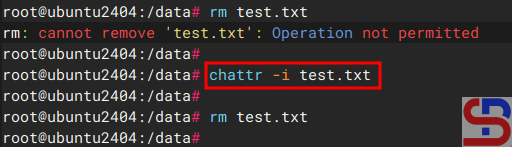
If you want to really delete a file, you have to run the command below, and you can delete the file like in the image below:
The file can be deleted
2. Append data without modifying existing data on a File
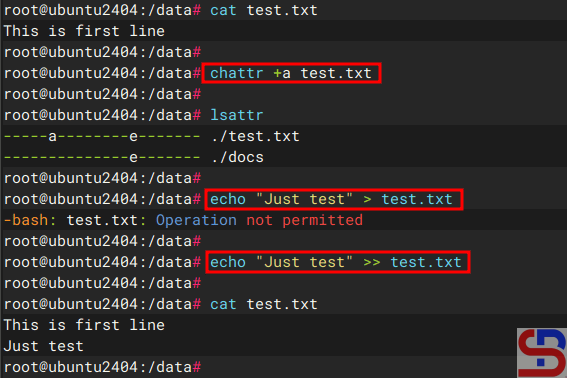
If you want the file to be able to add content without deleting the content that is already in the test.txt file, use the command below
And only the second command should be able to be executed, as shown in the image below:
Append a file
To get the file back to “normal”, use the command below:
chattr -a test.txt
3. Making a folder secure
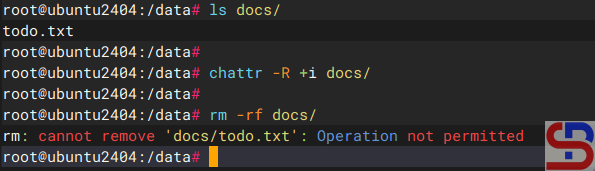
Use the command below if you want your folder to be undeleted, for example, the docs folder:
chattr -R +i docs/
Now, try to delete the folder, and it should not be deletable as shown in the image below:
Can not delete the folder
Even you can’t delete the files in the folder, as shown in the image below:
Cannot delete the file in the folder
For the folder to be deleted, use the command below:
chattr -R +i docs/
Note
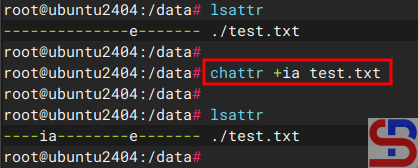
You can run more than one option to change the attributes of a file in a command. For example, you want the file to be undeletable and appended without deleting the content that was previously present in the test.txt file, then use the command below:
chattr +ia test.txt
Give more than one attribute for one file
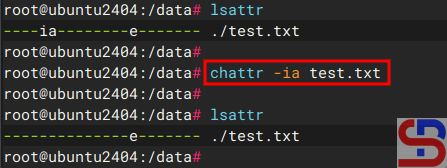
Likewise, you can delete more than one attribute for the test.txt file, then use the command below:
chattr -ia test.txt
Delete more than one attribute in one file
You can also run and change the attribute in more than one file or folder. For example, you want to change the attributes for test.txt and ok.txt, use the following command:
I want to access the user on the Ubuntu server that has the privilege of root using the sudo command, but I forgot my user password.
Problem
How to reset the password in Ubuntu?
Solution
Here are the steps to reset the password in Ubuntu:
1. Reboot the server
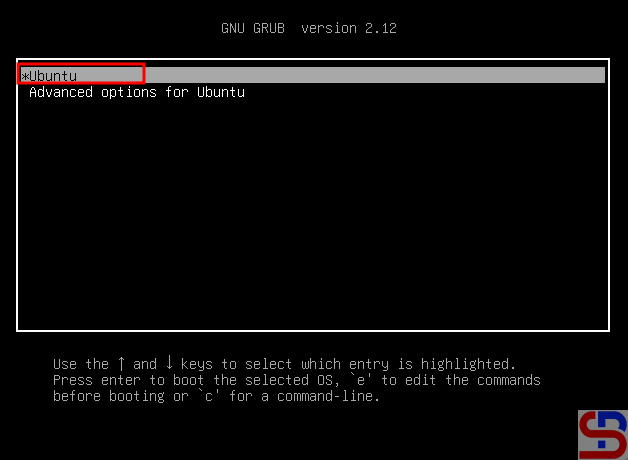
Reboot the server and press the Esc key or Shift key, and there should be a display like below:
Choose the Ubuntu
2. Click the first option
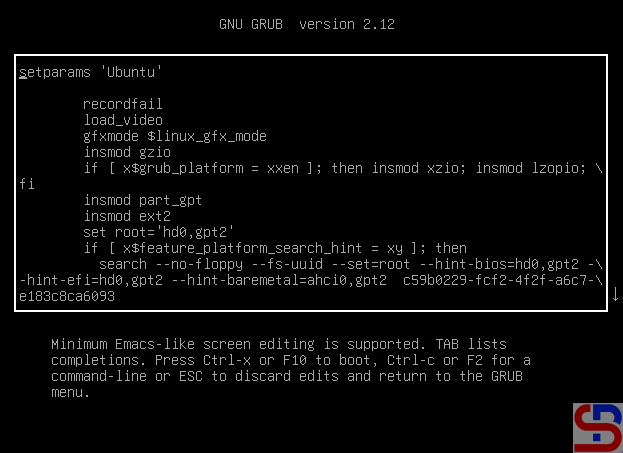
To enter recovery mode, select the top part of the image above and push the e button, so that there will be a display like the image below:
The GRUB options
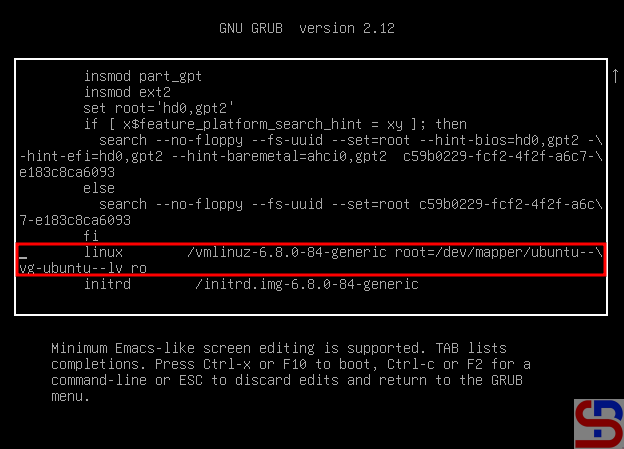
Find the line starting with linux, similar to the picture below:
Find the line starting with linux
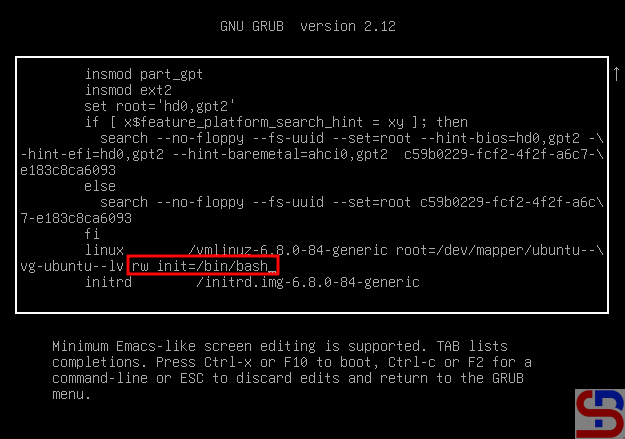
Remove everything from ro and append rw init=/bin/bash to the end of this line, like the picture below:
Change the script
After you change the script, press F10 or Ctrl+x to boot these parameters.
3. Run the commands
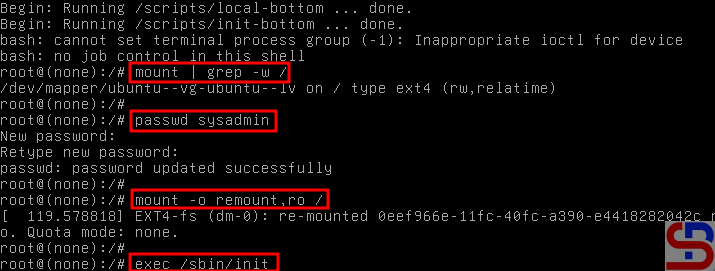
In the recovery mode, run the command below:
mount | grep -w /
After that, execute the command below to change the password:
passwd
After you change the password, run the commands below:
mount -o remount,ro /
exec /sbin/init
Run the commands
The Linux server will reboot, and after that, try to log in with the new password that you set before.
Note
By default, you cannot log in directly as root on Ubuntu, so you can’t change your password to root because to be root on Ubuntu, you only need to use your sudo command and enter your user password.
How to Display the Progress Bar in Linux Commands?
written by sysadmin | 13 October 2025
The previous article has explained how to display progress in a process, but unfortunately, this application is limited to displaying the copy and move process. This article will explain how to display a progress that not only displays the copy and move process, but can also display the backup process and restore a database.
Problem
How to display the progress bar in Linux commands?
Solution
By default, Linux commands do not display a progress bar, so you don’t know when the process is complete, like in the image below:
Copy the file without using pv application
Therefore, Andrew Wood, An Experienced Unix Sysadmin, created an application to display a progress bar named Pipe Viewer or PV. To install the application, use the command below:
RockyLinux/AlmaLinux/CentOS
yum install epel-release
yum install pv
Ubuntu/Debian
sudo apt update
sudo apt install pv
OpenSUSE
sudo zypper install pv
If you want to install pv applications in addition to the operating system shown above, you can go to this page. Here are some methods when using the pv application:
A. Copy
1. Copy the file
Use the format below to copy the file:
pvfile1>/folder/filename
So, if you want to copy an instances.sql to the /tmp folder, use the command below:
pv instances.sql > /tmp/instance.sql
Copy the file using pv application
2. Copy more than one file
If you want to copy more than one file to the folder, use the format below:
tar cf -file1 file2 file3| pv | tar xf - -C /folder
Here is the command to copy more than one file to the /tmp folder
tar cf - babel.sql babel.sql.gz babel.sql.tar.gz | pv | tar xf - -C /tmp
Copy more than one file in pv application
3. Copy the folder
If you want to copy the folder, use the format below:
tar cf -folder_name/ | pv | tar xf - -C /folder
If you want to copy the example folder to the /tmp folder, use the command below:
tar cf - example/ | pv | tar xf - -C /tmp
Copy some files using pv application
4. Copy more than one folder
If you want to copy more than one folder, use the format below:
tar cf -folder1/folder2/| pv | tar xf - -C /folder
So, if you want to copy more than one folder to the /tmp directory, use the command below:
tar cf - example/ test-project/ | pv | tar xf - -C /tmp
Copy some folders using pv application
B. Move
If you want to use the move command on the PV application, then you can actually use the command to copy number 1, but add the command && rm -rf file1/folder1 behind it.
1. Move the file
So, if you want to move an instances.sql to the /tmp folder, use the command below:
If you want to move some files to the /tmp folder, use the command below:
tar cf - babel.sql babel.sql.gz babel.sql.tar.gz | pv | tar xf - -C /tmp && rm -rf babel.sql babel.sql.gz babel.sql.tar.gz
Move more than one file in pv application
3. Move the folder
If you want to move a folder to the /tmp folder, use the command below:
tar cf - example/ | pv | tar xf - -C /tmp && rm -rf example/
Move the folder in pv application
4. Move more than one folder
If you want to move some folders to the /tmp folder, use the command below:
tar cf - example/ test-project/ | pv | tar xf - -C /tmp && rm -rf example/ test-project/
Move more than one folder in pv application
C. Compress
1. Using gz Use the format below to run the gz command in pv application:
pvfilename| gzip >filename.gz
For example, you want to compress babel.sql using gz, so use the command below:
pv babel.sql | gzip > babel.sql.gz
Compress the file using gz in pv application
2. Using tar Use the format below to run the tar command in pv application:
tar cf -filename| pv | gzip >filename.tar.gz
For example, you want to compress babel.sql using tar, use the command below:
tar cf - babel.sql | pv | gzip > babel.sql.tar.gz
Compress the file using tar in pv application
3. Using bz2 Use the format below to run the tar command in pv application:
pvfilename| bzip2 >filename.bz2
For example, you want to compress babel.sql using bz2, use the command below:
pv babel.sql | bzip2 > babel.sql.bz2
Compress the file using bzip2 in pv application
4. Using zip Use the format below to run the tar command in pv application:
pvfilename| zipfilename.zip -q -
For example, you want to compress babel.sql using bz2, use the command below:
pv babel.sql | zip babel.sql.zip -q -
Compress the file using zip in pv application
D. Extract
1. Using gunzip Use the format below to extract the gz compression in pv application:
pvfilename.gz | gunzip >filename
For example, you want to extract babel.sql.gz, so use the command below:
pv babel.sql.gz | gunzip > babel.sql
Extract the file using gunzip in pv application
2. Using tar.gz Use the format below to extract the gz compression in pv application:
pvfilename.tar.gz | tar zxf -
For example, you want to extract babel.sql.tar.gz, so use the command below:
pv babel.sql.tar.gz | tar xzf -
Extract the file using tar in pv application
3. Using bunzip2 Use the format below to extract the bz2 compression in pv application:
pvfilename.sql.bz2 | bunzip2 >filename.sql
For example, you want to extract babel.sql.bz2, so use the command below:
pv babel.sql.bz2 | bunzip2 > babel.sql
Extract using bunzip2 in pv application
4. Using unzip Use the format below to extract the zip compression in pv application:
unzipfilename.zip | pv
For example, you want to extract babel.sql.zip, so use the command below:
unzip babel.sql.zip | pv
Extract the file in pv application
E. Backup DB
If you use MariaDB, you can use the commands below: 1. Without compressing the database Use the format below to back up the database without compression in pv application:
mariadb-dump -uusername-pdbname | pv >dbname.sql
So, use the command below to back up the database without compression in pv application:
mariadb-dump -uroot -p babel | pv > babel.sql
Backup database without compression in pv application
2. Back up the database using gz Use the format below to back up the database using gz compression in pv application:
If you use MariaDB, you can use the commands below: 1. Restore the database without compression Use the format below to restore the database without compression in pv application:
pvbackup_file.sql | mariadb -uusername-p
So, use the command below to restore the database without compression in pv application:
pv babel.sql | mariadb -uroot -p
Restore the database without compression in pv application
2. Restore the database with gz compression Use the format below to restore the database using gz compression in pv application:
pvbackup_file.gz | gunzip | mysql -uusername-p
Use the command below to restore the database using gz compression in pv application:
pv babel.sql.gz | gunzip | mariadb -uroot -p
Restore the database using gz in pv application
3. Restore the database with bz2 compression Use the format below to restore the database using bz2 compression in pv application:
pvbackup_file.sql.bz2 | mariadb -uusername-p
Use the command below to restore the database using bz2 compression in pv application:
If you are using a MySQL database, then you can use the commands in point E to back up the database and the commands in point F to restore the database by changing the mariadb-dump command to mysqldump and changing the mariadb command to mysql.
The previous articles have explained how to perform a database backup in MariaDB. This article will explain how to perform a database restore in MariaDB.
Problem
How to restore the database in MariaDB?
Solution
There are several methods to perform the database restore in MariaDB:
1. Restore the entire database
To restore the backup file of the entire database, use the format below:
mysql -uusername-p <backup_file.sql
Use the command below if your backup file name is backup_all_databases.sql:
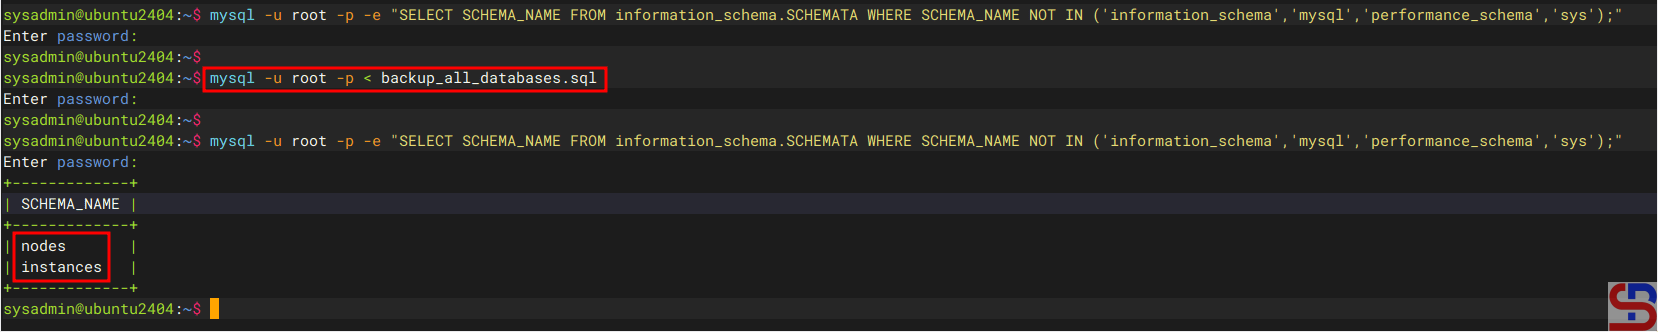
mysql -u root -p < backup_all_databases.sql
After you run the above command, the database will be restored in MariaDB as shown in the image below:
Restore all databases in MariaDB
2. Restore a database
Use the following format to restore a database’s backup file:
mysql -uusername-p -e'create database new_database;' <backup_file.sql
If you want to restore the nodes database, then you can use the command below:
mysql -uroot -p -e'create database nodes;' < backup_nodes_db.sql
After you run the command above, MariaDB will restore the database like in the image below:
Restore a database in MariaDB
3. Restore the table(s)
If you want to restore the table(s), you can follow the format below:
mysql -uusername-pdb_name<table_backup_file.sql
So, use the command below if you want to restore the tables in the nodes database:
mysql -u root -p nodes < table_backup_file.sql
4. Restore a compressed backup file
There are two methods to restore a compressed backup file:
a. Restore the .gz backup file
If you want to restore a .gz backup file, use the format below:
gunzip <database.sql.gz| mysql -uusername-p -e'create databasenew_database;'
For example, if you want to restore a database that uses .gz compression, then use the command below:
Restore a database that is compressed using .bz2 compression
Note
You can restore a database backup file that is compressed using method number 4, whether you compress when backing up the database or after backing up the database.
Before doing a backup, it is highly recommended to ensure that there are no transactions in the database. Maybe you can turn off the application that is connected to the database or turn off the connection to the database so that it will produce a good backup file. In this article, I have 3 databases to use as an example, like the image below:
Example of databases
And below are the commands to back up the MariaDB database:
1. Back up the entire database
If you want to back up all databases in MariaDB, use the format below:
When you back up a database, by default, the database will be backed up in its entirety, both the database and the database structure. But sometimes you just want to back up the database without the structure, so you can use the format below:
By default, when people perform database backups, they will usually use .sql as an extension of the database backup file. But actually, you can compress the database backup files when you do a backup. There are 2 methods of compressing database backups, namely using the tar.gz method and the .bz2 method. If you want to use the first method, use the format below:
And if you want to use bz2 compression when backing up databases, then make sure that the bz2 package is already installed on your server. If the package is not already installed, use the command below:
RockyLinux/AlmaLinux/CentOS
dnf install bzip2
Ubuntu/Debian
sudo install bzip2
OpenSUSE
zypper install bzip2
After you install the package, try to back up your database using the format below:
Below is a comparison image of the size of the backup file that does not use compression, uses .tar.gz compression, and .bz2 compression:
Comparison size file
Warning
If you use compression when backing up the database, it will take longer than if you don’t use compression. And if you use bz2 compression, then the time spent will be longer than using .tar.gz.
Note
You should know that the mariadb-dump command has many useful options, including the ‐-single-transaction and ‐-lock-tables options. If you have a database that uses the InnoDB storage engine, then you should use the ‐-single-transaction option because this option starts a transaction before dumping and reads data from a consistent snapshot without locking the tables for extended periods, allowing concurrent reads and writes. However, if you are using the MyISAM storage engine, you can use the ‐-lock-tables option when backing up the database in MariaDB. If your database has a different storage engine, it is recommended to back up the database partially; some tables that use InnoDB use the ‐-single-transaction option, and some tables that use MyISAM use the ‐-lock-tables option when backing up the database.
If you are a user of the MariaDB database, you should know about the term storage engine.
Problem
How to display the storage engine in MariaDB?
Solution
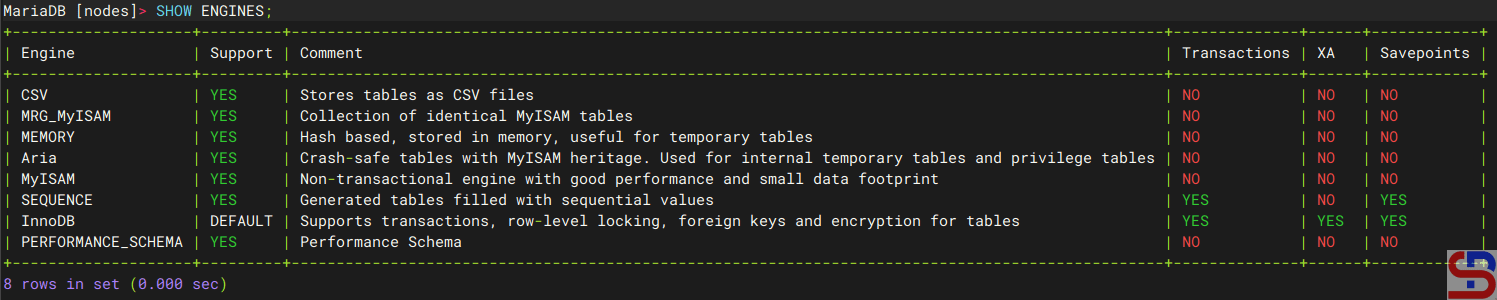
A database engine (or storage engine) is the underlying software component that a database management system (DBMS) uses to create, read, update, and delete (CRUD) data from a database. To see a list of all available storage engines on the server, use the command below in the MariaDB prompt:
SHOW ENGINES;
and it will appear as shown in the image below:
Display all the storage engines in MariaDB
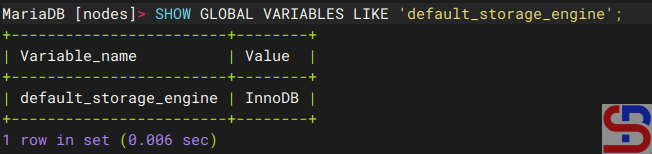
From the image above, you can see that InnoDB is the default storage engine in MariaDB. You can also use the command below to see the default storage engine in MariaDB:
SHOW GLOBAL VARIABLES LIKE 'default_storage_engine';
Display the default storage engine in MariaDB
You can change the default storage engine by using the command below, which changes the default storage engine to MyISAM:
SET GLOBAL default_storage_engine='MyISAM';
Or you can use the below command if the session default storage engine supersedes the global default during this session:
SET SESSION default_storage_engine='MyISAM';
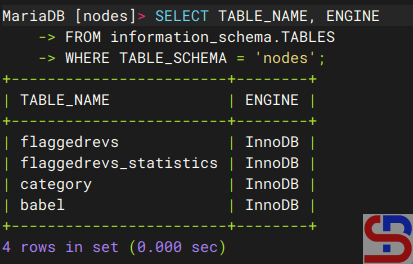
You should know that the storage engine is used per table and not per database, and to see it, you can use the command below:
SELECT TABLE_NAME, ENGINE
FROM information_schema.TABLES
WHERE TABLE_SCHEMA = 'nodes';
and the result will look like below:
Display the storage engine used in the table
From the image above, it can be seen that all tables in the nodes database use InnoDB, so it can be said that the nodes database uses InnoDB. However, one database (schema) can have a table with a different engine, and the query below is the sample to create 2 tables that use different storage engines:
CREATE TABLE product (
    id INT PRIMARY KEY,
    name VARCHAR(100)
) ENGINE=InnoDB;

CREATE TABLE access_log (
    id INT PRIMARY KEY AUTO_INCREMENT,
    time DATETIME,
    user VARCHAR(50)
) ENGINE=MyISAM;
where the product table uses InnoDB and the table access_log uses MyISAM. If a database uses various storage engines and you want to know how many storage engines are used, you can use the query below:
SELECT ENGINE, COUNT(*) AS Number_of_tables
FROM information_schema.TABLES
WHERE TABLE_SCHEMA = 'db_name'
GROUP BY ENGINE;
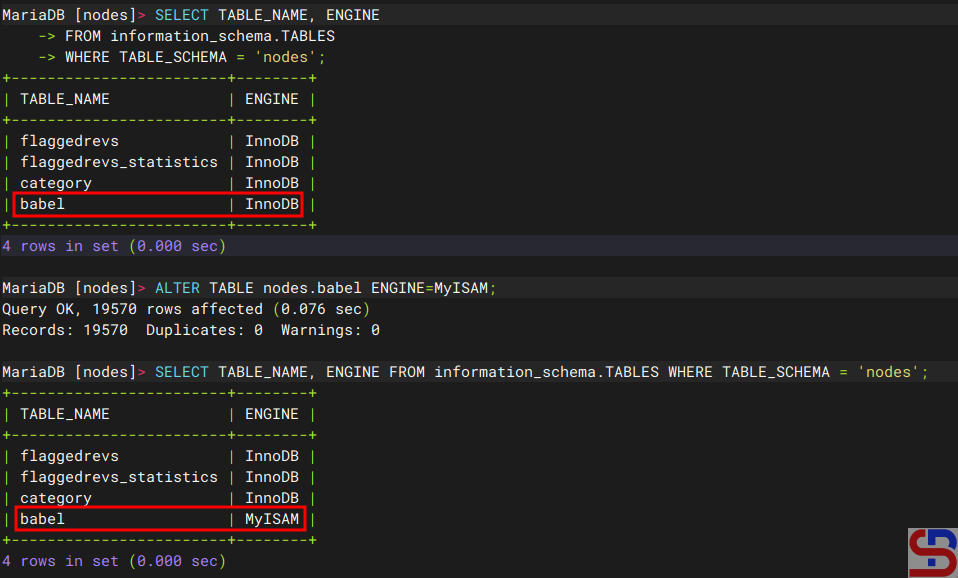
You can change the storage engine of a table by using the query below, for example, change it to MyISAM:
ALTER TABLE database_name.table_name ENGINE=MyISAM;
Change the storage engine in the table
Note
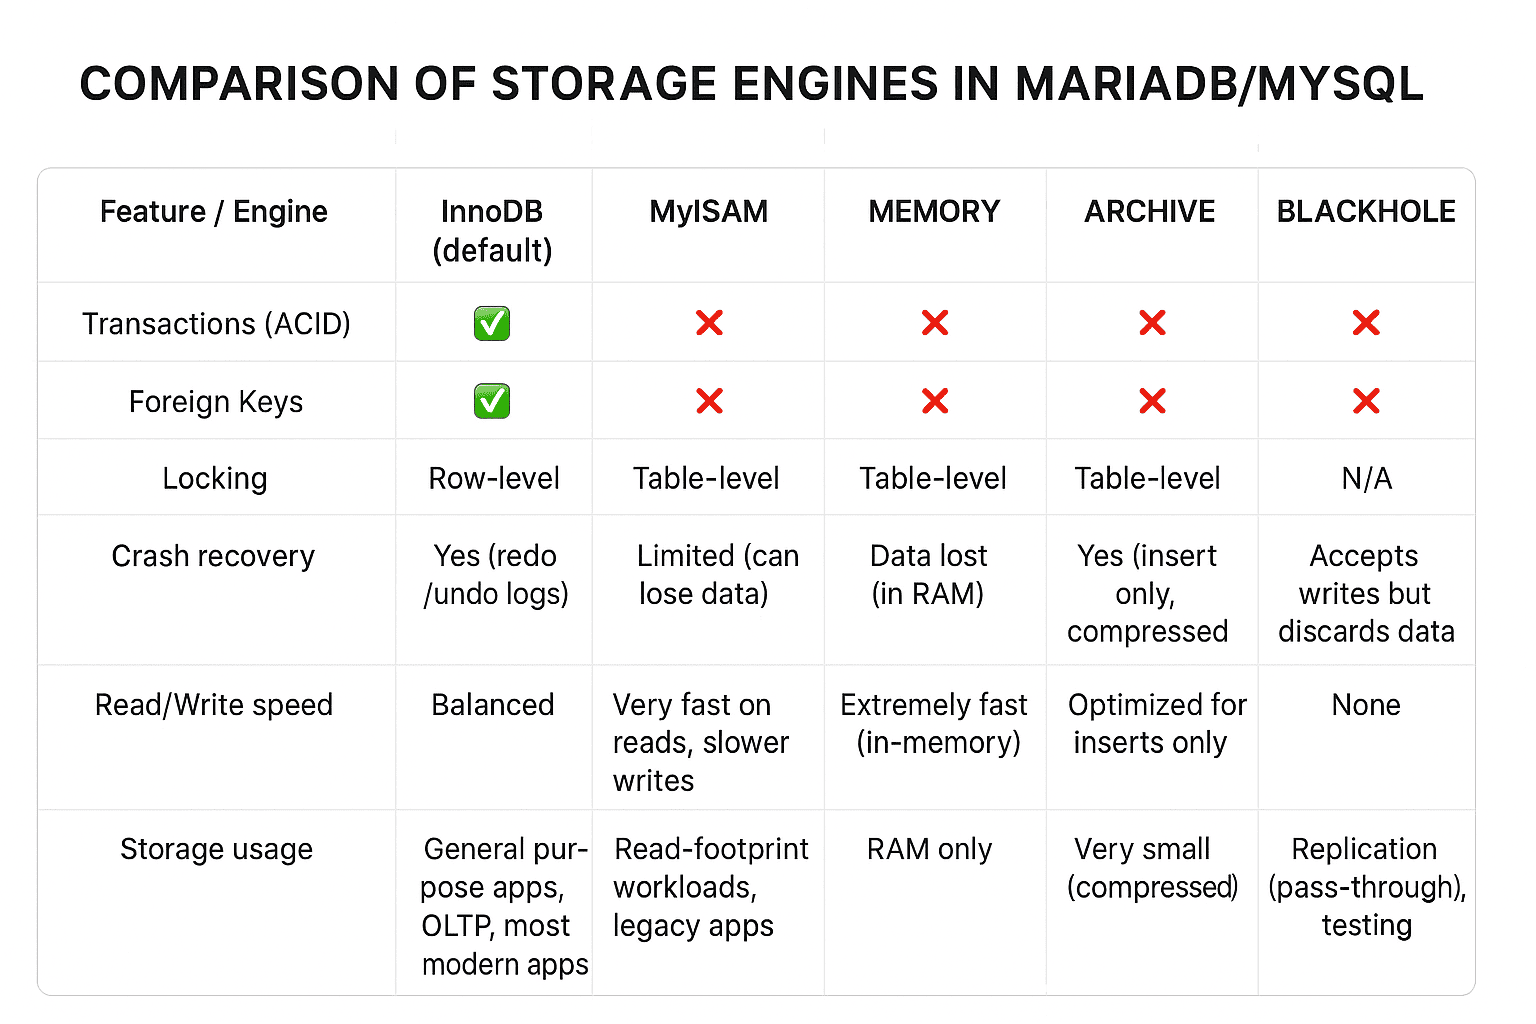
As explained above, there are many storage engines that you can use. But before you decide to use a storage engine, you should first find out the advantages and disadvantages of each storage engine, and to briefly see the differences between storage engines in the image below:
Comparison between the storage engines
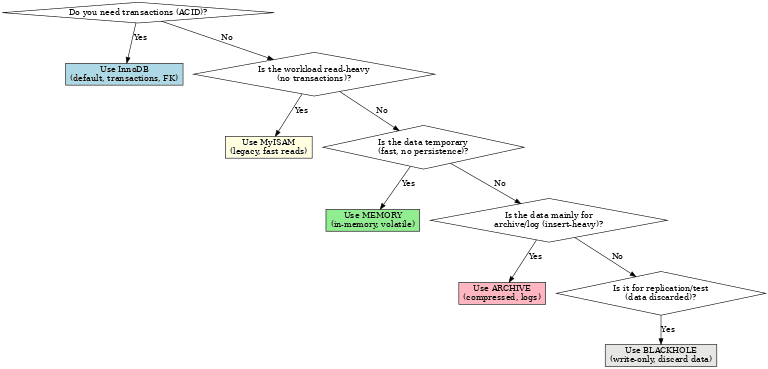
And below is a flowchart to determine the storage engines you will use:
Flowchart to choose the storage engine
However, as far as I know, among the many choices of storage engines, generally people use 2 types of storage engines, namely InnoDB and MyISAM. Maybe you can see the difference between the two through this site.