By default, PostgreSQL uses port 5432. But for security’s sake, I want to change the default port to another one.
Problem
How to change the default port in PostgreSQL?
Solution
If you want to see the port used by PostgreSQL, you can see it in the postgresql.conf file by using the command (I’m using Ubuntu distro and PostgreSQL version 18):
Display the PostgreSQL port via postgresql.conf file
Or you can use the command below to see the PostgreSQL port:
sudo ss -ptuln | grep postgres
Display the PostgreSQL port via netstat
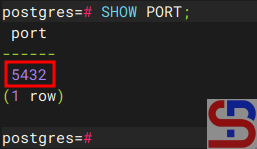
Or you can use the query in this post to see the port used by PostgreSQL:
SHOW PORT;
Display the PostgreSQL port via query
From the images above, you can see that PostgreSQL uses port 5432. If you want to change the PostgreSQL port to port 6543, for example, then go to the /etc/postgresql/18/main/postgresql.conf file if you use the Ubuntu distro and PostgreSQL version 18, and change the port value from 5432 to 6432.
Warning
If you’re using a distro other than Ubuntu/Debian, you can search for the postgresql.conf file by using the command:
sudo find / -type f -name "*postgresql.conf"
Then restart PostgreSQL using the command:
sudo systemctl restart postgresql
After that, you can check the PostgreSQL port by using one of the commands above, and the PostgreSQL port should have changed according to the port you want as shown in the image below:
Display the PostgreSQL port via netstat after changing the port
Note
If you have changed the default port of PostgreSQL from 5432 to 6432, for example, then you don’t need to write the port in the Linux command to access PostgreSQL if you access from localhost:
Access PostgreSQL from localhost after changing the default port
But, if you access PostgreSQL from another host, you have to write the option for the port, like in the picture below:
Access PostgreSQL from another host after changing the default port
Just as MariaDB requires the mariadb-client package to connect other hosts to a MariaDB database, PostgreSQL also requires the postgresql-client package to connect other hosts to a PostgreSQL database.
Problem
How to install postgresql-client on Linux?
Solution
Below is the command to install postgresql-client on some Linux distributions:
Then run the command below to see the installed PostgreSQL version:
psql --version
Check PostgreSQL version
As you can see in the image above, the version of postgresql-client that you installed is version 16.10. But you should know that, usually by default, the package provided by the distro is a stable old version and not the latest stable version. Therefore, if you want the mariadb-client package to use the latest stable version, use the command below if you use a Ubuntu/Debian distro:
How to Access a MariaDB Database From Another Host?
written by sysadmin | 6 December 2025
The previous article already explained how to access a MariaDB database from localhost. This article will explain how to access the MariaDB database from another host.
Problem
How to access a MariaDB database from another host?
Solution
To access the MariaDB database, you can follow the format below:
mariadb -hyour_server_ip-uusername-Pport_number-p
By default, the MariaDB database uses port 3306, so if your MariaDB database uses port 3306, then there is no need to write the port when executing the command to access the MariaDB database. I have a MariaDB database server with an IP of 192.168.56.101 and an Ubuntu server with an IP of 192.168.56.11. I want to access the MariaDB database via the Ubuntu server using the user john and run the command:
mariadb -h 192.168.56.101 -u john -p
But I got an error like below:
ERROR 2002 (HY000): Can’t connect to server on ‘192.168.56.101’ (115)
Error when accessing the MariaDB from another host
Below are the steps to access the MariaDB database:
1. Open the port
Open port 3306 on both servers. If you use RockyLinux/AlmaLinux/RHEL for your servers, use the command below:
But if you use Ubuntu/Debian for your server, type the command below:
sudo ufw allow 3306
2. Check the MariaDB version
You should know that to access the MariaDB database, you need a mariadb-client package whose version is the same as the MariaDB database version. If the mariadb-client version is different from the mariadb database version, then there will usually be an error. To install the mariadb-client package, you can go to this page.
3. Grant access
On the database server, run a query with the format below:
For example, if user john wants to access the entire MariaDB database from the host with IP 192.168.56.11, then use the query below:
GRANT ALL ON *.* TO john@"192.168.56.11" IDENTIFIED BY "123456";
Grant access for user john
Warning
If you want user john to be able to access only the Zabbix database, use the query below:
GRANT ALL ON zabbix.* TO john@"192.168.56.101" IDENTIFIED BY "qwerty";
And use the query below if you want user john to be able to view only the Zabbix database:
GRANT SELECT ON zabbix.* TO john@"192.168.56.101" IDENTIFIED BY "qwerty";
4. Configure the file
Go to the file /etc/mysql/mariadb.conf.d/50-server.cnf and change the bind-address item to be as below:
bind-address = 0.0.0.0
Warning
You can also change the bind-address item in the /etc/mysql/my.cnf file by adding the following script to the file:
[mysqld]
bind-address = 0.0.0.0
5. Restart MariaDB
After that, restart the MariaDB service using the command below:
sudo systemctl restart mariadb
Then, try to access it again, and you should be able to access the database like in the picture below:
Succeed to access MariaDB from another host
Note
If you want your MariaDB database to only be accessed from a certain IP, for example, IP 192.168.56.11, then use the command below if your distro uses Ubuntu/Debian:
sudo ufw allow from 192.168.56.11 to any port 3306
But, if you use RockyLinux/AlmaLinux/RHEL, type the below command to open port 3306 only from IP 192.168.56.11
If you want to access MariaDB databases from other hosts, then your device must have a mariadb-client package.
Problem
How to install the mariadb-client in Linux?
Solution
Below is the command to install mariadb-client on some Linux distros:
Ubuntu/Debian
sudo apt update
sudo apt install mariadb-client
RockyLinux/AlmaLinux/RHEL
sudo yum install mariadb-client-*
Use the command below to see the version of mariadb-client after you installed the package:
mariadb --version
Checking MariaDB version
As you can see in the image above, the version of mariadb-client that you installed is version 10.11.3. But you should know that, usually by default, the package provided by the distro is a stable old version and not the latest stable version. Therefore, if you want the mariadb-client package to use the latest stable version, use the command below:
After that, reinstall the package using the command above (sudo apt install mariadb-client or sudo yum install mariadb-client-*), and your MariaDB version should be the latest.
Note
If you want to know how to access the MariaDB database from another host, you can go to this article.
How to Access a PostgreSQL Database From Another Host?
written by sysadmin | 6 December 2025
I want to access a PostgreSQL database from another host.
Problem
How to access a PostgreSQL database from another host?
Solution
I have 2 servers, the PostgreSQL server IP is 192.168.56.101, and the Ubuntu server IP is 192.168.56.11. I want to access the PostgreSQL database from the Ubuntu server. By default, use the format below if you want to access PostgreSQL:
psql -hip_db-uusername-ddb_name-pport_number
By default, the PostgreSQL database uses port 5432, so if you access your PostgreSQL using port 5432, you don’t need to write the port. I accessed my PostgreSQL by writing the command:
psql -h 192.168.56.101 -u postgres -d mydb
But I got an error like the image below:
psql: error: connection to server at ‘192.168.56.101’, port 5432 failed: Connection refused Is the server running on that host and accepting TCP/IP connections?
Error when accessing the PostgreSQL database
The following are the steps to access a PostgreSQL database from another host:
1. Open port
Open port 5432 on each server. If you use RockyLinux/AlmaLinux/RHEL for your servers, use the command below:
Ownership of a database and the tables in it in PostgreSQL is very crucial because this has a big influence on users who want to carry out CRUD (Create, Read, Update, Delete) activities in a PostgreSQL database. If the user is not the owner of the database and the tables in it, then the user will not be able to perform CRUD.
Problem
How to change ownership in PostgreSQL?
Solution
For example, I have a mydb database and mydb_user as a user. When I access the database using the user mydb_user and perform a query:
select * from employee;
There is an error as shown below:
ERROR: permission denied for table employee
Error permission denied
After I searched on the internet, it turned out that this was caused by the user mydb_user not being the owner of the mydb database and the tables in it. To see the owner of the database, you can use the query below:
SELECT datname AS database_name,
       pg_catalog.pg_get_userbyid(datdba) AS owner
FROM pg_database;
List the owners
You can see in the picture above, the postgres user is the owner of the mydb database. This is because when creating the database uses the postgres user and not the mydb_user.
INFO
You can also use an alternative query like the one below to see the owner of your database:
SELECT d.datname AS database_name, r.rolname AS owner
FROM pg_database d
JOIN pg_roles r ON d.datdba = r.oid
WHERE d.datname = 'your_database_name';
or using the simple query:
\l
Similarly, if you want to see the owners of the tables in the database (but you must first log in to that database to run this query), use the query below:
SELECT tablename, tableowner
FROM pg_tables
WHERE schemaname = 'public';
Then there will be a display like the following:
Show the owner of the tables
You can see in the image above that the owner of the table employee in the mydb database is a postgres user. This is because when creating the tables uses user postgres and user mydb.
INFO
You can also use a query like the one below to see the ownership of all tables in PostgreSQL:
SELECT
    schemaname,
    tablename,
    tableowner
FROM pg_tables
ORDER BY schemaname, tablename;
A. Change database owner
If you want to change ownership of the mydb database from user postgres to user mydb_user, then you have to log in to PostgreSQL as an existing user, which in the case of a postgres user:
ALTER DATABASE mydb OWNER to mydb_user;
Run the query below to check ownership of the database:
\l
Change the database owner
You can see that the owner of the mydb database has changed to user mydb_user. But even so, you still can’t run CRUD on the database because the tables in the database still belong to the postgres user.
B. Change the owner of the table
Still using the postgres user, log in to the mydb database using the command:
\c mydb;
Then run the query below to change the table, sequence, and view to mydb_user:
DO $$
DECLARE
    r RECORD;
BEGIN
    -- Change the owner of all tables
    FOR r IN SELECT schemaname, tablename FROM pg_tables WHERE schemaname = 'public'
    LOOP
        EXECUTE format('ALTER TABLE %I.%I OWNER TO mydb_user;', r.schemaname, r.tablename);
    END LOOP;

    -- Change the owner of all sequences
    FOR r IN SELECT sequence_schema, sequence_name FROM information_schema.sequences WHERE sequence_schema = 'public'
    LOOP
        EXECUTE format('ALTER SEQUENCE %I.%I OWNER TO mydb_user;', r.sequence_schema, r.sequence_name);
    END LOOP;

    -- Change the owner of all views
    FOR r IN SELECT table_schema, table_name FROM information_schema.views WHERE table_schema = 'public'
    LOOP
        EXECUTE format('ALTER VIEW %I.%I OWNER TO mydb_user;', r.table_schema, r.table_name);
    END LOOP;
END $$;
Query to change the owner of the tables
After that, run the command below to view the ownership of the tables in the mydb database:
SELECT tablename, tableowner
FROM pg_tables
WHERE schemaname="public";
Change the owner of the tables
From the image above, you can see the owner of the tables in the mydb database is not a postgres user but a mydb_user. So, you should be able to do CRUD using the mydb_user user as shown in the image below:
Do CRUD on the database
Note
As a reminder, to create databases and tables in the database, you should not use postgres user but create a new user because it is very dangerous to use postgres user to carry out daily activities in the PostgreSQL database.
As a sysadmin, you need a tool to monitor the MariaDB database, and one of the tools you can use is mytop.
Problem
How to install mytop?
Solution
Mytop is an open-source utilitydeveloped by Jeremy Zawodny with Perl for real-time monitoring of MySQL/MariaDB databases. To install this tool, use the commands below:
wget https://jeremy.zawodny.com/mysql/mytop/mytop-1.6.tar.gz
tar -zxvf mytop-1.6.tar.gz
cd mytop-1.6/
perl Makefile.PL
make
make test
sudo make install
To run this tool, use the format below:
mytop --prompt -ddb_name
For example, if you want to monitor the Zabbix database, then use the command below:
mytop --prompt -d zabbix
Warning
But, if you want to use another user, you have to use the command below:
mytop --prompt -u zabbix_user -d zabbix
By default, Mytop uses the root user to enter the database, then enter the password from the root user, and you should see a display like the one below:
View of mytop application
You see from the image above, it looks like the top command in Linux. The following is a brief explanation of what the image above looks like:
The first line shows the version of the MariaDB Database and the uptime of the server.
The second line shows the number of queries that have been processed on the server (Queries), the average number of queries per second (qps), the number of slow queries (Slow), and the percentage of Select, Insert, Update, and Delete queries (Se/In/Up/De(%)).
The third lineshows the current value since the last mytop refresh, which defaults to 5 seconds. The first field is the number of queries per second. The second value is the number of slow queries per second. The threads segment indicates there are a total of 32 connected threads, 1 is active (the others are sleeping), and there are 0 threads in the thread cache. The last field in the third line shows the query percentages, like in the previous line, but since last mytop refresh.
The fourth line shows crucial buffer efficiency (the frequency of key reads from the buffer instead of the disk) and the total number of bytes that MySQL has both sent and received, including data from the last mytop cycle. Key Efficiency: 100.0% indicates that all keys are read from the buffer, not from the disk. Bps in/out: 0.1/5.4 shows that since startup, MySQL has averaged 0.1kbps of inbound traffic and 5.4kbps for outbound traffic. Now in/out shows the traffic again, but since last mytop refresh.
The next line up to the last line shows a list of current MySQL threads, sorted according to their idle time (least idle first).
If you want to see more details about a query, then you can press the f button, and you will see a display like the one below:
Type the f button to get more details
Select the ID number for which you want to display the query in detail, for example, number 65, then type number 65 and press the Enter button, and then there will be a display like the one below:
Display the query in more detail
If you want to see an explanation of a query, then type the e button as in the image below, then there will be a display like the one below:
Type the ID number to explain the query
Type the ID number you want to explain, and after that, press the Enter key. If you want to see the command view, press the c button, then there will be a display like below:
Display the command view
The Command column displays the type of command or query that was executed, and the following is a brief explanation:
– The Total column represents the overall count of that type of command executed since the server began.
– The Last column indicates how many of that command type were executed since the last mytop refresh
– The Pct column indicates the equivalent percentage.
If you want to exit the mytop application, press the q button. If you want to enter the mytop application without having to type a password, you can create a .mytop file. Type the command:
vi ~/.mytop
After that, copy the script below, assuming the Zabbix database that you want to monitor uses the mytop application:
After that, type the mytop command, and the mytop application should immediately display the mytop application without you having to write arguments and passwords, as in the image below:
Run the mytop tool without arguments and a password
You should only make a user a viewer if you are afraid that others will see your database password.
Note
Regrettably, this application is no longer under development, and the final version available is 1.6 from 2007. Nonetheless, after I use this tool in November 2025, it remains effective for monitoring MySQL/MariaDB databases.